
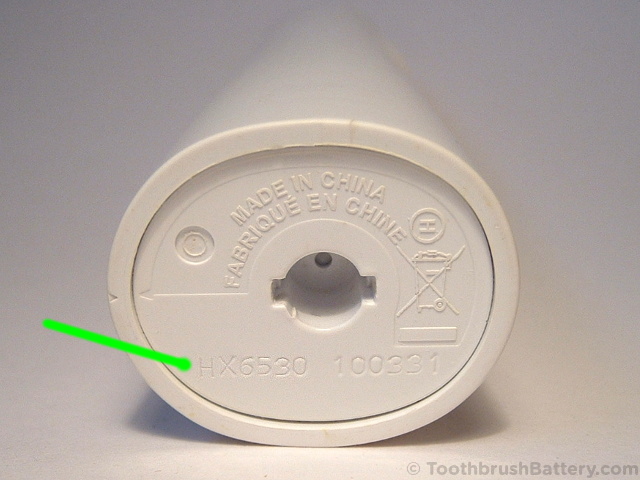
This guide will take you step by step through how to dismantle the Philips Sonicare EasyClean HX6530 electric toothbrush and replace the internal rechargeable battery. The tutorial is based on the HX6530 model but may be applicable to other HX6500 series models and similar, such as the EasyClean HX6510, HX6511, HX6530, HX6581 and HX6582. The Sonicare FlexCare and HealthyWhite models are also substantially similar. The model number of your toothbrush is marked on the bottom of the handle.
For other toothbrush models the battery replacement procedure is slightly different so please see our other guides to toothbrush battery replacement instead.
The basic method is:
- Open and dismantle handle
- De-solder old battery
- Replace battery
- Solder in new battery
- Reassemble handle
This is documented in detail below along with lots of pictures. Click on any picture to enlarge it.
Disclaimer
Any damage to yourself, your toothbrush or anything else is entirely your responsibility. This guide is for professional, educational purposes only and is offered without guarantee or liability. Warning: Lithium-ion batteries are volatile and if overheated they will ignite due to thermal runaway creating a severe burn hazard. Do not short-circuit, disassemble, crush or expose contents to water. Lithium reacts in water like Sodium and Potassium did in those science experiments at school!
Video
We have also created a short video on our YouTube channel from this guide to Philips Sonicare EasyClean battery replacement here, which you can also watch below.
Tools / Parts / Equipment
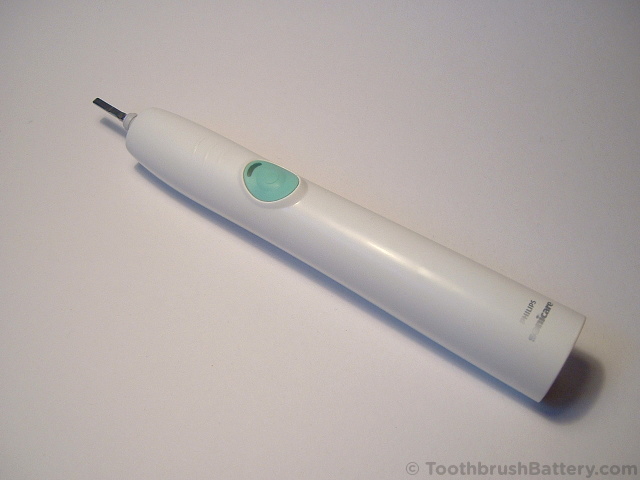
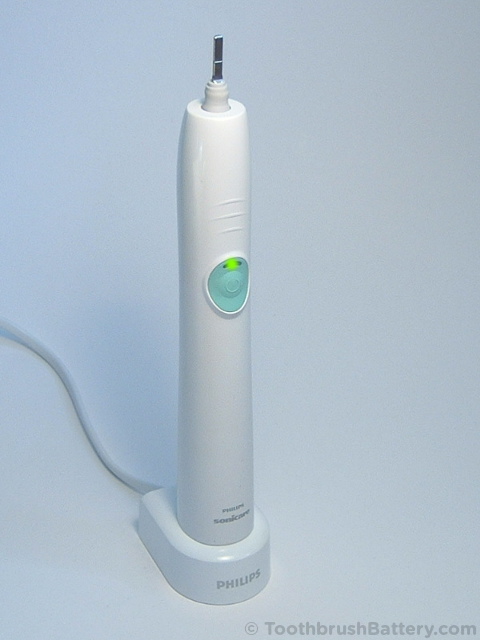
- Philips Sonicare HX6530 Electric Toothbrush
- Original recharging base
- Soldering iron: Electronics grade (about 18-25 watt) with chisel tip
- Solder: Lead-free silver solder is great for this
- Solder sucker (also known as a desoldering pump) and/or desoldering braid
- Adjustable grips
- Small flat-bladed screwdriver: 2 to 4mm wide
- Miniature side-cutters
- Duct tape
- Corrugated cardboard
- Replacement battery: 49mm by 14mm 3.6V Lithium-ion (Li-ion) with wire pins. Support us by buying from us at ToothbrushBattery.com
How-To
To start with, remove any brush heads from the top of the handle. To soften up the plastic of the handle you can stand the toothbrush in a cup of hot tap water (about 60 degrees C or 140 degrees F) for 5 minutes before starting. This should make opening it up easier as the internal clips should flex more easily.
Tear off a strip of duct tape about 15cm (6 inches) long and stick it around the circumference of the handle right at the bottom, up to the edge.
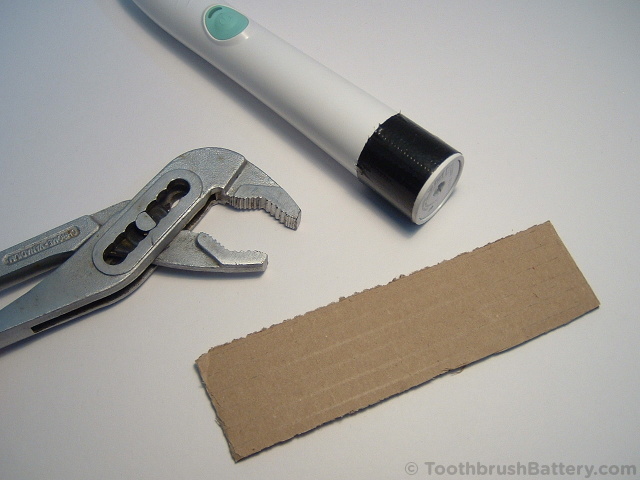
Cut a piece of cardboard the same length and width as the duct tape and wrap over the top of the duct tape. Fix it in place with another piece of tape. Together the cardboard and tape will protect the toothbrush from damage by the grips.
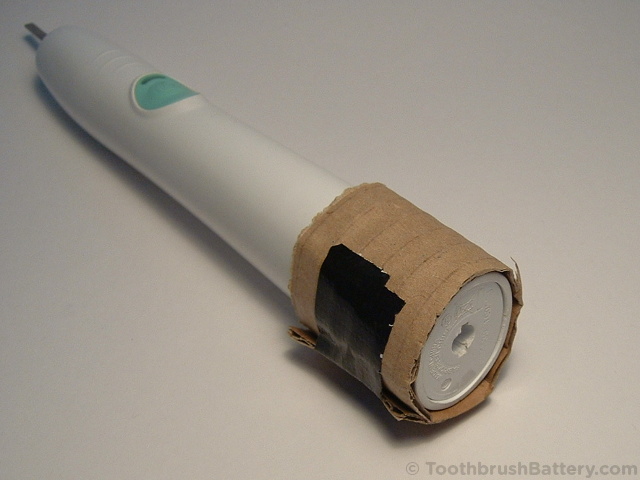
Place the grips right up to the bottom edge of the handle and squeeze the handle firmly across the widest part of the oval base.
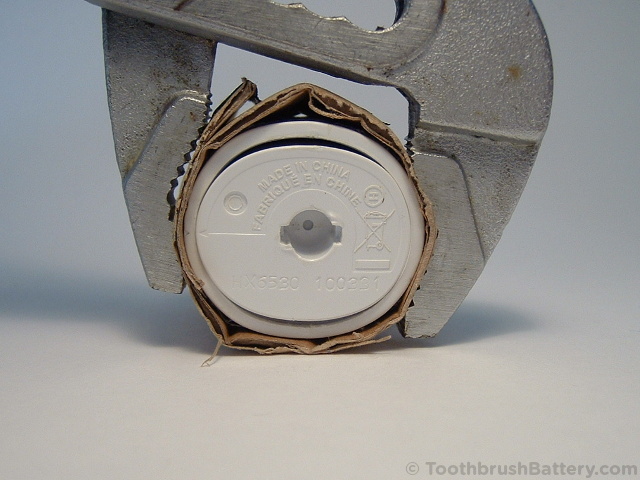
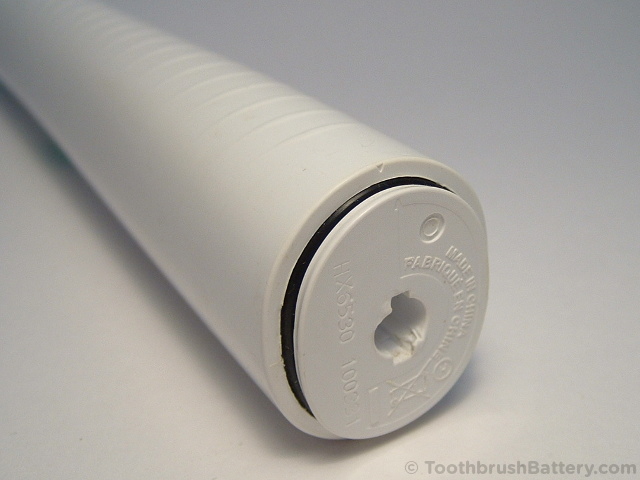
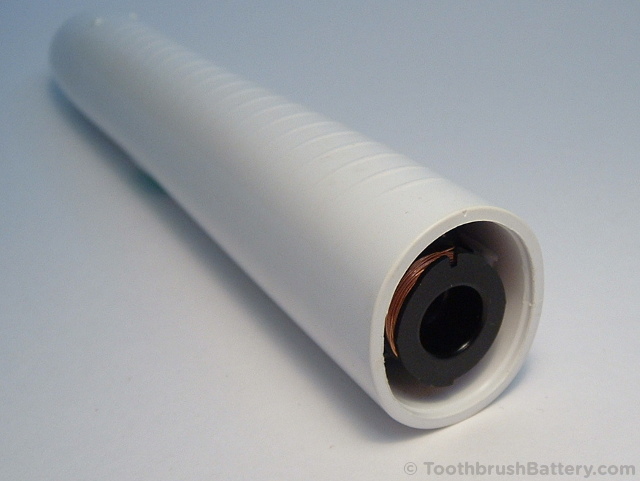
As long as the grips are right up to the bottom edge of the handle the base cap should pop out slightly on both sides. If it only pops out on one side then release the grips, rotate the brush half a turn and give it another squeeze. You should now be able to start gently pushing the inner workings of the toothbrush out from the shaft end.
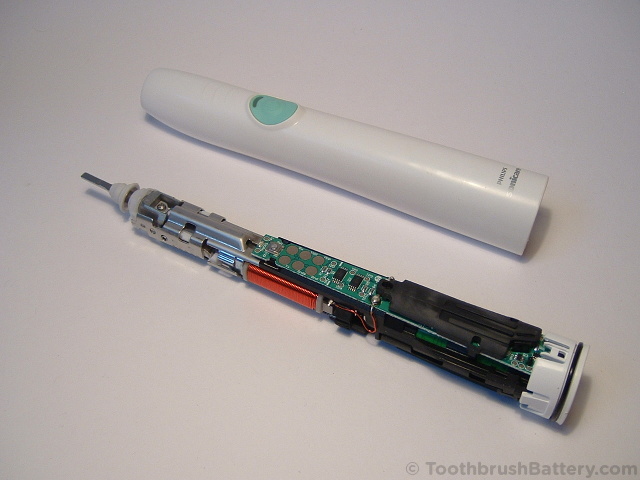
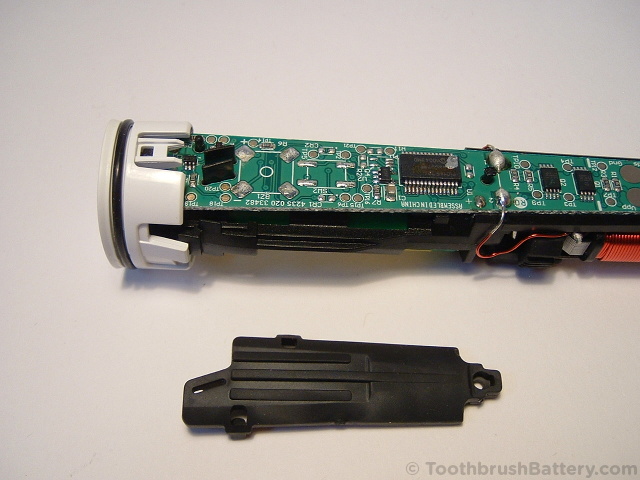
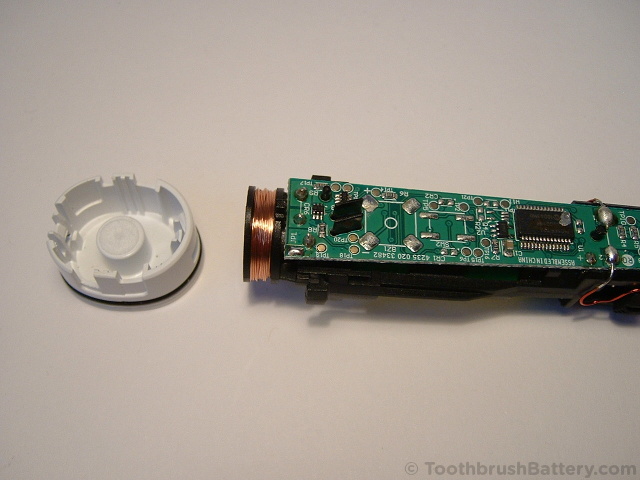
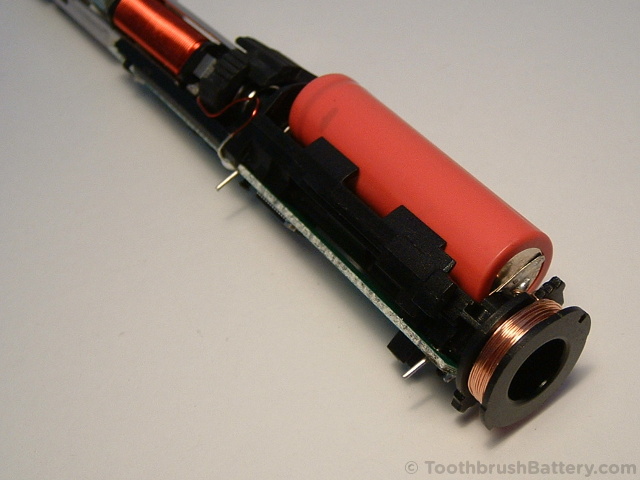
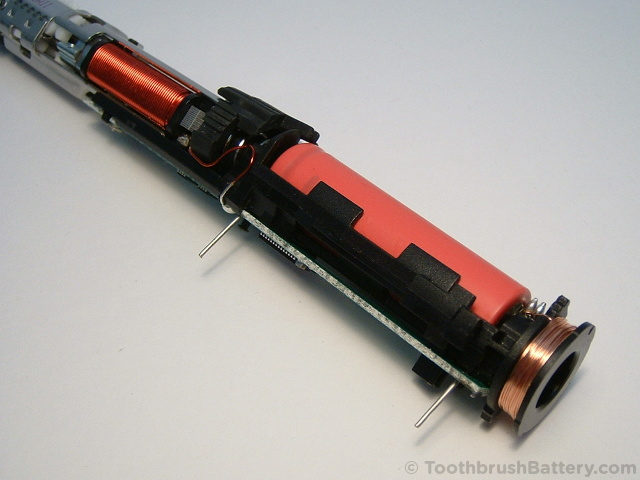
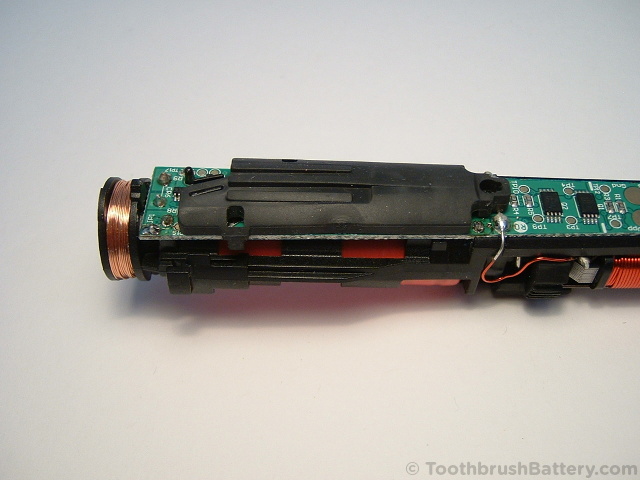
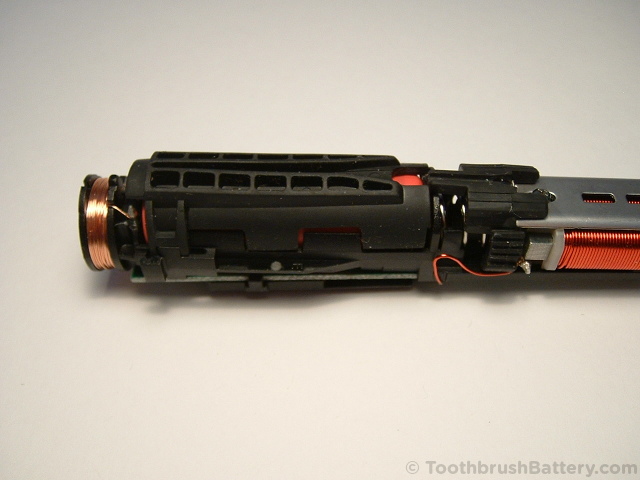
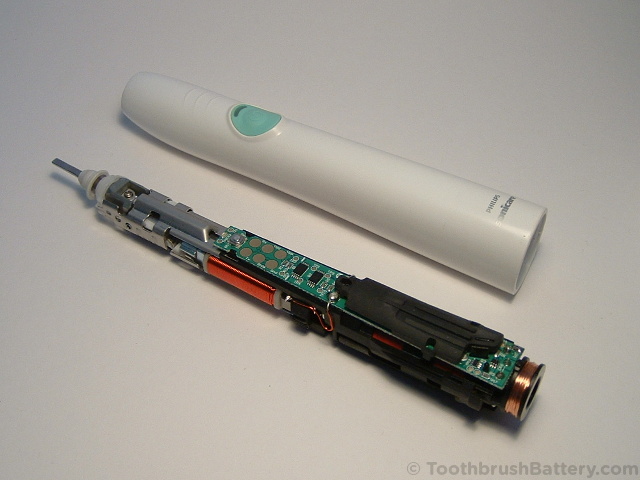
Slide the inner workings of the toothbrush out.
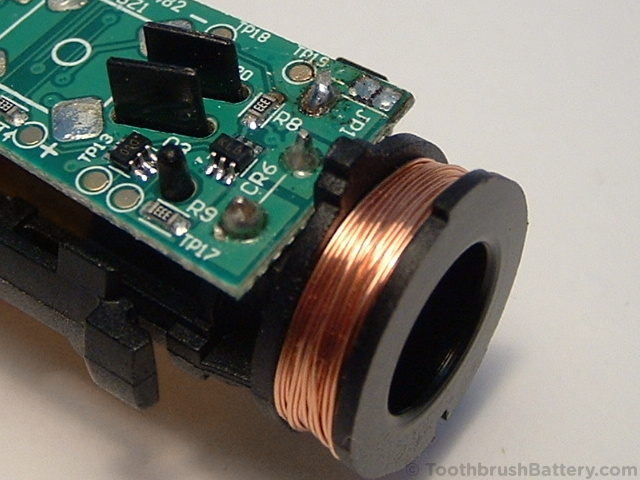
Remove the protective black rubber spacers from both sides. First the circuit board side:
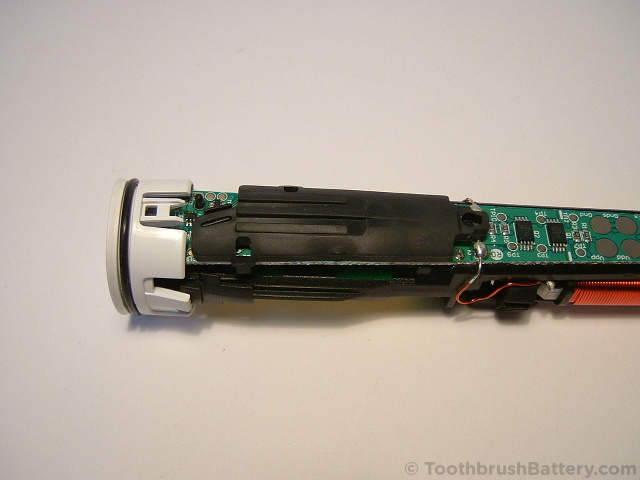
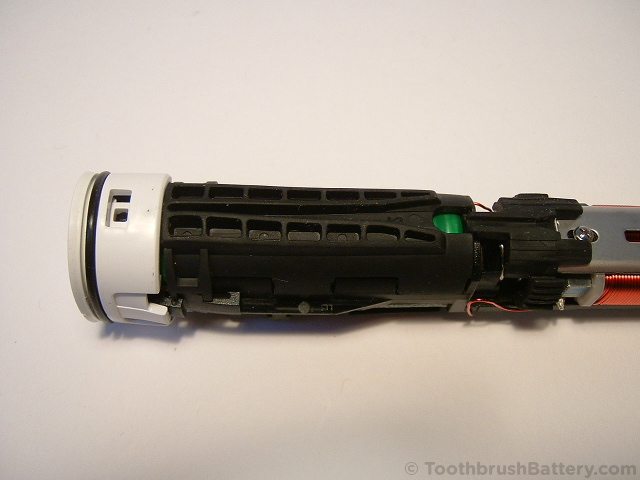
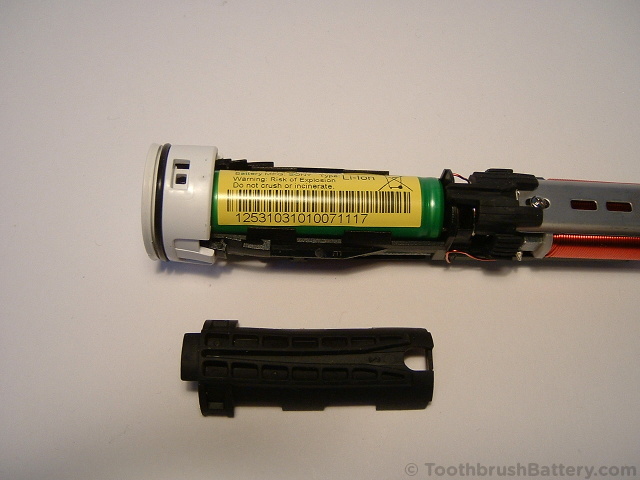
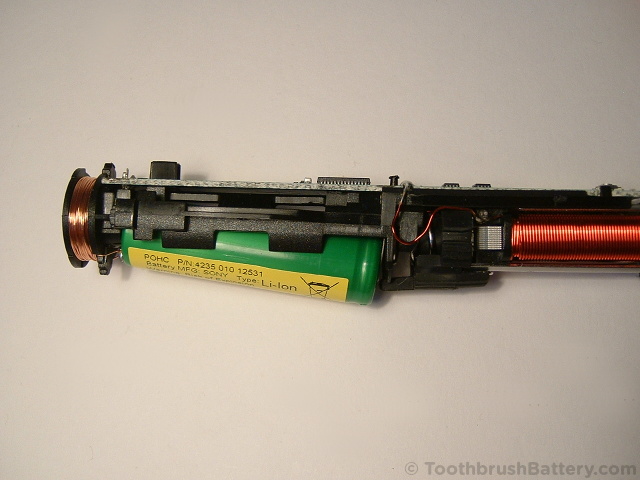
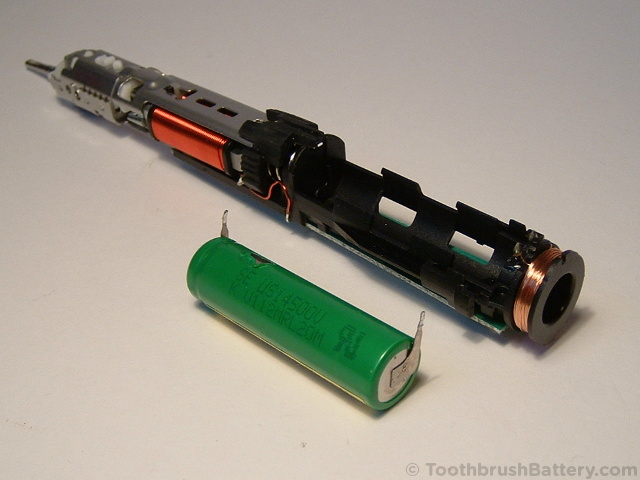
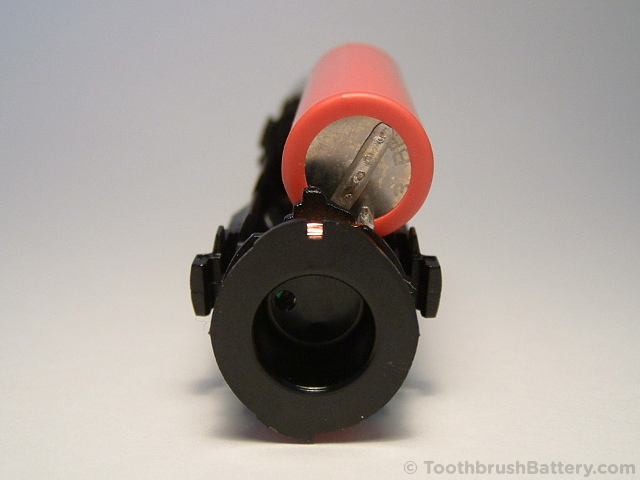
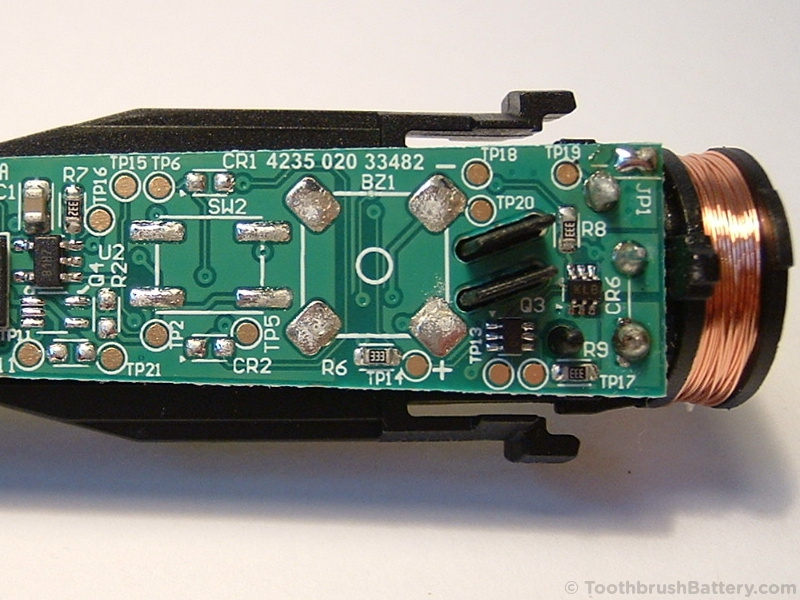
Then the battery side. You can see the original battery in-situ.
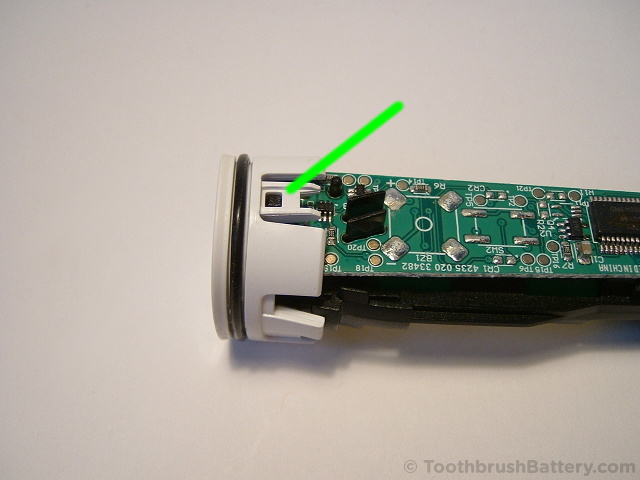
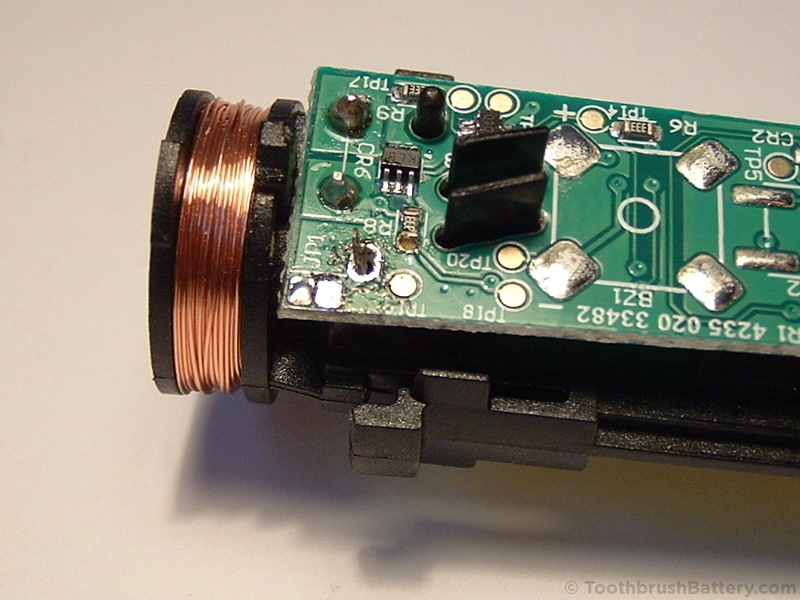
Unclip the end cap by carefully lifting the white plastic clip (arrowed below) and remove the cap.
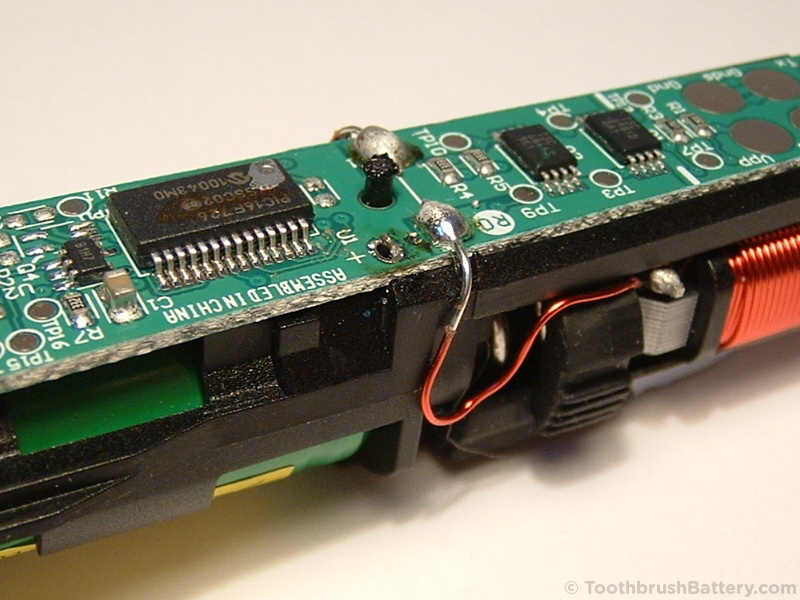
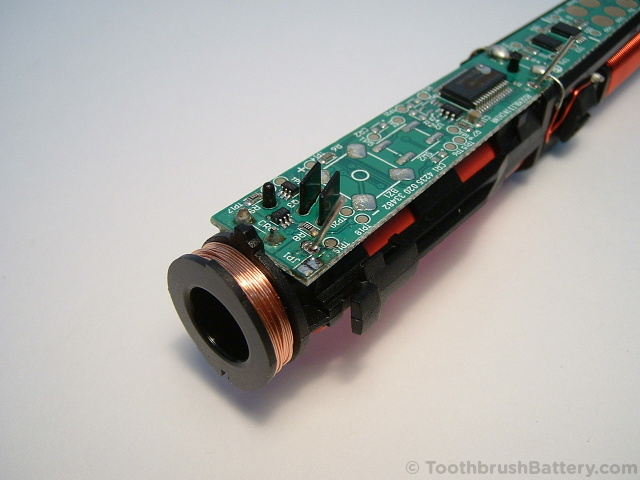
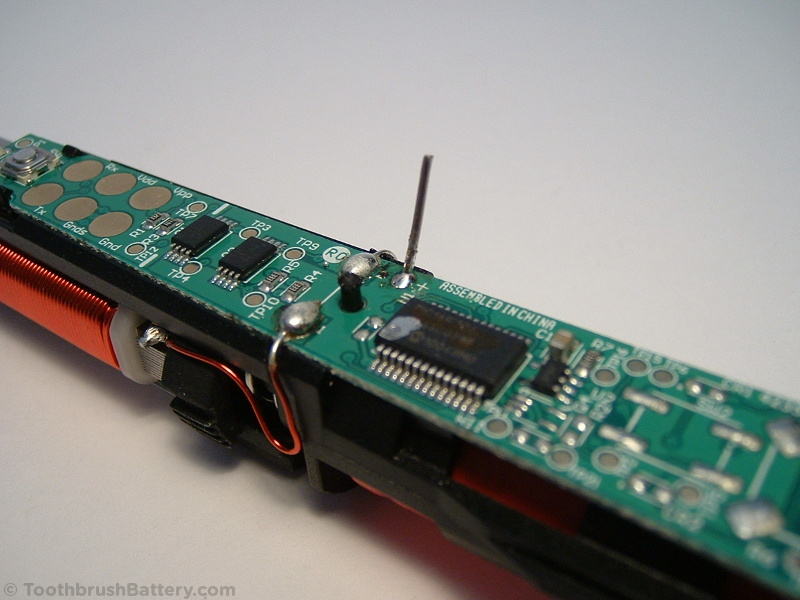
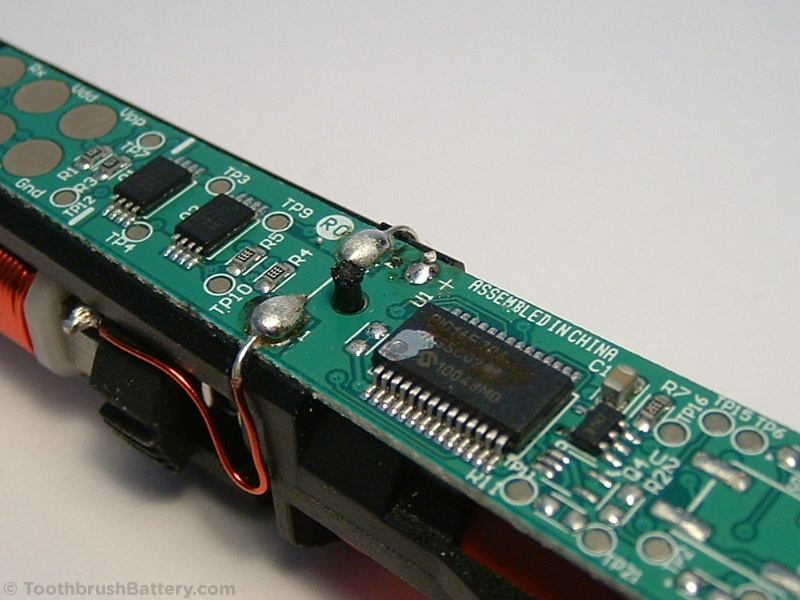
There are three solder points that we’re interested in. The positive battery terminal, (arrowed below)
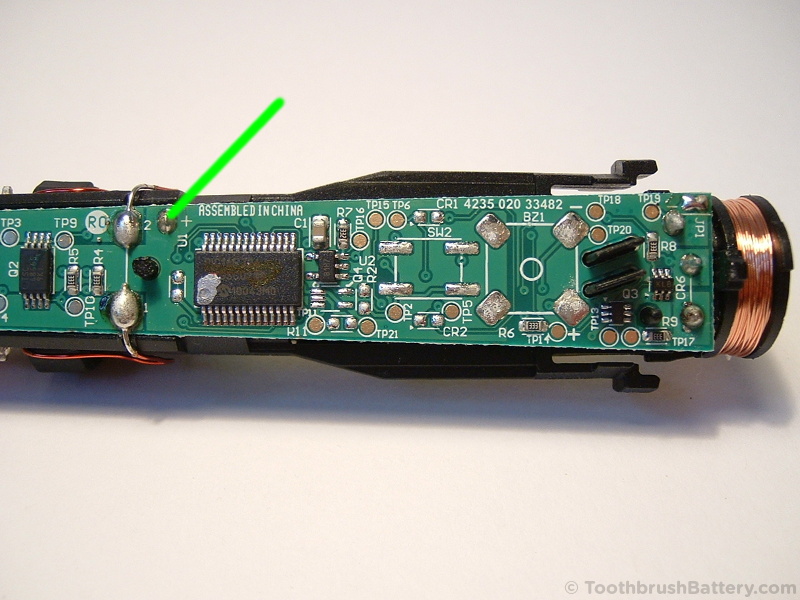
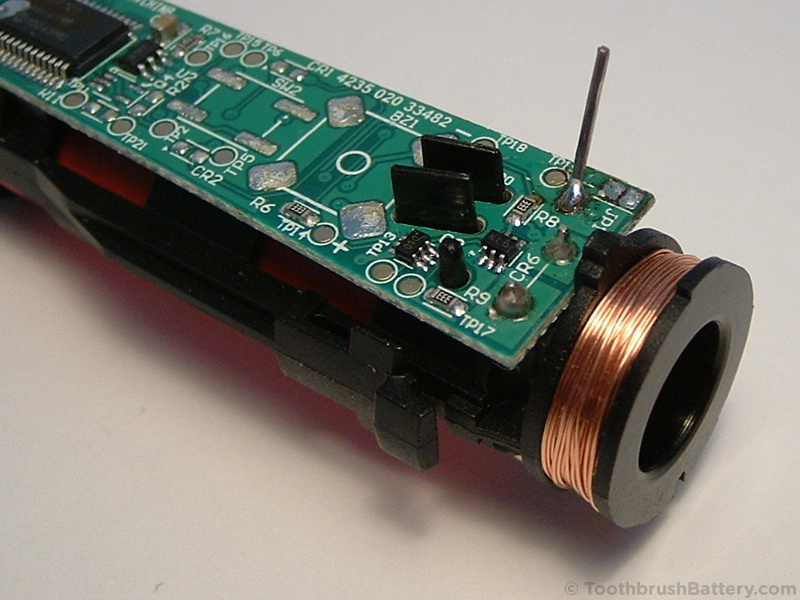
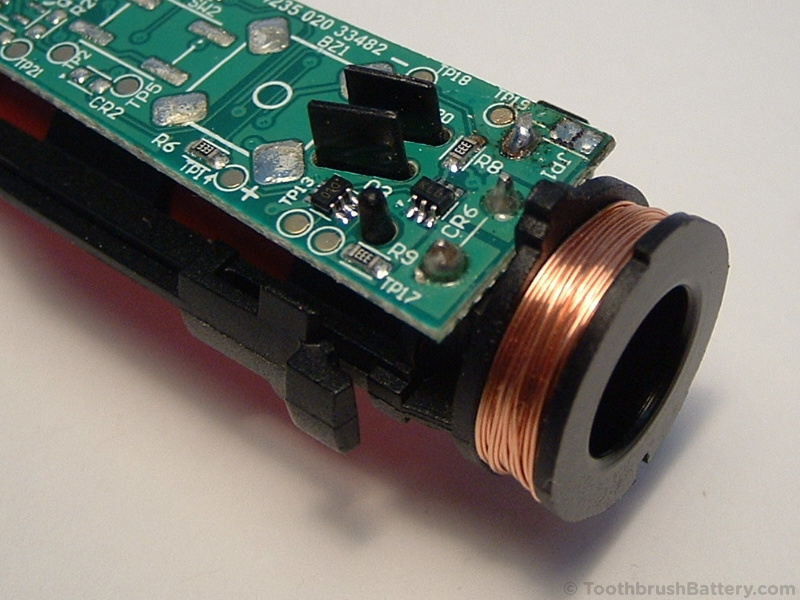
The negative battery terminal, (arrowed below)
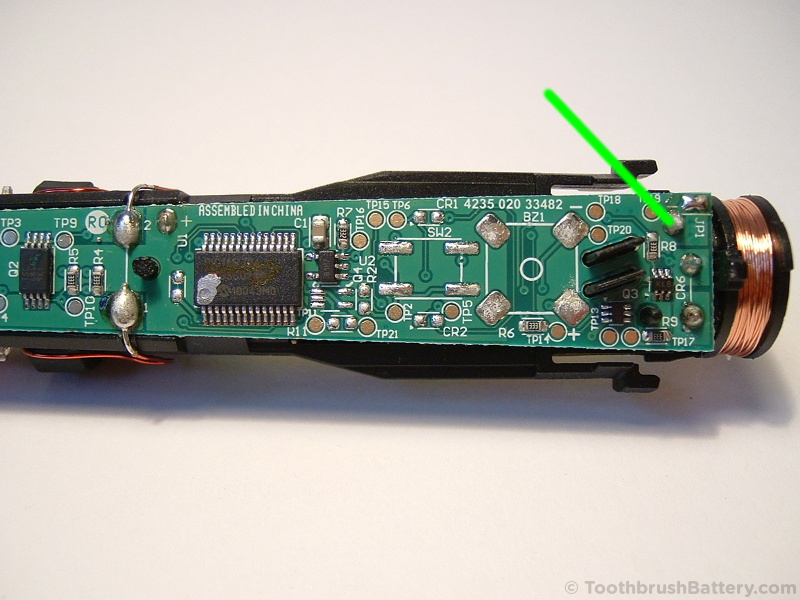
And JP1 which disconnects the battery (arrowed below.) This is very important due to the volatile nature of Lithium-Ion batteries. It also takes away some risk of shorting out the battery when we remove it.
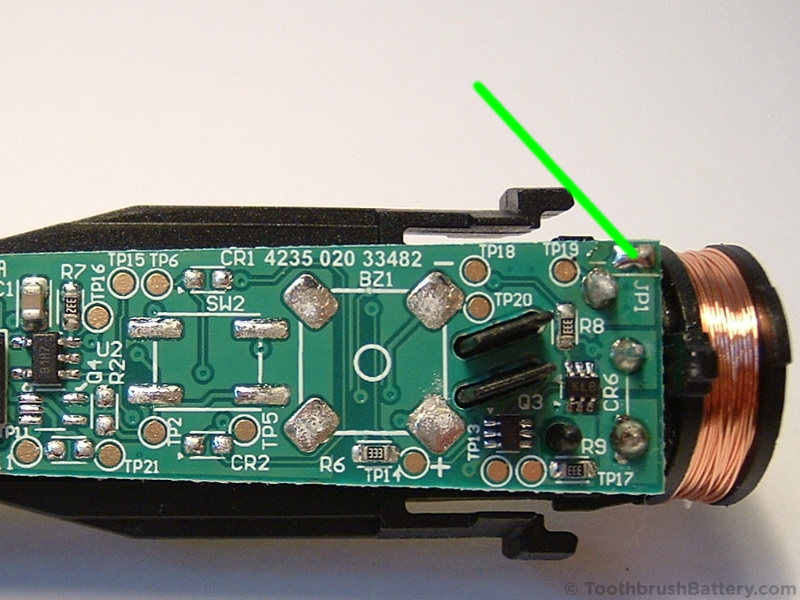
Warm up your soldering iron and using a solder sucker, braid or just by carefully moving the solder blob break the join between the two pads of JP1.
Using the solder sucker or braid, de-solder the positive battery terminal so that the metal pin can be moved inside its hole. You might find that you need to simultaneously pry the battery out slightly at that end while the solder is molten to make sure the solder doesn’t solidify back onto the solder tag.
In the same way, using the solder sucker or braid, de-solder the negative battery terminal so that the metal pin can be moved inside its hole. Again, you might find that you need to simultaneously pry the battery out slightly at that end while the solder is molten.
Remove the old battery from its holder.
The label on this original battery shows part number POHC P/N 4235 010 12531, Battery Mfg Sony and Type Li-Ion on it. Yours might have a different part number such as POHC P/N 4235 010 15362 and Battery Mfg Sanyo or Battery Mfg Highpower but it should still be a Li-Ion type (Lithium-Ion.)
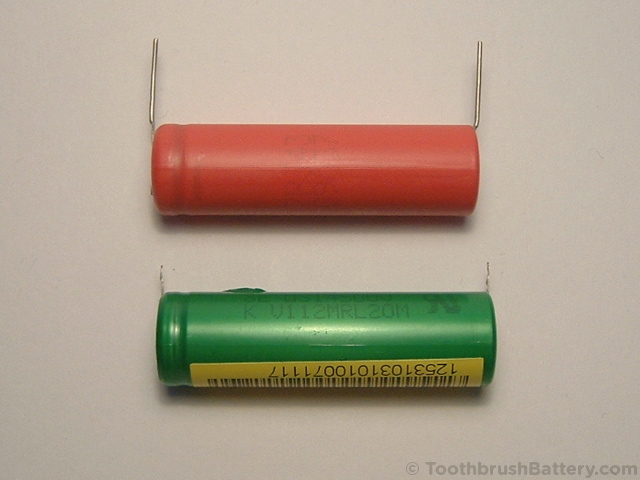
Compare the original battery to its replacement as shown at the top of the photo below. This is a 49mm long by 14mm diameter 3.6V Lithium-Ion battery. Also available as a newer OE version in grey! Please support us with writing these repair guides by buying your replacement battery through our secure online shop here at ToothbrushBattery.com. Note the groove around the circumference of each battery. This is at the positive end of the battery, as shown on the left in the photo below.
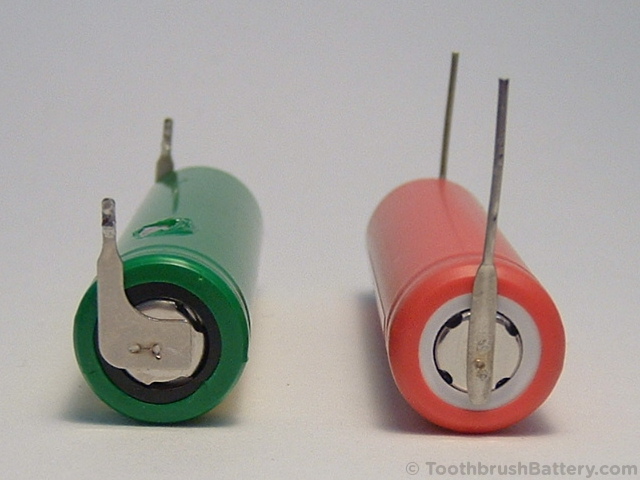
Positive terminals:
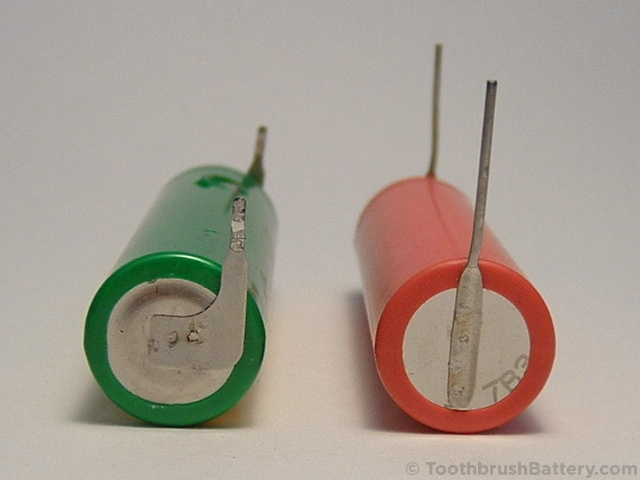
Negative terminals:
Insert the new battery into its holder with the pins at an angle so they line up with the holes in the circuit board. Make sure you get the polarity (+/-) correct!
Push the battery right into its holder so the pins go through the circuit board.
Turn the brush over so you can see the circuit board.
Making sure that the battery is still firmly in its holder, solder both battery pins in place.
Using miniature side-cutters cut the pins off just above the solder joint.
Re-join the two solder pads of JP1.
Once the solder has cooled re-fit the protective rubber spacer over the circuit board, ensuring the moulded clips at the sides go over the circuit board.
Re-fit the protective rubber spacer over the battery, ensuring the moulded clips interlock with the plastic frame.
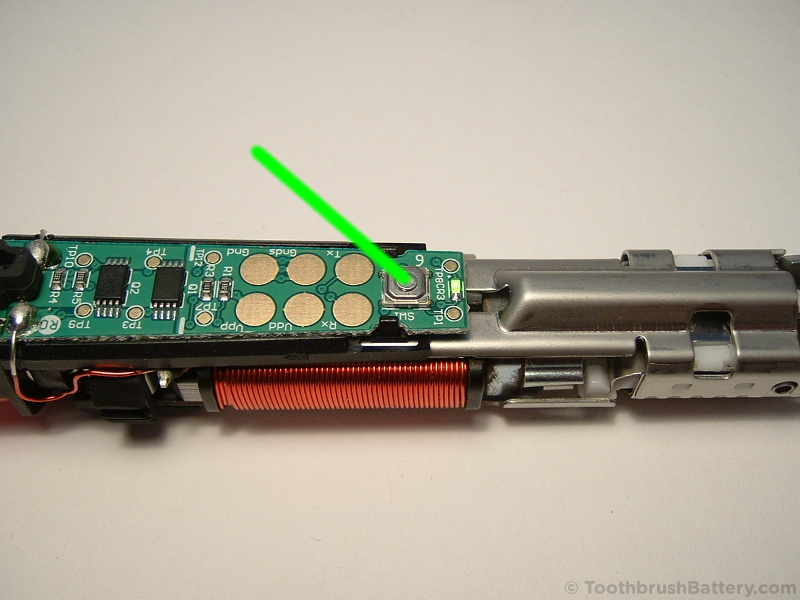
Carefully but tightly hold the toothbrush around the rubber spacers. You can now try switching on the toothbrush to test it by pressing the power switch arrowed below. Be aware that it will vibrate strongly! Switch it off again after a second or two. The light might stay lit for a while after testing.
If the brush will not switch on go back and check your soldering of the battery connections, the soldering of JP1 and that the battery was fitted the correct way around.
Slide the inner workings back into the handle casing. Make sure the innards are the right way up and that they slide in easily along the alignment splines moulded inside the casing. The inner workings should slide all the way in.
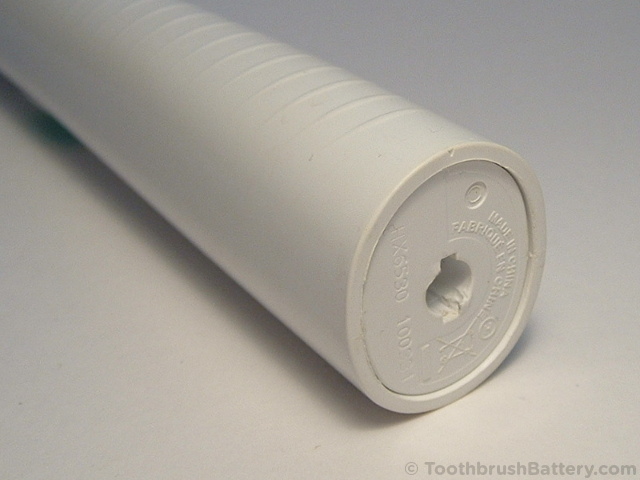
Line up the tiny arrow on the casing with the arrow on the base cap (see below) and push the cap in. It should click into place.
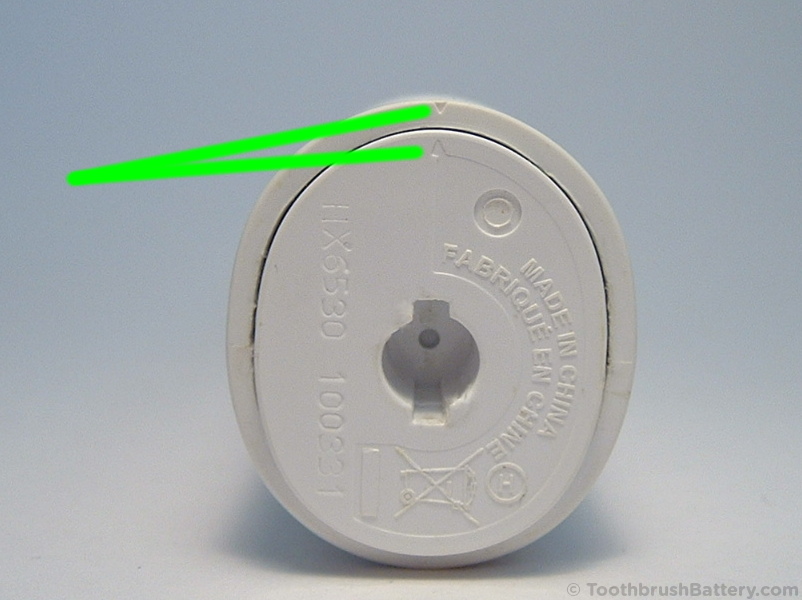
The cap will not clip into place if it is still attached to the innards of the handle. The inner workings have to be installed first, then the cap separately, due to their interlocking clips.
You should now have a fully reassembled Sonicare EasyClean toothbrush! Put the brush on to charge for a full 24 hours and check that the charging light starts to flash. Please recycle your old battery at either your local civic amenity or a supermarket collection point.
Please leave any questions, tips or comments about repairing your Sonicare EasyClean toothbrush below.
Hi, I have replaced the battery that I brought earlier and it powered on, however, I have problem recharging it. I see my JP1 connection are joined properly. Any suggestion?
Hi, I’d suggest checking the solder connections for the battery and that the wire pins haven’t been pulled off the ends of the battery. Also check that the copper wires from the charging coil at the bottom of the handle are connected to their PCB pins still, and verify that charger is working correctly. Does the charging indicator light up when the brush is put on to charge?
I have the same issue. Got battery replaced, the brush can turn on. But the charging indicator doesn’t light up when it’s put on charge. I can also confirm that the charger works properly because I have another toothbrush that charges fine.
Tried all. And the charging indicator light is not up. Which are the jumpers that matters for the recharging? I will see if I should re-solder those jumpers again.
Only JP1 and the two connections to the battery (+ and -)
Try re-soldering those and you should get some indication of charging, especially if the brush runs when it’s not on charge.
Battery is good, how do I trouble shoot the motor. The unit does num , but does not Vibratie
Once you’ve got the toothbrush open tighten the screw that couples the metal output shaft to the motor.
Can I replace HX6932’s battery to HX6710’s?
SANYO 4235 010 18531 can be replaced with SONY 4235 010 15212 ?
Yes, as long as they are both Li-Ion type batteries then they can be interchanged. They can both be replaced with our Li-Ion replacement battery for Sonicare available in our online shop.
Hi folks.
First of all. Thank you very much for your website and the guides. My Sonicare Diamondclean (HX9340) broke a few weeks ago. With your guide I was able to open the Sonicare. Unfortunately, it was not the battery. Thus, I had to buy a new one. I decided to buy the Sonicare Easyclean (HX6530) instead of the Diamondclean. I am happy with that decision, because the Easyclean works very well.
But I asked myself it would be possible to move the mechanic life of the Easyclean to the handpiece of the Diamondclean, because I still have the accessories like the travel case (the handpiece of the Easyclean doesn’t fit completely into the travel case of the Diamondclean). On the pictures the mechanic life inside of the handpiece of the Easyclean (HX6530) looks very similar to the Diamondclean (HX9340). Does someone of you tested that or know if that would be possible? Thank you very much for your comments and best regards.
Hi Ramon, It’s good to hear that the guide was useful in opening your DiamondClean. Regarding fitting the internals of the EasyClean into the DiamondClean casing, I think the main issue will be the different PCBs which might be different sizes and have different locations for the switch. If the switch is in the same place then it might be possible. Also note that the DiamondClean has a ferrite bead inside the charging coil which will need to remain with the DiamondClean handle for charging. Let us know how you get on!
Hey Ionic Admin :).
Thanks. Sure, I will let you know. I didn’t know that I have to change the charging components as well. Let’s see.
Hi,
Many thanks for the guide. I have a Sonicare toothbrush which was no longer accepting a charge (lights not showing) so I disassembled it, there was some moisture and slight rusting on the battery (along with a bit of gunk elsewhere).
How do I know if it’s the battery that was the problem, or if something else has broken? I used a multimeter and the battery seems to give off 2V, not the 3.7V that should be expected. Will the battery be the problem, or could it be something else?
Thanks!
Hi Blair, firstly let the dismantled handle dry out for a day or two in a warm room or cupboard. Then try charging it again. If the battery still won’t charge and measures 2V then this is too low and below the spec for a healthy Li-ion battery even when discharged, so it will need replacing.
Thank you for posting this guide! I wish i’d had it prior to troubleshooting my Sonicare. Unfortunately, in my haste, the bottom pieces (plastic battery cover) of two toothbrushes were slightly damaged. They both still charge, but rest on the charger a little lopsided! Lol! I can’t seem to find replacement pieces anywhere. Do you all sell those or know where i can find them?
Thank you so much!
Hi Cynthia, you might be able to find spare caps for the base of the handle through our Sonicare parts page. Alternatively you could buy a whole faulty toothbrush and take the cap off that!
Hi,
Many thanks for the quick reply and battery.
Prior to soldering it into the handle I’m trying to work out if the battery is the problem, as once I solder it in I obviously can’t return it.
Do you know if the charging LED should appear when I hold the new battery on the connectors ? (as shown in this image: http://i.imgur.com/aFVttNW.jpg )
It effectively looks the same as if it was soldered in properly, yet nothing appears when it’s put on the charging stand (nor does it turn on).
Thanks!
Hi Blair, holding the battery in place like that is not recommended because if you momentarily disconnect the battery while it’s charging you could blow the charging circuitry. It will also only work if JP1 is reconnected. You could solder some test pins (pieces of metal paperclip) to the PCB and then use test leads with crocodile clips at each end to connect the battery if you want to test without soldering to the battery pins.
Hi..many thank for the pics ! Worked so far and runs again !
**One additional detail : **
Using the grips and pressing onto the table, didn’t work for me.
It didn’t pop out..and I used all my strength 🙂
So I had to use a thin srewdriver and lever the cap (pry open) out.
Now I have some marks on the plastic-edge..but no problem for me.
And it didn’t pop out, because there are 2 black plastic clips inside who kept
the inner system in position.
I had to use the screwdriver again to move them a bit and let it loose, then everything came out
Hi I replaced the battery on my HX6530 in the hope that it was the problem, but it’s still the same… The toothbrush actually works OK, but when it’s on the charging base, it makes a repetitive beep, beep-beep, beep, beep-beep sound, and the charging indicator flashes orange/green/orange in time with the beeps. The unit does apppear to charge, but obviously the beeping and flashing indicates a fault of some sort. I did clean off all of the electrical parts, pcb etc with alcohol and a nailbrush, and gave ’em a squirt of WD40. I don’t know what else to try!
Strange! I’m not sure what that beeping means. On some Sonicare toothbrushes 3 beeps indicates low charge. There might be an issue with the charging circuitry but you could try running the toothbrush until the new battery is flat then give it a full charge.
Hello my HX6950 stopped fully charging only two of the three charge lights lit, then one. The unit was being returned to the charge base after use. Then one yellow light flashing and then flat.
I changed the battery with a new one. I pushed the button to check it was working and everything fine, two green charge lights showing. I put it on the base for its 24 hour charge. Lights all flashing fine for charging at 18 hours I took it of the base to see how it was going and to my surprise I only had one green light showing, the charge had gone down after 18 hours. At 30 hours I now have one yellow light flashing it is nearly discharged, the unit has been retutned to the charging base every time. Can you advise please.
Thank you for your help.
Regards Peter
That’s a strange one! Your FlexCare is very similar internally to the EasyClean. Is there any water damage (staining) to the PCB on either side? Check your solder joints and JP1. Check there are no stray blobs or whiskers of solder causing a short circuit on the PCB. Although the charging lights are low, how long will the brush run for?
I have some different type of battery in my HX6530. It’s SANYO POHC P/N 4235 010 19621, Li-Ion 10. I have used a multimeter and it gives me 5,3 V. Where can I get replacement battery in my case?
Your old battery is reading over-voltage which is probably why it is faulty. They should all read between about 3.0V and 4.2V. Replacement Li-ion Sonicare batteries are available here: http://tinyurl.com/sonibatt
Following your excellent repair guide, I found that the seal between the case and the metal shaft on which the brush is mounted is worn out and leaking and causing corrosion and contamination of the interior of the body. Phillips does not have the seal for sale, so the unit is trash. It appears to me that the seal ought to be replaced periodically as normal flexing with use will eventually wear it out. Any suggestions? Thanks
It’s true that the seal can split. You can dry the unit out by removing the internals for 24 hours and reassembling. Then you can probably continue to use it as normal, provided that after every use you remove the brush head and then store the handle on its side to stop water seeping past the seal.
Hello
My HX6790 stopped working and I used some online instructions to open it up an take a look. There was moisture on the inside and a little rust on the battery and connectors. I have since switched the battery for a new one and cleaned the rust.
Now the light comes on when I put it on the charger but it doesn’t seem to want to turn on when I press the button. I think the new battery is in the right way as although I couldn’t see any +ve or -ve indications on it, there is a indent about 3mm down from one end (which was the +ve terminal on the old battery) and I put the new one the same way round. Could it be the wrong way round? Would the charging light come on if it was? Have you got any idea what else I could try if not?
Thanks
The groove around the battery is at the positive end (on li-ion cells) so it sounds like you’ve installed it correctly. It sounds like there is water damage to the PCB on one side or the other. Look for staining on the tracks and you might find that you can bypass any damage by soldering a fine wire in place.
Ive had a look at the circuit board and there appears to be some of the blue surface of the PCB flaking off a bit on the underside near the charging coil. Apart from that there is a very small area of what looks like water damage on the front. I have a picture which shows it. How can I post it? Was wondering where to put the bypass
Yes those two patches sound like damage. You can upload your photos to an image hosting site then paste the links into your reply here. However, remove the letters “http” from the start of each link so your comment won’t automatically get deleted.
Thank you for your clean disassembly instructions for the Philips Sonicare HX6530.
The problem was not with the power but with the metal part that the brush fits onto. It was becoming looser and looser although the securing screw seemed tight. Nonetheless, the screw was loosened, the metal part was removed and examined; minimal wear was found, the metal part returned and secured by tightening the holding screw extra tight and the working assembly reinserted into the outer shell. The metal part still wobbles a bit more than when new but is better than it was. The design is deficient and mickey mouse.
Thank you again. You saved me time and most likely some grief. 🙂
Thank you for your guide! I managed to replace the battery but unfortunately my Flexcare only beeps once long twice short when I try to charge it and it doesn’t seem to charge. However, I can turn the toothbrush on (the new battery was partly pre-charged), but it won’t turn off again until the 2 minutes program has finished. The buttons for the different programs and the level of intensity sometimes work, sometimes not.
I had to recharge the old battery every four days before I replaced it and in the last weeks the toothbrush sometimes turned itself on and off. I believe that it finally turned itself on and didn’t stop until the (old) battery was completely empty. After that the beeping started, with the old and also with the new battery. But, since the replacement of the battery, it doesn’t turn itself on anymore (yay!). It was a little bit wet and also partly corroded inside, but not very much. Maybe that was the reason why it turned itself on and off, some kind of a short circuit or so.
Do you probably know how I can fix the issues mentioned above?
Thank you again!
Hi John, Glad to hear the guide was useful. It sounds like water ingress is the issue and this might have damaged the PCB and switches causing the issues you mention. See our Sonicare Spare Parts page for new seals and our Sonicare PCB Corrosion Repair page. Then once you’ve repaired it read our Toothbrush Care Tips to stop it happening again.
I have an HX6530 with a newly replaced battery, but I am still having the same problem as before. The unit has run fully once with the new battery, but now doesn’t seem to hold charge. It will buzz for only an instant when turned on, and the light blinks indicating low power. When charging, it blinks, but isn’t holding that charge.
It sounds like there could be a problem with the charging circuitry on the PCB, or damage to the PCB caused by water/corrosion, meaning that the battery is not being charged. Check the PCB for corrosion and broken tracks. The new battery would have been supplied partially charged which is why you got a bit of use out of it before it needed recharging again.
Yes, I think that’s what it must be. I charged it all night, and today it barely even buzzes at all. Everything looks fine inside as far as I can tell. Is there a way I can test the charging circuitry? I guess a blinking charge LED doesn’t assure that the charging is working properly.
The only way to test is to monitor the battery voltage as it charges. It should gradually rise to 4.0V (max. 4.2V) as it charges. Alternatively, measure the battery voltage before you put it on charge, then again when it has finished charging and compare.
I cannot seem to get the insides out of my Sonicare HX6530. I can get the cap out but not the insides. What can I do?
Are you able to simultaneously release both catches inside the casing of your EasyClean? This is shown more clearly in our Sonicare DiamondClean battery replacement guide.
I replaced the battery in my HX6530 as you showed and it worked! I then used it for about 3 days and then left it for a further 3 days or so. When I tried to use it again it wouldn’t work at all and no green light shows when I put it on the charger (which works with another HX6530 we have so doesn’t itself have a problem). I have taken it apart again and re-soldered, but no change unfortunately. The one thing I perhaps did wrong when I fitted the battery was that I missed your instruction to charge for 24 hours before using – could this have caused my problem? Do I need another new battery or do you have any suggestions on how to get it going again? I get a reading of about 2v across the battery from the contacts on the PCB which doesn’t have any apparent water or other damage. Thanks.
More information on the problem…
Found by chance last night that if the toothbrush with the replacement battery is put on the charger immediately after a working toothbrush has been charged, then for a little while that it’s green charging light does start flashing, but stops after a minute or so. This is can be done repeatedly and was not a one-off. I did it quite a few times with the same results, except on two occasions where the green charging light didn’t flash but stayed on, but again only for about a minute. Don’t know if this helps diagnose what’s wrong.
Thanks
Hi, Thanks for the guide.
I followed your instructions to the T on my HX6910 leaving the re soldering of JP1 to the very end. However as soon as I re soldered it it started running o it’s own for a while and SW1 is unresponsive. The handle started running crazy one day and I assumed it was the battery going after 5 years of loyal service. When I put it on the charger it vibrates randomly a few times and nothing else happens. SW2 seems to be working fine going through all the lights. The charger is fine because I bought another new handle and it charged perfectly. Any thought on what to look for? Is it common for SW1 to go? Thanks
Hi Ignacio, this sounds like water damage to the PCB or SW1 switch. If you remove the SW1 surface mount switch does it then behave correctly when you temporarily bridge the PCB pads to simulate the switch being pressed? You could also try moving the switch at SW2 to the location of SW1.
Will the JP1 jumper be soldered when replacing the battery in the HX6910 brush?
Yes. If the JP1 is present de-solder JP1 before de-soldering the old battery. Solder in the new battery then re-solder JP1.
What happens if JP1 is not desoldered before desoldering the battery? I’ve replaced the battery, the battery is making contact with the PCB (measured 3.77V across the + and – solder points), but the handle doesn’t turn on and when placed on the charger will flash all LEDs simultaneously very fast. Is there a way to fix?
Thanks for your guide, unfortunately I did not see it until I already went off another guide that didn’t mention the JP1 jumper.
JP1 is there so that the circuitry doesn’t get blown by the constant disconnection/reconnection of the battery terminals during replacement. It also guards against creating accidental short circuits if the soldering iron slips.
Is the battery connected with the correct polarity? The voltage looks good so the brush should turn on unless there is damage to the circuitry. Water ingress can damage the fine PCB tracks and the components too.
We have a HX6530 that was dropped in shower and water go in. It wouldn’t turn off then it was turn off but not on again. I dry it off but it wouldn’t charge anymore. Be left it a side then months later looking at it again, the battery is drained to empty & damaged. So I remove the dead battery and solder in a 18650 to test. It does nothing for about 20-25 seconds, then its start buzzing like normal but the switch doesn’t work. Led comes on for 30 seconds then off. The tooth booth just keep running and do the pause thing every 30 seconds till the 2 mins up and its stop and the led come back on for 30 seconds then all off. Is it the switch or the micro processor has gone? Thank
It sounds like faults on the circuit board. There are some suppliers of new PCBs on our Sonicare spares page here.
I have replaced the battery on my HX6530 , I have followed your instructions, all is OK. thanks
Super instructions. Bought the battery from your link, removed the old one and fitted the new following these instructions. Worked perfectly – I now have a new toothbrush!
Hi, thanks for step by step guide.
I replaced the battery in my HX6530 toothbrush because it was charging for more than 24 hours and the indicator that it was charging was still flashing.
Now I have a new battery in the brush discharged even though it has been in the charger for more than 24 hours. It doesn’t even light up when the button is pressed. How can I diagnose a charger problem? Thank you Jirka
Are there any signs of water ingress such as staining, corrosion or crystal formation on the PCB? The new battery would be partially charged so the brush should switch on and run without any further charging.
Thanks for this battery replacing guide. I successfully replaced my HX6720 battery.
I have a sonicare HX3220 with two MiNH batteries that I replaced.The motor sounds powerful but the brush movement is weak. Not sure what is causing this. It was fine when it was new. Any ideas thanks
This is possibly caused by loose screws in the mechanical transmission linkages.
Hi I replaced the battery on my toothbrush in the hope that it was the problem, but it’s still the same… The toothbrush worked only few seconds, and when it was on the charging base, it maked a repetitive beep, beep-beep, beep, beep-beep sound, the problem was a malfunction of micro-switch. I re-solded th micro-switch and I works OK, now.
Hello, my HX6530 rubber seal on the top is starting to turn black and I need to replace it.
Do I just dismantle then pull the plastic collar, then pull the seal off? Do I have to replace the collar too?
Thanks for posting these parts.
Hi Mark, Yes you need to slide the inner workings out of the handle casing to remove the seal as you suggest. You can use our guide above to help you. Pull the collar off, then the seal. You do not need to fit a new collar if the old one is still clean and undamaged.
Thanks for offering these parts and guides. I replaced the collar and seal today and it works like new again.
Also, which collar should I order for my HX6530? The one I have is small and doesn’t cover the rubber seal. It just fits on the top of it. Thanks.
You can fit the taller collar that we supply instead of your flat one. It covers more of the seal.
Cant open hx6530. Followed step by step w/cardboard & grips, base doesn’t pop out or come ajar.
Hmn Puzzled?
While squeezing with the grips you might be able to pry the base cap out.
Bonjour,
Merci pour vos guides très bien expliqués.
J’ai remplacé la batterie de ma brosse à dents philips sonicare flexcare HX9112/13. J’ai l’impression que tout s’est bien passé sauf que maintenant quand je l’allume, elle s’éteint après une demie seconde…
Une idée de quel pourrait être le problème?
Merci par avance
It is possible that there is a bad solder connection between the battery and the PCB. Is the battery a 3.6V Li-ion battery? Can you measure the battery voltage after it is fully charged?
This is a superb guide. I do it that way too. Yet the first steps with cardboard and grips, I do something different.
There are two tabs on the bottom hole. I put a large fitting screwdriver in there and turn it counterclockwise a bit.
Then I turn the Sonicare upside down and push it down over the rod, where the brush normally sits. Then it comes out at the bottom. No need for grips and cardboard.
A really interesting project, but difficult. That said, if it goes according to the possibilities, it’s a lot cheaper than a new toothbrush. This is a job where you must hope rather than expect. It’s a lot of fun, and worth the small investment for that alone. I’ve had my own value from trying (and failing).
Worked well, thank you. The fiddliest part was cleanly desoldering the old battery – i managed it by using desoldering braid on all sides of the pin in several stages. I could have done with a proper desoldering station with suction and a heated nozzle, like we had at my employer when i did this sort of thing for a living 😀Thanks for the guide and battery 👍
I have a hx751g, it came on in the middle of the night while camping, we could not get it to stop, what do we do with it?
If your electric toothbrush switches itself on this is usually due to water ingress around the top seal. Use our guide to help you open the toothbrush handle and let the internals dry out for 24 hours. If you need a new seal because yours is split then we have these available on our toothbrush spare parts page. Otherwise, just follow our tip to store the toothbrush lying flat on its back with the head removed between uses.
Thank you! My issue was not the seal or battery but the armature screw being loose. It did take some prying of the end cap, and it did distort the plastic a bit, but I was able to open it up ad find the very loose screw near the brush head arm. I also noticed there was no moisture intrusion. Massive help. If the seal or battery needs replacing, I’ll be back again! Thanks for having this info available!