
In this battery replacement guide we will show you how to open up and dismantle the Braun Oral-B iO series of toothbrushes and repair them by fitting a new replacement Li-ion battery. These are expensive, high-end toothbrushes so it is well worth fitting a new battery to bring them back to life.
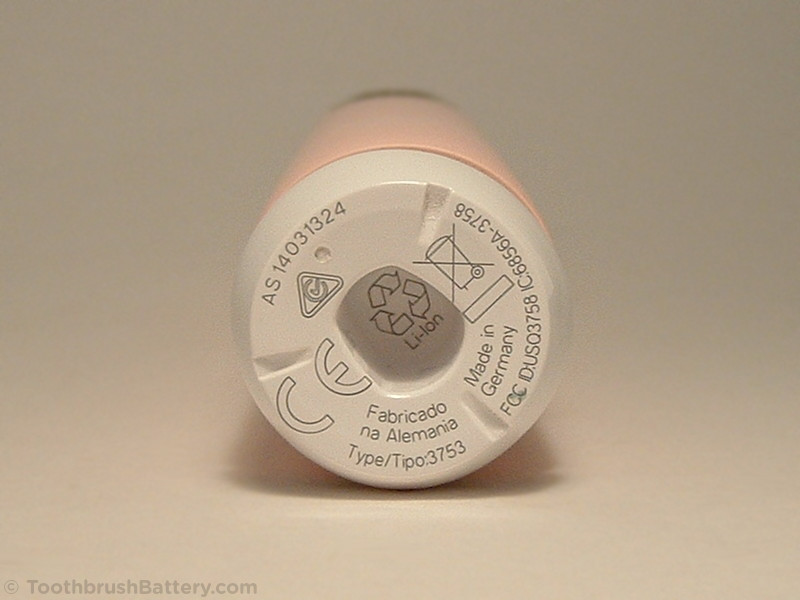
This battery replacement guide is only for Oral-B iO series toothbrushes. This includes the iO2, iO3, iO4, iO5, iO6, iO7, iO8, iO9 and iO10 models. These are marked with one of the following ‘Type’ numbers on the bottom of the handle: Type 3753, 3758, 3769, 3770, 3776, 3794, 3795 or 3796. Be aware that the iO2 toothbrush (Type 3770) takes a different voltage of battery (3.2V) that is not interchangeable with the 3.6V battery used in the rest of the iO range (iO3-iO10).
Click the photo below to see a larger photo of where the type number is marked on your Oral-B iO toothbrush:

For other type numbers, makes and models the toothbrush opening procedure, battery replacement procedure and battery specification is different so please see our other guides to toothbrush battery replacement for your other toothbrushes.
The basic replacement method is:
- Open up the iO toothbrush handle using our photographic guide
- Slide out the inner workings
- Unclip the original iO toothbrush battery
- Clip in the new iO toothbrush battery:
– For iO3-iO10 toothbrushes use the 3.6V battery, part number 0602589724096
– For iO2 toothbrushes use the 3.2V battery, part number 0602589724119 - Reassemble the handle
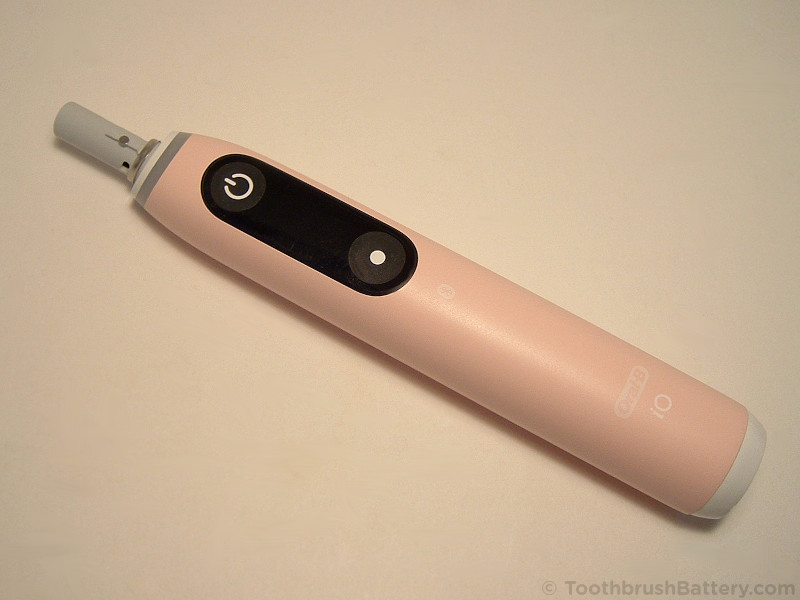
Some iO toothbrush handles have a built-in display screen and some do not. This guide covers both versions.
The Oral-B iO series toothbrush battery replacement process is documented in detail below along with lots of photos. Click on any photo to enlarge it.
Disclaimer
Any damage or injury to yourself, your toothbrush or anything else is entirely your responsibility. This guide is for professional, educational usage only and is offered without guarantee or liability. Lithium-ion (Li-ion) batteries are dangerous if short-circuited or mis-handled and can go into thermal runaway and self-ignite if you do not observe all handling and safety precautions.
Video
We have created a short video to complement this guide to Braun Oral-B iO toothbrush battery replacement. The video is published on our YouTube channel and you can also watch it below.
Tools, Parts & Equipment
- Braun Oral-B iO series electric toothbrush
- Original charger (either the circular magnetic charger or the oval Type 3757 charger with central peg)
- Medium sized, blunt, flat-bladed screwdriver: 4 to 6mm wide
- New replacement battery:
- For iO3-iO10 models: part number 0602589724096. Support us by buying yours from ToothbrushBattery.com here.
- For iO2 models: part number 0602589724119. Support us by buying yours from ToothbrushBattery.com here.
Safety Certification
The Braun OE and Sanyo batteries originally fitted to these toothbrushes have been tested for safety by Underwriters Laboratories (UL). UL are an international technical testing establishment, and these batteries have received their Recognized Component Mark for components displayed as a “reversed UR” symbol on the battery as in the photo below. Lithium-ion batteries can be more dangerous than other chemistries of battery if not manufactured very carefully, especially during charging/discharging. It is important to only use Lithium-ion batteries that have been certified as safe in your toothbrush.
How-To
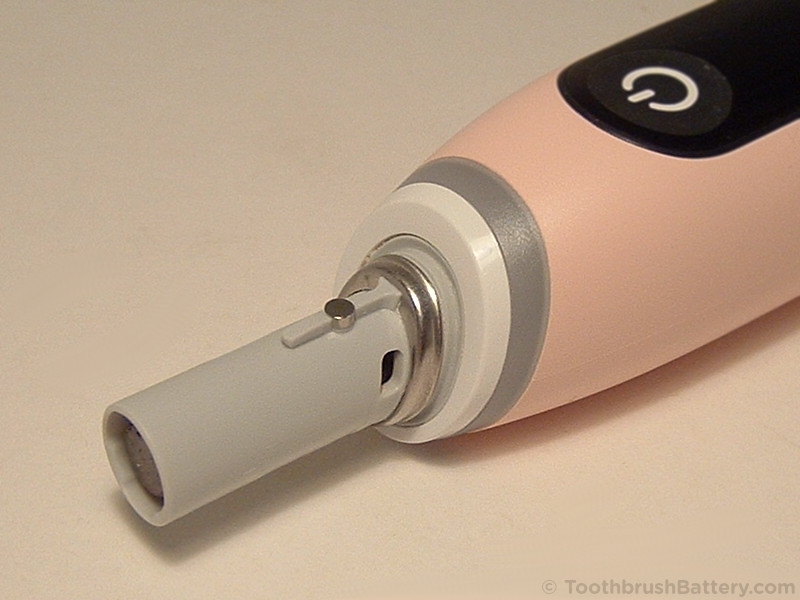
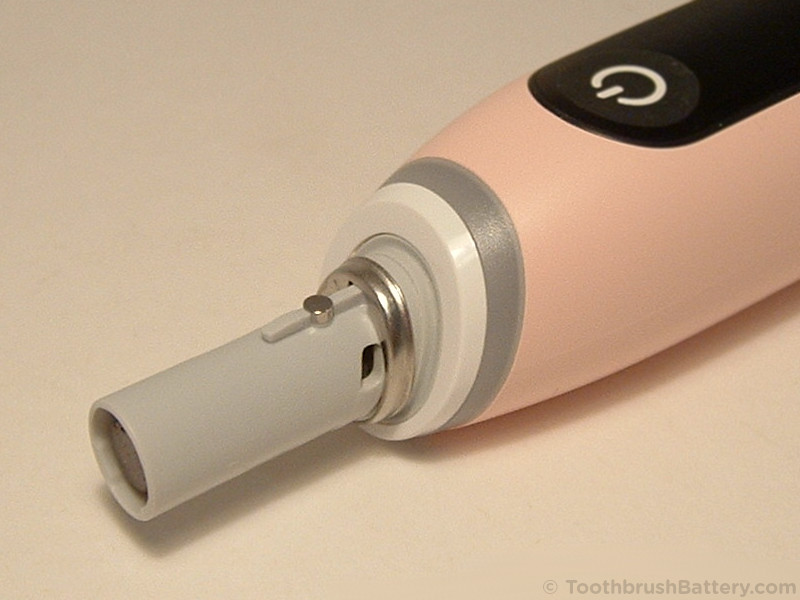
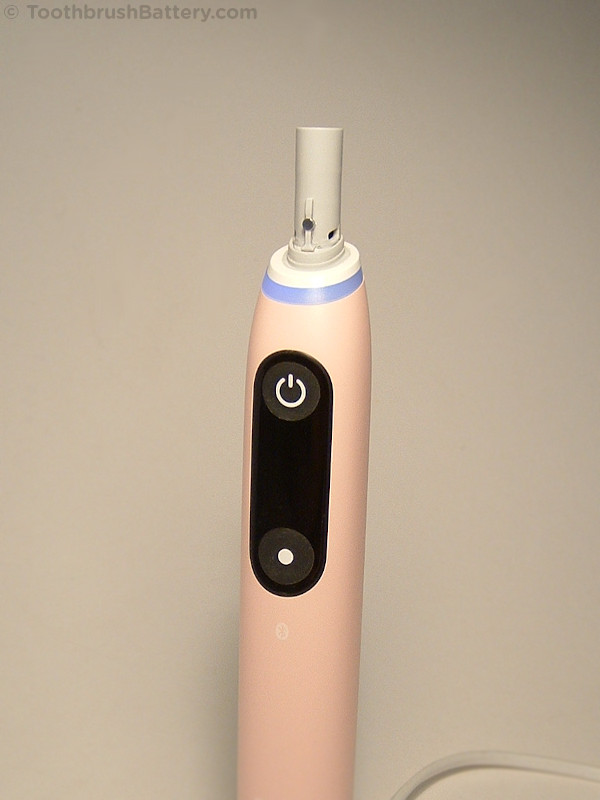
To begin, remove the brush head from the top of the handle.
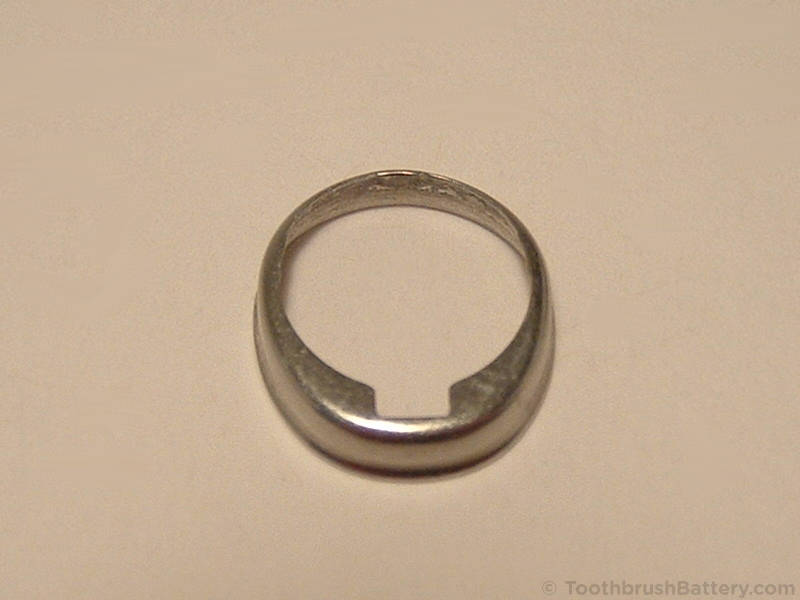
Starting at the front of the metal retaining ring, use the flat-bladed screwdriver to gently pry the ring up and away from the body of the handle. A screwdriver with blunt corners is less likely to mark the toothbrush.

Store the ring somewhere safe until the end of the repair procedure.
Optionally stand the toothbrush in hot tap water for 5 minutes to soften the seal and plastic latches.
Dry the toothbrush and pick up the unplugged charger.
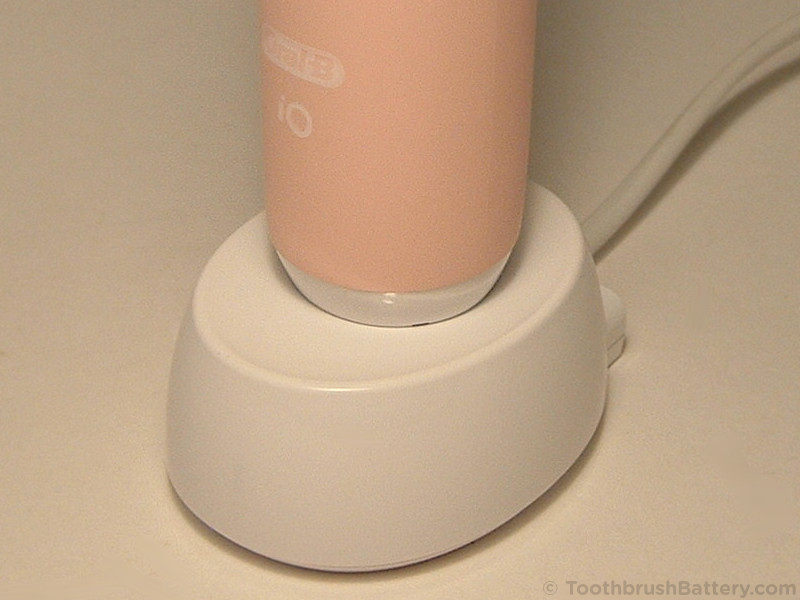
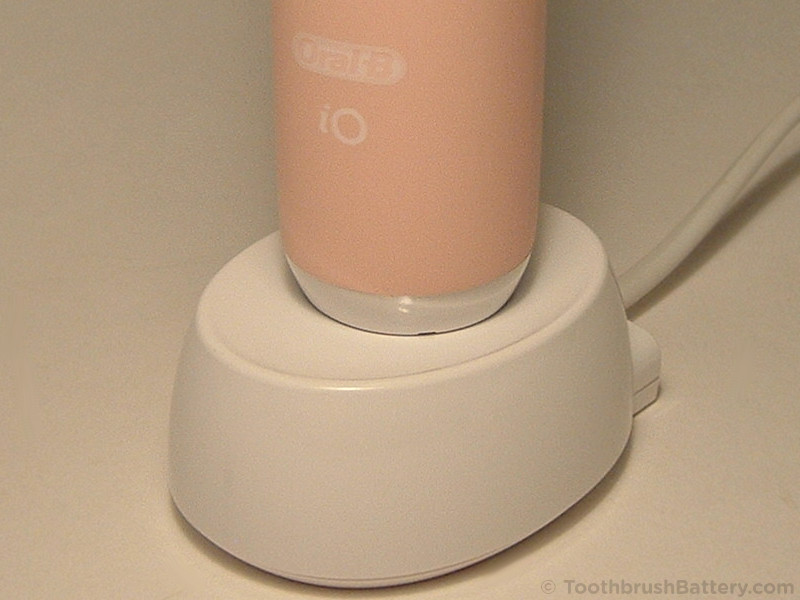
For iO toothbrushes that came with a circular magnetic charging base use the 3 tabs on the underside of the magnetic charger to engage in the 3 notches on the base cap of the toothbrush. Notches are arrowed below.

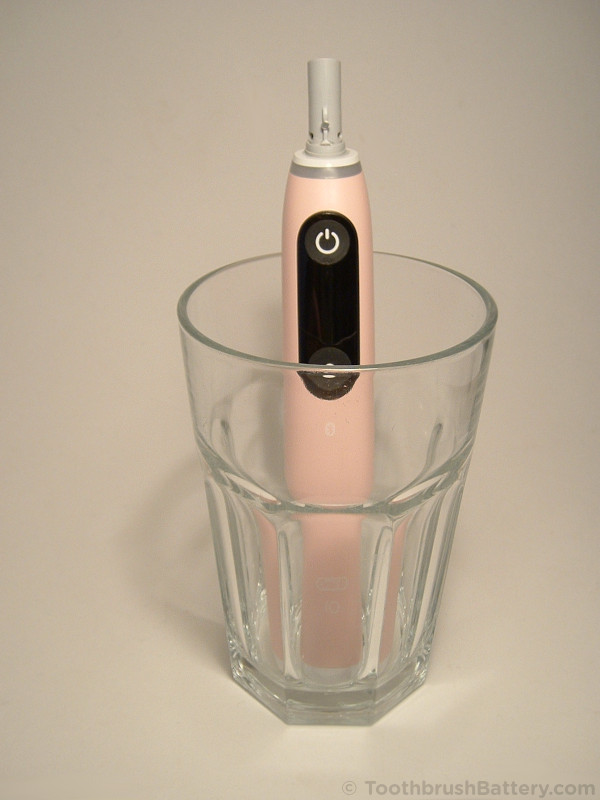
For iO toothbrushes that come with oval chargers with a central peg stand the toothbrush on its unplugged charger.
For both types of charger, turn the toothbrush approximately 45-degrees anti-clockwise (an eighth of a turn) against the charger. You will feel the base cap come unlatched.
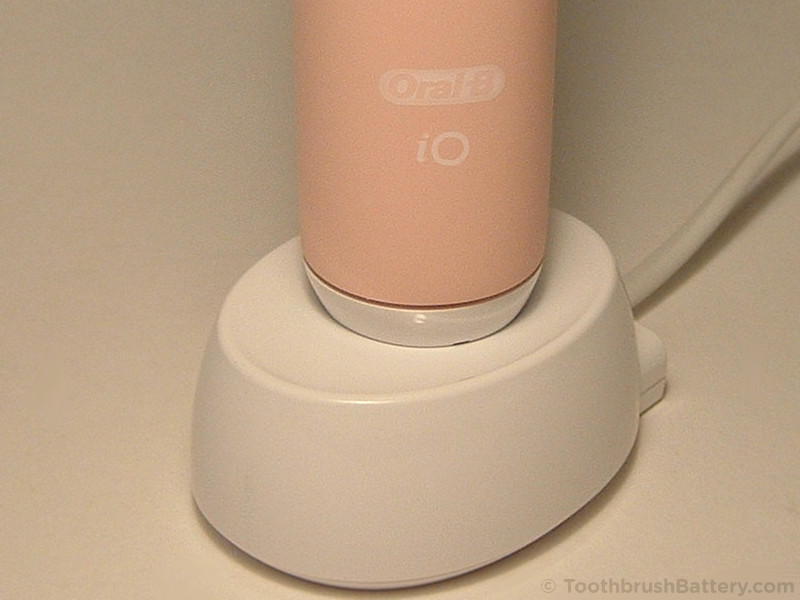
Bend the toothbrush back a little to create a gap and release the seal slightly.
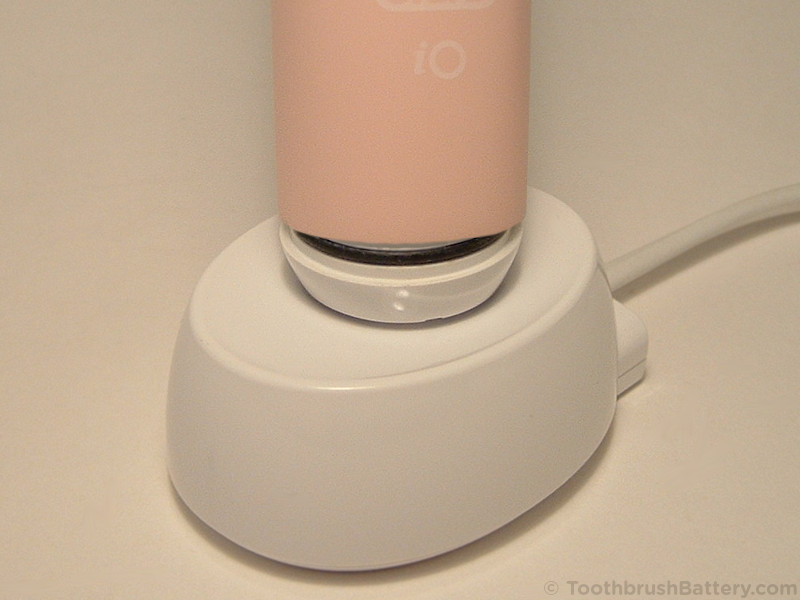
You can now lift the handle off the charger. The base cap might stay on the charger.
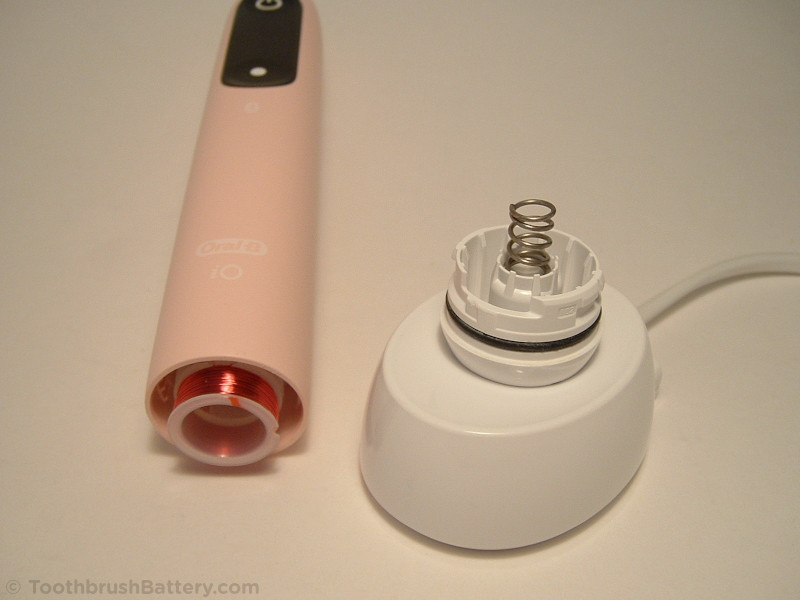
If the cap stays attached to the handle casing you can then pry the cap out by hand. Be careful not to lose the spring!
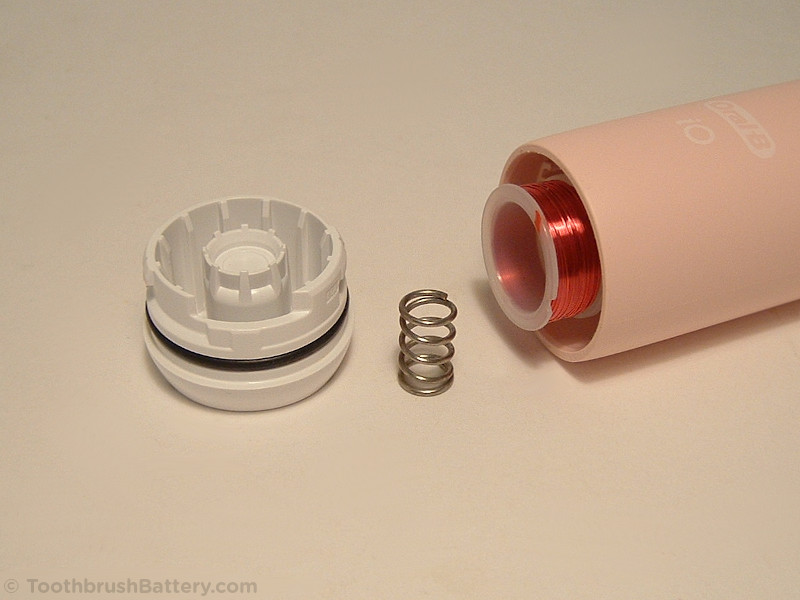
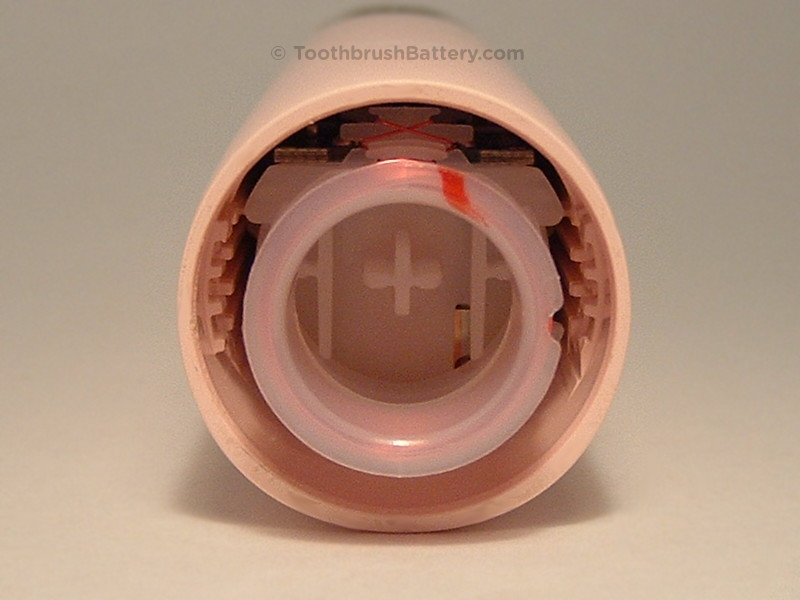
Holding the handle casing push the grey head connector down inside the casing. The grey rubber seal might fold inside the casing but this is fine.
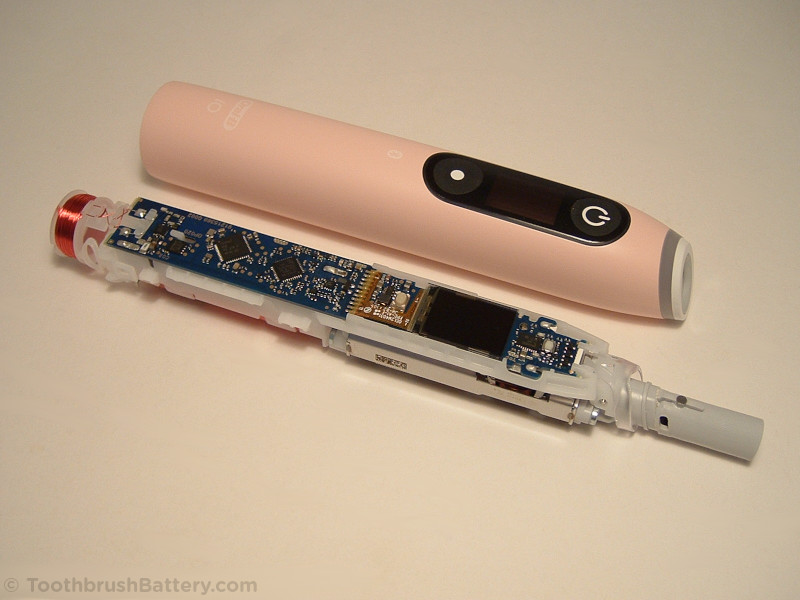
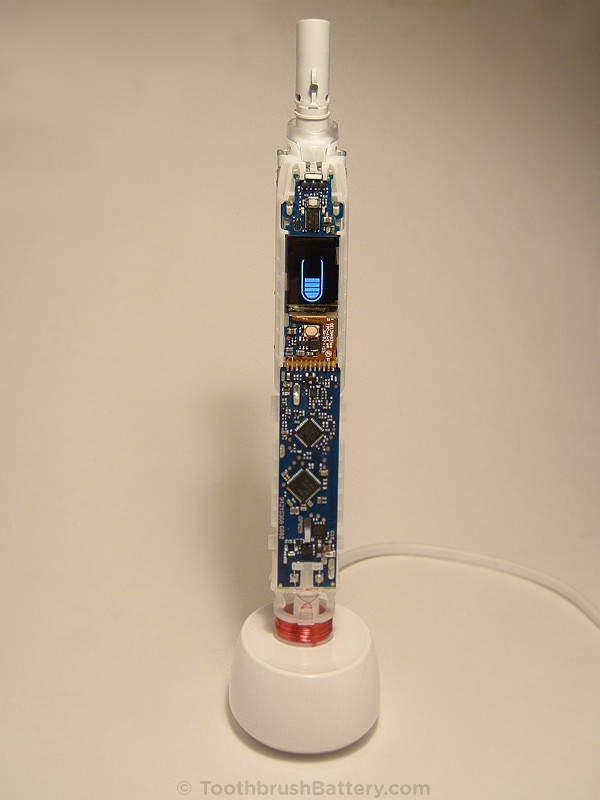
The internals of the toothbrush will start to emerge from the bottom of the handle.

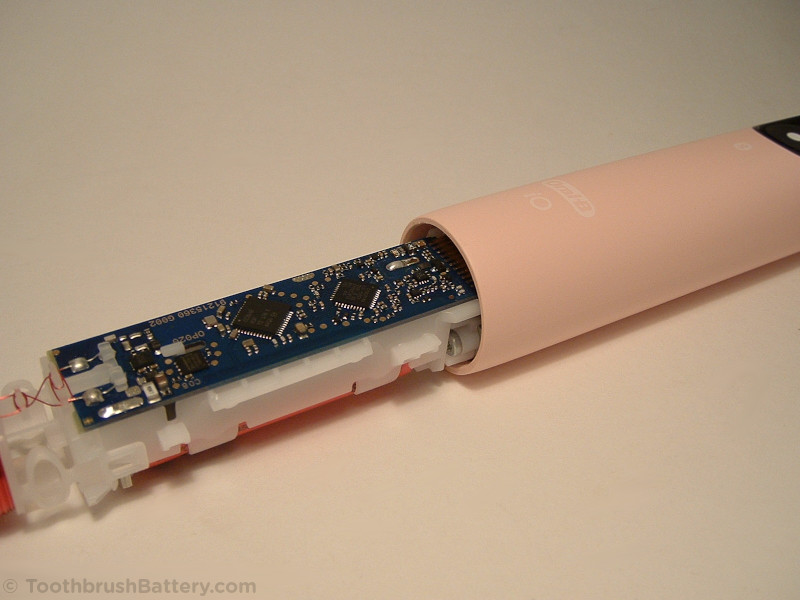
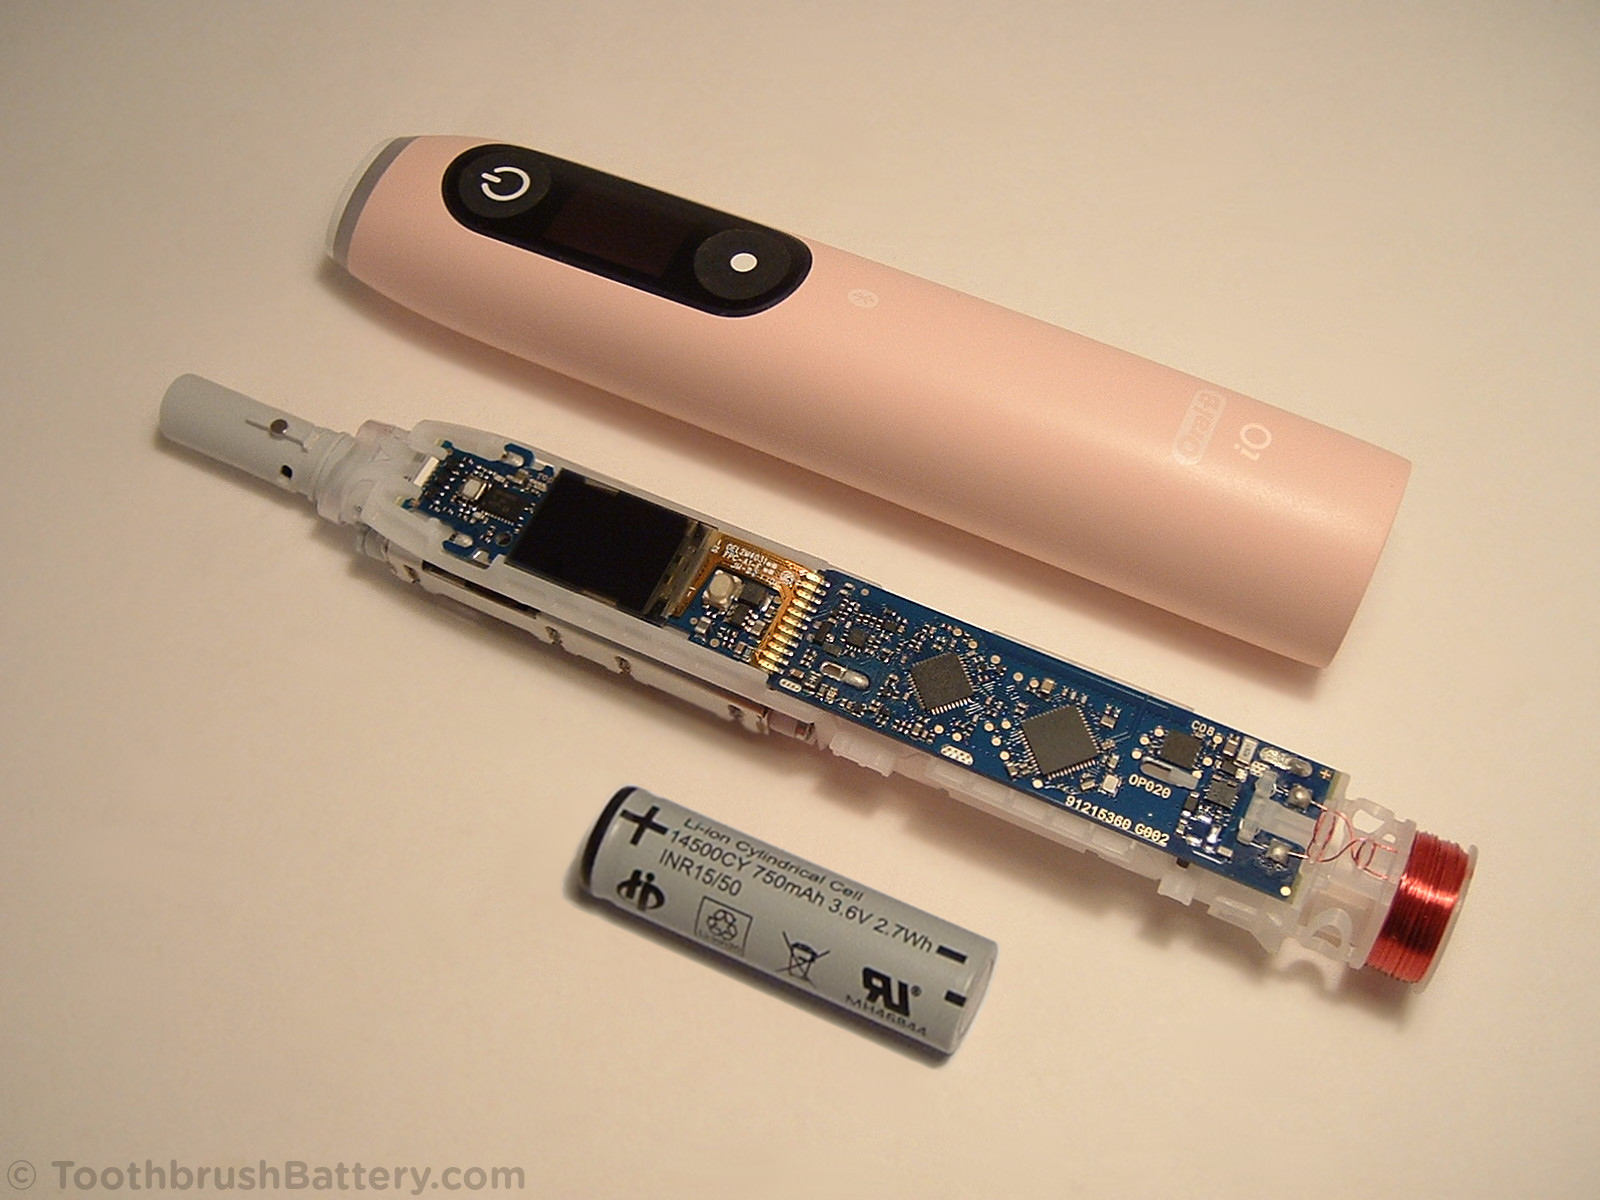
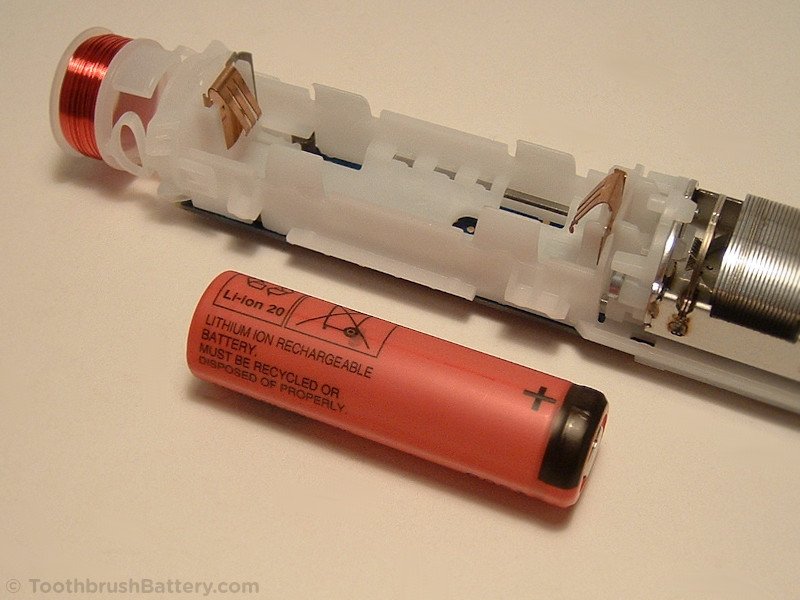
Below you can see the removed inner workings of your Oral-B iO series toothbrush:
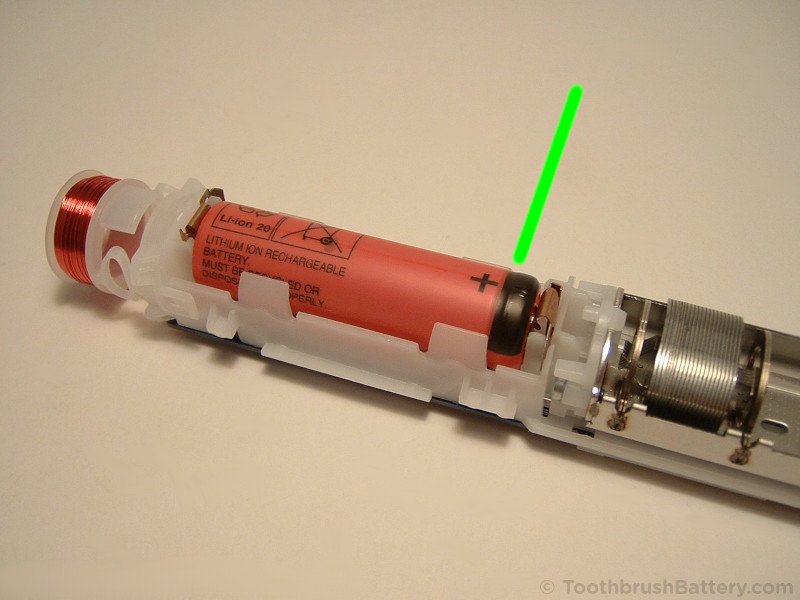
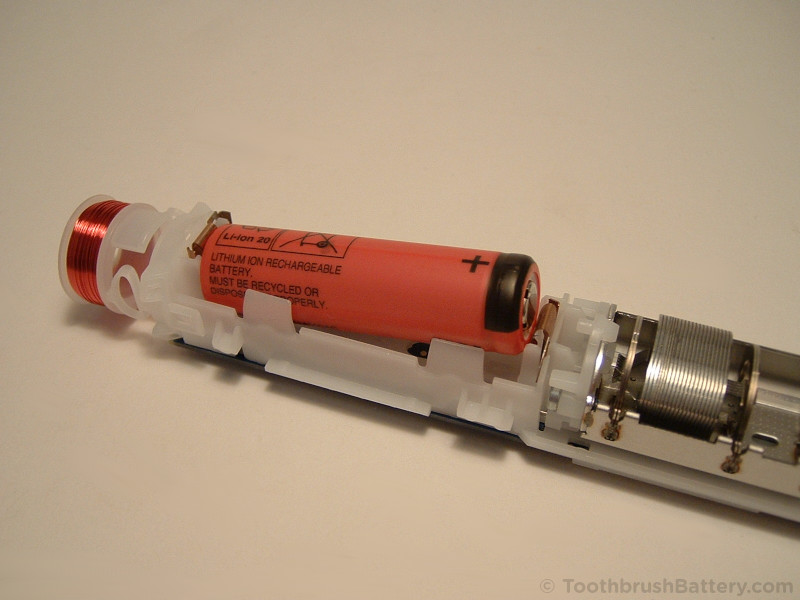
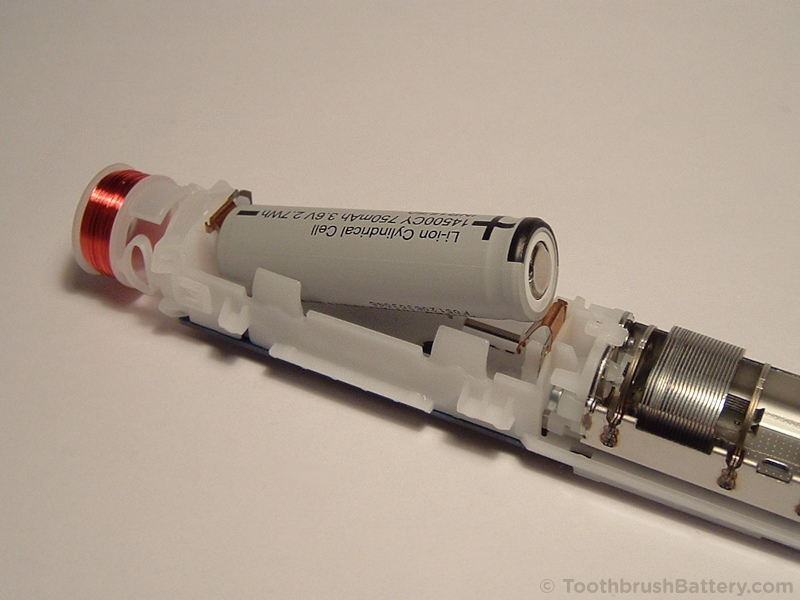
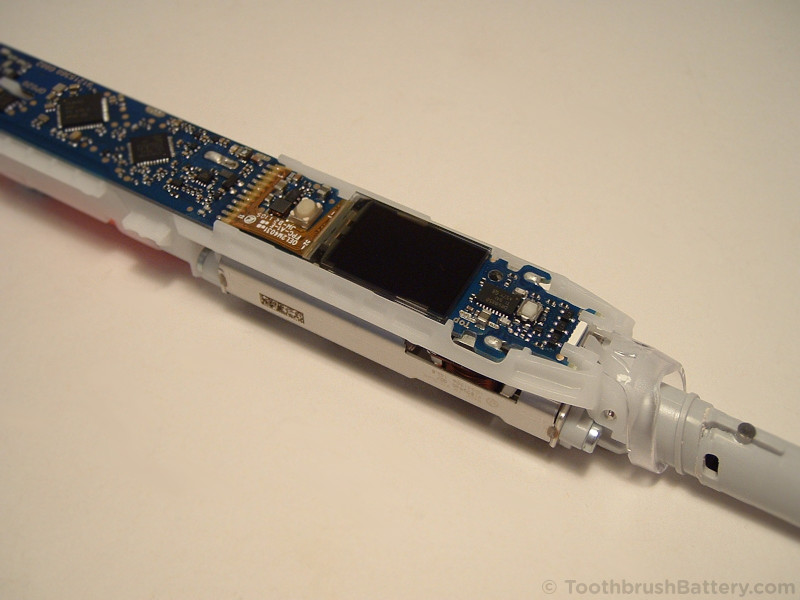
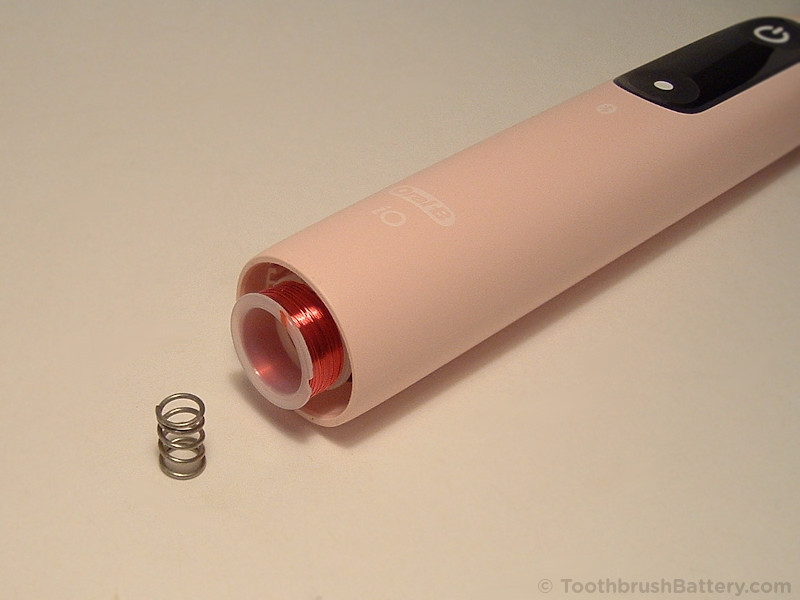
Turn over the innards to see the internal rechargeable battery in its holder.
Note the + sign on the battery indicating the positive end of the battery. There is also a groove around the circumference of the battery at the positive end, arrowed below.
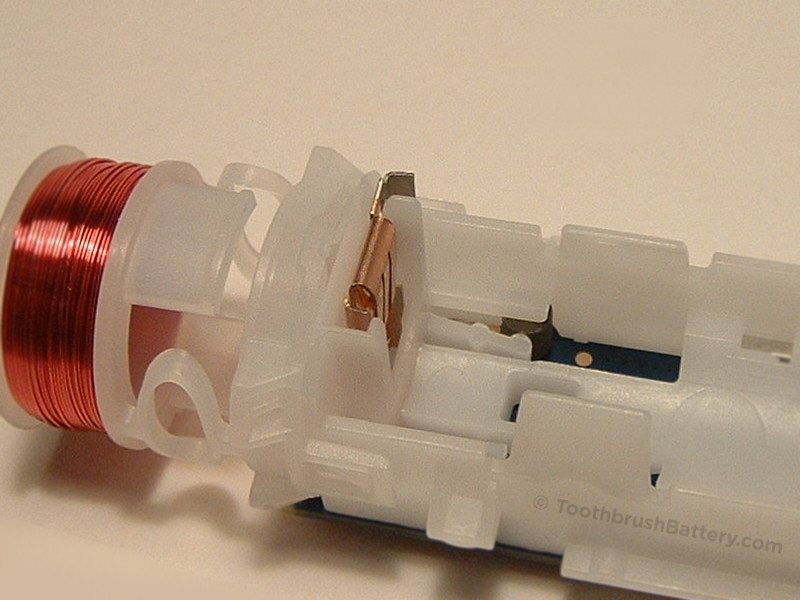
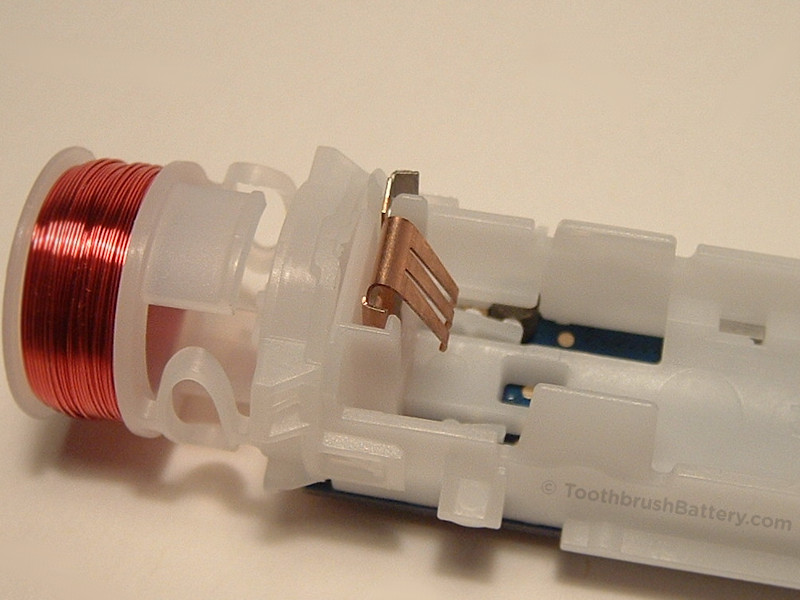
With the blunt screwdriver pry the battery out. There is a convenient gap in the holder at the side of battery near the positive end.
Note the + symbol moulded into the white plastic of the battery holder to indicate the positive terminal, arrowed below.
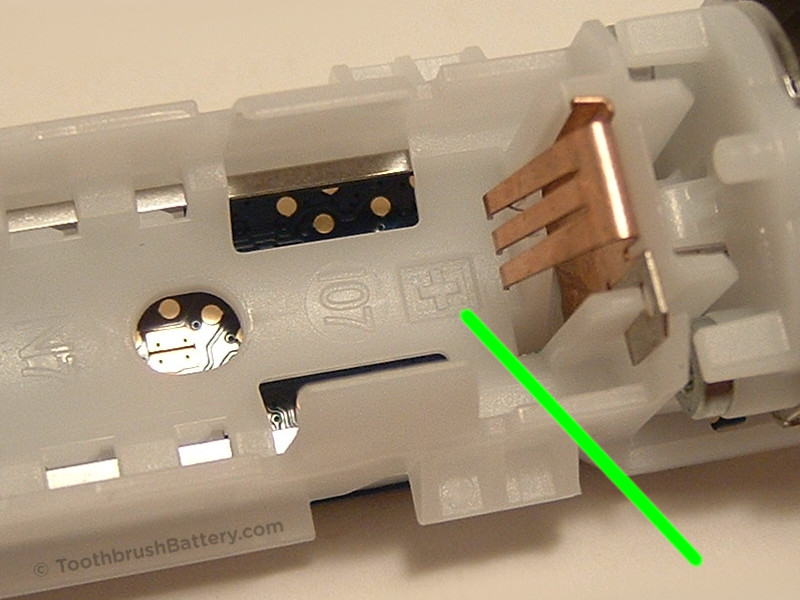
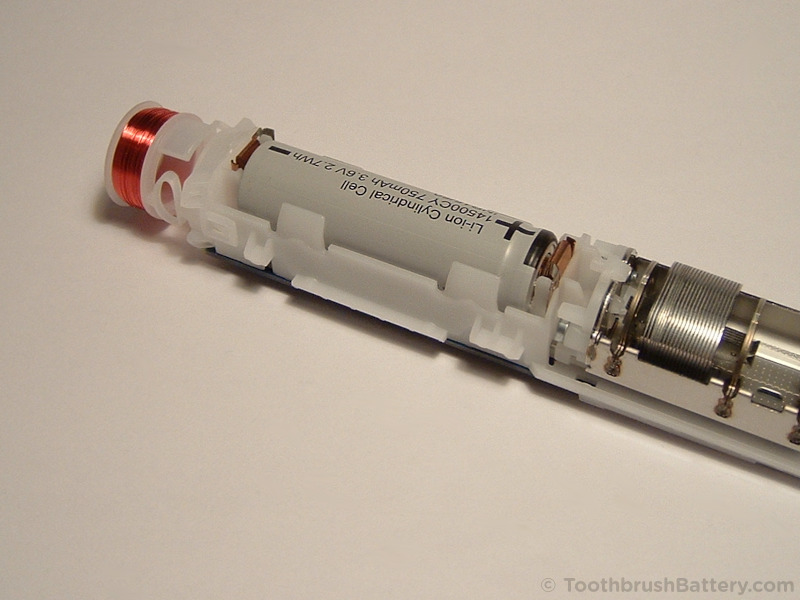
Check that the metal prongs of both sprung battery contacts are protruding into the bay of the battery holder. If the prongs have been folded back flat they will not make good contact with the battery. Carefully bend them out a little with the screwdriver as pictured below.
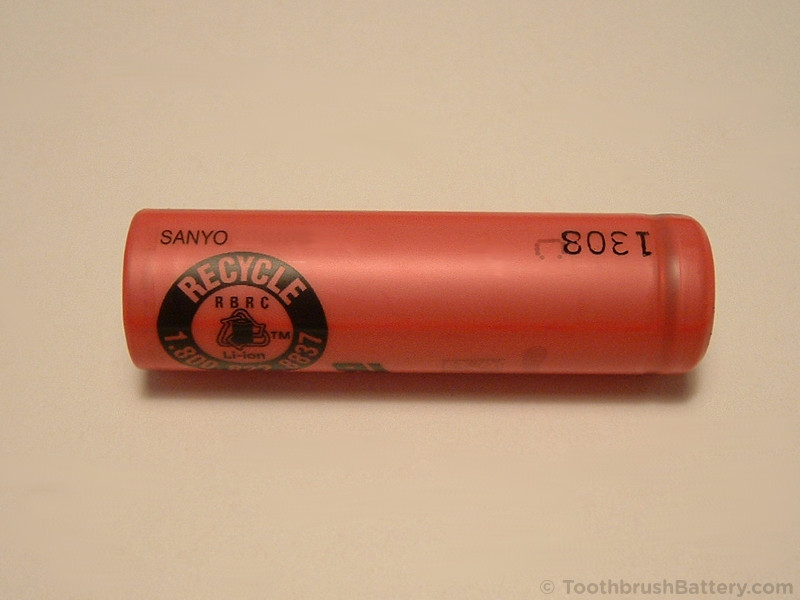
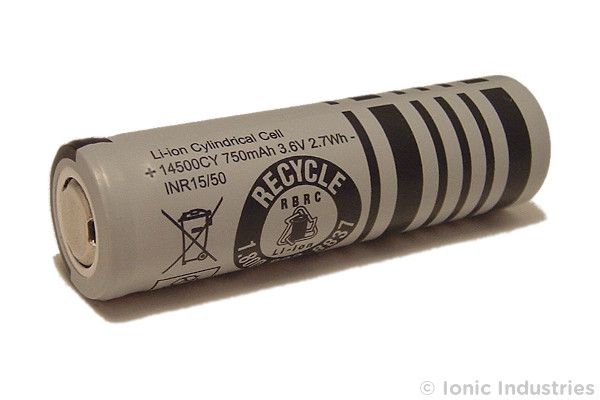
This battery is a 49mm long, 14mm diameter 3.6V Li-ion battery with a flat top made by Sanyo which are now discontinued. Your iO toothbrush might be fitted with the newer grey 3.6V Braun OE model of battery, part number 0602589724096. We recommend fitting this latest Braun OE battery for longer running time between recharges to iO3-iO10 toothbrushes. iO2 models use a different 3.2V battery which is not interchangeable with the 3.6V batteries. Please support us in writing these repair guides by buying your new iO battery from us via our Oral-B iO toothbrush battery shop page.
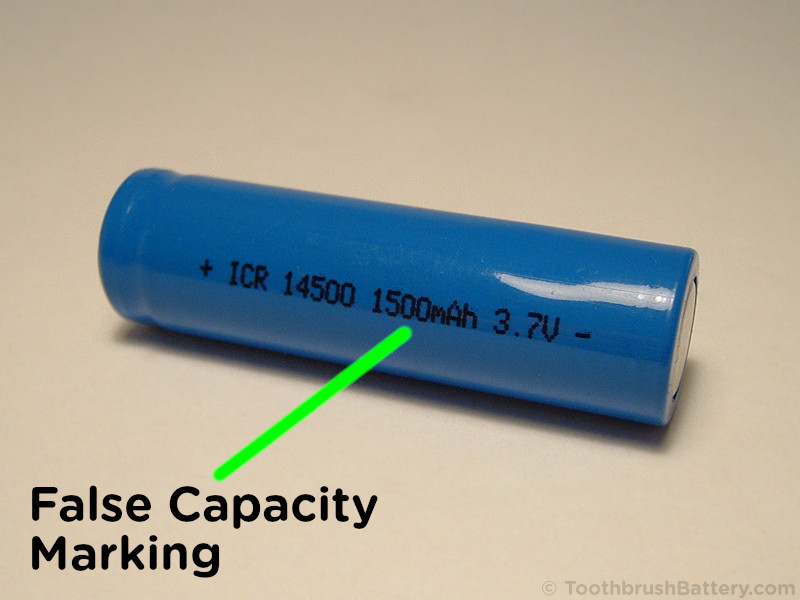
Only use well-known brands of Li-ion battery with a UL safety certification such as our Braun OE or Sanyo batteries for safety, reliability and long life. Batteries of this size from Sanyo and Braun have true capacities in the 600-750mAh range. There are generic/unbranded batteries available which claim huge capacities well over 1000mAh. These are false claims and no manufacturer makes a 49mm x 14mm Li-ion battery with a real capacity that high. The fake batteries can have a real capacity less than 300mAh when tested!
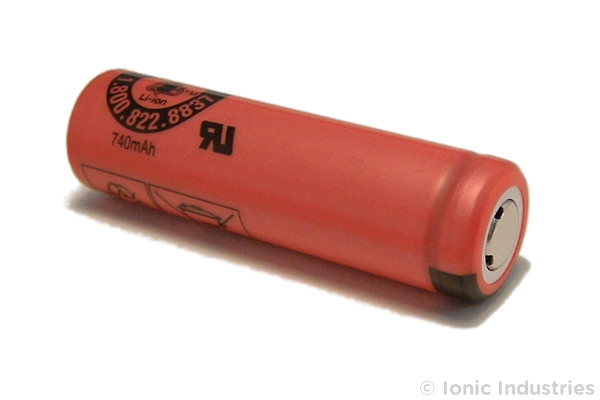
Genuine Braun OE 750mAh Li-ion batteries for iO3-iO10 toothbrushes, part number 0602589724096, are available from us at ToothbrushBattery.com here, or click on the picture below.
The older Sanyo 740mAh Li-ion batteries as shown below are no longer manufactured. They were previously available from us at ToothbrushBattery.com but supplies have now been exhausted. Unfortunately these Sanyos are now being counterfeited so be wary of anywhere selling them.
Below is a photo of an unbranded battery with a falsely claimed “1500mAh” capacity printed on it. No manufacturer makes this size of battery with a real capacity that high so avoid these unbranded fakes. This one had a real capacity of only 255mAh when we tested it:
Making sure to observe the correct polarity (+/-) for your toothbrush, insert your new Braun OE replacement battery in the battery holder. It is possible to install the battery the wrong way round so be careful to get this right or you might permanently damage the toothbrush’s circuitry.
You might find that the toothbrush’s LED or display lights up when you turn it over.
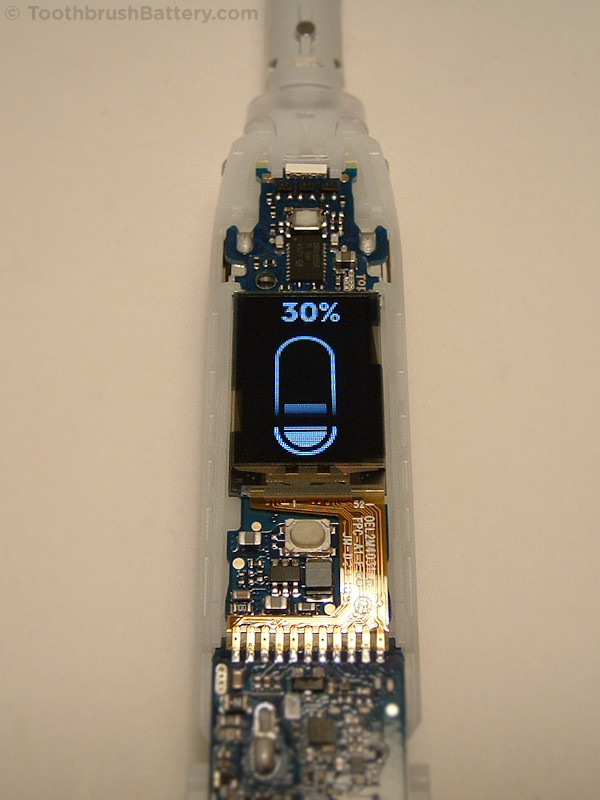
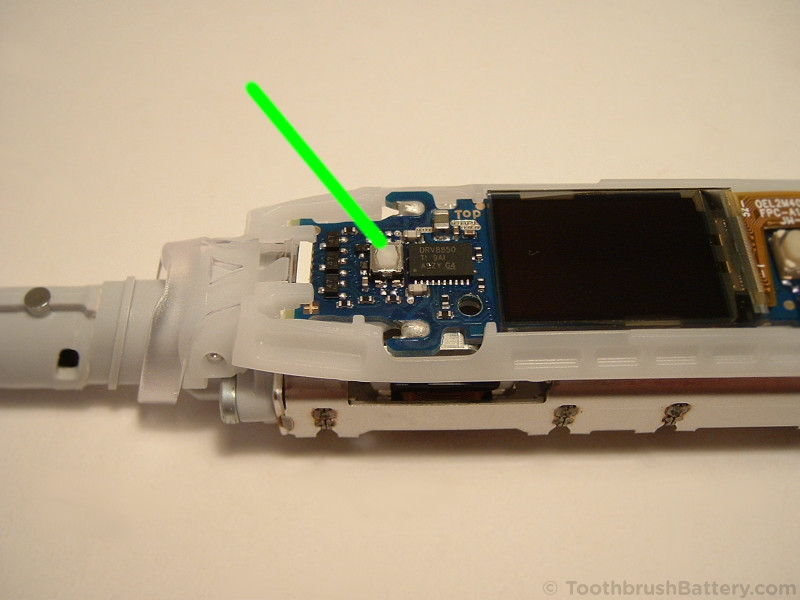
If the display does not light up then hold the brush securely at the sides of the frame and press the power button once (arrowed below) to check that the screen comes on and the new battery is working.
You can alternatively hold the internals on the plugged-in charger to verify that it wakes up if you wish.
Wait for the screen to turn off then check that there is no dust or debris on the screen as this might be visible through the outer casing after reassembly.
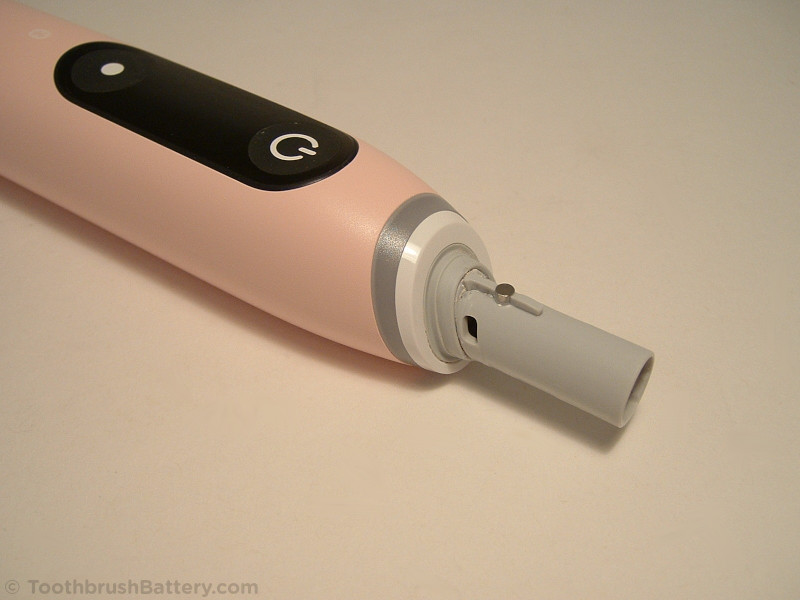
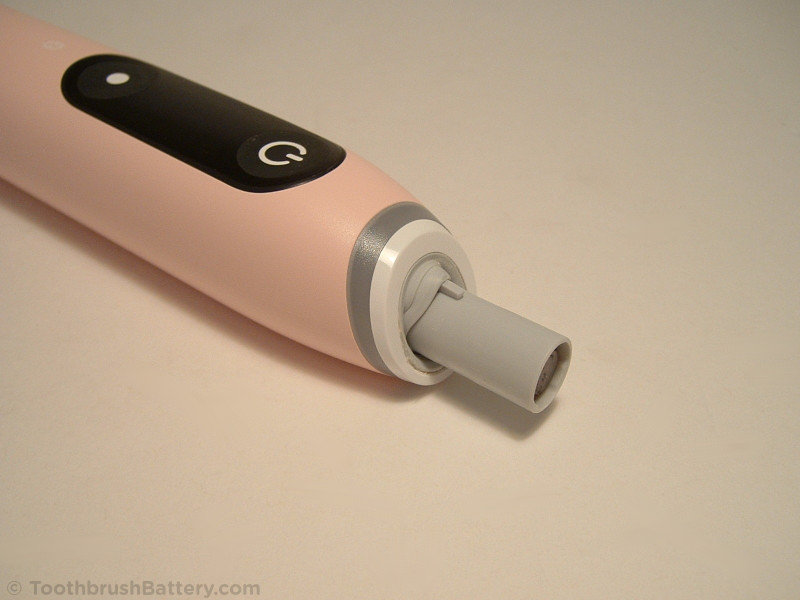
Slide the internals back inside the handle casing. You should not need to force it so if it does not slide in easily check the alignment of the internals within the grooves inside the casing.
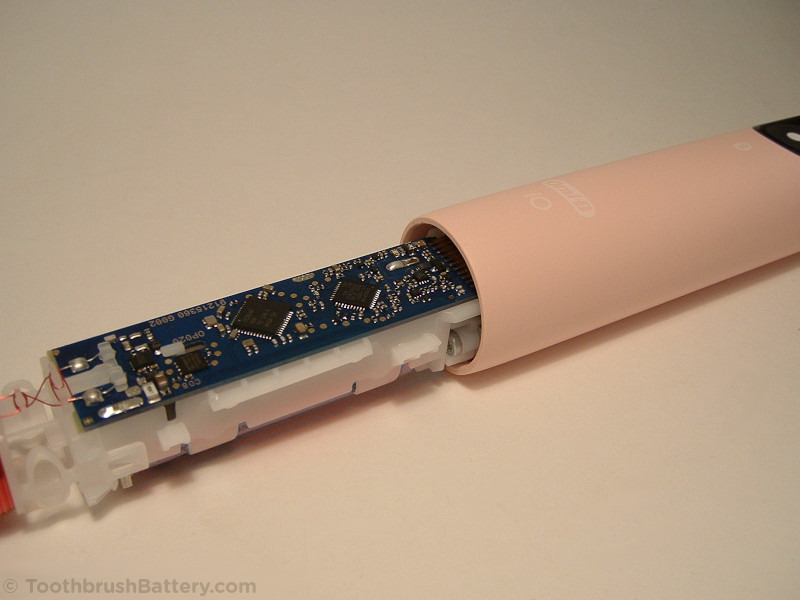
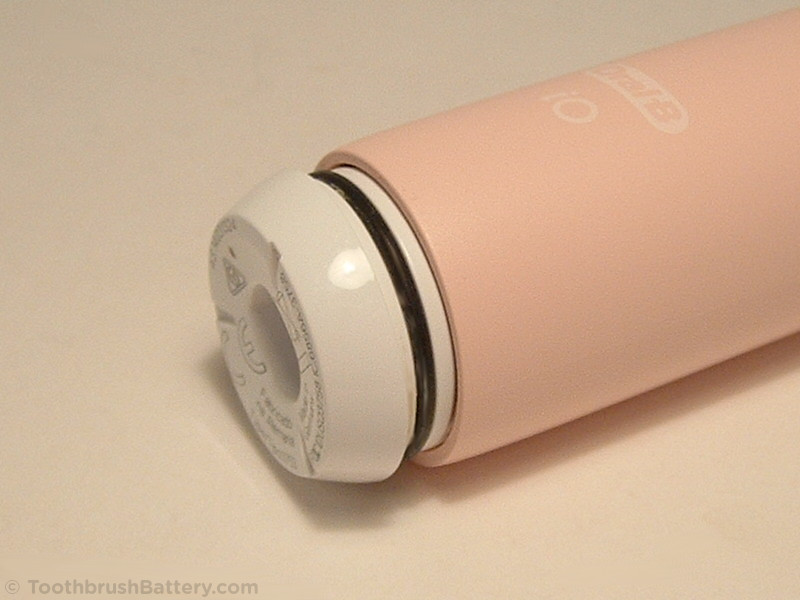
As the grey head-holder emerges through the top of the casing it should fold the grey seal out.
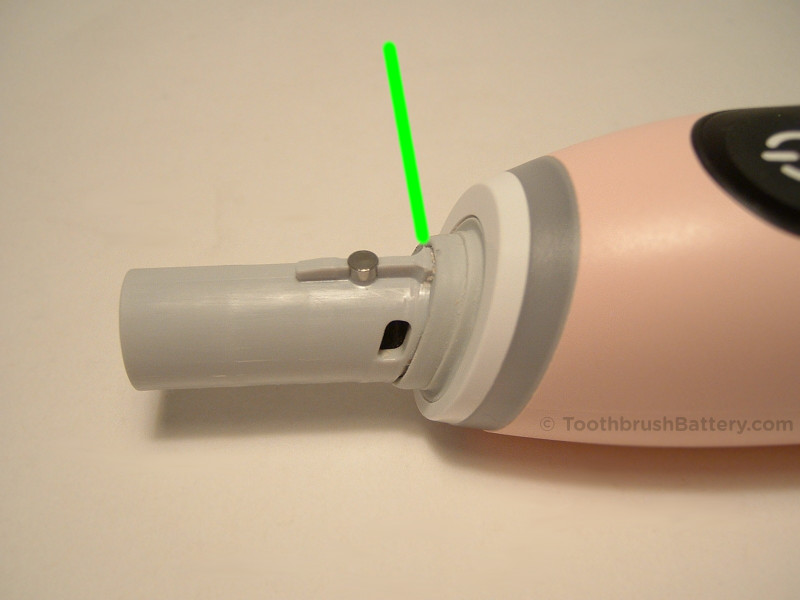
Make sure the grey head-holder is fully proud of the seal so you can see where the grey ridge widens towards its bottom, arrowed below.
Put the spring back on its + shaped peg inside the bottom of the handle.

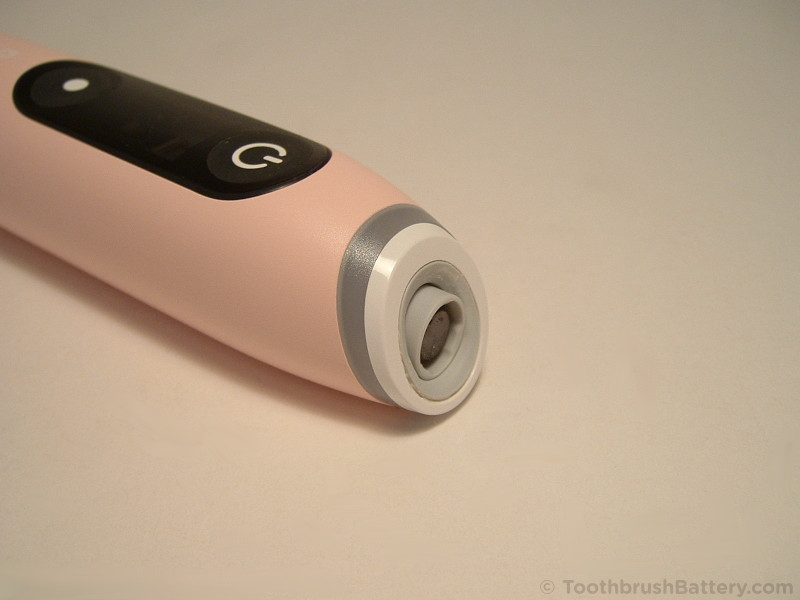
Partially insert the base cap back in place so the black seal is still visible. If you push it all the way in it might pop back off due to the spring pressure. Make sure you get the cap’s orientation correct. The printed “Li-ion” and “CE” text is rotated 45-degrees anti-clockwise.

Stand the toothbrush on its charger and push it downwards so the base cap is fully seated.
While holding the charger still, turn the handle 45-degrees clockwise to latch the base cap in place.
Plug in the charger to check that the toothbrush indicates that it has started charging.
Finally, clip the metal ring back over the seal. Position the back of the ring first then clip the front edge in place.
You now have a fully repaired Oral-B iO toothbrush!
Give your brush a full charge then it will be ready to use.
Please recycle your old battery. It is safest to put sticky tape over at least one end of the battery to avoid short-circuits. You can then take it to your local supermarket battery collection point or civic recycling facility.
Please leave any comments, questions or suggestions about this Braun Oral-B iO toothbrush battery replacement guide below. Happy brushing!
Frequently Asked Questions
Yes you can replace the battery in every Oral-B iO toothbrush, including the iO2, iO3, iO4, iO5, iO6, iO7, iO8, iO9 and iO10 models, without any specialist tools by following this guide. It shows how to open up your iO toothbrush handle and replace its internal rechargeable battery.
The 3.6V 49mm x 14mm size Li-ion replacement battery required for the Oral-B iO series has part number 0602589724096 and fits the iO3, iO4, iO5, iO6, iO7, iO8, iO9 and iO10 toothbrushes. It is detailed in the Tools, Parts and Equipment section of our guide above. iO2 models require a 3.2V battery instead.
Yes take a look at our list of toothbrush battery replacement guides to see how to replace the battery in various models of electric toothbrush.
Many thanks for your guide… very informative. Our 7 month old Oral B io just stopped working but was still live but with the white light beneath the power switch flashing rapidly. The receipt is unfortunately lost, so thinking this was a battery issue I dismantled it and replace the battery which I bought from you (arrived this morning) and is identical to the original Sanyo battery.
Unfortunately this did not repair the problem and the symptoms are the same. There is no obvious fault on the circuit board and no corrosion to be seen – everything seems brand new. Any help you can offer gratefully received. The model number is 3794
Even without the receipt you might still be able to return it to the shop you bought it from as faulty, if you have the bank/card statement. Otherwise the UK service centre for Oral-B (Olympic) might still repair it under guarantee as they can tell its age from the serial number.
Followed the instructions including soaking in water but turning toothbrush on the oval charger base does not work. It just does not turn at all. Is there anything that can help to release the base so I can change the battery?
The joint between the base cap and the handle body might be caked with toothpaste so if you can scrub this out it might let you turn the base cap. Otherwise you might have to resort to tools. Do use padding/cardboard/tape to prevent too much marking of the plastic.
I had the same problem, the base doesn’t seem to turn, and the hole has now snapped a little bit so I cant use it to turn. What can I do?
You might have to resort to using tools such as adjustable grips e.g. water pump pliers. You can protect the plastic to some extent by taping thick cardboard around the edge of the base cap.
instructions are simple and effective , toothbrush came apart after a hot soak , unfortunately using a battery tester , the battery was fully charged . reinserted the battery and tested for power at coil at the head of the toothbrush .Result was no power however the button was pressed so must be circuit board . my io 4 is around 14 months old and I don’t have the receipt what are the chances of repair
If your battery tester is for standard 1.5V AA batteries it will give a false reading when a high-voltage Li-ion battery is put in it. A healthy Li-ion cell will be over 3.0V when empty and just over 4.0V when full.
You might find that your toothbrush is under a 2 year guarantee. If you contact your regional Oral-B service centre they can normally tell you from the brush’s serial number if it is under guarantee still.
Thanks for a very useful guide, and also for the info on the differences between genuine and poor quality batteries. I have ordered a battery today from you.
Glad to hear the guide was useful, and thank you for your order.
Let us know how the repair goes!
Guide was great,but after I installed new battery, put it back together, it’s not working?…
Make sure the battery is installed with the correct polarity (+/-) then give it a 24 hour charge.
Thank you for the very clear instructions.
Following a full charge the toothbrush kept going off with the low battery -red light flashing. After removing the original battery (740mAh), testing with a multimeter is showing 3.91V. Does this mean battery is ok?
3.91V indicates a Li-ion battery that is nearly fully charged. The low-battery light could indicate a fault with the internal circuitry. Are there any signs of water ingress such as staining on the PCB or rust?
Doesn’t appear there has been any water ingress. Probably circuitry issue. Toothbrush is 3 years old – so unfortunately no warranty.
Absolutely chuffed with this guide! Bought an iO7 a few years back and the battery was only lasting about 30 seconds, not great from a £££ toothbrush. Bought a battery from you, followed the guide (which was super easy) and it’s like new again! Thanks so much!
Fabulous!!! Thank you
Really pleased with this guide. Bought a new battery for my iO8 toothbrush from you, it came the next day. Followed these instructions which were really easy to follow and now toothbrush works like brand new,. Thank you, saved me some money here from buying a new iO toothbrush
Hey guys, replaced my battery – everything was working well but after a few days my screen stopped working. I miss that smiley face 🙁
Do you have a source for these batteries in the US? Your article was very informative, but the on brand batteries are very hard to find here.
Yes, use the link to Ebay.com on the iO battery description page for sellers who can ship to the USA.
I bought an oral-b io from Costco September 2023 . Now not working . Charging 24 hr no light on.
Open up the handle and check for signs of water ingress, e.g. rust on metal components; or staining, corrosion or crystal formation on the circuit board.
I replace the battery but it can’t wakes up, How can I do ?
Assuming the battery is reading above 3.0V, put the brush on to charge for a few seconds and it should wake up. If it is not functioning after an hour on charge then there is likely to be a fault with the PCB in the toothbrush.
Thanks for the info.
My 2020 Oral B iO is stuck. Only shows the animation of “iO” and sometimes the sun.
I have removed the battery and see that the voltage is 3.9, so I think it is not the problem.
Do you have any idea?
Thanks in advance!
The battery sounds healthy. Are there any signs of water ingress inside the toothbrush such as rust on metal parts, or staining and crystal formation on the PCB?
No I can’t see nothing wrong inside.
Perhaps contact your national Oral-B service centre to see if it can be repaired under guarantee, or return it to the shop you bought it from.
Thanks. It’s not under warranty. They told me that they don’t repair nothing. Only change the device or the charger.
I hvae just bought another one. The charger is not the problem.
Hi, did you manage to fix the toothbrush in the end? I have the same issue, the screen seems stuck 🙁 Thank you!
I have replaced the battery too as I thought that could be the issue.
Thanks a lot for the guide, I have a IO 9 and it all seems crystal-clear that way how to replace the battery.
Just one question as you offer 2 different batteries from Sanyo and from Braun: Which one is needed in which case or is there any difference between them?
The two different brands of iO battery are interchangeable and there is no noticeable difference in capacity between them. The choice is yours!
Hi, I fail to open it and I found the key and the slot at the cap / charger were snapped.
What else I can do with this?
Thanks for advise.
If you protect the base cap with some tape you could then use grips to turn the base cap.
Do you know where can I find the display? In my IO 9 toothbrush the display is broken
Is the display physically cracked or damaged? If not, it is probably a loose connection or water damage on the PCB.
I have burnt through electric toothbrushes at a rate of knots. Every 18 to 30 months they give out. My current io I claimed on the 2 year warranty, they repaired it and 12 months later the battery has gone yet again. I just can’t work out what I’m doing wrong. I mush have gone though 5 electric toothbrushes of all major brands in the last 10 years. I’ve even had one that started to turn on by themselves in the middle of the night.
Will give this repair a go myself.
Are you aware of any common mistakes that lead to reduced battery life I could be making?
Have a look at our toothbrush care tips to extend the life of your toothbrush and its battery.
My iO6 is about 3.5 years old and has been dying after about 7 uses for the last year at least, with battery indicator at about 50%. The toothbrush used to last about 2 weeks on a full charge. Would a new battery correct his problem?
Possibly. The first thing to try is to fully charge the toothbrush, then remove the battery for 10 minutes. Reinstall the battery and the toothbrush should now behave correctly. If the battery is still running down after only a few days then a new battery might help, assuming there is no internal water damage to the toothbrush.
Thank you! – will follow your advice.
I can confirm that following the advice provided has solved the problem. Thank you very much!
A great guide.
Your suggestion to fully charge then remove the battery for 10 minutes restored my Oral-B to like new performance. Thank You!!!
I cannot seem to locate anywhere in the product packaging or documentation nor on the Oral B website what type of battery chemistry the Oral B iO2 toothbrush has. Have you any knowledge on the subject to share?
The iO2 toothbrush (Type 3770) has the same Li-ion battery as the rest of the iO series. Details are near the top of this guide in the Tools, Parts & Equipment section.
Hi, followed your guide and it helped. Thanks.
Just wondering if the battery % is still accurate if the battery capacity has changed. Thanks
The toothbrush’s battery level meter will still be accurate after a new battery is fitted. If it is not spot-on, it will recalibrate itself after a full charge then full discharge of the battery through using the toothbrush.
What an excellent guide! Very straightforward, and accurate. I used it to remove my battery from a 3-4 year old, iO series (type 3794) toothbrush which had stopped charging properly. It was odd as it was holding 5% according to the phone app; so would brush properly for 2-3 minutes. Putting it back on charge, it would later work for another 2-3 minutes but no longer.
I followed your advice, removed the battery to ensure the right type. My volt meter also showed the battery as only 3.45 volts, so a depleted battery. Having noted this, and then cleaned everything up, and replaced it (I also checked the connectors weren’t flattened). My brush is o now charging correctly, and fully working once again.
I completely agree with you, that having used your guide I am very happy to support by buying my replacement battery from you – but will delay just until the need arises (I’m guessing I have just been lucky, but the current one may not last long all the same.) I have also looked at your other batteries, and will come to you should I be looking for any similar appliance needs.
Many thanks to you, my order will follow one day!
Hi, I have a IO-B Type 3794
Problem: trying to turn off yellow ligth, (different versions of button press), now the handle won´t
turn on again. No reaction whatsoever.
Battery is OK, fully charged 3,9 v.
No charge indicator.
This sounds like possible water ingress. Inspect the internals for staining, corrosion and crystal formation on the PCB. Remove the battery and let the internals dry out for 24 hours.
AO21350925 Type 3794
After externally charged the battery, the power led blinks very dimmed at a rate of approx 2 blinks per second.
So the handle is not totally dead !!
Hi,
my IO3 randomly died, swapped batteries with io9 and it isn’t the battery.
no water marks/stains on pcb or crystals, but it just will not turn on.
Does the toothbrush show that it is charging either immediately you put it on, or after an hour sat on the charger?
Type number : 3770
The Type 3770 toothbrush is the Oral-B iO2 model and you can use this guide to open it up. We’ve updated our guide to mention the iO2, so thank you for the reminder!
Hi done the battery change as described here… thank you.
Apologies if I’ve missed it along the way are the top rubber seals available as my wife’s has perished it is a type 3758
Spare parts for Oral-B brushes are hard to come by, but you might be able to use some flexible glue or silicone sealant to fix the seal.
I’m having difficulty locating a Sanyo or Sony battery for my Braun io toothbrush Type 3768. Do you know where or if one is available? Thanks
What country are you in?
After my IO 4 died and would not charge I took it apart as per your instructions here and I’ve found quite a lot of water inside the brush, surprising for a waterproof brush. I waited a day for it to dry and then put the original battery back and now I see a faint white light blinking at the power button and still would not charge.
Thanks.
It sounds like the water has damaged the circuitry unfortunately.
My io model 3758 stopped working. I just open up the toothbrush following this guide and I can see rust around the battery terminal and on the metal plate on the back (behind the circuit board above the screen). Does this mean changing the battery won’t work?
After letting the internals dry out overnight, does the original battery now charge to 100% and then run the motor to some extent?
No, nothing is happening at all when I try to charge. There was some corrosion on the battery so maybe this is why. About a week ago the toothbrush started turning on randomly on its own and it was difficult to turn off. Then it stopped working entirely
This sounds like water damage to the circuitry.
Thanks for the guide! Everything was very easy for my IO9 – the battery was easy to order.
It took me around 5 minutes to get it done, I recommend being careful not to bend the metal ring in the first step, as it felt pretty frail.
The bottom requires far more twisting force to loosen up than I’ve expected. Do not use your teeth, it uhh, doesn’t work and you’ll scratch and damage the bottom. Get some pliers or a tool that can grip in some capacity and a paper towel, fold the paper towel a few times and use it to protect the bottom part from getting bent / scratched.
It’s very easy from there, just pop the old battery, it’s clearly marked which side is + and which is – pop the new one in and check if the display lights up.
After you’ve slid the body back in comes the hard part – placing back the metal ring and the bottom as they feel like they’re not as cooperative anymore. For the bottom just do your best, if it looks like its 98% of the way in there it’s good enough. For the metal ring I just put the top part in my mouth and used my teeth to gently push it from both the front and the back – as pushing from only one side doesn’t really work.
Good luck! It’s very satisfying making simple repairs like this instead of just buying another 200$ toothbrush that worked great until the battery went out.
The guide is fantastic overall, it’s very difficult to go wrong if you’re careful and patient.
IO 9 AH03551945. IC6856A -3758
USQ3758.
So these are the number on the end cap that I’ve damaged due to being so difficult to get off I had to use a wrench
Is there anywhere that I can buy new caps I think I’ll buy two just in case I need to change the battery again
Hello,
did you find where to get those end caps? I have been looking for some as well without much luck
Thanks, I had io-9, it was very expensive and after years of use the battery lasted barely 1 wash and decided to try this guide out. I was little hesitant and scared to do it but in the end it took less than 5 minutes and was so easy all thanks to this guide! I had different type of charger so I used this plastic tool you use to open mechanical watches to open the bottom. Thank you so much!
Good to hear that the guide was useful! For the flat, round type of charger you can use the bottom of the charger to open the toothbrush handle. The three lugs engage with the notches on the toothbrush.
I bought an IO about 3 years ago, a full charge was lasting less than a week so followed your incredible useful guide and ordered a sanyo replacement battery. Getting the base of was a nightmare, I even wore down the 3 prongs on the bottom of the charger, fortunately someone posted a 3d printed model on Makers World, so had one 3D printed. I soaked the base in hot water…nothing. Reported to running a stanley knife in the gap between the base of the toothbrush and the body, then using a small screw driver managed to free it up – it was caked in old toothpaste.
I replaced the battery, making sure the flattened prongs were elevated again and placed it on the charger, the IO logo appeared, then nothing! No flashing light.
I fear I must have gone wrong somewhere. Have you come across this before?
Thanks again for your guides, just the right amount of detail.
Hi Blair, assuming the new battery is installed with the correct polarity (+/-) it might take a few hours of being on charge before the toothbrush recognises that a new battery has been installed. Also check that both copper wires from the charging coil inside the bottom of the toothbrush are unbroken and are still soldered to the PCB.
I bought two Braun batteries from you that arrived promptly next day. Followed your guide which was very straightforward and now have two IO 3769 that are working again. I used my little tools for tightening screws on glasses, perfect size for this job. Very pleased, thank you!
Hi I lost that metal ring on my io .. do you know where I can buy a new one?
Nice guide. Thank you. Worked very well and super easy. Beats the old soldered replacements for sure. I appreciate your write up.
I chamge the battery but it won’t work. I did everything according to instructions. No luck.please somebody help.
What symptoms did your toothbrush have before you changed the battery? How long did it run for on a charge, what lights were showing and what was on the display (if fitted)?
Hi, changed the battery and is working. But is not charging. I checked the PCB and I can’t see any rust on it. From other comments here I saw you posted it needs to be in the charger for longer to recognise the new battery. How long is that?
Thank you!
If the motor runs when you switch the brush on then charging should be instantly recognised. One of the wires from the induction coil of wire at the bottom of the handle might be broken along its route to the PCB. Alternatively, water ingress might have damaged the battery management/charging circuitry.
In that case, can I recharge the battery as a normal rechargable AA battery and put it back in the toothbrush?
No, these are not ‘normal’ AA batteries and must never be put in standard battery chargers for Ni-MH or Ni-Cd batteries. If the battery management/charging circuitry in the toothbrush is faulty then this can potentially destroy a healthy battery. If your brush is out of its two-year guarantee then it might be worth you seeing if one of the toothbrush repair options can diagnose the fault with your brush.
Hi, I have followed your guide with out any problems, the base came off nice and easy.
Inserted the new battery, pressed the button, the IQ logo came on briefly, but nothing else showed on the display. The unit has been on charge for about 90 minutes, but no change.
Hi Shel,
If the toothbrush won’t run at all after a few hours on charge then it could be faulty circuitry in the toothbrush. Are these symptoms similar to those that your toothbrush was exhibiting before you replaced the battery?
This was very easy and worked for me on my io7 and the tip about soaking the handle end to soften the crud was very handy! One note about the battery – unlike the pictures it had an almost imperceivable, microscopically small ‘+’ symbol. Not sure why surely that should be the main thing to label clearly…. Anyway, working toothbrush now and saved a fortune buying new or sending for official repair (was already replaced under warranty once for same issue but has expired now)
Type Oral b io9 series
3758
The toothbrush has started to loose its charge, and needs a battery replacement.
Many thanks
Hi Dean, you can follow the guide above to open your iO9 toothbrush and replace the battery inside it. You’ll need to use the 3 protrusions on the bottom of the charger to grip the base cap of the toothbrush and turn it.
Troquei a bateria conforme o guia , a escova ligou e acendeu a luz azul mas o motor não funcionou. Removi algum zinabre no circuito elétrico . Antes de tudo a escova ligou sozinha num certo dia quando começou a ter problemas de desligar repentinamente durante o uso e logo a seguir começou a dar problema também no carregamento da bateria.
Yes, water damage can cause the toothbrush to switch on and off on its own.