
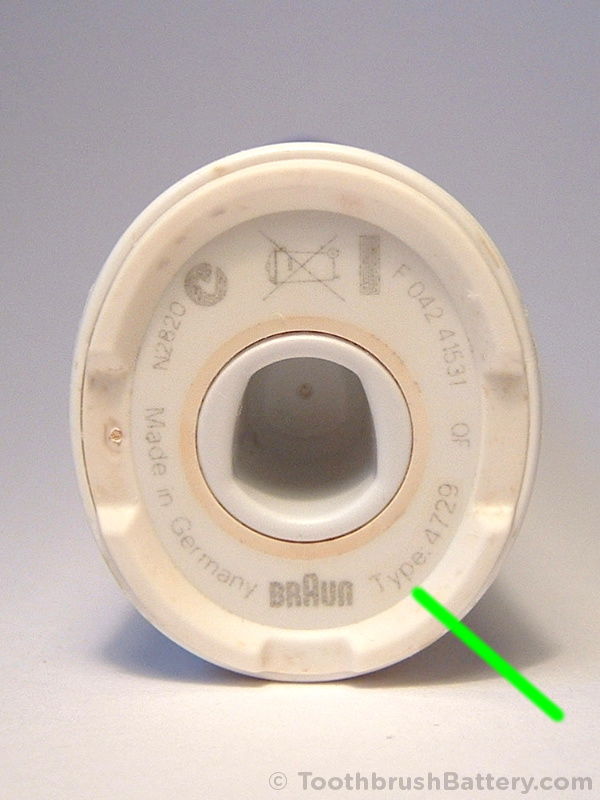
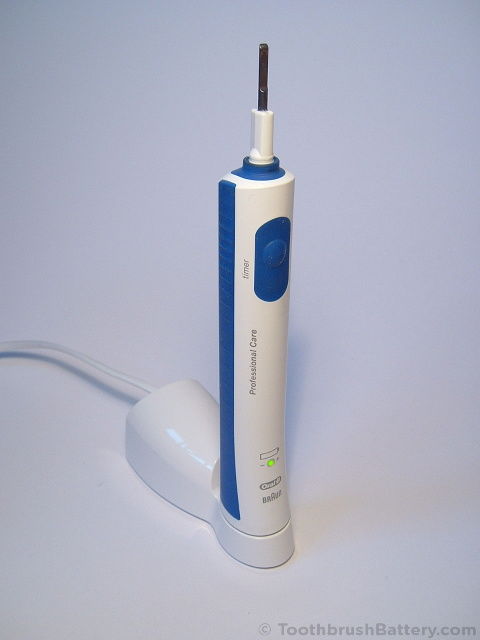
This guide will take you step by step through how to open and dismantle the Braun Oral-B Professional Care Type 4729 electric toothbrush then repair it by replacing the internal rechargeable battery. The guide may also be applicable to similar models including the Type 3746. The type number of your brush is marked on the bottom of the handle.
For other toothbrush models and type numbers the battery replacement procedure is slightly different so please see our other guides to toothbrush battery replacement instead.
The basic method is:
- Dismantle handle
- De-solder circuit board and old battery
- Solder in new battery (2 sizes available)
- Reassemble handle
This is documented in detail below along with lots of photos. Click on any photo to enlarge it.

Video
We have also created a short video from this guide to Braun Oral-B Type 4729 battery replacement on our YouTube channel, which you can also watch below.
Disclaimer
Any damage to yourself, your toothbrush or anything else is entirely your responsibility. This guide is for professional, educational purposes only and is offered without guarantee or liability.
Tools / Parts / Equipment
- Braun Oral-B Triumph Professional Care Type 4729 toothbrush
- Original recharging base
- Soldering iron: Fine tip, electronics grade (about 18-25 watt)
- Solder: Lead-free silver solder is great for this
- Solder sucker (also known as a desoldering pump) and/or desoldering braid/wick
- Scissors
- Craft knife e.g. scalpel, snap-off, retractable or Stanley type
- Small flat-bladed screwdriver: 2 to 4mm wide
- Replacement battery with solder tags. Either:
- 42mm by 14mm 1.2V NiMH, (support us by buying here at ToothbrushBattery.com), or
- 42mm by 17mm 1.2V NiMH, (support us by buying here at ToothbrushBattery.com)
How-To
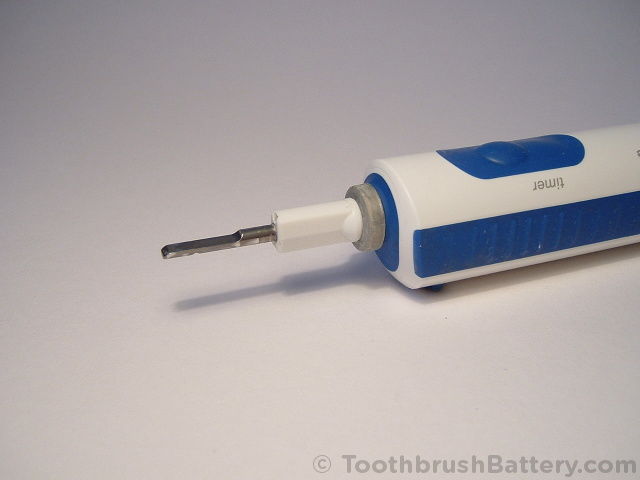
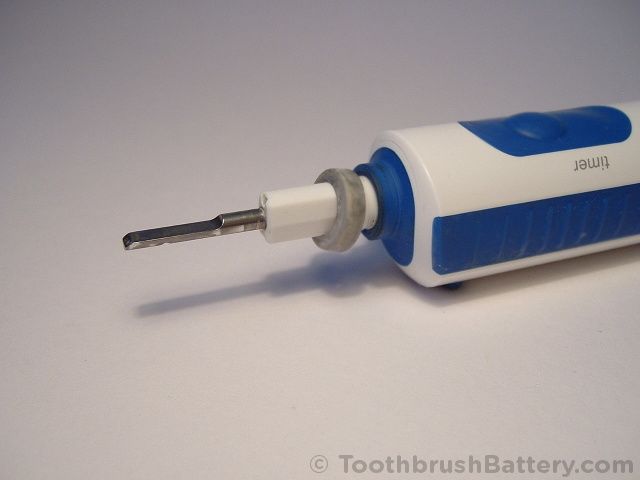
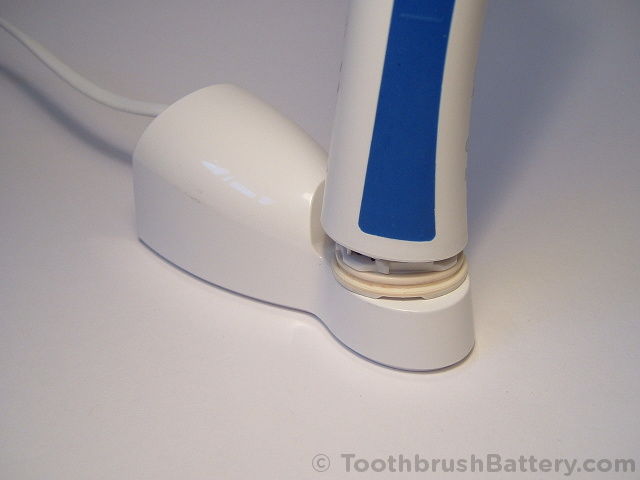
Using the screwdriver or pliers with tape over the jaws carefully pry off and remove the ring around the shaft of the toothbrush.

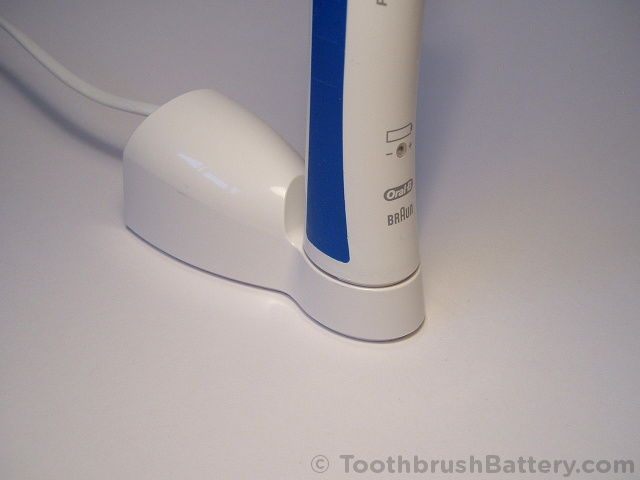
Place the toothbrush on its charging stand and carefully twist the handle anti-clockwise to release the latches holding the base into the handle. It will spring open slightly.
Push the shaft of the toothbrush into the handle so that the internal mechanism starts to slide out of the handle casing.
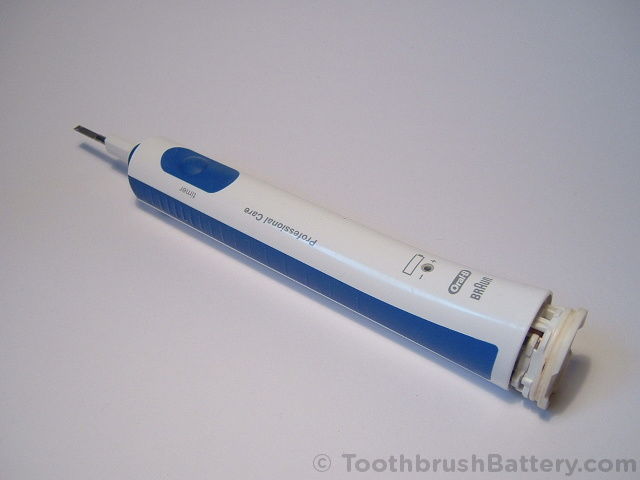
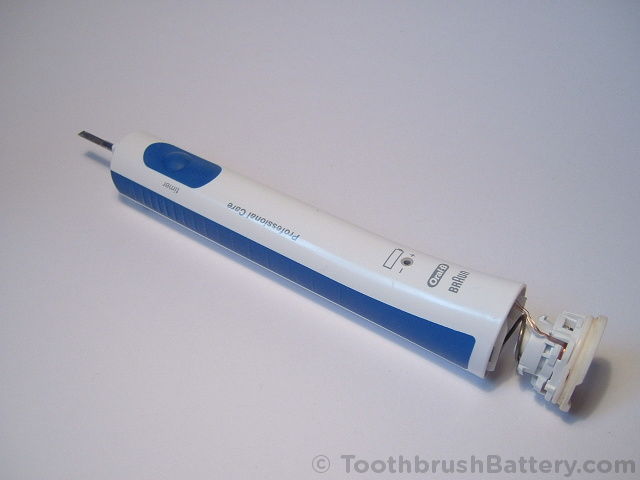
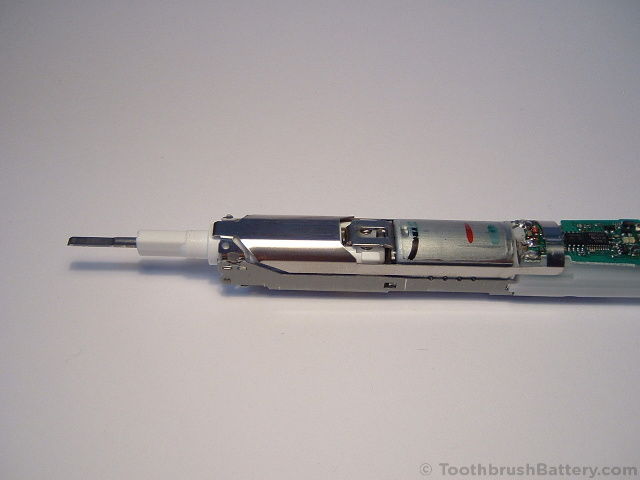
Remove the inner workings from the handle casing.
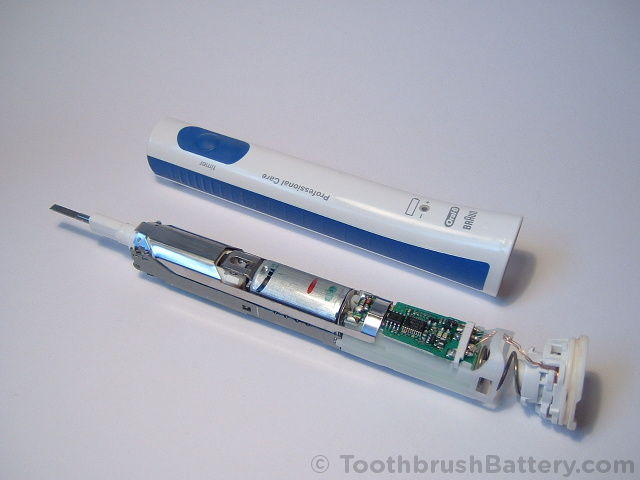
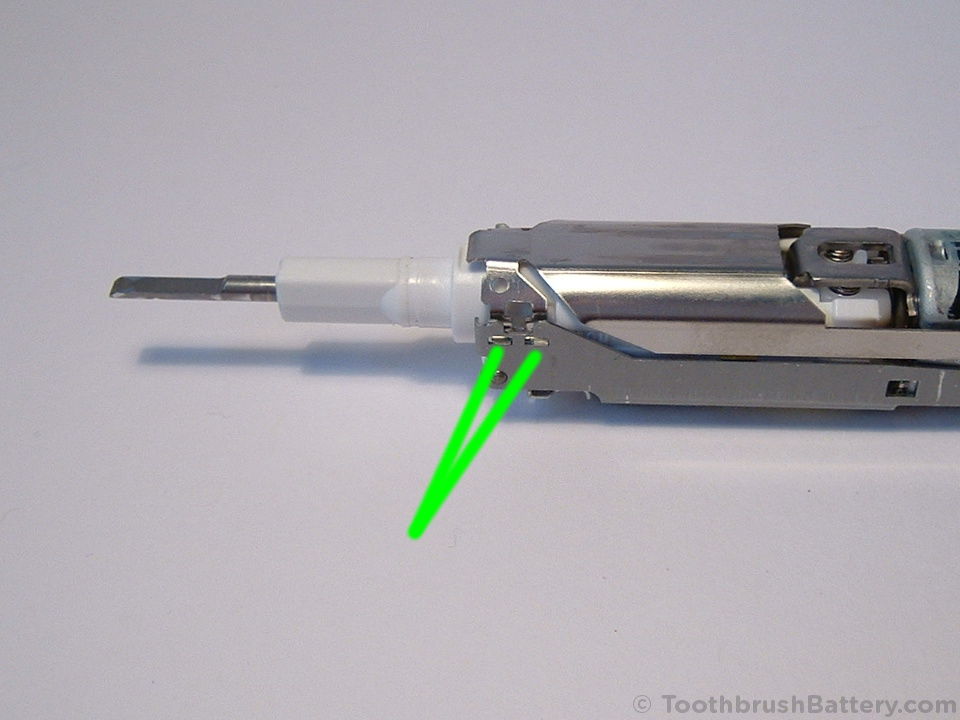
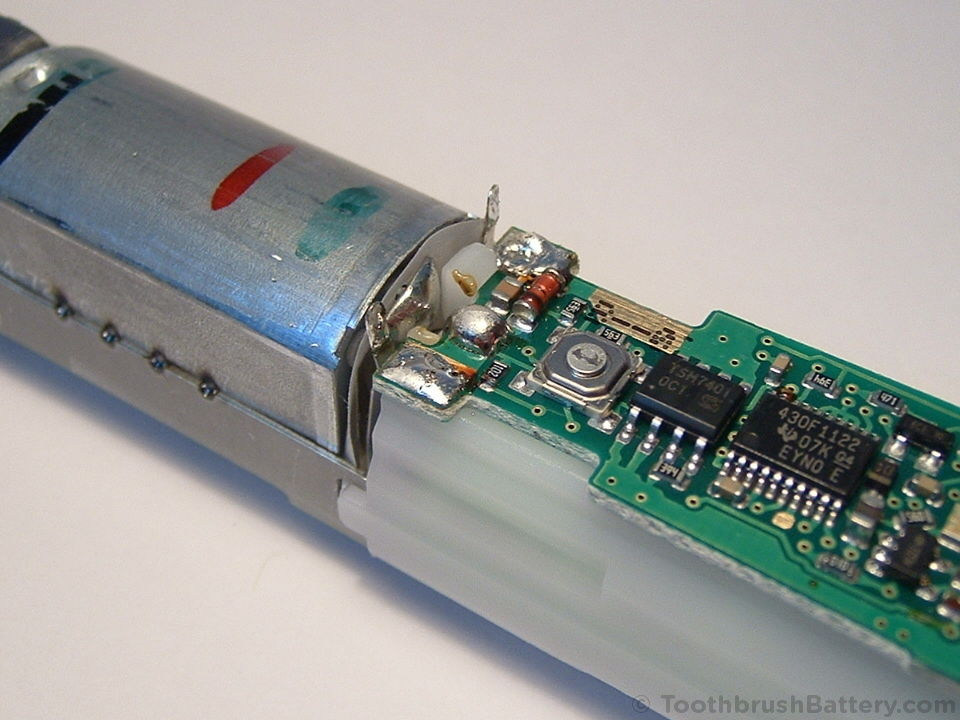
Using the screwdriver gently press the two clips (arrowed below) on one side of the switch cover plate, then the other side, to release the plate and remove it.

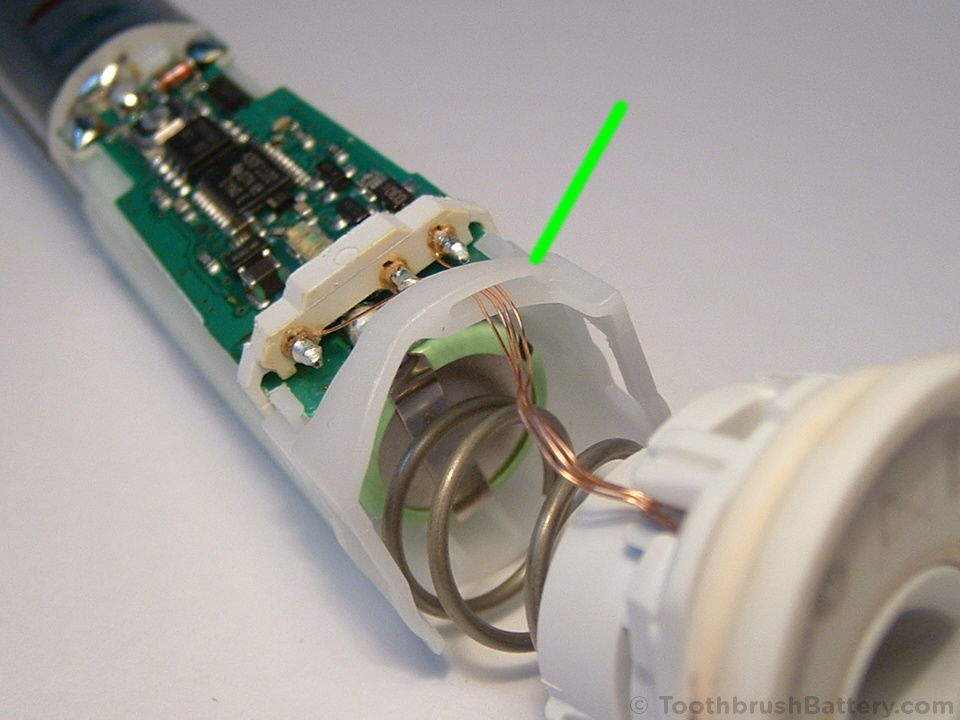
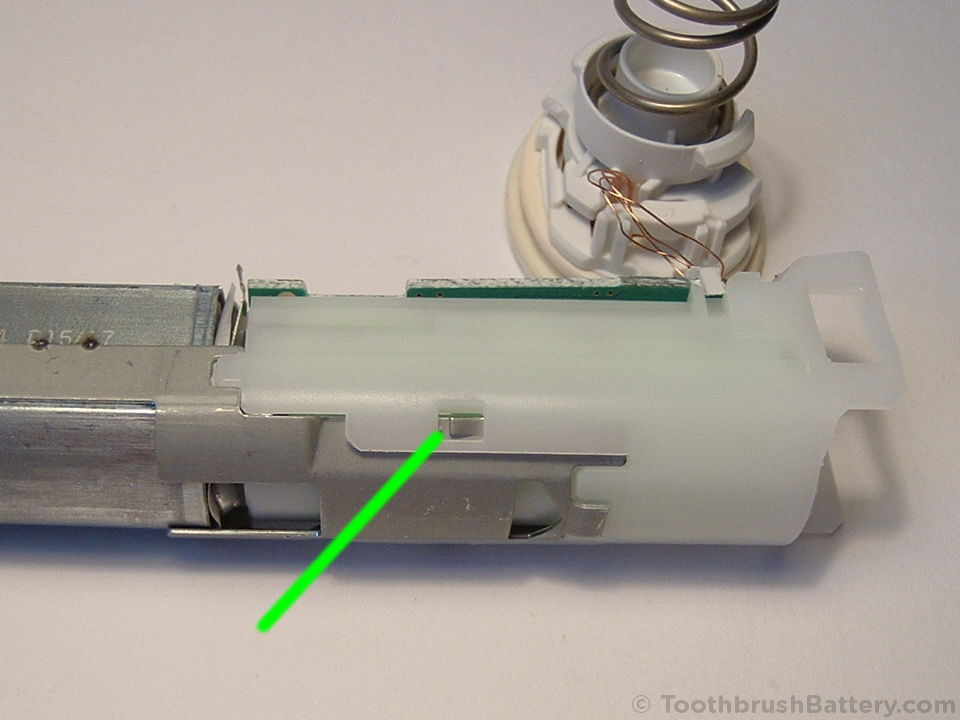
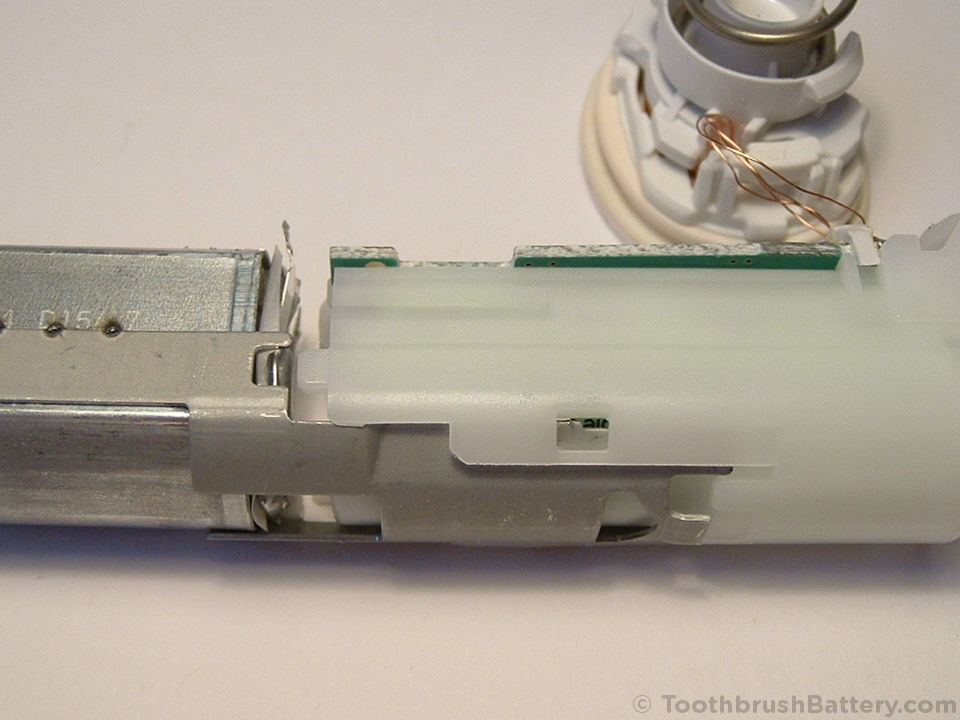
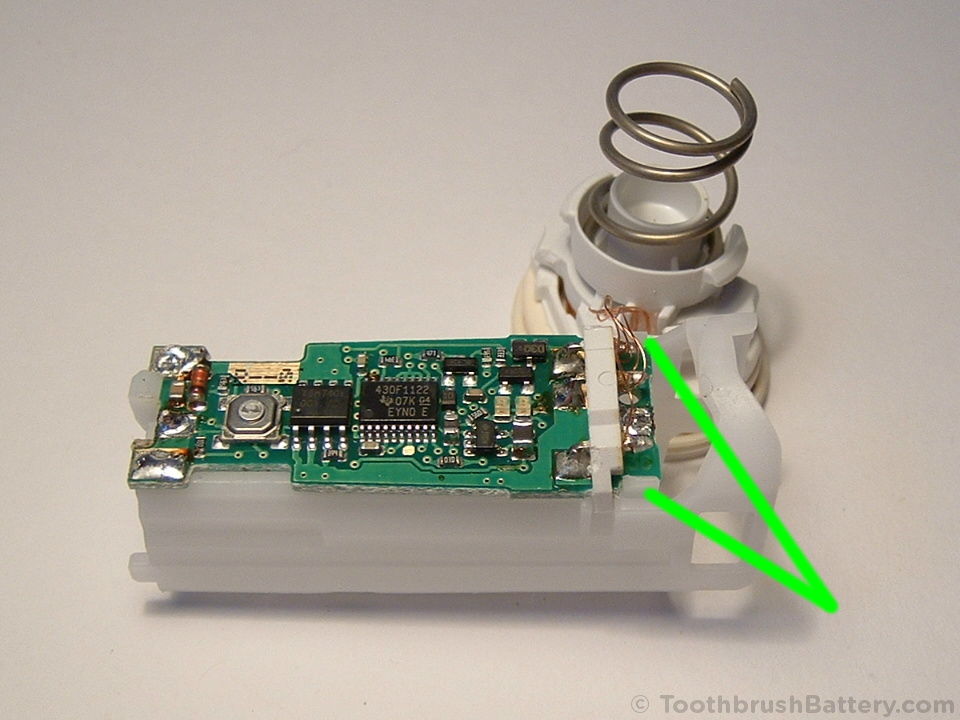
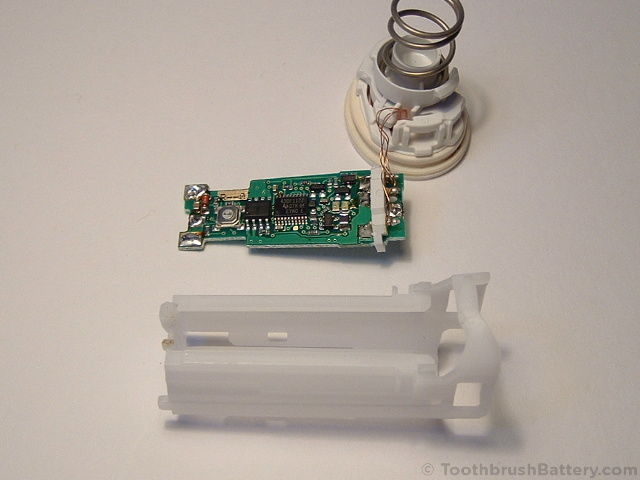
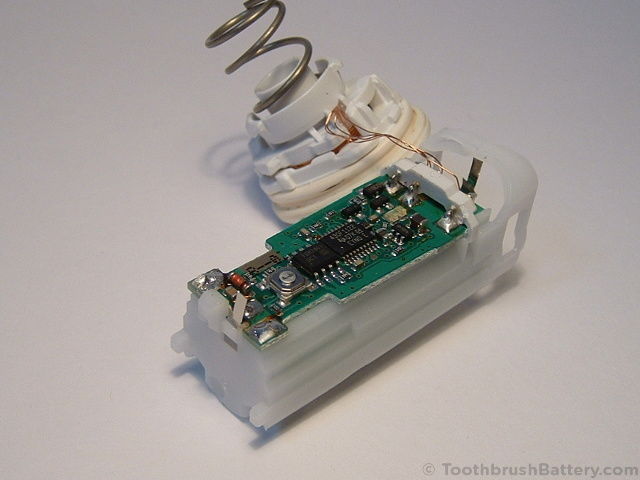
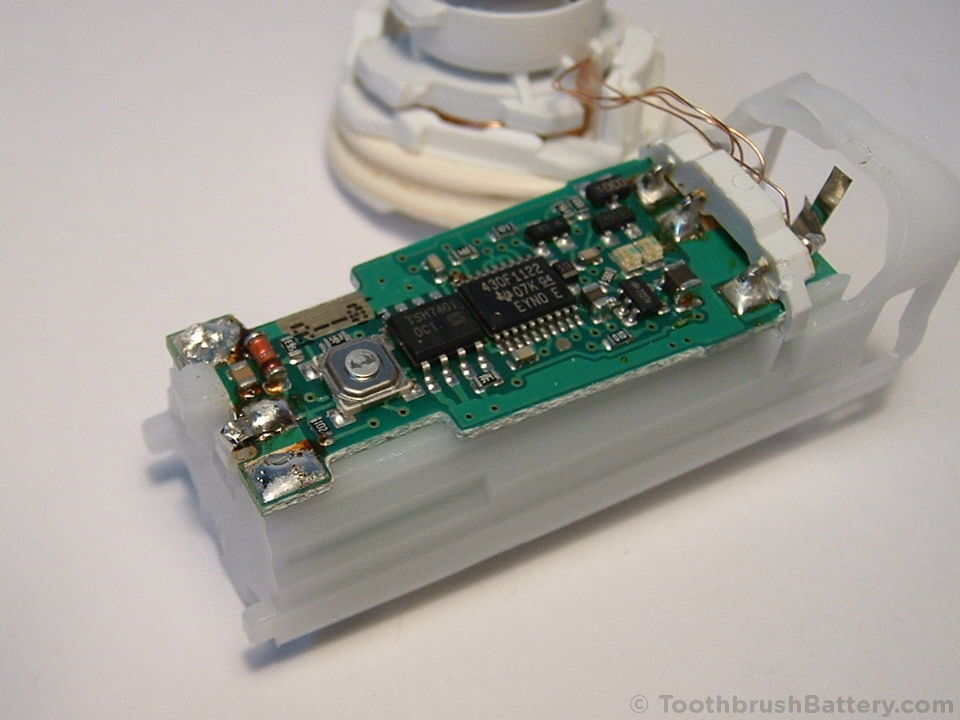
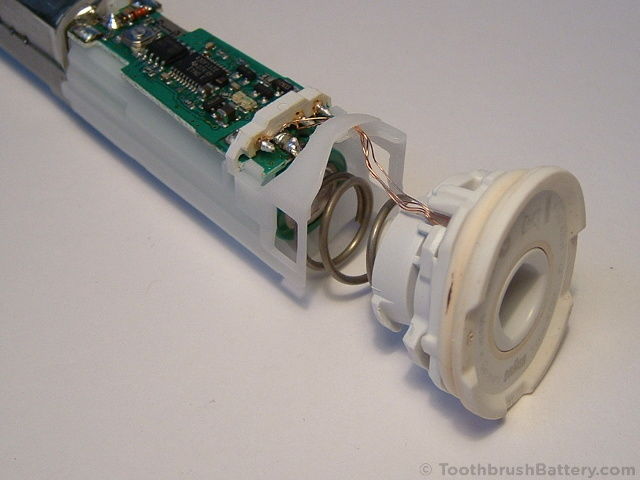
Gently unhook the copper wires connecting the charging coil to the circuit board from the plastic arch (arrowed below) and move the base to the side for access.
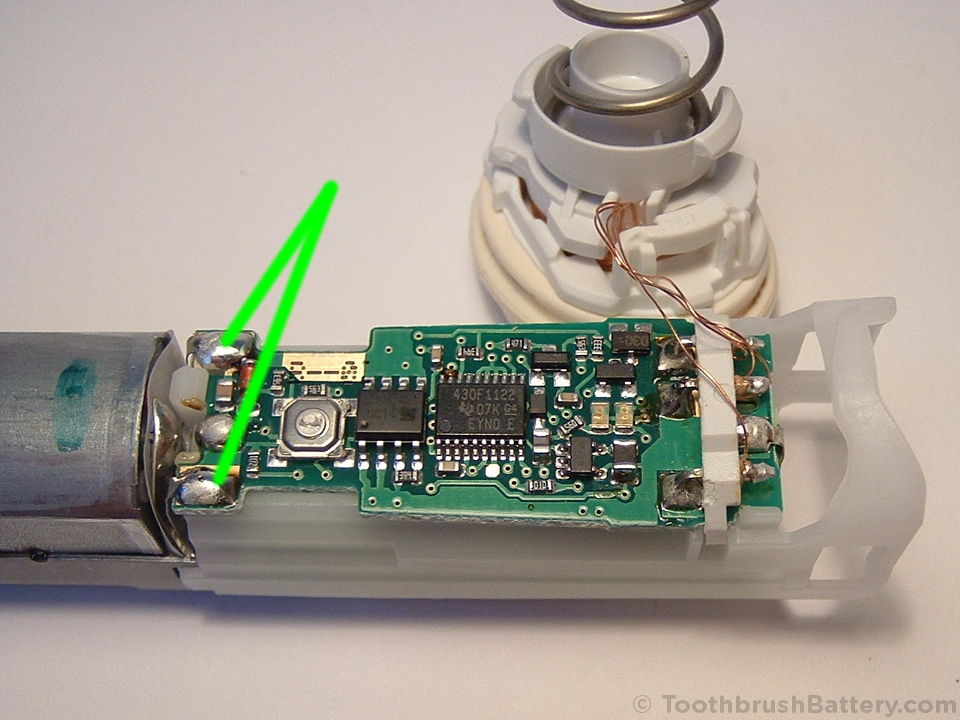
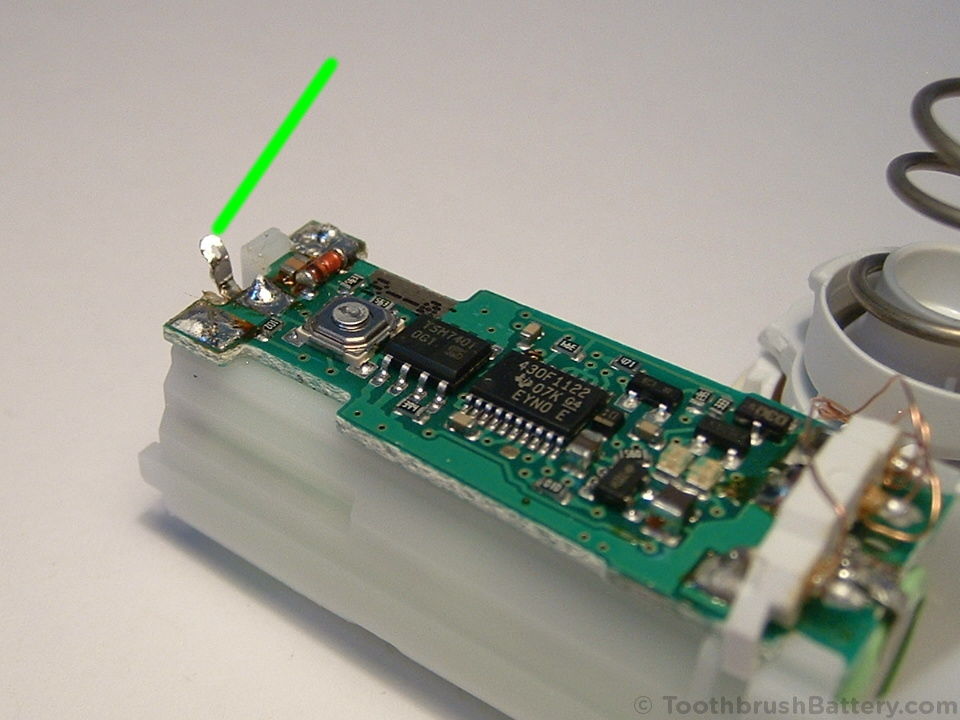
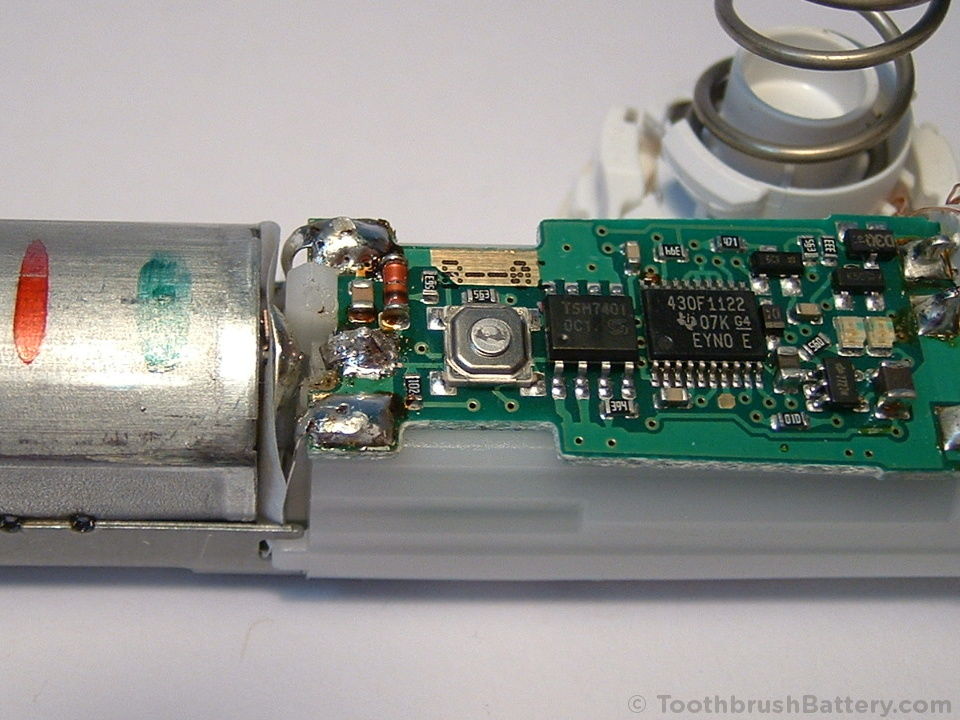
Time to get your soldering iron warmed up now! Using a desoldering pump or braid desolder the two motor connection tags (arrowed below) from the circuit board and use the knife to bend them upright.
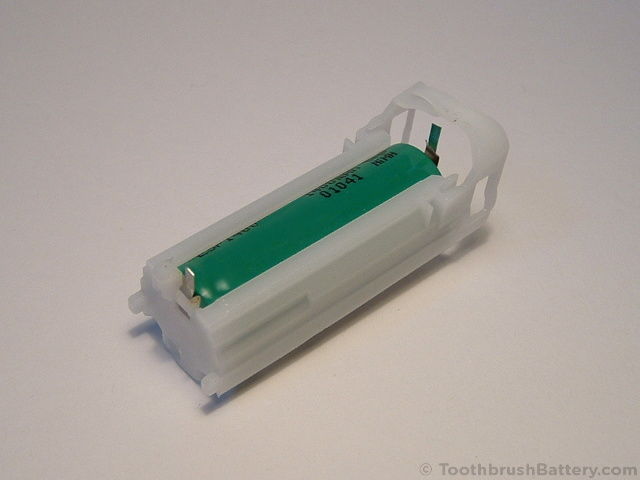
Unclip the plastic battery carrier from the metal clips (arrowed below) on the frame of the toothbrush mechanism and slide the carrier off the frame.
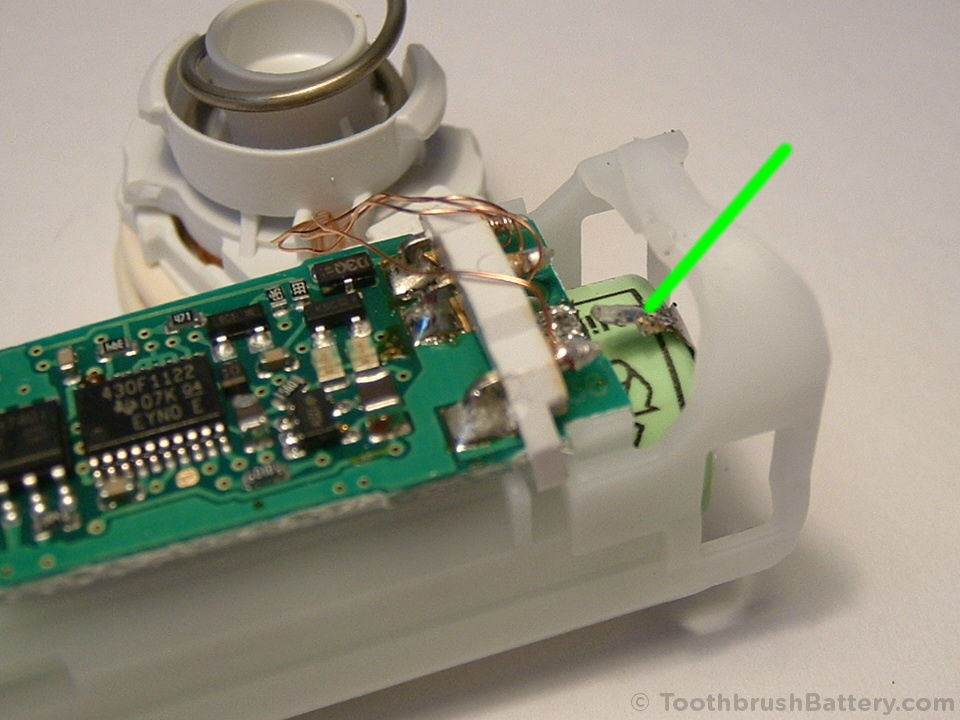
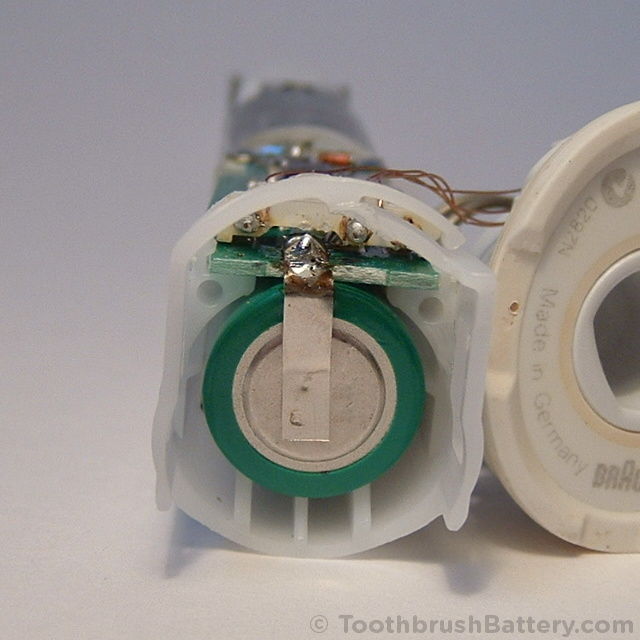
Desolder the positive battery terminal (arrowed below) from the circuit board and bend it upright.
Desolder the negative battery terminal (arrowed below) by inserting your soldering iron horizontally under the plastic arch. While the solder is still molten push the battery in from the positive end so it starts to slide out of the plastic carrier.
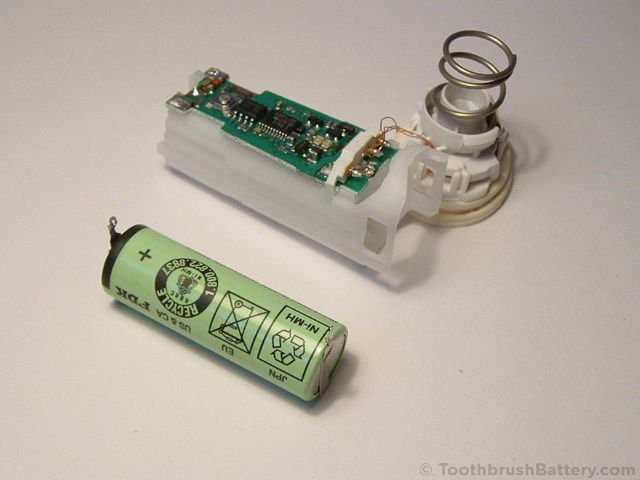
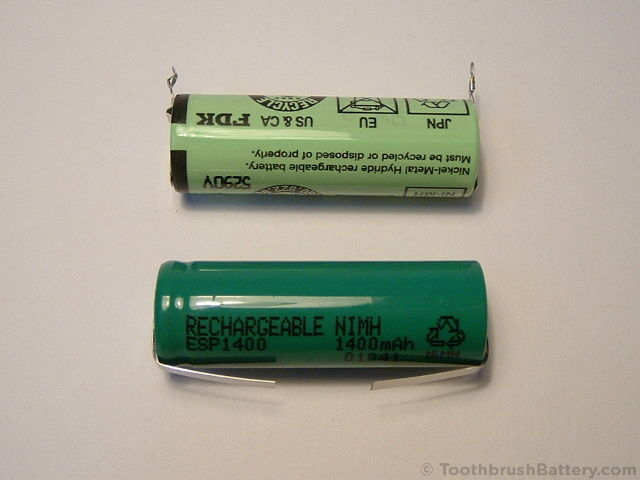
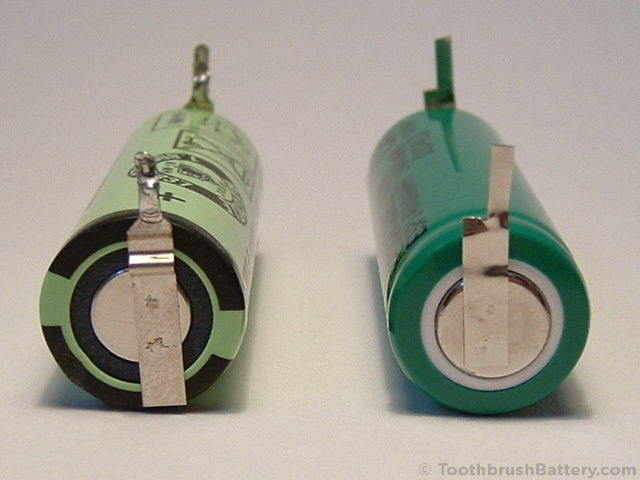
Slide the battery right out of its carrier and measure its length and diameter. This one is 42mm long and 14mm diameter but different versions of the Type 4729 have different size batteries depending on the features of the toothbrush. You might also like to modify your toothbrush by cutting down the spring so you can fit a longer, higher capacity battery.
Unclip the circuit board from the plastic battery carrier, starting with the side clips (arrowed below.)
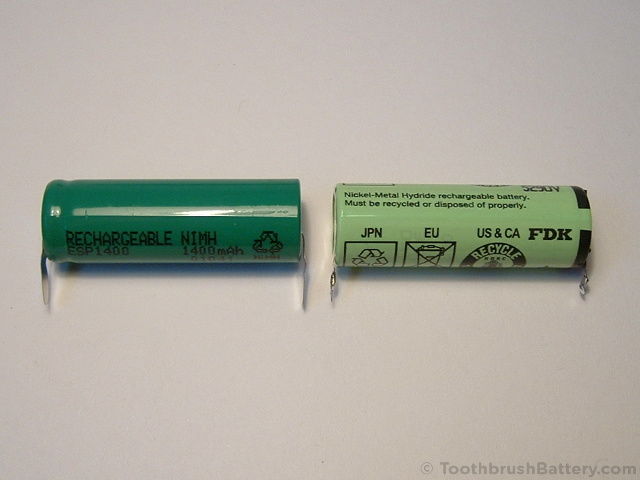
Compare the original battery to its replacement. Please support us with writing these repair guides by buying your replacement battery through the links to our online shop shown. In the version of the Type 4729 toothbrush shown it was a 42mm x 14mm battery. However, yours might be fitted with a 42mm x 17mm battery so measure your original battery before ordering.
Using scissors trim the solder tags of the new battery to the same length as those on the original battery.
Shape the tag on the negative terminal by carefully cutting in from the side using the tip of the scissors. Then cut down from the top.
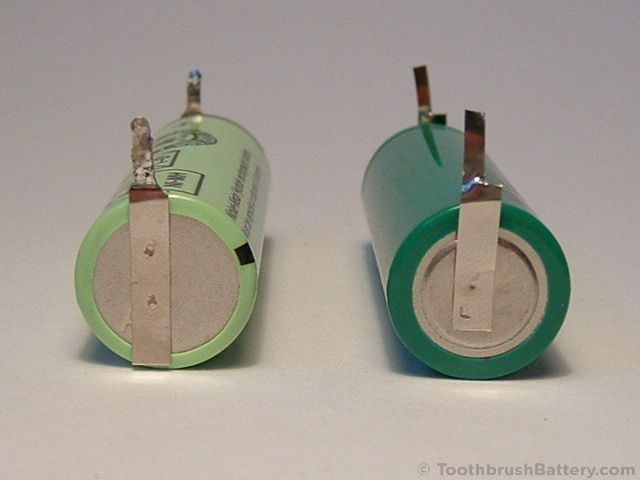
Do the same with the tag on the positive terminal.
Fit the battery into its plastic carrier.
Clip the circuit board back into place, making sure that the battery’s solder tags line up with the solder pads on the board.
Bend the positive tag over and solder it to the circuit board.
Slide the battery carrier back on to the metal frame of the toothbrush, ensuring it clips into place.
Solder the two motor connection terminals back on to the circuit board.
Bend the battery’s negative tag over and solder it to the circuit board.
Carefully hook the copper wires back under their clip on the plastic arch. Check that they are all still intact and connected as damage to these wires is a common cause of charging problems.
Clip the button plate back on to the toothbrush frame.
Slide the workings of the toothbrush back inside the outer casing and push the base in as far as it will go.
Put the toothbrush back on its charger and push down on the handle to compress the spring inside the base. Turn the handle clockwise to engage the latches in the base.
Plug the charger into a power socket and check that the green light starts to flash. If it doesn’t flash then check your soldering for dry joints and short circuits. The brush might need 10 seconds on charge to reset the internal electronics so that it recognises the new battery and will then allow you to pick up the toothbrush and switch it on.
Re-fit the ring around the shaft, making sure that it is firmly pressed into place. An 11mm ring-spanner might be helpful for this.
You should now have a fully reassembled Braun Oral-B toothbrush! Put the brush on to charge for a full 24 hours before use. Please recycle your old battery either at a local civic amenity or a supermarket collection point.
Please leave any questions, tips or comments about this guide below.
Thank you for an excellent guide with just the right level of detail. One minor improvement might be to describe how to tell which is the positive terminal on the replacement battery, as mine, identical to the one in the photographs, wasn’t marked. (It’s the terminal nearer the indented ring around the battery body.)
Thanks Richard, that’s a good point. Good to hear that you got your toothbrush repaired and running.
Happy brushing!
Hello
I’m trying to replace the brushes for our Braun type 4729.
Previous brushes had two brush heads. Top is round then beneath is a U shaped brush. Are they still available?
Thanks, Judy
Hi Judy,
The brush heads you’re looking for with two sections of bristles are Oral-B “Dual Clean” heads. These are available brand new through eBay here.
So my battery is not the problem… the little motor is so goop’d up that it wont turn. So how do I take the front apart so I can soak it in water or something as well as grease the motor shaft? Thanks in advance for advice.
Hi Tom, I’d recommend cleaning the toothbrush with warm water before opening it so you can clean any toothpaste residue off. If water has got inside the brush and seized the motor then the best you can do is apply light oil to the bearing at each end of the motor and turn it by hand to free it up.
Changed the battery and not confident that my soldering is good enough: the green light is flashing very fast, rather than slowly and regularly.
It sounds like there is a problem with the charging circuitry. There are 2 checks you can carry out:
See if that helps!
Thanks to your easy guide I have just successfully replaced the battery on the second Braun toothbrush in our household (different model this time) but just as easy.
As with the last one I did I think it really helps if you use desoldering wick rather than a desolder pump, also after you have removed the solder off the three front connections they will probably be still stuck down so just use the sharp edge of the knife blade to lift the tags up. For the negative connection just heat the joint and press on the positive end of battery and it will pop out.
Thanks for the tips Keith, it’s great to hear your success story 🙂
Not sure what has happened. Instructions followed but when charging a red light is observed – flashes a few times and then nothing.
Soldered connections seem to be ok
Copper wires seem undamaged.
Motor can start then stops.
Help?
Hi Andy, it sounds like it’s not charging. Try leaving it on charge for an hour or two as sometimes it takes that long before the brush realises it’s being charged. Also double-check for blobs of solder on the PCB near the battery connections.
I followed your excellent instructions, re-assembled the brush and placed it on the charging stand, observing the charge light. However, the brush won’t run after testing it the next day. I dis-assembled again, thinking perhaps that a motor lead might be off, but noticed that both the motor and the battery were warm, too warm if you ask me. I de-soldered both the motor tabs and battery tabs and removed the battery. It reads 1.25v so I’m assuming it got charged. I tried going directly to the motor itself with a 1.5 volt source but got nothing. Bad motor? I’m 100% positive I did not install the battery with the wrong polarity, the positive was near the motor, the negative near the charging coil at the bottom. I’d appreciate any ideas, thanks again.
Hi Mike, it sounds like the circuitry is trying to drive the motor but if the motor won’t run directly off a 1.5V source then there could be something jammed in the gears. Try turning the metal shaft of the brush back and forth by hand or turning the gears by hand.
Ok, good suggestion, I was able to fairly easily move the nylon gear which moved the motor’s brass gear and the shaft linkage, so nothing jammed. Tried the 1.5v again on the motor, not even a peep. Bad motor?
Sounds like it could be 🙁 That or the capacitor across the motor terminals is damaged. Make sure the motor is disconnected from the PCB when you’re testing. Try the 1.5V across the motor with both polarities in case there’s a diode hidden in there to stop back EMF.
The motor is definitely disconnected, and I just tried both polarities, nothing. I’m guessing this is probably not worth repairing in that event then. And that maybe my old battery is fine!
Sadly you might be right about the motor – it’s very rare if there’s been no water damage inside the brush.
Excellent step by step instructions. Toothbrush now working as new.
More to the point, excellent service for battery ordering. I did not concentrate properly and ordered the wrong battery. Rob promptly replaced it for me, only for Royal Mail to shred the envelope and lose the battery! This was again sorted promptly and the toothbrush is as good as new (if not that clean!).
Thanks again.
Thanks Nic!
Thank you for your excellent guide.
I decided to fit the larger 49mm long battery to my 4729, which originally had a 42mm long battery fitted. In order to do so, as well as cutting 1.5 turns off one end of the coil spring, I also had to carefully trim the inner plastic shoulder on top of the induction coil so it was flush with the centre. (Otherwise it butts up against the bottom of the battery and the case cannot be closed)
Great to hear about your modification Richard. The longer battery must last for a lot more brushing sessions than the original battery!
Hi! I did also the change to 49mm battery for this one. It worked well, but just one note. You need to completely remove the cup shaped thing there in center of the spring, and cut the spring shorter as said. I used a good quality file to cut the spring.
Thanks for all the instructions! <3
Does anyone know how to reset the minimum battery level. My brush works fine for two sessions and then while still running pretty fast suddenly stops and requests a recharge. (I changed the battery a while ago. I believe I got it right, but your instructions would certainly have made it easier, so I will use them next time.)
Hi Walter, have a read through our trouble-shooting tips, there are a couple of techniques near the bottom for resetting the battery meter.
Thank you. There must be a magic charge time for this process, as previously I had tried a few seconds and also hours and neither worked. I tried about 10 seconds as recommended and it has already run longer than for ages. I will let you know how it goes in terms of a full reset.
Hi, had to undertake this over several weeks and although I kept all parts in a box did not notice I had lost the spring. However fitted all back together but have to raise the toothbrush 1/4″ of the charger to get the green flashing light. Will leave for 24 hrs but surprised did not get any movement when I pressed the on switch. The shaft will not turn manually as I see other posts say it should do. Measured the new battery and it read 1.275 against the old one’s 1.244, odd that the new one before charging does not give a murmer?
Hi Dave, that’s a good voltage reading from the new battery so have a look through the troubleshooting tips on our customer support page here, particularly the coil tips. In the short term the brush will operate correctly without the spring supporting the battery but in the long term the missing spring might allow the battery to pull away from its connections.
This guide is just brilliant! What can I say? My toothbrush was barely getting one use between charges and I baulked at paying huge sums for a new one! (Tightwad lol) This guide has enabled me to breathe new life into a perfectly good brush.
First time, no luck – just a fast flashing red light so I took it apart again. The negative tag wasn’t soldered quite right and had become detached. Fresh solder and tried again…..success! Thank you for this invaluable guide!
Great work Tony!
Must be the best guide anywhere on anything. Thankyou!
Thanks for this guide- I love the idea of replacing the battery rather than simply buying a new toothbrush and throwing the old one in landfill! However, I’ve managed to break one of the copper wire connections to the coil in the process- how would you recommend I fix this? Many thanks 🙂
Hi Dominic, you can fix a broken coil wire by soldering the two pieces together. If necessary you can unwind one loop of wire from the coil to give you more to play with. There’s also a blog post here that might help you fix the wiring in your toothbrush.
Great guide, It took me 20 minutes to replace the battery and now toothbrush is working again 🙂 Thank you.
My oral b braun electric toot brush won’t hold a charge for more that 3-4 days, so I had Battery Plus change the battery. Now with the new battery fully charged it won’t run. I can’t find any lose wires or anything. Got any ideas? Really don’t want to throw it our as it was working fine before they clanged the battery.
If a repair shop changed the battery for you then take it back to the shop – the repair should be under guarantee. We also have a guide to fixing common issues on our customer support page.
first, id like to thank you for your detailed explanation of the inner workings of this toothbrush,
I have had it for years and need to put it on charge all the time.
It stopped working the other day.
When i took it apart i see the three wires from the PCB to the coil are broken.
The housing holding the coil is broken on one side and being that
it is highly sprung i think this caused the problem
Is it fixable?
I though of unwinding the coil to give me some more wire to
solder to the PCB.
Hi Steve, yes you can repair the wires by resoldering them. Make sure you touch the wires with the sodlering iron to burn off the thin transparent insulation. See our blog post on repairing the copper coil wires here.
In preparation for the replacement procedure, I had already taken the device apart once, concluded that it was fitted with a 42mm battery, decided for the “larger battery and cut down the spring” option and sourced a 48mm battery.
With full confidence in the guide, I followed the steps to the letter, only to realize that it’s missing one crucial point when opting to put in a larger battery (which cost me a wasted battery).
More precisely, the battery tag for the negative terminal should not at all be trimmed “to the lenght of the original battery”, instead most likely be left in full length (or more precisely “orginal length +6mm), this since the negative terminal of a longer battery will be that much farther away from the circuit board solder point.
Pretty obvious once there, but oh well 🙂
G -day my unit turn on but the shaft willnot turn or engage regards RIC
Open up the toothbrush using the relevant guide and check for corrosion around the motor and PCB.
Ho letto delle sostituzioni e delle riparazioni. Io non ne sono capace. Esiste un centro per farmelo riparare pagando? E dove?
Salve, we keep a list of toothbrush repair services.
I have just replace battery second time. Seems it stands for ~2 years. It is not bad. Thanks for your perfect manual.
You’re welcome. The battery life depends on how many people use the toothbrush and the quality of the battery you use.
I have replaced the old battery with a new fully charged battery (I charged it in a separate battery charger) in my braun 4729 , now it will not turn on.
For some common solutions have a look through our troubleshooting tips page. It might just need 5 seconds on the charger to ‘reactivate’ the brush.
Thank you for this guide.
I changed the battery and is charging right now.
It took me about an hour, I’m a noob in soldering. But it worked and learned a new skill.
Desoldering the motor en + side of the battery gave me some trouble. I used a desoldering pump after that I had to use the knife to losen the these points.
Thanks again.
Thank you for this extensive description to replace the battery. Is there a specific reason why to solder the two motor connection terminals back on to the circuit board before soldering the battery’s negative tag to the circuit board?
I did a batterychange and found out that small copper wires were not connected anymore to the PCB. So, I started to puzzle and tried all connection possibilities (but still unsucessfull)
Can you share the how many volt I need to measure between the soldering points of the small copper wires on the PCB (when I “connect” the base to the charger before assembling everything in the outer casing)?
Hi Jack, when re-connecting parts to the PCB it’s best to re-connect the power source last to reduce the chance of accidental short circuits.
There is an article on re-connecting the fine copper wires from the charging coil here.
I have seen that reconnecting-sketch fro copper wires. How do I know which coil is A and which coil is B?
Are there any answers available what voltage should be measured?
It doesn’t matter which is A and B as long as you are consistent. There is no voltage to measure, just continuity when all the wires are disconnected.
I agree with Brandon (way above) – this must be the best repair guide ever about anything! Many thanks!
thank you for the nice guide!
i changed my 15 year old battery with a new one, now the toothbrush is like an tornado now.
Maybe its because of the new battery so its stronger or i did something wrong and the tootbrush is so strong right now that you could clean rust off an boat?!
Bit concerned to clean my teeth with that now… :X
What voltage was the battery you bought? You can post a link to it but remove the ‘http’ or it will be deleted automatically.
Hello, I also had to replace a battery in ~20 years old toothbrush of my grandma. I would like to thank you very much this way for providing such a great tutorial that made the replacement quite a quick job. Thanks a lot!
J.
I have changed the battery however the coil wires have come away and have broken.
They are now too short to reconnect this means its game over or can i re coil the wires to obtain longer wire to re solder ?
Not sure now if this can be saved. not sure how to re-wind the coil. i should end up with four ends but now clever me only got 2 ends not sure if its been re coiled correctly
can you buy the coil ??
anyway if you help be glad of your input.
maybe time to hit the pub and drown my sorrows and throw in the towel !!!!
Hi Alan, If the coil wires snap they can be re-joined with solder but you will need to insulate them from each other. You can also unwind a few centimetres of the wire (i.e. unwind once around the loop) and then solder this to the pin.
We also have a separate page describing what to do if your toothbrush charging coil wires break.
On the Braun 4729 charging base it says voltage is 100-130 V ac ~ 50-60 Hz 2,4 W
Further down (in a box) it says Braun IP 67 100-120 V ~ 50/60 Hz 2 W
**Will this work charger work in Europe 240/50 hz ? thank you
Your 100V to 130V charger will not work on European voltages (220V to 240V). You will need a step-down transformer (not just a mechanical adaptor) to use it.
Once you arrive in Europe you could buy a cheap Oral-B electric toothbrush in a supermarket or pharmacy and use the charger from that with your 4729 toothbrush. Or just use the new toothbrush (which will charge on your North American charger when you return home).
Also see our Braun Oral-B toothbrush charger information page.
Thanks for these very clear instructions! I just saved my perfectly fine toothbrush from becoming e-waste 🙂
Many thanks for this excellent guide!
IHAQ two questions about charge termination and the 3757 charger unit.
The 4729 toothbrush always charges for 18 hours indifferently from when its battery was new versus now that the battery is old and degraded.
The old battery now has less than half the run time (9 minutes) versus when it was new (27:30 min).
Because the now wearing battery can hold less charge, it should be charged less/shorter. Otherwise it will overcharge and and overcharging degrades the internal NiMH battery even faster.
Question 1:
Will charging be automatically terminated when the battery is filled, or will it bluntly charge for the fixed 18 hours. Thereby overcharging the now aging battery and wear it out even faster?
Question 2:
When I would upgrade from the standard 1400 mAh battery to a 2450 mAh NiMH battery, will the standard 18 hours charge time be sufficient to load the new battery completely? Will charge termination take place when the battery is full? Or can I better opt for a 1900 mAh that can take twice the abuse due to overcharging, but has a shorter run time and takes a shorter charge time?
It might be that the old battery in your toothbrush is not triggering the ‘full’ cut-off for the onboard charging circuit, and the circuit just keeps charging until it reaches an 18 hour limit. If you fit a new, higher-capacity battery this should charge fully and trigger the cut-off. What is the length and diameter of your original battery? 42mm x 14mm?
Thanks for your reply.
I’m using my third 4729 toothbrush now. All have charged (green indicator light on the toothbrush blinking) for the fixed time of 18 hours (the first brush blinked for the fixed time of 22 hours). The fixed charging time doesn’t seem to be a one off with the type 4729 brush.
I always use up the charge and then fully recharge the brush until the green light stops blinking. The current brush has about 140 charge cycles on it. And now the battery capacity / usage time has dropped to under half the time then when it was new.
I devised an experiment, where I cut off charging manually at 9 hours instead of the automatic cut off at 18 hours. The time I could use the brush afterwards turned out to be identical (9 minutes). So the battery is likely being overcharged (and damaged) for the remaining 9 hours.
I haven’t opened the brush yet, so I can’t confirm the length and diameter of its internal battery yet, but I intend to modify it for accepting an AA sized battery.
If there is a fixed time charging, then I’d rather opt for the lower capacity battery for it can withstand more abuse due to overcharging. What do you think?
Hi Marty, Once you’ve opened the brush you might find it is fitted with a 17mm diameter battery. Our 42mm x 17mm cells are 2100mAh capacity and, like the 2200mAh 49mm x 14mm (AA) cells, they are industrial-grade GP cells so can tolerate overcharging better than consumer-grade cells. They will take up all of the 18 hours of charge so should have a long running time and life-span.
This is a great guide! Unfortunately, I am too lazy and too unhappy with my soldering skills to try it 🙂 I have a 4729 toothbrush with a 4729 wall-mounted charger. The toothbrush is hardly charging anymore. It is a few years old. Unfortunately, Oral-B does not have any wall-mounted models anymore (except the one with irrigator). I like the wall-mounted charger and I do not have a good place in the bathroom to connect a commonc standing charging base. Which contemporary toothbrush model would fit the 4729 charger and not explode? Thanks!
See our Braun Oral-B toothbrush chargers page for new brushes compatible with your wall-mounted type 4729 charger.
My 4729 brush on off switch is showing problem it only turns on and never turns off by pressing same button.is it due to moisture issue inside the circuit or something else.? Please help
Yes this sounds like moisture ingress. Open up the toothbrush handle and let the internals dry out for 24 hours in a warm place. Once reassembled the toothbrush should switch on and off correctly. Always store your brush lying on its back with the head removed between uses to prevent future water ingress.
Followed the guide (which was great, btw).
Now when plugging the brush on the charger the green light blinks, but it seems to be blinking more frequently than before the repair. If I charge it for a bit it works fine right away, but if i leave it there (not charging) and take it up after some time it doesnt work anymore, as if the battery died doing nothing. What could be happening? Thanks for your great help.
It sounds like a bad connection somewhere. Please read through our troubleshooting tips to get you back up and running as this could be either the battery connection, the copper coil wires or a short-circuit somewhere.
Excellent guide. Toothbrush back to working. Thank you!
Is it possible and difficult to use a 49×17 mm battery where originally a 42×14 mm was installed?
From the comments I understand that the length can be managed but how about the larger diameter?
It’s becoming difficult to find a 42 mm long battery, or a 14 mm wide battery. The 49×17 mm is available at a lot of places.
Thanks!
You won’t be able to fit a wider 17mm diameter battery without replacing the whole battery holder framework. Other customers have fitted one of our 49×14 mm batteries by removing some material from the centre of the base cap. At 2200mAh capacity these are a massive upgrade over the original 1100mAh batteries! We send these to most countries.
How do I get it to flash and fully charge?
The green light is on (NOT flashing) while it’s on the charger. After 3-4 minutes of brushing, it switches off. I change the battery (excellent instructions, thanks!). Put on the charger, the green light is on (NOT flashing) as before. It charges for +24h. I can now brush for 6-8 minutes. That’s better but not good. How do I get it to flash and fully charge?
PS Thanks a lot for the guide. This was my first time soldering after 25 years. Proud I made it. Hope to get from 30% to 100% with your help.
Check the PCB for stray blobs or whiskers of solder as this sound like a circuitry problem. Also look for signs of water ingress on the PCB such as staining, corrosion or crystal formation.
Love this guide, even if it doesn’t show how frisky the soldering parts can be.
In my case I had problems with the red led flashing very fast. After checking I’ve had a bad soldering point. Once this was fixed it worked.
By the way I’ve replaced the 42 x14mm with a 49x14mm. This also can be pretty troublesome since the removal of material of the center cap took multiple tries. I also shortened the spring to reduce the pressure.
Best regards to all 😉
Thank you for this tutorial! Since we’ve already replaced this toothbrush, I took it apart so that I can recycle the battery separately from the circuit board according to the local guidelines. But I definitely needed the tutorial for getting it open!
You could always replace the battery and keep the brush as a spare!