
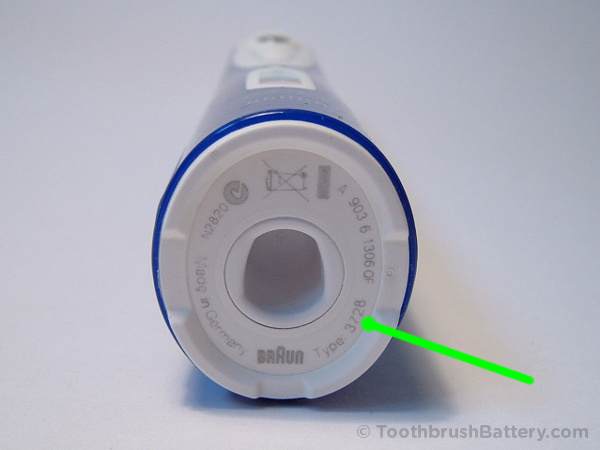
This guide will take you step by step through how to dismantle the Braun Oral-B Professional Care Type 3728 electric toothbrush and replace the battery. The tutorial is based on the Type 3728 model but may be applicable to similar models such as the Type 4736. The type number of your toothbrush is marked on the bottom of the handle.
For other toothbrush models and type numbers the battery replacement procedure is slightly different so please see our other guides to toothbrush battery replacement instead.
The basic method is:
- Dismantle handle
- De-solder old battery
- Remove circuit board
- Replace battery
- Re-fit circuit board
- Solder in new battery
- Reassemble handle
This is documented in detail below along with lots of pictures. Click on any picture to enlarge it.
Video
We have created a short YouTube video from this guide to Braun Oral-B Type 3728 battery replacement which you can also watch below.
Disclaimer
Any damage to yourself, your toothbrush or anything else is entirely your responsibility. This guide is for professional, educational purposes only and is offered without guarantee or liability.
Tools / Parts / Equipment
- Braun Oral-B Professional Care toothbrush (Type 3728)
- Original recharging base
- Soldering iron: Electronics grade (about 18-25 watt)
- Solder: Lead-free silver solder is great for this
- Solder sucker (also known as a desoldering pump) and/or desoldering braid/wick
- Scissors
- Craft knife e.g. scalpel, snap-off, retractable or Stanley type
- Small flat-bladed screwdriver: 2 to 4mm wide
- Replacement battery with solder tags. Either:
- 42mm by 17mm 1.2V NiMH, (support us by buying here at ToothbrushBattery.com), or
- 42mm by 14mm 1.2V NiMH, (support us by buying here at ToothbrushBattery.com)
How-To
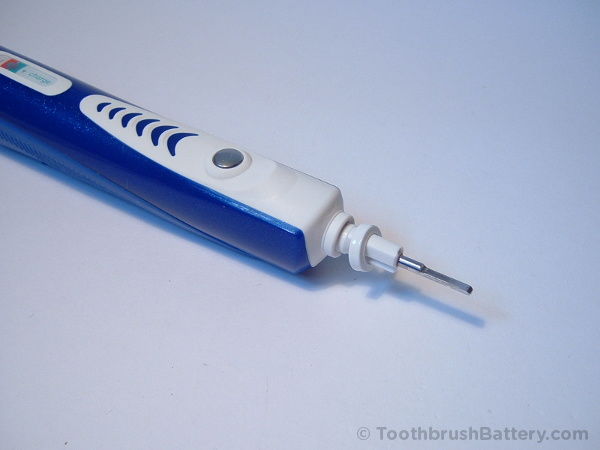
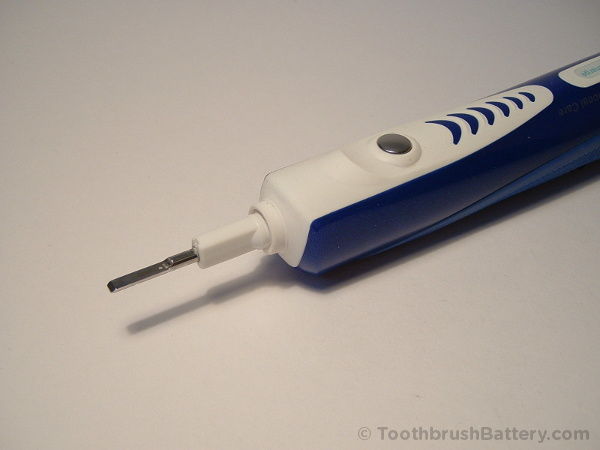
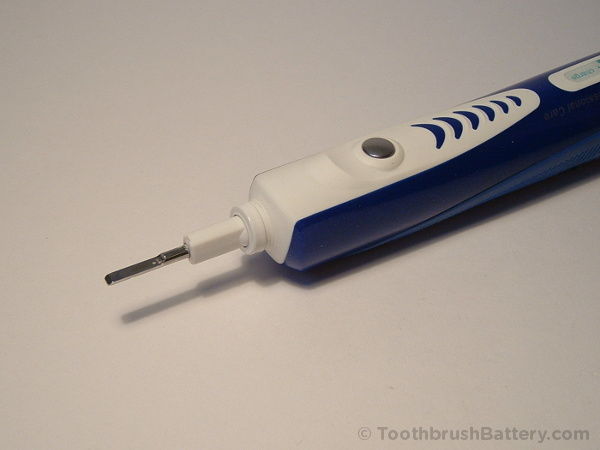
To start with, remove any brush heads from the top of the handle and using the screwdriver start to pry off the ring around the shaft. Alternatively you can use pliers with tape inside the jaws to stop them marking the ring.

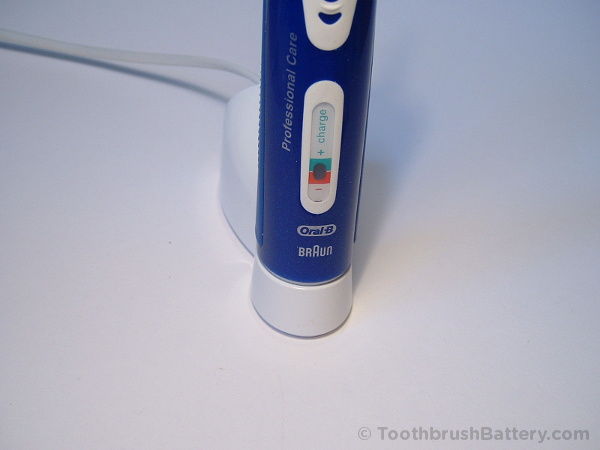
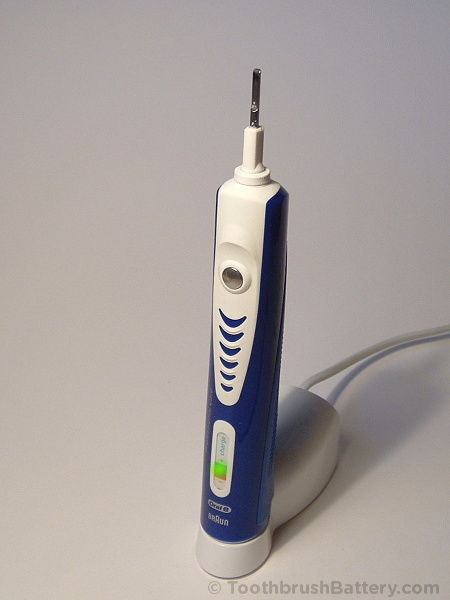
Put the brush on its charger and gently twist it anti-clockwise to release the catches holding the base of the toothbrush into the handle.
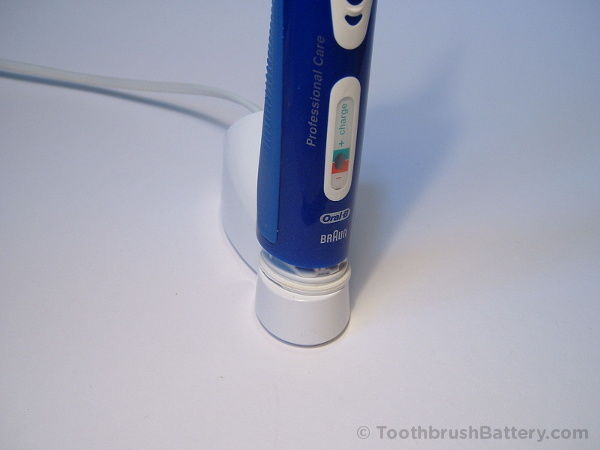
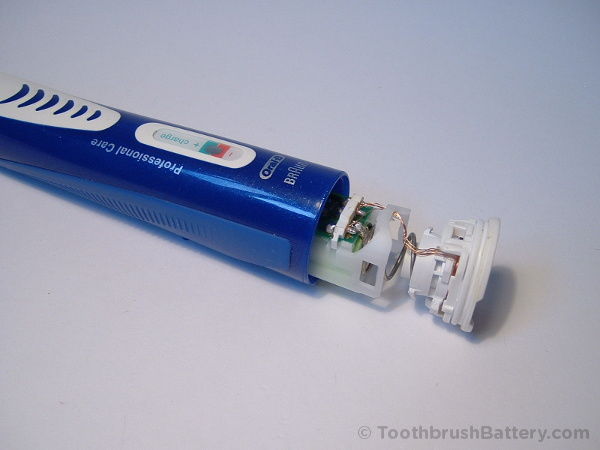
Take the brush off its charger and start to push the shaft in from the top.
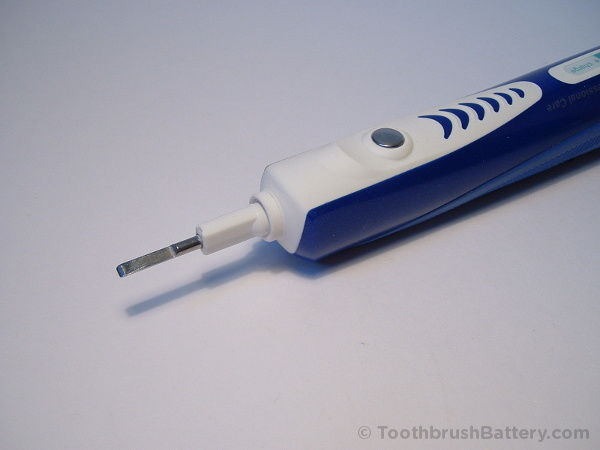
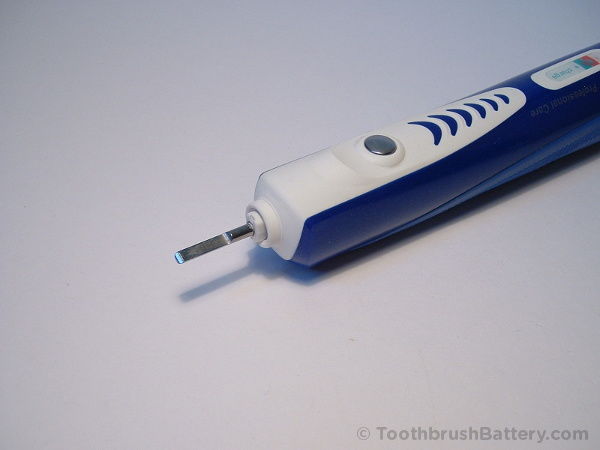
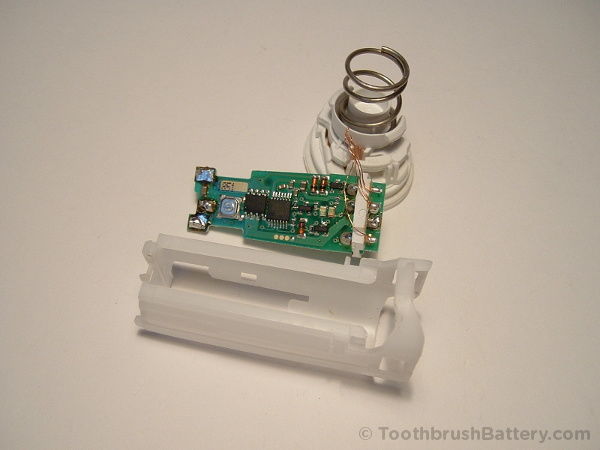
Carefully extract the inner workings of the toothbrush without pulling on the thin copper wires.
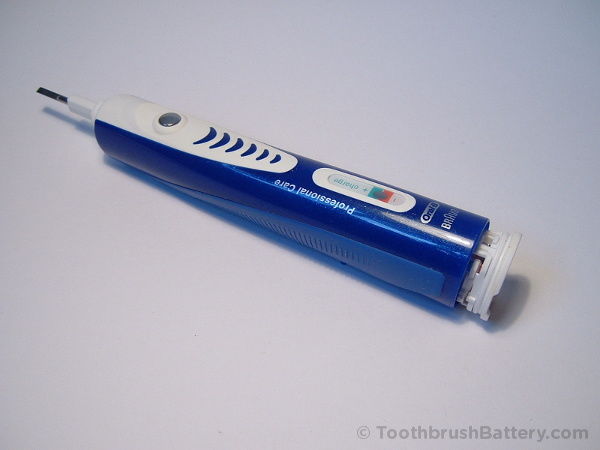
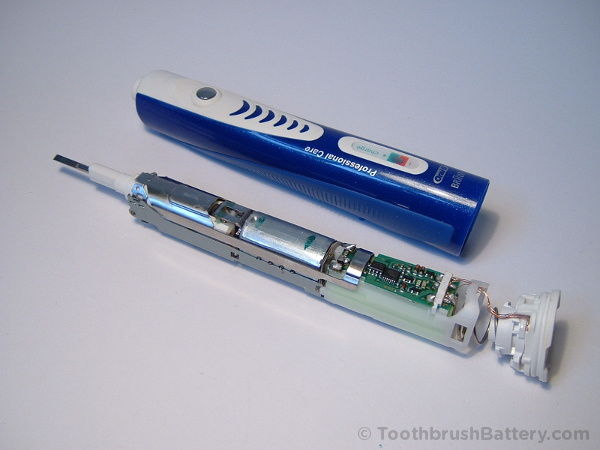
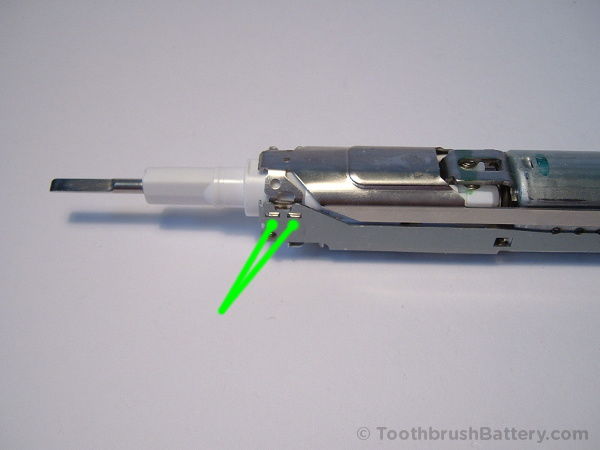
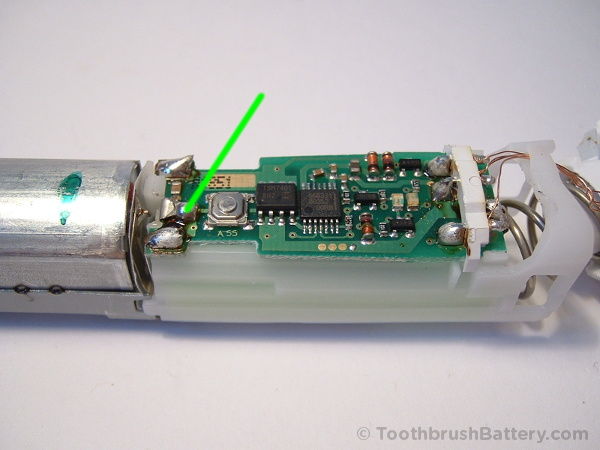
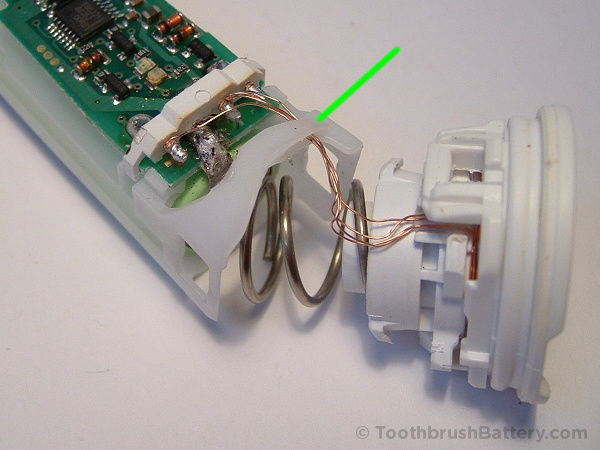
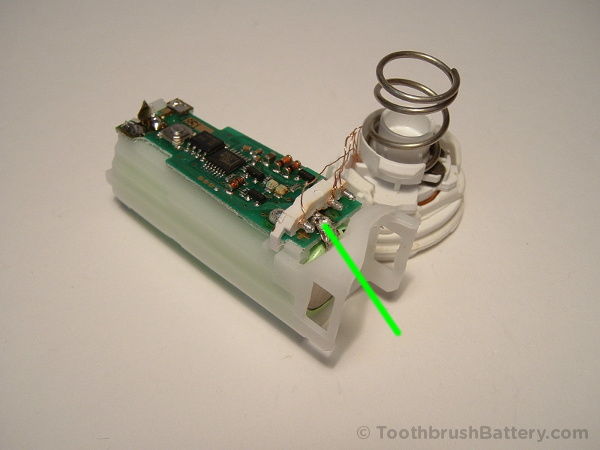
The first piece to remove from the internal assembly is the power switch plate. This is clipped in on both sides at the top of the brush, see arrows below. Carefully unclip it from one side, then the other.
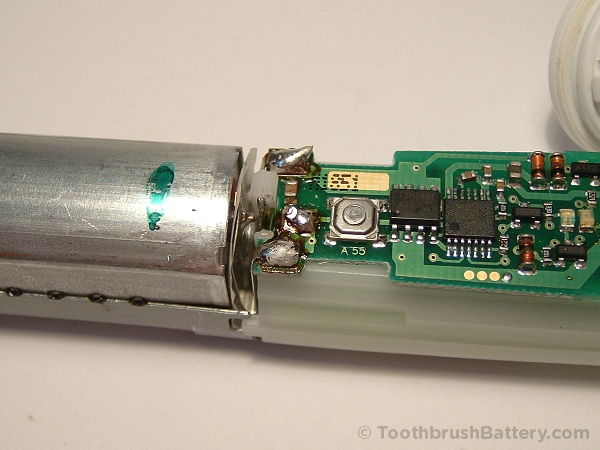
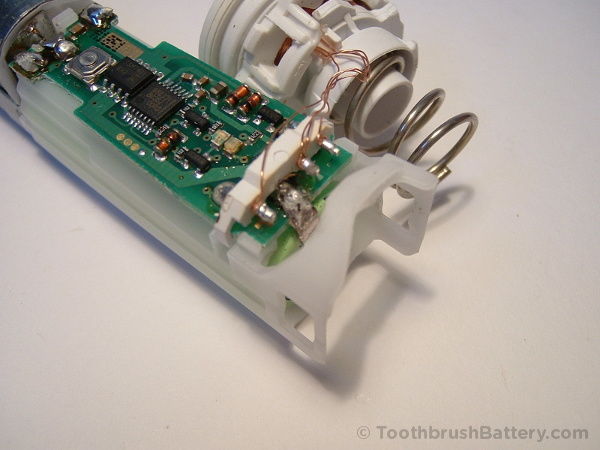
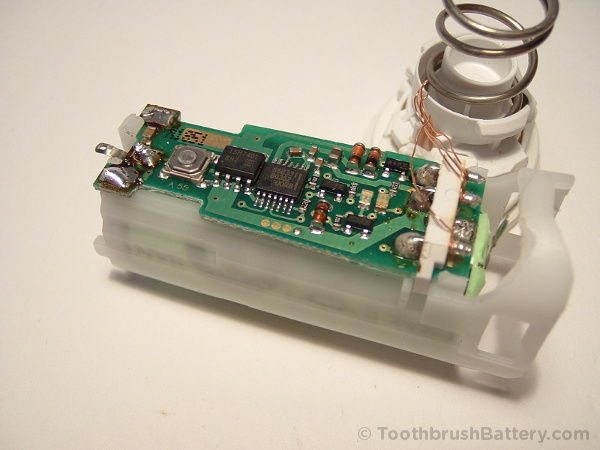
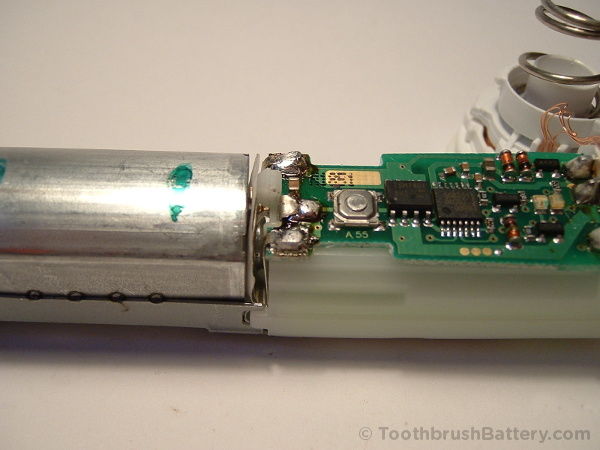
Time to get your soldering iron warmed up now! Using the soldering iron and desolder pump carefully desolder the battery’s positive terminal solder tag from the circuit board (arrowed below) and bend the metal tag upright and away from the board with a knife so there is no solder left joining the solder tag to the board. Desoldering braid might be useful for this.
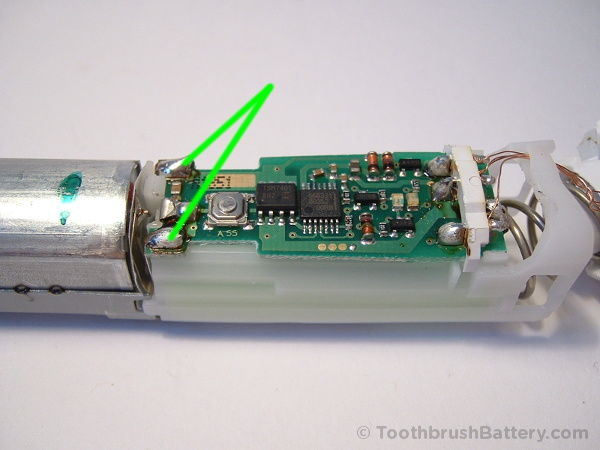
Do the same with the two motor terminals (arrowed.)
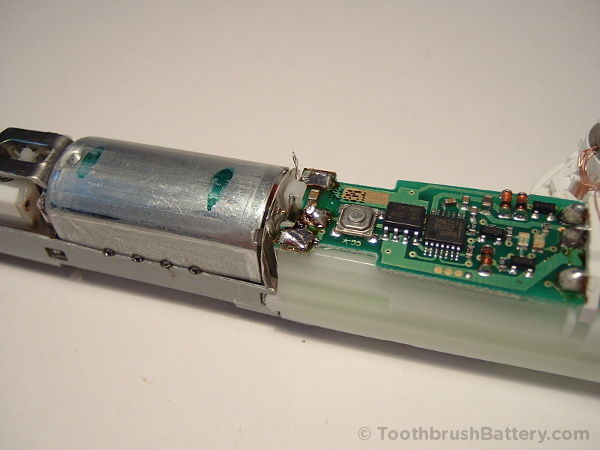
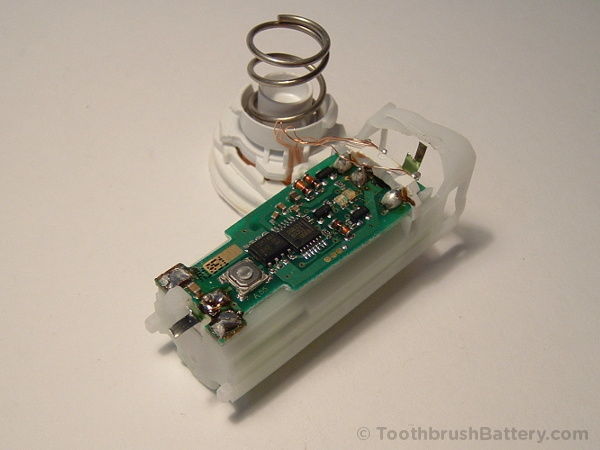
Carefully unhook the copper wires to the charging coil from under the white plastic clip holding them in place. The clip opens on the right (arrowed below.)
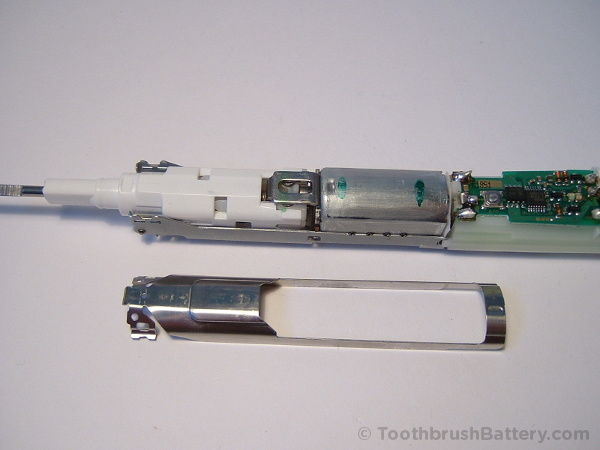
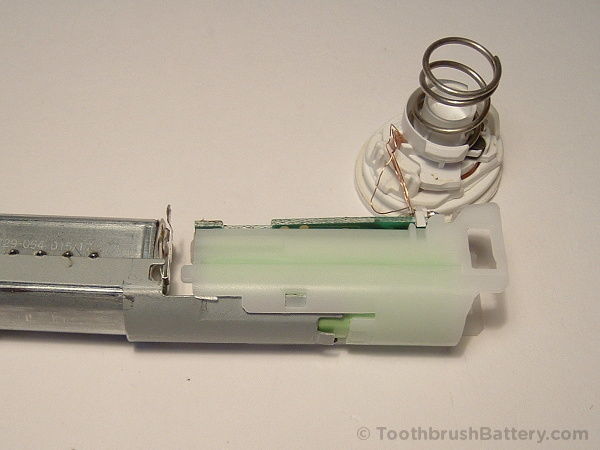
Unclip the white plastic battery carrier from the metal toothbrush frame by sliding the carrier over the metal tabs (arrowed)

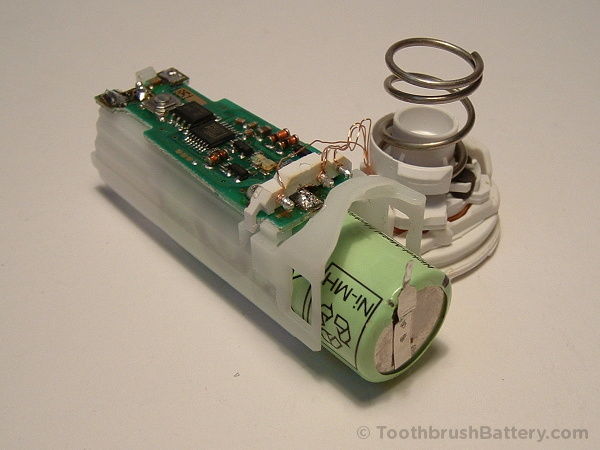
Desolder the battery’s negative terminal solder tag from the circuit board (arrowed below) and bend the metal tag upright and away from the board with a knife so there is no solder left joining the solder tag to the board. Take care not to melt the plastic arch which clipped the copper wires in place. You might find it easier to insert the soldering iron head underneath the arch.
Fold the positive terminal solder tag horizontally away from the circuit board (as above) then slide the battery out of its carrier.
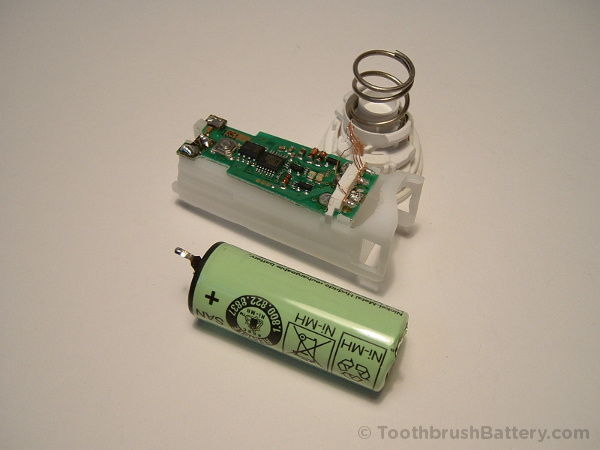
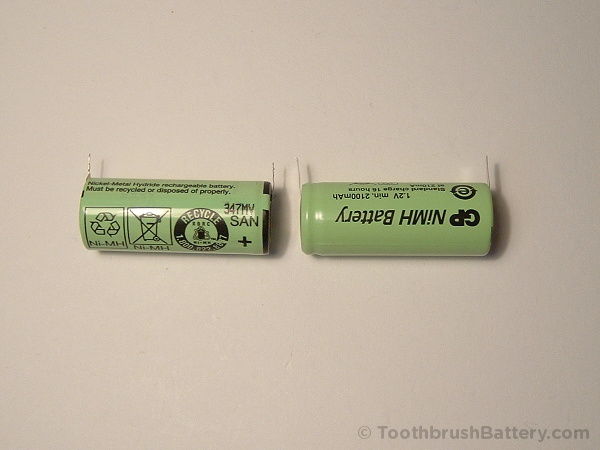
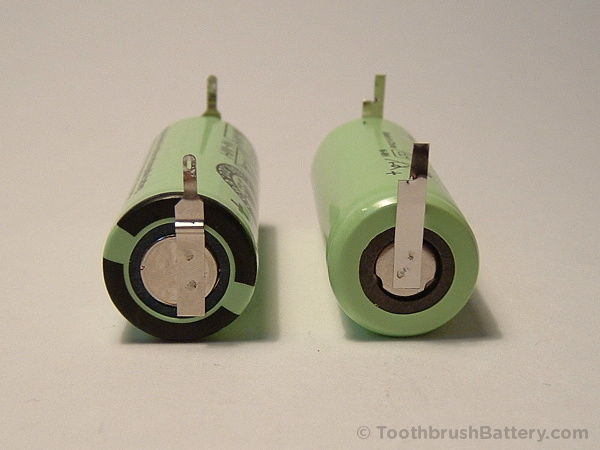
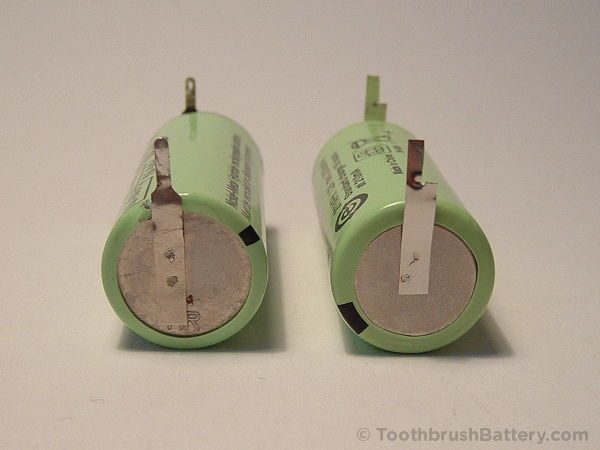
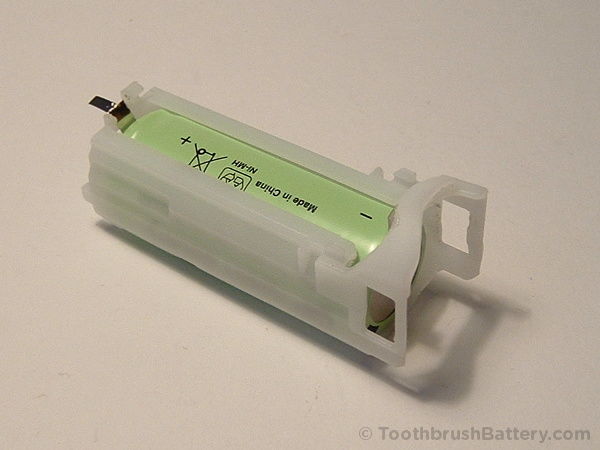
Compare the original battery to its replacement. Please support us with writing these repair guides by buying your replacement battery through these links to our secure online shop. The battery shown is a 42mm long by 17mm diameter tagged battery. However, your Type 3728 might be fitted with a narrower 42mm by 14mm diameter battery so measure your original battery before ordering!

Using scissors cut both solder tags to the same length as the tags on the original battery.
Very carefully start to narrow down the width of the positive terminal solder tag by first snipping into the tag from the left. Careful not to cut right through! Just go a quarter at a time. Then cut down from the top to remove the piece.
Do the same with the solder tag on the negative terminal, this time cutting in from the right.
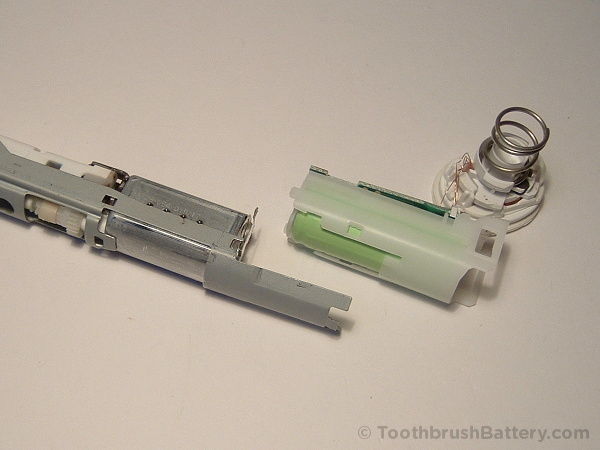
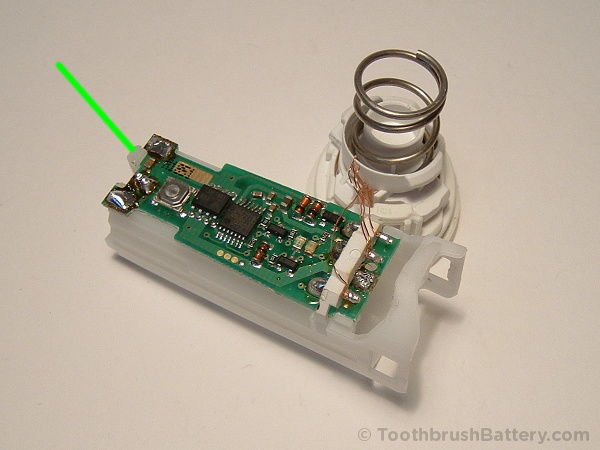
Gently unclip the circuit board from its plastic clip (arrowed below) and slide it out of the battery carrier.
Test fit the new battery in the battery carrier to check that the solder tags line up with the channels.
Re-fit the circuit board.
Solder the negative terminal solder tag onto the circuit board.
Refit the battery carrier to the metal frame of the toothbrush then solder the motor terminals and the battery’s positive terminal solder tag back onto the circuit board.
Hook the copper wires for the charging coil back under the hook into the plastic arch (arrowed below).
Clip the power switch plate back into the metal frame of the toothbrush making sure the pins locate correctly on both sides.
Gently push the innards of the brush back inside the outer handle.
Put the toothbrush back on its charger and, while pushing down vertically on the brush to close the base, twist the handle clockwise to engage the latches.
Fit the ring back around the shaft making sure it is firmly pressed into place. An a 10mm or 11mm ring spanner or similar might be useful for this.

You should now have a fully reassembled Professional Care toothbrush! Put the brush on to charge for a full 24 hours and check that the charging light starts to flash. Please recycle your old battery either at a local civic amenity or a supermarket collection point.
Please leave any questions, comments or tips about this guide below!
Thank you very much. For the instruction manual.
Just ordered 2 battery’s from your site. You are cheaper then I can find in Holland even including shipping
Plannnning to reuse the old solder tags and soldering then on the new battery like some ones reply suggested.
Thank you very much much cheaper then buying a new brush
Hi Harold, I’m glad to hear the instruction guide is useful. We recommend fully desoldering the old battery first instead of trying to re-use the old solder tags. Happy brushing!
also thank you very much for the instruction manual.
but i made a little mistake 🙁
i can’t swith off the electric toothbrush 🙁
do you have an idea may be what’s wrong?
many many thanks!
br wolfgang
Hi Wolfgang, If the brush runs continuously after soldering in the battery there could be a short circuit caused by a stray blob of solder on the PCB or the battery polarity (+/-) could be wrong. Check the battery polarity and examine your soldering for short circuits. Make sure the battery tags are not touching motor terminals or other conductive items. If you could switch the brush on but not off then the switch plate might be misaligned. Remove the inner workings from the handle casing and check the alignment of the switch plate with the actual switch on the PCB.
Excellent guides and service guys! My soldering may not win me any awards but the toothbrush’s back to life and gives quality clean again. Less waste and so much cheaper too!
Now off to get a spare battery 🙂
Great work Dave, thanks for your feedback!
I opened up my tooth brush (professional care 8500, from 2012) and I found it to have a 14 mm battery. However it appears that you can easily use a dremel sanding attachment to remove the splines inside battery tube and force it to take a 17 mm battery.
Extending the length of the battery however, appears to be impossible as that spring is nearly fully compressed in the body and would only provide 4 mm if you remove it.
Good to hear about your modification Denny! Inside the spring in the end of the cap there might be a plastic tube which could possibly be cut down to allow a longer battery to be fitted.
I did it like there. Only before my brush gave no more flashing green light. The last few days the green light did not blink, just kept on. But he worked, just after brushing your teeth began flashing red light. The last day light turned off completely, but on the charger. After replacing the brush works half minutes. Light is not on, charge no. What could it be?
Thanks in advance.
Hi Jusief, It could be the solder connections of the new battery, or it could be that the copper wires from the charging coil have become disconnected. Check both of these things first.
Do you really need to dismantle more than the bottom
and the cover/shell to dissolder the old battery.
take it off put in a new one and resolder the new battery^?
Hi Leif, It makes it easier to remove the PCB as well, but you might be able to manage it without unclipping the PCB.
Thank you for the great manual and perfectly fitted battery!
I did the battery replacement, everything works except the button is a little less sensitive now. Sometimes I have to press it two or three times. The bigger concern is a low volume ticking noise coming from the brush now. I think it is draining power and don’t know what it could be. Any insight? Thanks for this guide.
Hi Anthony, if the button seems less sensitive it could just be that the handle innards are not quite pushed all the way in. Remove the top ring and the base cap and make sure the insides are pushed right in. There could also be a piece of dirt or debris inside the casing blocking the switch. Regarding the constant ticking – that seems to be a ‘feature’ of the type 3728 toothbrush so it’s nothing to worry about.
Just a quick word to say thanks for the perfect guide, every detail covered, spot on!
Battery was delivered super fast.
Toothbrush is back up and running more strongly than i ever remember!
Thanks again!
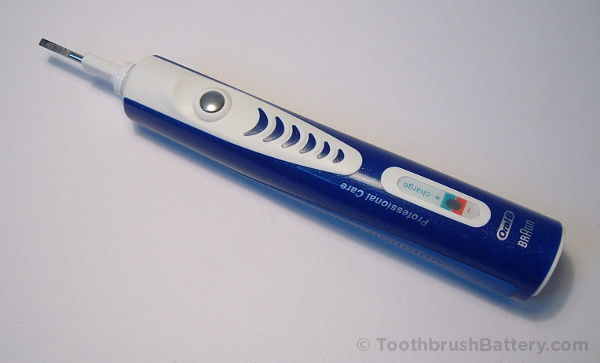
Braun-Professional-Care-Type-3728-Electric-Toothbrush-Handle
Was wondering what would cause the brush to move sideways. it is not the replacement brush heads but something with the inner body works. Also is there away to fix it?
Do you mean that the brush head can move side to side without twisting or that the whole head twists on the handle? The white plastic support around the metal shaft can wear causing the heads to fit loosely. Also, counterfeit or 3rd-party heads do not fit as well as original Oral-B replacement brush heads bought from a supermarket.
Hi, I am a woman and I watch your tutorial. It looked complicated with soldering and de soldering. Do You know if anyone from the SF Bay Area will offer battery replacement service.?
Thanks for your help In advance
Have a look at our list of toothbrush battery replacement service providers for some ideas Loni.
Hi, the guide is well done and went through the process for type 3728. I left it on the charger 24 hrs but I only have a fast red light flashing no green. Any hint on what went wrong? Tks in advance.
It sounds like a connection problem so go through the checks on our customer support page and see if that helps.
Hi ,
My problem is that the switch no longer seems to switch off. When I put my 3728 on the charger it charges up and LEDs all seem to work correctly but after I take it off the charger on charging is indicated complete, after a minute or so the 3728 starts running and I can’t stop it. Any ideas?
regards
David
Hi David, that sounds like water ingress. Open up the toothbrush handle and let the internals dry out for 24 hours. Reassemble and see if it turns itself on again. Remember to store your brush on its side with the head removed to stop water getting down the shaft.
Hi sorry for delay in getting back. I have been waiting to judge the outcome of your suggestion. I dismantled the unit from the case but didn’t find too much evidence of water ingress but gave it all a clean anyway. After all I have had this toothbrush since 1999 so not bad , never had it apart and not needed to replace battery, used a minimum of twice a day in places as far afield as Russia, America (North & South) as well as Australia and New Zealand so stood up well. It now fully charged and working as good as new. No need to change battery either. Many thanks.
Hi,
I’ve just done this replacement. The green light has been flashing correctly indicating the battery is charging but when I press the on button nothing happens. It’s been 5 hours.
I expected some movement from the motor? Or does it have to be completely charged? Worries I messed it up!
Thanks..
Hi Gordon, run through the troubleshooting checks on our customer support page and let us know if you have any further problems.
Thank you for this excellent guide, without which I’d probably have decided that there was no way to take apart my Braun 3728. I’m now up and running with one of your replacement batteries and everything is fine.
When trimming the battery tags, I found that a couple of slanting cuts worked OK. This is perhaps easier than making right-angled cuts, with the risk of slicing right through the tab.
Once I’d replaced the battery there was a worrying moment when I couldn’t start the motor. Perhaps taking out the internals had caused the gear train to jam; at any rate, wiggling the tip of the drive shaft seemed to fix it. Before you reassemble the toothbrush it’s probably worth pressing the switch on the circuit board to check that the motor runs OK.
I was impressed by the build quality of this 11-year-old toothbrush. There always comes a point where something is not worth the effort of repairing it, and £10 is a fair amount to spend on a battery given that you can buy a new Braun toothbrush for £18. But although this one has clearly seen some wear and tear I reckon it’s good for a few more years yet, and it’s good to keep it out of the landfill.
Thanks for a super tutorial. New battery fitted and a new lease of life for my old brush.
Thanks heaps for the guide (and the new batteries). Because the negative solder tag is hard to get to on this model when de-soldering it, I ended up cutting the old negative solder tag on the battery negative face with a knife, so I could remove the battery and the print board before de-soldering the old piece of the tag left (gave better access to avoid melting any plastic). However, soldering the new battery in the order as described in the guide (meaning everything tightly packed) was easy.
Dear Sir or Madam, I need your help please in selecting the correct battery. I have just removed the battery from an Oral B 3728. It is a Sanyo NiMH. 127MH, colour dark green. ( these are the only markings ) It is 42mm long by 16mm diameter. Can you help with supply please. I live in the UK and have a £ credit card. Thank you and regards John
Dear John, our 42mm long by 17mm diameter batteries will fit in your particular type 3728 toothbrush. These are available through our secure online shop here. Best regards, Rob
Dear Rob, I think I’ve got a real problem, and it’s probably not resolvable, but here goes. I’ve reassembled the toothbrush up to the point of reassembling into the holder. Before I did this I tested the negative to positive on the battery and got 1.33 volts, then I tested negative battery to one of the motor connections and got 1.33volts, did the same on the other motor connection and got 1.33 volts. I have cleaned around both motor terminals as best I can but still get 1.33 volts on both. I also tested across the motor terminals and had zero reading. There appears to be a tiny brown coloured diode or something between the positive battery connection and one of the motor connections, should this be connected across or independent of both. At present it appears to be unconnected. I fear I have blundered in some way!! Regards John.
Dear John, the motor will generally have an internal resistance of near zero so you will get the same voltage reading at both terminals. The brown capacitor across the motor is to suppress radio-frequency interference.
What happens to the onboard LED when you hold the brush innards on the charger?
Hi Rob Thank you very much for responding. In response
to your question one of the LED’s commences to flash when the unit is applied to the charger.
Question. Do you know which motor terminal is positive and which negative. What I don’t understand is why I get the same +1.3 volts at both motor terminals when I put the multimeter across to the negative battery terminal. This seems to me that the supply to the motor terminals are both positive? Am I missing something logical? Thanks again & Regards John.
Hi John, it sounds like the brush is charging so you might find it runs a little when switched on, without further charging. You can now fully reassemble it and put it on for a 24 hour charge.
Re the motor voltages, both terminals will read the same voltage relative to the battery due to the near-zero internal resistance of the motor. The circuitry switches the ‘return’ connection between the motor and the negative battery terminal. This means that the motor’s coils are always ‘live’ relative to the battery’s negative terminal when not running.
Hi Rob Thank you I’ll keep my fingers crossed and give your suggestion a try. Best wishes John.
Just installed my new battery and my toothbrush is charging. The process went pretty smooth. It was a little tricky soldering the negative terminal. My toothbrush should last at least another five years and it didn’t end up in a landfill because it needed a simple battery replacement. Another happy customer!
I still have the original battery working, 20 years plus. Great toothbrush
Hello,
I did the battery replacement according to your instructuons and the problem is when I put the toothbrush onto the charger. The light flashes very quickly and it is not as bright as it used to be before the battery replacement. The blinking light is far more dimmed. Could you please respond where the problem might be?
This could be due to a short circuit caused by stray solder or another fault. Have a read of the troubleshooting tips on our Customer Support page.
I have a Type 4736 . I’ve had it since 2005, replacing the battery in 2017 and then again ~3 weeks ago, as the time between charges seemed to decrease. It’s been performing admirably since replacing the battery again. A day ago I came indoors and discovered it had powered itself on, its whirring sound instantly recognisable. I thought maybe it was a one-off as I don’t ever remember it doing that before. Then earlier this evening it did the same thing. My soldering skills aren’t great and I wonder whether there’s a dodgy connection that could explain it? Thanks for any thoughts you might have on this.
Hi Jim, it sounds like water ingress. Open up the handle and check for moisture. Let it dry out for 24 hours then reassemble. Have a read through of our toothbrush care tips to reduce the chances of future water ingress.
Thank you! I’ve just opened it up and I think you’re spot on; running my finger up the inside wall of the handle reveals significant moisture. There’s also some grimy blackish buildup (mould?) on the rubber below where the ring sits and the ring’s plastic coating is also starting to come off in places, with metal showing through, so probably wasn’t on as tight as it used to be (came off with ease).
I will store it horizontally in future, as one of your tips suggests, and perhaps install some plumber’s tape (or even blu-tack?) below the ring for extra protection against water ingress.
Wonderfully detailed how to…thanks so much.
Possible useful tip for some: I found it difficult to snap the metal ring on around the shaft. The top cylinder from my Pilot G-2 pen has the exact diameter to use it as a tool to press with equal pressure around the ring’s circumference to complete the snap fit.
What a brilliant service. We have had our toothbrush 15 years and still going. Will come here when I need a battery. Do you ship to New Zealand? Cheers Kit (NZ)
Thank you Kit. Yes we regularly send batteries to customers in New Zealand.
I bought the battery from you because your guides are top notch.
Order dispatched July 17 and was delivered to my box in Canada August 7.
Just finished putting it all back together and all is good.
I did not bother with removing the PCB.
Thanks for the high quality guides.
Hello everyone!
I would like to ask about the Oral B 3728 electric toothbrush.
I replaced the battery 3 weeks ago.
Now it has turned on by itself, it cannot be turned off, the engine is running at a reduced, fluctuating speed.
It is not wet, there are no soldering errors, the push button is functional.
I can’t find any inscriptions on the circuit components.
What circuit component can cause the error?
Thanks in advance for the answers!
This sounds like water damage (staining or crystal formation) or a stray whisker of solder causing a short-circut somewhere.
It is completely dry and there are no soldering errors. It has been checked several times. Some kind of part, I just don’t know which one.
Thanks for the detailed instructions, they were very helpful for replacing the battery in my old Type 3728. Successful in the end, but I found the de-soldering and re-soldering of the battery contacts is the hard part. They aren’t well placed for easy access with the soldering tip, and getting the new battery terminals to stick was quite difficult. I also managed to break one of the fine wires to the charging coils and had to repair that. Tip: if the charging light flashes red rapidly when the toothbrush is place on the charging stand , then the battery is not making good contact.