
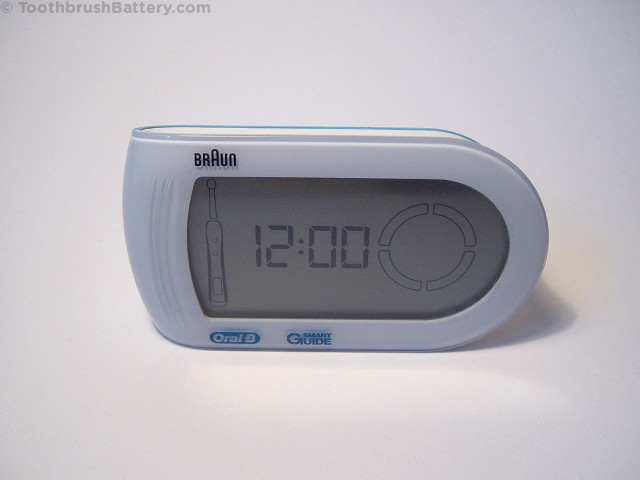
Some of the more “luxury” models of electric toothbrush made by Braun/Oral-B come with a small wireless display called a SmartGuide. The SmartGuide displays your progress as you brush, showing how long you’ve been brushing, which quadrant of your mouth you should be on, flashing up a warning if you press too hard and rewarding you with a smiling face when you’ve finished 🙂
However, due to the damp environment that the SmartGuides are used in they are prone to internal corrosion which eventually stops them working. The good news is that a faulty SmartGuide can (often) be repaired!
If you are looking for a new Smart Guide display unit because yours is lost or beyond repair then take a look at our Smart Guide compatibility guide to help you identify which variant you require.
We were going to write this as a full guide to go with our electric toothbrush repair guides but as it’s a less involved process a blog post should suffice.
The Type 3741 Oral-B Smart Guide
There are two versions of the Smart Guide – the original Type 3741 and the later more oval-shaped Type 3742. This repair guide shows you how to repair the Type 3741.

The blank display of the SmartGuide could just be an indication that the batteries are flat. If you haven’t already done so, try replacing them with two new alkaline AA size batteries to see if that brings it back to life. Alkaline batteries are recommended and you can usually get a pack of 4 in your local pound shop – just don’t be tempted by that pack of 12 zinc batteries! Zinc batteries only have a quarter of the capacity/life of Alkaline batteries and they don’t have the punch to run some devices correctly.
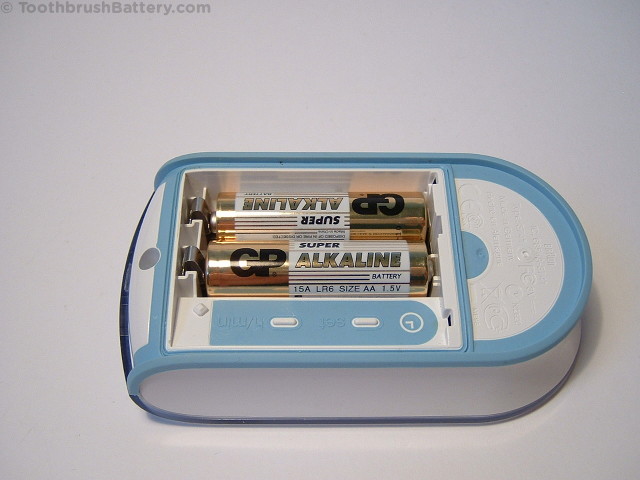
Check that the battery contacts are clean and free from corrosion at both ends. If they are corroded then clean them up by scraping with a sharp knife, rubbing with dry rough tissue or a cotton bud (q-tip) soaked in alcohol.
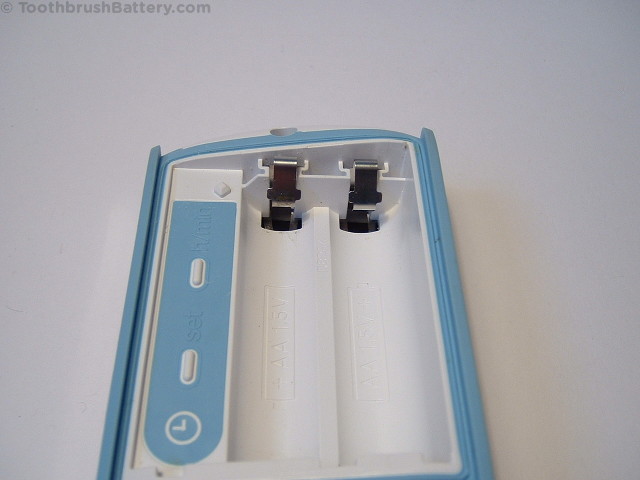
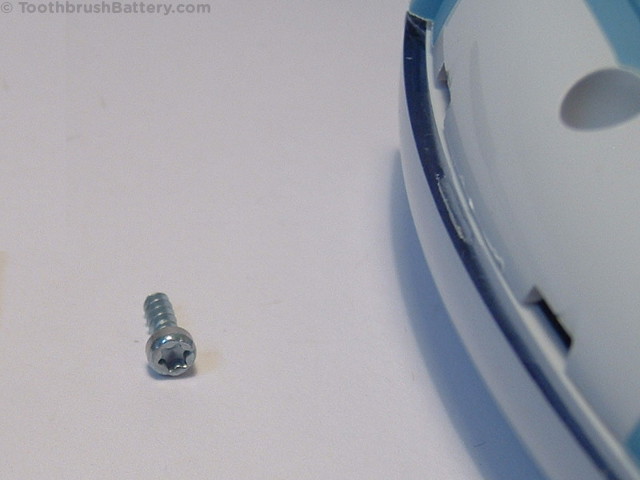
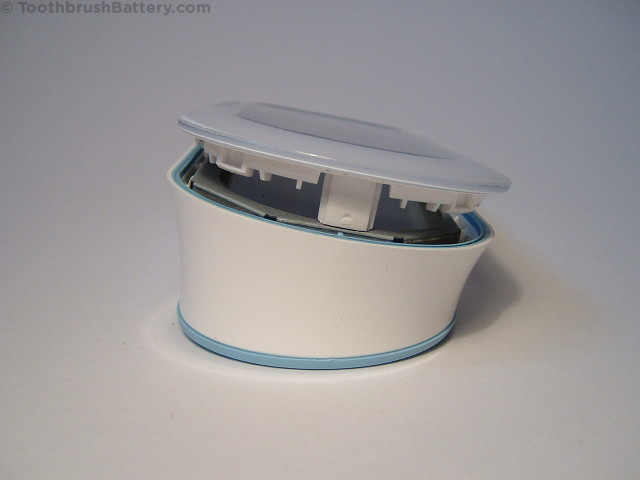
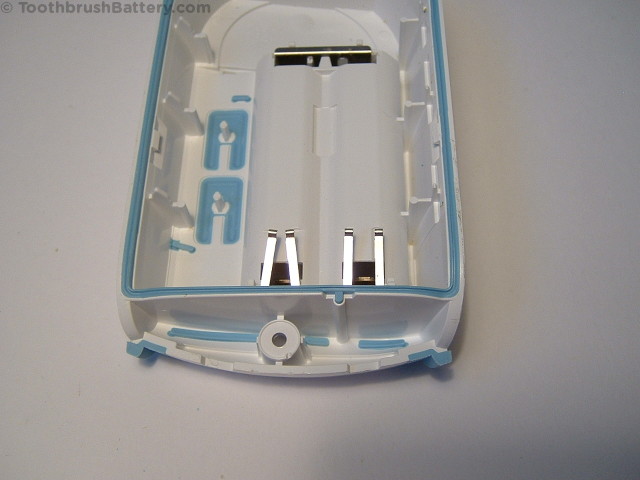
No joy from changing the batteries? Well it’s time to open up that SmartGuide and get cleaning! This is the earlier type 3741 SmartGuide so if you have a later, smaller model then the opening procedure is different. Undo the screw in the end of the casing using a T-9 size Torx screwdriver. These specialist screwdrivers are available through our secure online shop here if you don’t already have one in your toolkit – T-9 Torx screwdriver.
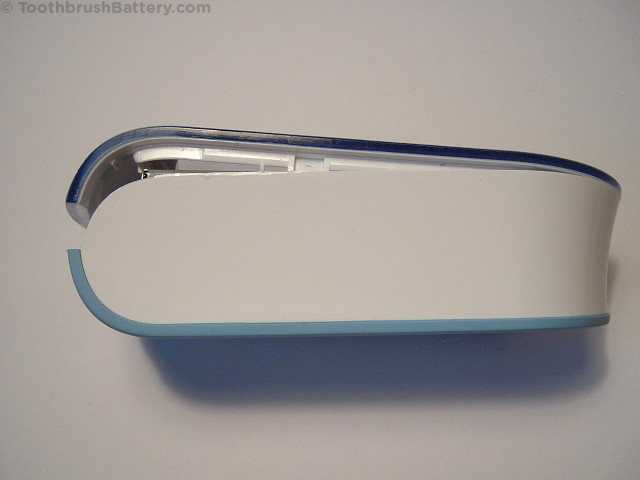
You can now start to pull the casing open. It is held together with some quite strong clips.
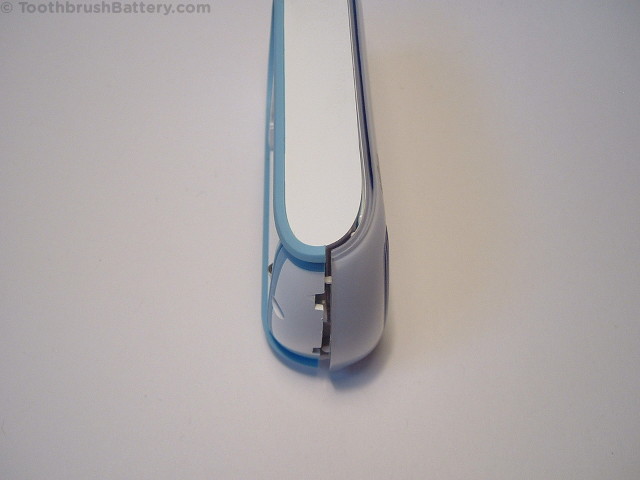
Work your way along the casing using an appropriate lever such as a guitar pick, blunt pallette knife or spudger. Be careful not to damage the plastic casing.
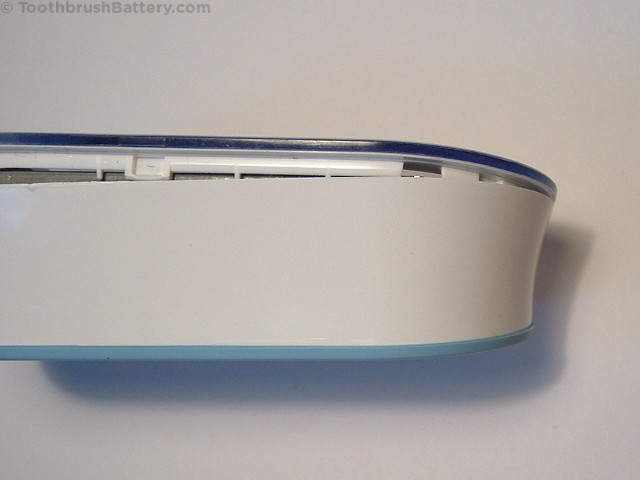
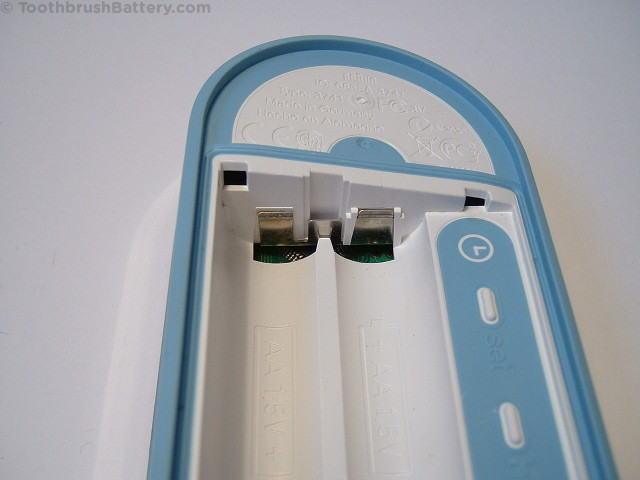
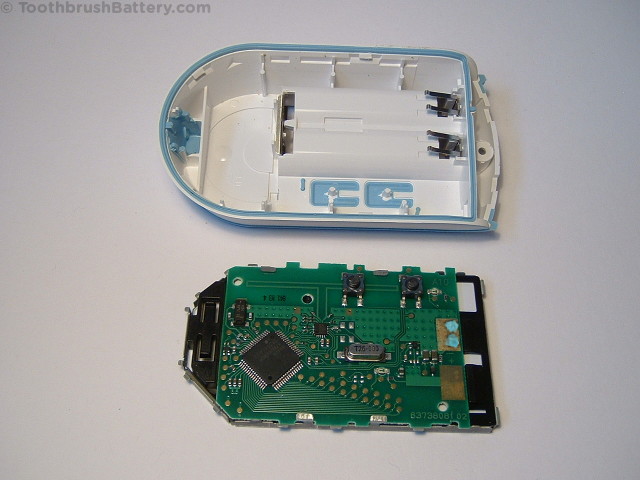
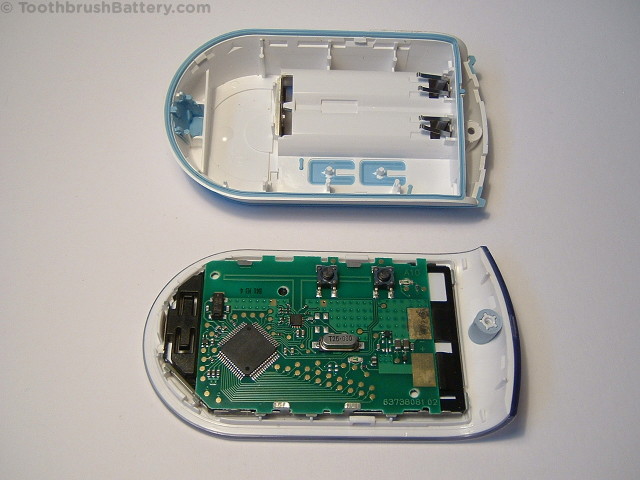
Once you’ve separated the two halves remove the PCB from the case.
You can see the corrosion on the gold PCB pad (above) and on the corresponding sprung contact legs.
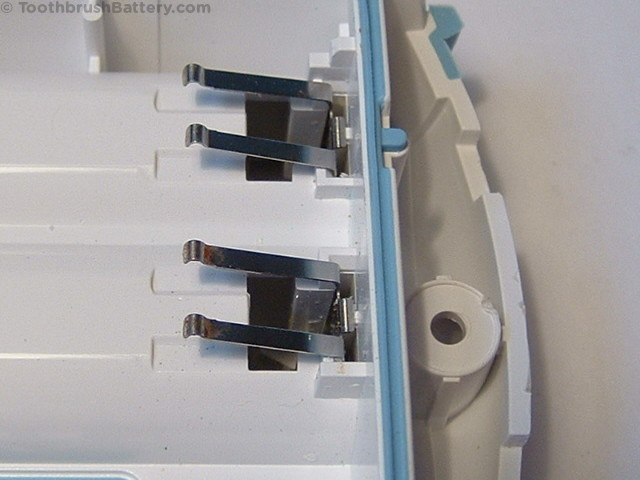
Remove the corrosion on the legs and the PCB and assess the damage. We carefully scraped at it with a sharp knife and finished with a cotton bud soaked in isopropyl alcohol. On this Smart Guide the corrosion on the PCB had eaten all the way through the metal on the pad.
This means that to create a good connection the sprung contact legs need to be bent sideways (together) so that they touch a different part of the pad when reassembled.
If you’re feeling adventurous perhaps some silicon grease on the contacts will slow down future corrosion. Once you’re happy, clip the casing back together, insert some batteries and hopefully your SmartGuide will spring back into life.
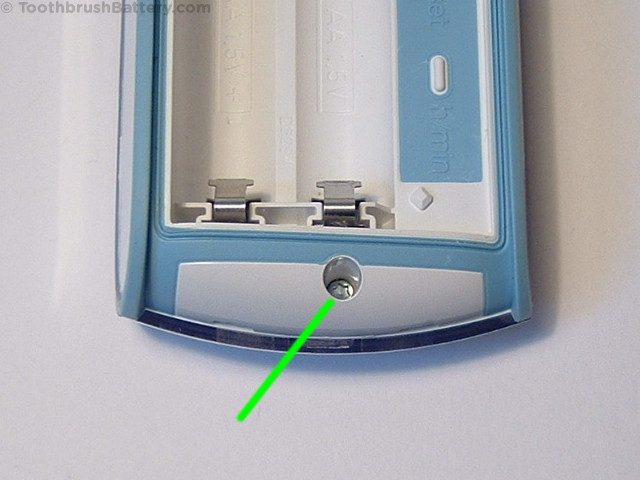
Don’t forget the screw!
If your Smart Guide still refuses to work after trying to repair it as above then take a look at our page showing where to buy a new Smart Guide.
We also publish repair guides for the toothbrushes themselves, so when the battery inside your electric toothbrush is no longer holding much charge take a look at how to replace it in our list of toothbrush battery replacement guides.
We had an email from a customer the other day about our SmartGuide repair blog post:
“Hi there, Just wanted to take the time to thank you for your repair guide for the Braun Wireless Smartguide timer. Sure enough batteries had been left in for too long and the terminals were all corroded. Once I cleaned the gunk off I had a working unit again. Thanks! Andy”
It’s always good to hear about people’s successful repairs!
Danke für den guten Rat. Ich hatte zuerst nicht an die mögliche Korrosion gedacht. Es hat wirklich in Sekundenschnelle geklappt. Mit einer alten Kreditkarte oder einem stabilen und schmalen Kunststoffstreifen lässt sich das Öffnen ohne Spuren bewerkstelligen. Nochmals vielen Dank
Bitte schön, Johannes!
My smart guide dropped off the edge of the sink two days after I got it. I hadn’t decided exactly where I wanted to place it. It hasn’t worked since. Any ideas how to fix it? Half of the display was just gone, so it’s useless.
Your only hope is to check the electrical connections between the glass LCD and the PCB. But if the glass is damaged then you will need a whole new Smart Guide 🙁
Thank you for a clear and accurate description of the repair procedure; The unit is functioning perfectly again,
Bill
Thank you the guidance and the direction, Worked for me too.
So here we are in 2018, and I just used your 2015 post to repair 2 Braun OralB Smart Guides. THANKS!
Opening the 3742 is a bear. I used a small screwdriver on one end to pry it open a bit with little damage. It is held on by a big clip at each end. I could not figure out a correct way to open it.
In any case, your instructions to repair it worked perfectly. it is now working. Thanks for going to the trouble to document and preventing this cool little display from entering the waste stream!
Thanks for the tip on clip location. I used a guitar plectrum and wedged it in one end, slight pressure on the screen at that end at it all popped out with no damage!
Thanks for your comment, we have the 3742 and my wife wanted it to work. Yours helped. Also, FYI if scraping off the corrosion/burning off the copper rectangle doesn’t work I’m sure a dab of solder would work to complete the connection
Great repair article. This looks like a common problem.
ie. the gold contact on the PC board “burning through”.
Thank you for this article and pictures. Described fault to the letter.
I simply wrapped the contact with foil. lets see how long this will last.
KZ
I followed your cleaning instructions and I still can’t get the display to show the time. There was very little corrosion, but I cleaned liked the instructions stated and moved the clips and still it doesn’t work. How do I get a replacement?
See our SmartGuide types and replacements page for where to buy a replacement SmartGuide.
It worked for me.
Thank you
aw
I hope you dont mind, I am uploading my version for the type 3742 to ifixit’s website and linking this one in the intro.
Yes please, do link back to this guide!
Great work! Thanks. Just the problem I had and a solution that worked down to the specific contact pad of the two that needed cleaning. Your description and pictures are a model of clarity that all posters should follow. My wife thanks you, too, by the way.
Worked for me too. Thanks for posting
Hi mine has stopped working it’s only 3 weeks old so would be unlikely to be corrosion .tried new battery’s still no luck what do I do now thanks
Hi Emma, if it’s only 3 weeks old then it is still under guarantee with the shop you bought it from so take it back there.
Thank you for this repair guide. Our Smart Guide works again, thanks to the clarity of the pictures and tekst.
Very useful, thanks a lot !!
My LCD became frustratingly dim and no matter how new the batteries were, there simply was no change. I began to look for a replacement smart guide but the prices were discouraging. Following your easy instructions I opened the guide, cleaned the terminals and now my smart guide is as new.
The batteries are replaced but the display does not stay on. I need to replace it, HELP. PLease tell me where to get a new Smart Guide!
There are many versions of the Type 3741 Smartguide and they’re not interchangeable so if you get the wrong version it won’t ‘pair’ with your toothbrush. Check that the SmartGuide you’re buying has the same colour of rubber seal around the battery cover (grey or light blue), that it has the same number of stars on the screen (5, 4 or none), and if it has no stars check that the on-screen diagram of the brush is the same (long oval head on it or rounder head). We have an article explaining the differences and where to buy one here.
Can you tell me who would do the battery replacement for my Braun type 3738? How much?
You could try your local television repair shop.
Fantastic advice and following the instructions to remove the cover and clean the Braun Smartguide terminals the timer “came back to life” and is as good as new. Many thanks.
Great, It worked! Thank you.
I have Oral-B (Smart Series 5000). It was gift. It is only about 5 months old. I carried it on the plane several times during the last two months (in the check in baggage), and did not use it during my constant traveling, during those two months. Now, my brush works fine. However, the display unit is blank (even after putting new Alkaline batteries). I am sure there is no rusting! I have pressed the ‘Set’ button over 5 seconds, and nothing shows on the display!
What should I do?
If this is one of the newer SmartGuides that takes AAA batteries then I haven’t yet dismantled one. Check the metal contacts inside the battery compartment but if it’s only 5 months old then it will still be under guarantee so you can return it to the shop for a replacement.
Just a quick note to say thank you for your easy to understand guide to repairing a smart guide.
After dismantling the guide, I had some corrosion on one of the terminal plates which I removed and bent the contact pins.
The guide now works like new,but that screw is one pig to get out .
Thank you
Glad it worked for you Bob. Yes, without the correct size of Torx screwdriver they are a pain to get open! For other people wanting to make the repair, your local mobile phone repair shop or even a mechanic might be able to remove the screw for you.
Great, it works….. thanks for this Tutorial
The gold contacts on my pcb are completely gone through corrosion. What would be the next step?
Hi Mike, you could potentially solder a fine wire between the battery contact and a non-corroded part of the PCB pad.
I wish I could upload an image. There’s zero gold left. If there was, I would’ve done that.
Do you know what part of the board the gold contacts connect to?
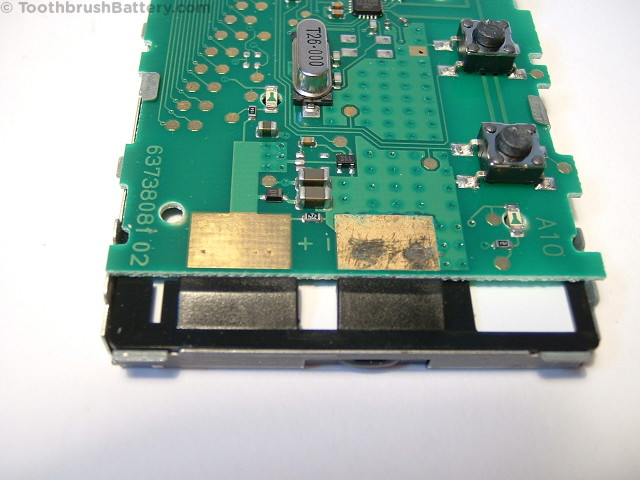
That’s some corrosion! If it’s the gold battery contact on the right as seen in the photo here labelled with a minus sign (-) then it looks like it connects to the nearest push button, to the button’s corner connection nearest to the pad. This is a Revision A10 PCB so yours might be different and have a different track layout. It’s just a case of tracing the tracks. Whatever track (or in this case a large area) leads off from the corroded pad should take you to something else you can solder to. You can also scrape off the green coating from the track or large area (light green) and solder directly to it.
I have oral b toothbrush, 2yrs old the time works on the clock, since I changed the hr, toothbrush dosnt pick up clock, any susgetions please
Hi Lynn, you might need to re-synchronise your Smart Guide with your toothbrush. What is the Type number of your SmartGuide?
It’s 3742
There are instructions on re-synchronising your toothbrush with the Type 3742 SmartGuide on the page numbered 10 of the Braun instructions here. Hope that helps!
Thankyou so much for the info, it has worked, go’s to show should always keep manuals , thankyou once again😀
Thank you for this. The recommendations and steps worked. Now the display powers on
Awesome…work great. I had exactly the same proble as shown
Hi – will the newer 5000 series Bluetooth toothbrushes work with the older 3741 SmartGuide?
Thanks
Allan
No, in general I don’t believe so. There were at least 3 different revisions of the 3741 SmartGuide and they are each incompatible with the brushes supplied with the other revisions. It’s possible that some v2 Triumph 5000 brushes will work with the latest revision of the 3741 SmartGuide but there’s no definite way to tell.
Many thanks for that – keep up the good work!
Thank you for the pictures. It was successful
Hi, any idea how to remove the cover for the 3742 model? There seems to be no screw and I can’t prise it open.
Thanks in advance!
The cover is closed by pressure at both ends.
Thank you a lot. Your procedure just fixed my unit that stopped working monthes ago.
Great gift, thanks a lot.
Bye from San Marino Republic
So excited to find this! Fixed the problem in time. I was about to toss the display. Many thanks.
Thanks a lot. You just saved my Smart Guide from going into the trash bin…I followed the detailed guidance of yours and it’s working like a charm now. Thanks 🙂
Thank you very much for your guide!!!!!! ‘Till today my smart guide display wasn’t working, so I was thinking that the problem was display or PCB, but once I followed your very helpful guide, I realized that either battery contacts and PCB contacts, was full of corrosion ’cause unfortunately I had left the batteries inside for too long and I was throwing away the display!!!!!! I was also afraid to force opening casing display, once I took off the screw, ’cause was too strong to pull out and I was thinking that there was another hidden screw, but with your guide, no problem and now my display is working flawlessly again!!!! Many thanks 🙂
Thank you for this. I tried it and now my Smart Guide is working again!
Just want to say thanks for showing me how to fix my SmartGuide…it works again!
Thanks for the tips. My LCD does not reset to a clean 12:00 or the circle or the toothbrush. It just looks a bit garbled. Is there another reset or just that the terminals are still not making good contact.
If removing and re-inserting the batteries does not clear the screen then there could be debris on the PCB causing a short, or the connection between the LCD and PCB could be loose/damaged.
My wife’s little smiley face stopped working and thanks to your article I was able to open the casing, clean the contacts and solve the problem. Took only a couple of minutes. Many thanks and keep up the good work.
Happiest thank you, it really worked.
I was in many shops, first in several handy shops, at the end in an electronic warehouse to find just there a friendly seller who gave me a new T9 screwdriver to open the shitty screw. I didn’t have to buy the screwdriver.
I think to avoid a new problem I would have to pack the smart guide in a vacuum envelop or do you think a water (vapor) resistent packaging is doing well ?
It was a small, but very effective help against our “throwawayindustry and -society” !
Many many thanks
and in hope of further creative ideas.
Unfortunately these latter won’t save our planet,
but are valuable witness of human friendly intelligence.
Yours
Sigrid
Hi Sigrid, maybe a grip-seal bag would keep the Smart Guide dry?
Brilliant advice , just about to throw it away. Thanks
Following your guide, I have further soldered wires between the battery terminals and the power pads at the PCB. This is hopefully a permanent fix.
This worked great! Thanks for sharing.
My smart guide display is working (showing the time) after replacing the batteries, but does not show any brushing activity information when I brush my teeth. it seems like the display and the brush are not connecting anymore. Is there any way to “reconnect” them?
To re-synchronise or “pair” the SmartGuide and your Triumph toothbrush, hold down the “h/min” button inside the Smartguide for 3 seconds until the display starts flashing “L—“. Now switch on your toothbrush and the SmartGuide should shortly update to “L-1-“.
If this doesn’t work, perhaps you have disabled the radio transmissions from your toothbrush. Instructions for both enabling transmissions and the re-syncing process are both on page 17 of this Braun instruction guide.
Hi This was helpful to a point. I have a oral-b smartguide timer 7000. Eventually I prised it open with a blunt thin knife. The whole unit popped out. I carefully looked at it. It turned out to be the silver connection ribbon between the display and the circuit board. A bit of tape fixed it but it was still under warranty so I took it back. If you play with this, be careful to only touch the circuit board on the edges and don’t touch the silver connection ribbon or the oils on your skin will stop it working.
Hi, thank you very much for this guide. I have a triumph 5000. Tried every battery wasnt working. Unscrewed and had to use a hair dryer to soft up the clips so i could open the unit with some pry tools. And as described plates had slight corrision which i scraped off. Fitted it together again and the guide works 🙂 🙂 :).
Thank you again for the guide
This worked the first time for about a year. The second time I soldered wires from the pads to the battery case ends. That lasted maybe 2 months and now the LCD is too dim to read even with new batteries. Maybe I need thicker wires? This thing is such a PITA, I’d replace it but that doesn’t appear to be an option.
The wires can be pretty thin as it’s not a high current device. Is there corrosion where the batteries touch the metal contacts inside the battery compartment? Make sure you are using Alkaline batteries too.
Thank you for the awesome post! Years ago I had purchased three of the Wireless SmartGuide with the Braun Power Toothbrush sets for my family. I had already thrown one of the SmartGuide’s away because I couldn’t get it to restart (as you note above). Glad I held on to the two others. One was still working and the other had also died similar to the first (of course the two units that broke were in each of our children’s bathroom, while ours is still working). Thanks to you helpful and well documented post, I was able to get the non-functional SmartGuide to work again and am now mailing it across the world to my daughter who is the US Navy! Hopefully using her childhood toothbrush (with replacement heads) will bring a smile to her normally stressful day. Thanks again!
Taking the 3742 type of Smart Guide to pieces is not easy. After a long fight with thin feeler gauges, I decided that I had nothing to lose and pushed a small screwdriver inside and down the centre of the curved edge. The case gives a little and the works can then be levered out. I was quite surprised that this did not result in damage to the case; but try it at your own risk! Reassembly is a snap..
Thanks for the tip about the smaller 3742 Smart Guide David. Did you manage to repair it OK?
Yes. It just needed cleaning, and I have now mounted it away from any water!
David
Thanks David!
I caused some minor cosmetic damage on mine by starting with a screwdriver that was too thick but I got it off using a knife and got it working again (at least for now).
Now trying to source a T9 (the smallest I have is T10) to try and get my old one working too…
This worked for me! Thanks for giving me the knowledge and confidence to crack it open!!! Easy fix of corrosion inside on only 1 contact.
Thanks and God bless!
Scott
Hi, how can I open the new wireless smart guide (rounded version)?
Thanks!
See David’s comment on 12 November 2017 here.
the copper ring came off can it be repaired?
What copper ring? Which Smartguide display unit do you have?
You rock! Thanks for saving me the agrivation of replacing the unit. Some spray from electrical contact cleaner and a little rubbing cleaned off the corroded contact. Up and running. Ty again.
My SmartGuide (type: 3741) display is working (showing the time) but does not show any brushing activity information when I brush my teeth. It seems like no connection with the brush (type: 3762). I tried to re-synchronize and enable radio transmission, but it didn’t work.
I bought this pack several years ago. I accidentally dropped the SmartGuide into water long time ago.
I open up the SmartGuide after your repair instruction, see little corrosion on the gold PCB pad and a little corrosion on the frame of LCD. See pictures here: (no links allowed…)
Do you have any idea how to fix this? Thank you.
You can post links, but change the letters ‘http’ to ‘hxxp’ at the start of each link.
gracias por la información de la reparación del oral-b type 3741, he seguido los pasos y vuelvo a tenerlo nuevo.
Excellent guide – unit working again. Thank you!
are we able to buy the smart guide alone? I don’t want to have to buy the whole tooth brush
Yes, have a look through our Smart Guide compatibility guide to help you choose the correct one for your brush.
Thank you so much for posting this tutorial. I would have investigated if there was anything I could have done, but your encouragement made things so much better, and reassuring.
Thank you once again
Type 3742
it’s easy to open with a nail file, just push in vertical (in one of the side ends from the back)
With mine , parts of the Display did not work. The flexible contacts became partly loose.
I did just put in a plastic straw , so the flexible contacts got more pressure.
Works fine
Maybe next time I try it like in
Fixing Missing Digits of Calculator
S.
Hi, our Smartguide worked fine until I tried and loaded the app to my phone to try it out. However when I checked the smartguide it no longer reacted to any toothbrush actions. I decided that I wanted to continue to use the smartguide but to no avail and it dose not see to link to the tooth brush. Please do you have any thoughts on how I can fix the problem.
Many thanks
Mike
What Type number of toothbrush is this? If you link the brush to the smartphone app it might turn off the SmartGuide functionality on the brush. You might be able to re-enable this function within the app. For some toothbrush models the app will upgrade the toothbrush firmware to a version that removes SmartGuide functionality 🙁 See our notes for the SmartGuide 3742 version B here.
Thank you for your guide as it worked great and now my Smart Guide is up and running as new.
I have a oral b timer type 3742 , opened it and saw that the flexible contacts became loose. Which glue can I use to fix it? Because when I push the flexible contacts together it works, so a little glue should sove the problem.
Ruud
Can you bend the metal contacts on your 3742 slightly so that they give more pressure?
It’s about the plastic contacts which are connected to the glass (timer), They are not tight to each other anymore, so I need glue to tighten them together. What glue should I use?
Ruud
If this is the flexible ribbon connector between LCD and PCB, perhaps it is enough to tape it down, or warm up the original glue with a hot-air gun or hairdryer.
Unfortunately both solutions did not work.
I think I need some glue, but do not know which glue I must use.
Hi Folks
It’s probably a bit late for a reply to most but here goes.
My one just stopped working. Thanks to your post I was able to get it apart (those clips sure are strong; I wasn’t game to force it but your instructions set me right.
I knew the trouble with mine was that the battery connectors had been bent due to it falling on the floor. Once open and the contacts bent … all is OK.
Cheers all.
Ted
Thanks It works now……………… yea!
Thank you.
Great post!
Thanks for your clear instructions – and the photos! It worked & my smart guide is working great once again!!
Clock/Timer was not working…was ready to toss! Tried this method and unit works perfectly. Instructions were the best and easy to follow. Great advise…thank you very much.
Followed your directions on how to repair the Braun Oral B Smart guide timer #3741 that stopped working. Put new batteries in and still nothing. Took it apart and cleaned the corrosion off the gold plates and terminal ends and is working perfect. Thank you for the how to detailed instructions.
This worked like a charm. Thank you.
I found your guide helpful on the internet and even cleaned the contacts of my smartguide (3742-B)
The thing with my smartguide is that every 30 seconds, it starts the timer from 00:26 and up to 02:03 – like its detecting a ghost toothbrush.
Because of this, i cant set the time on the smartguide and the buttons dont always work.
Have you seen this issue and do you know how to solve it?
Perhaps there is moisture inside the Smartguide causing the erratic behaviour. Opening it up and letting the insides dry out for 24 hours might cure it. Also check for any corrosion or crystalline deposits on the circuit board and components.
I just started having the same problem as M. I can’t see a way to open it. There are no visible screws. My guess is that it snaps together but there is no obvious place to pry it open that I can see.
Hi, thanks for the article.
However, I too have the same problem as M.
I took the batteries out, left it out for at least 4 days, and the screen was blank after I replaced the batteries.
Then I followed the instruction on your article, now it is back to the 00:26 to 02:03 cycle again…
The timer is about 2 years old, inside there was minimal erosion to the eye, nothing as dramatic as your photo.
I really hope I can get it working it again and not create another piece of junk…
Thanks again for all your help.
LenSatic, the snap is on the oval sides. Some force may be needed, some damages may be unavoidable.
Love your work! 5 years on and this is still a handy page!!
Thanks! This method worked. However, to fix the dim screen, I bent the battery contacts on the board slightly askewed to the side to avoid the corrosion. I then bent the contacts out to create a tighter connection.
Every time I put in new batteries is starts with low battery blinking and then shuts off after a couple of days:(
Are you using batteries that are marked with the word ‘alkaline’? After cleaning the contacts these should power your Smart Guide correctly.
Hello my problem is a constant red triangle alarm of too much pressure! What could be the reason!
Best regards
Eva
What happens if you remove the batteries from the SmartGuide for 10 minutes then replace them?
It is still doing the job. I mean your way to repair it.
Dank je wel.
Frans
Wanted to write to thank you kindly for your repair article. My fiancée has had her SmartGuide for all of high school, university, and beyond. Her trusty companion of nearly ten years recently became unwell, and I was able to save the day thanks to your article. Thank you for leaving it up after all this time.
What was particularly helpful was the tip to use a softer instrument to separate the case- I was using a metal flathead screwdriver and could tell I was going to cause unnecessary damage. I ended up using a bread clip, which I am unsure is something used in the UK. The pads on the control board were in excellent condition, but had very small areas worn thin by the contacts. I used your technique to slightly bend the prongs inwards to change the contact area, and slightly upwards to increase contact force. Hopefully the latter does not noticeably decrease the life span of the new contact area on the pad.
The SmartGuide is back to humming along and my fiancée is positively glowing. Incredible how such a small thing can have such a great impact!
type 3742-b I apologize for my english mine turned off but it had nothing, the battery lugs did not make contact . For disassembly I used a credit card inserted in the long side and then I gently pushed on the display. Thanks everyone for the help.
Thank you very much. I know this post is very old now but I’ve had my little timer unit for easily 15 years – I don’t even have the toothbrush it came with anymore but I love that little unit, it fits just right in the bathroom with my colour scheme and I use it as a clock – but when I went to change the batteries one day it just stopped working.
I found this guide, and managed to get it working again by bending the contact arms as you suggested. All I had to buy was the special T8 screwdriver – a few pounds and mine came with a nifty little opener that helped get the two parts of the unit apart.
Hello. Just managed to fix my timer. Contacts were corroded as per your very useful step by step guide.
Many thanks.
My little SmartGuide occaisonally stopped working. Slightly shaking the unit helped usually until yesterday. I followed your guide and what can I say? The SmartGuide is working again. Thank you very much.
Very helpful! Was able to restore mine which was dormant for about 8 years.
Grazie mi avete aiutato ad aprirlo
Hi
I have the 3742 version and it is not working properly.
I would like to open it up to check for corrosion and clean it but cannot find how to do this.
Are you able to tell me if there is a way please.
Your site has been very helpful and informative.
Many thanks
Amy
Hi Amy, There are no screws holding the 3742 SmartGuide together, put it does have some big plastic clips. There is a YouTube video here that might help you get yours apart.
This was perfect – thank you!
Thank you so much for the help. It worked like a charm, so easy.
MP
Thank you very much. These easy to follow repair instructions were successful. I thought that my Oral B Smart Guide was done. However, I am happy to report that it is now working perfectly again.
Thanks for a brilliant guide. Fixed my toothbrush clock/timer with your help in opening the case. The middle clips were so tight that I thought there was a screw that I couldn’t see but with your excellent guide I put extra pressure on opening it and bingo, it didn’t break :))
Thanks again for a great guide.
Toothbrush long gone, but my Smart Guide still tells me the time! and I would be dismayed if it finally gives up the ghost. I have no idea how old it is, bur I love the display.
Your guide on dismantling and cleaning it was a god send a couple of years ago. Thankyou, sites like this make my day when I come across them.
Just changed to summer time here on the East coast of Australia so battled the cantankerous process. I think its buttons (set and h/min – being a standards sort of guy I get a delight with these button labels) are a little cranky, so it always takes a few attempts.
Thanks again!
Once more, had to change the batteries and the display didn’t reinstate.
Used this and renovated the contacts AGAIN and it’s all back.
Thanks!
Tim in Oz