
We often get asked about corrosion on the PCB of Philips Sonicare toothbrushes, including on the top-of-the-range DiamondClean toothbrush (HX9300 series), as well as the FlexCare, HealthyWhite, EasyClean and other Sonicare models.
When the seal at the top of the toothbrush fails and the toothbrush is stored standing upright with the head still attached it means that water can seep down past the seal, into the inside of the toothbrush handle and start to corrode the inner workings of your Sonicare.
Often this corrosion can damage the fine tracks of the PCB resulting in a non-running toothbrush. Below is a photo of some corrosion on the underside of a Sonicare DiamondClean’s PCB: (Click to enlarge)
You can see around the two arrowed holes there is corrosion. These holes are “plated-through” meaning that the holes are coated with metal to allow them to conduct electrically from the track on this (lower) surface of the PCB to tracks on the upper surface.
The corrosion shown above was enough to stop the electrical conduction ability of this track. As it is a simple point-to-point track connecting at both ends to the other surface of the PCB continuity was checked between the two holes from the upper surface side and the track underneath was found to be non-conducting.
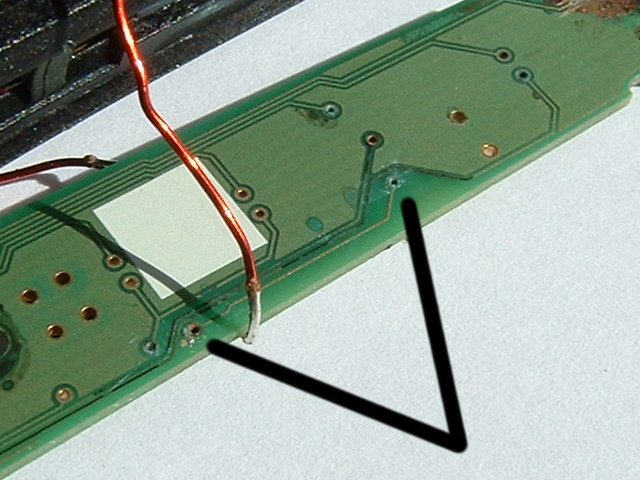
The repair shown below was made using some insulated copper telephone wire, but this was probably slightly too thick. A finer enamelled magnet wire might have been a better choice, similar to that used to wind the coils of the solenoid.
The repair:

The hole arrowed on the right in the 1st photo emerges by the letter “n” of the white “Gnd” on the upper surface on the left in the 2nd photo. A track then connects that hole to a leg of the black IC and then to a test point (arrowed on the left) where the white wire is now soldered to.
The hole arrowed on the left of the 1st photo connects through the PCB to where the right hand end of the white wire shown in the 2nd photo is soldered in place.
On this particular toothbrush there was a second patch of severe corrosion on the underside of the PCB under the button. A second, longer, bypass wire was used to restore continuity for this fault. Part of that wire can be seen in the 2nd photo.
The lesson that Philips could learn from all this, apart from making a better seal, is to use wider tracks on their PCBs and a thicker layer of copper so they’re more resistant to corrosion!
If your repair attempts are unsucessful have a look at our Sonicare spare parts page for where to buy replacement PCBs.
To reduce the chances of water getting into your Sonicare toothbrush and causing corrosion please see our electric toothbrush care tips.
Is there a way to open the Philips Sonicare toothbrush, repair the rust damage, and put the thing back together so it can continue to be used? Thanks.
Yes there are opening guides for various Sonicare toothbrushes on our toothbrush battery guides page.
Can you post the picture of where the 2nd repair wire goes? I have the same corrosion as shown in your picture but adding the wire you showed didn’t fix it. So I think I need to put in the 2nd wire in your picture. I couldn’t see the bottom side of the PCB. Can’t seem to be able to open it up.
On the DiamondClean shown there was further corrosion on the underside of the PCB. The 2nd wire is to bypass the corroded track on the bottom of the PCB. To remove the PCB you will need to desolder connections to the battery to the pins connecting the charging coil.
Finally able to see the underside by un-soldering the battery and coil. By continuity check, able to determine there was a corroded connection underneath the switch. Can`t see it but can tell by checking with a meter. The switch itself is fine but one terminal has lost connection underneath due to corrosion. I soldered a wire from the switch to a hole marked R1 and the tooth brush worked again. If you are looking at the switch from the top with the switch to your left hand side, it is the terminal on the top left corner. Adding two wires is probably most people need to do because the tracks are probably weakest at those two spots and will corrode first. Wish someone would have told me that so I don`t have to de-solder the coil. Now the coil is less sensitive. I need to put the toothbrush on the base without the glass holder to get it charged. It needs to be closer to the base. Anyone knows why?
A great alternative for the corroded holes in PCB. Thanks for sharing the very helpful tip.
Same here! Had a corroded hole under the power switch. Thanks for sharing this excellent list of tips!
Hi there, I have a brush where the corrision and crystal formation appears quite extensive on the pcb, battery terminals and connections to solenoid, is there a way I can share a picture? I’d like advice as to whether its worth attempting to clean or not.
Thank you!
Yes you can send an email to contact@toothbrushbattery.com with your photos attached.