
This guide will show you how to open and dismantle the Braun Oral-B Genius X, 10000, 9000, 8000, 7000, Smart 6000 and Smart 6 electric toothbrush models and repair them by fitting a replacement Li-ion battery. These are expensive, top-of-the-range toothbrushes so they are well worth repairing!
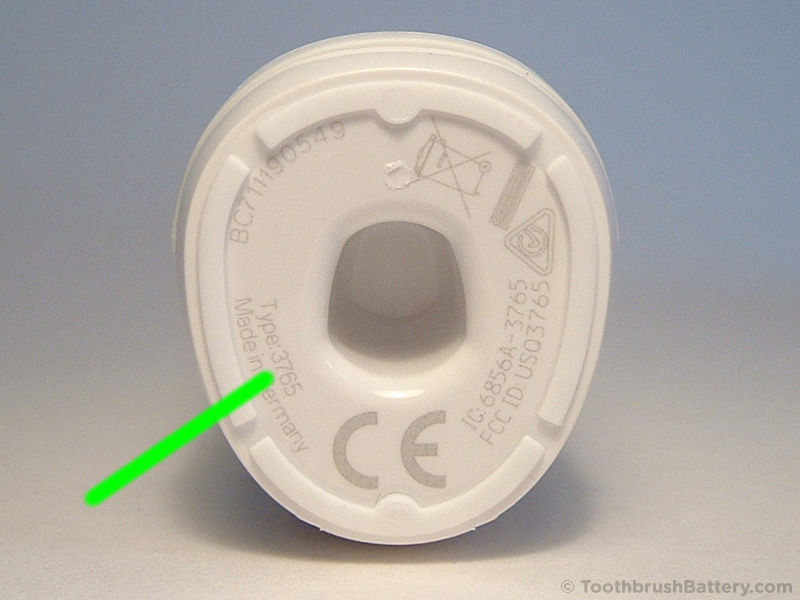
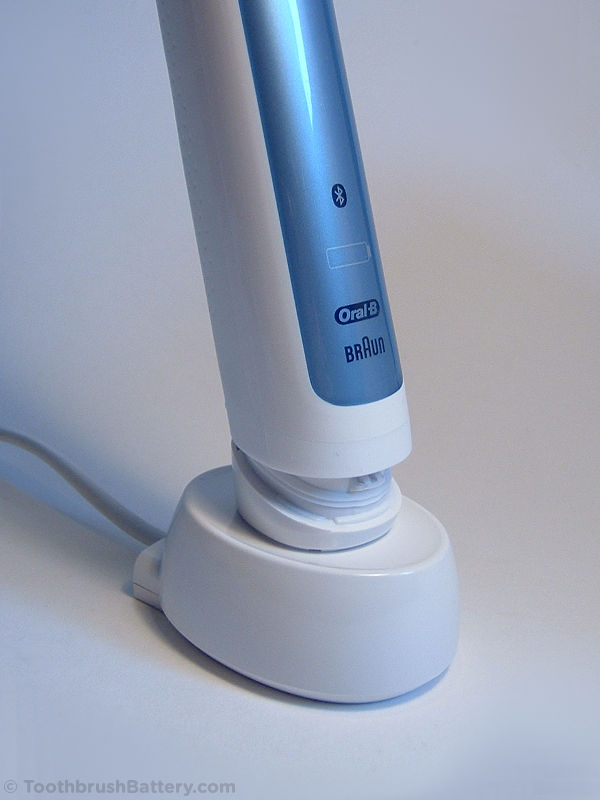
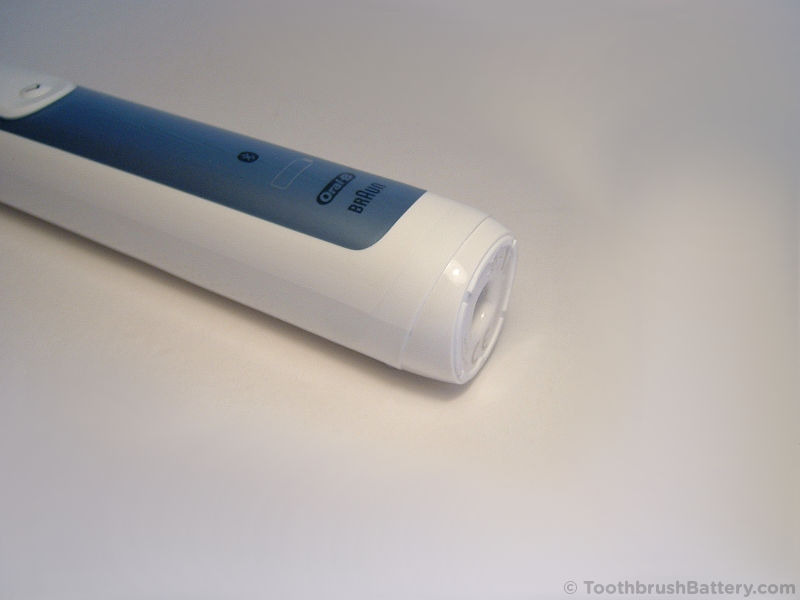
This battery replacement guide is only for Genius and Smart toothbrushes from Braun Oral-B that are marked either “Type 3765” or “Type 3771” on the bottom. Click the photo below to enlarge it and compare it to your toothbrush:
For other toothbrush makes, models and type numbers the battery replacement procedure is different so please see our other guides to toothbrush battery replacement for these toothbrushes.
The basic method is:
- Open and dismantle the toothbrush handle
- Desolder PCB connections
- Remove the old battery
- Solder in the replacement toothbrush battery
- Reassemble handle
The type 3765 and 3771 toothbrush battery replacement process is documented in detail below along with lots of photos. Click on any photo to enlarge it.

Disclaimer
Any damage or injury to yourself, your toothbrush or anything else is entirely your responsibility. This guide is for professional, educational usage only and is offered without guarantee or liability. Lithium-ion (Li-ion) batteries are dangerous if short-circuited and can go into thermal runaway and self-ignite if you do not observe all handling precautions.
Video
We have created a short video from this guide to Braun Oral-B Genius/Smart type 3765 & 3771 battery replacement on our YouTube channel, which you can also watch below.
Tools, Parts & Equipment
- Braun Oral-B Genius/Smart type 3765 or 3771 electric toothbrush
- Original charger
- Soldering iron with needle/cone tip: Electronics grade (about 18-25 watt)
- Solder: Lead-free silver solder with a flux core is recommended
- Solder sucker (also known as a desoldering pump) and/or desoldering braid/wick
- Needle nose pliers
- Craft knife e.g. scalpel, snap-off, retractable or Stanley type
- Small flat-bladed screwdriver: 2 to 4mm wide
- Large blunt flat-bladed screwdriver: 5 to 7mm wide
- Miniature side cutters
- Adhesive putty such as Blu Tack to hold the toothbrush to the work surface
- Replacement 3.6V Li-ion battery. Either:
- Li-ion toothbrush battery with thin wire pins – Support us by buying yours from ToothbrushBattery.com here
- Or Li-ion toothbrush battery with flat metal tags – Support us by buying yours from ToothbrushBattery.com here
How-To
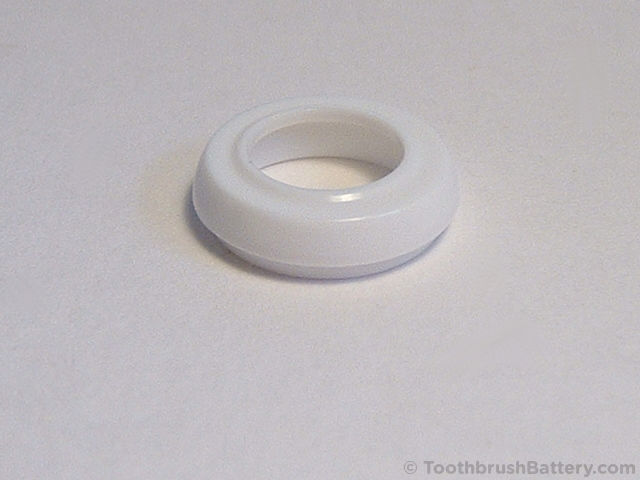
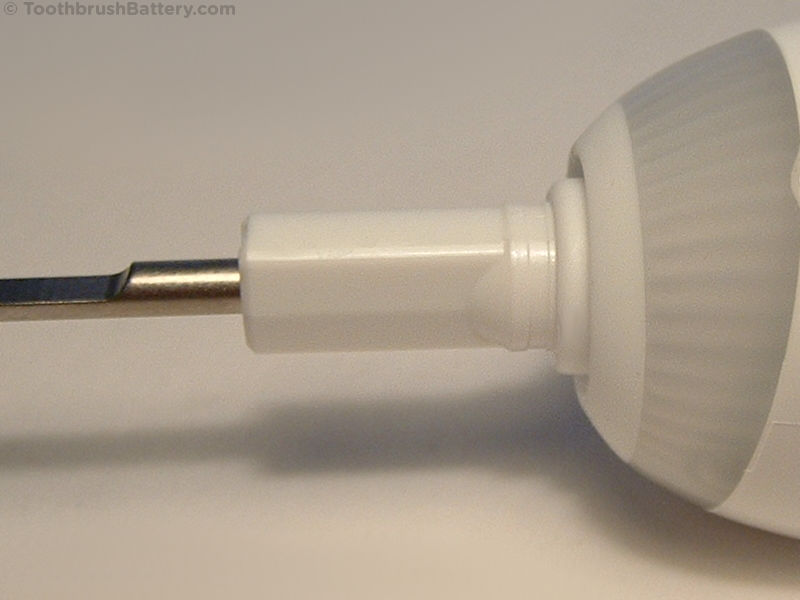
To start with, remove the brush head from the top of the handle and stand the toothbrush, tip downwards, in hot tap water for 5 minutes to soften the plastic ring.

Using the large flat-head screwdriver start to pry off the plastic ring from around the shaft. The ring is stepped so press down into the soft casing to get under its lower edge. A screwdriver with blunted edges is less likely to mark the toothbrush, and prying from the back side of the handle will hide any marks.
Store the removed ring safely.
Stand the toothbrush in hot tap water again, tip upwards this time, for another 5 minutes to soften the seal around the base cap and the internal plastic clip.
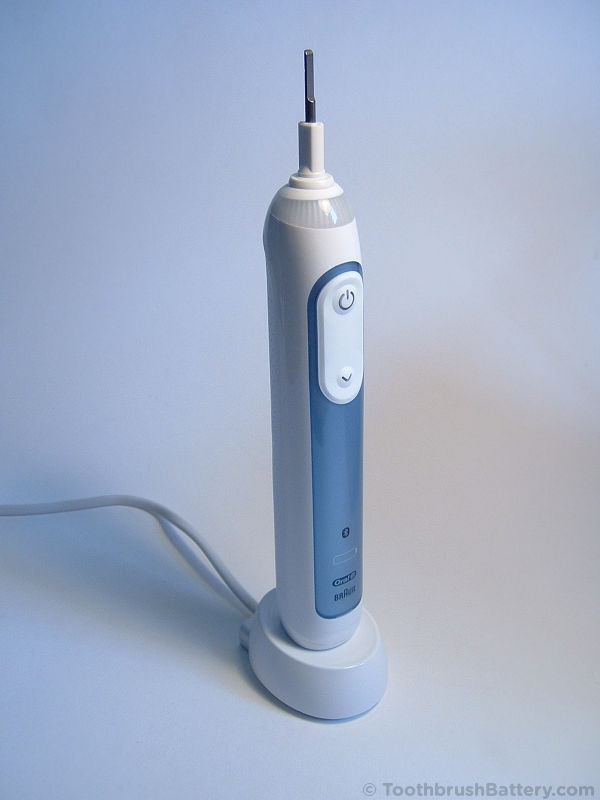
Dry the handle with a towel then put it on its charger (unplugged.)
Carefully bend the toothbrush backwards so the base cap is levered open.


Lift the toothbrush off the charger and remove the base cap. Be careful not to lose the spring!
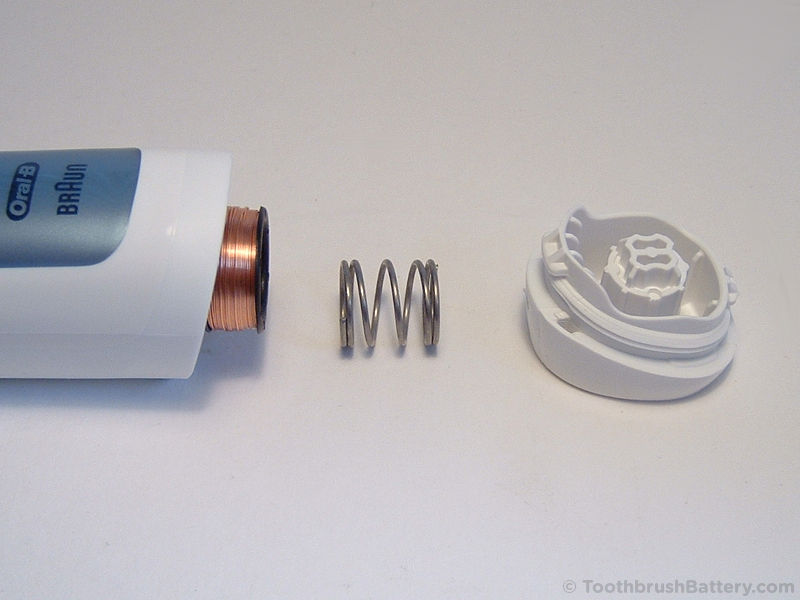
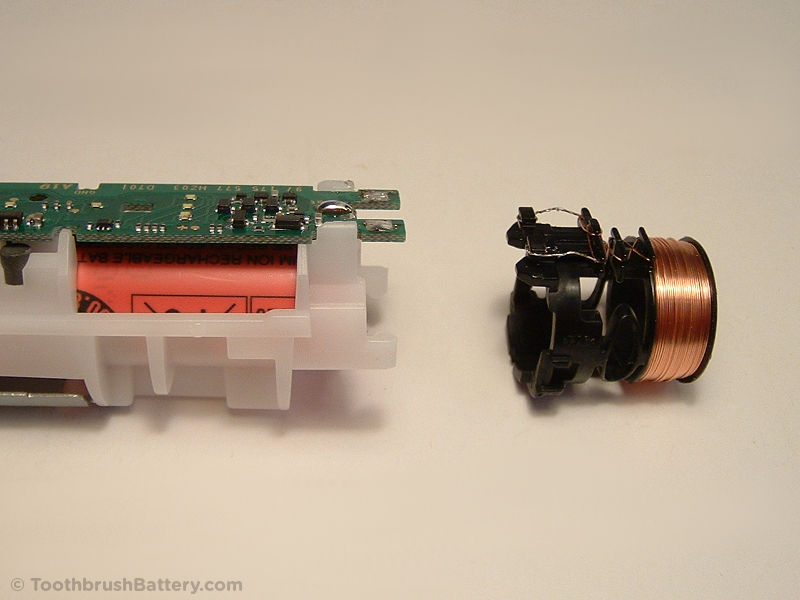
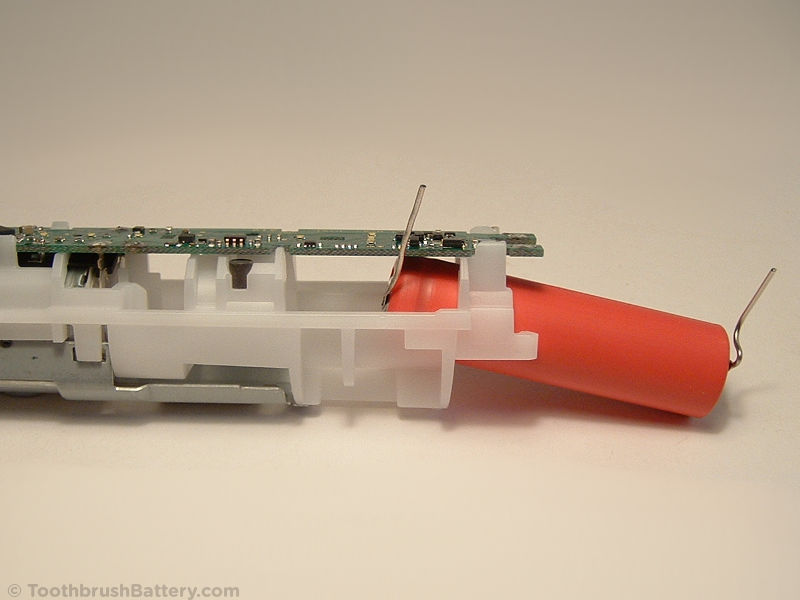
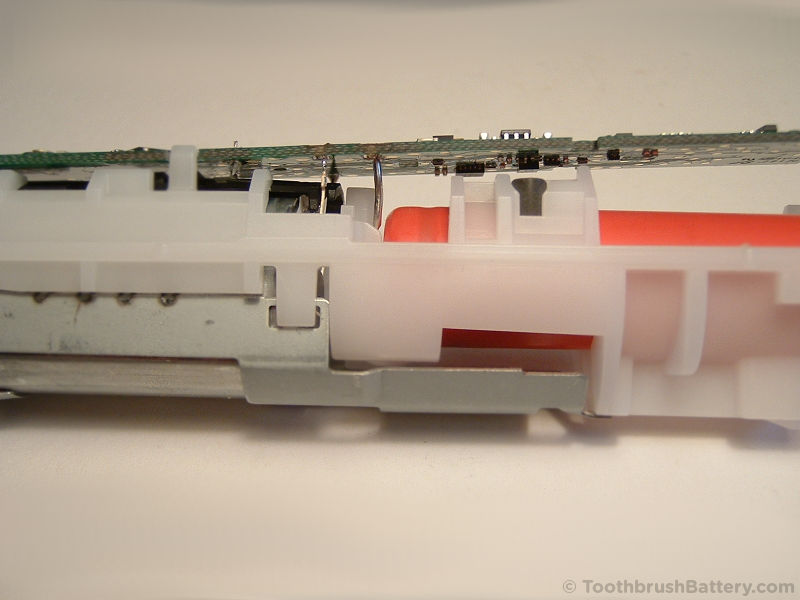
Push the top metal shaft into the main body of the toothbrush handle so that the toothbrush innards start to slide out.

Fully remove the inner workings of the toothbrush from its casing.
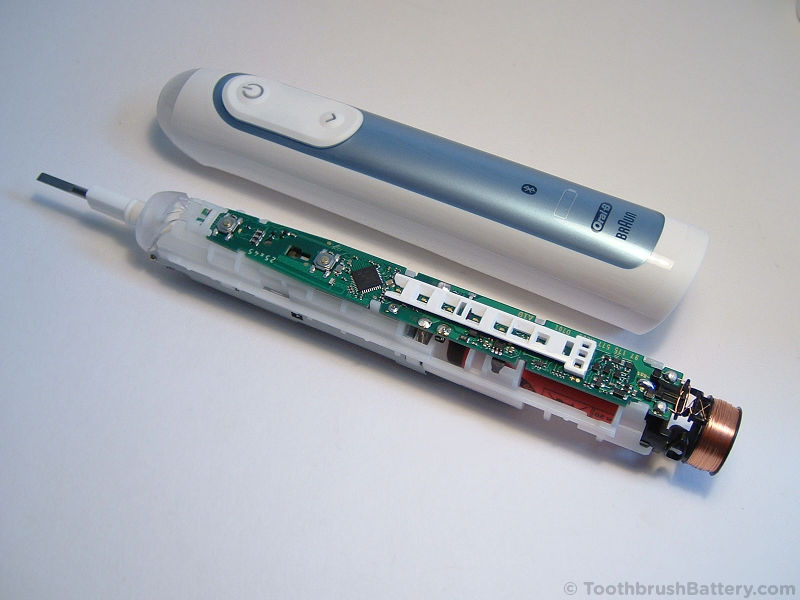
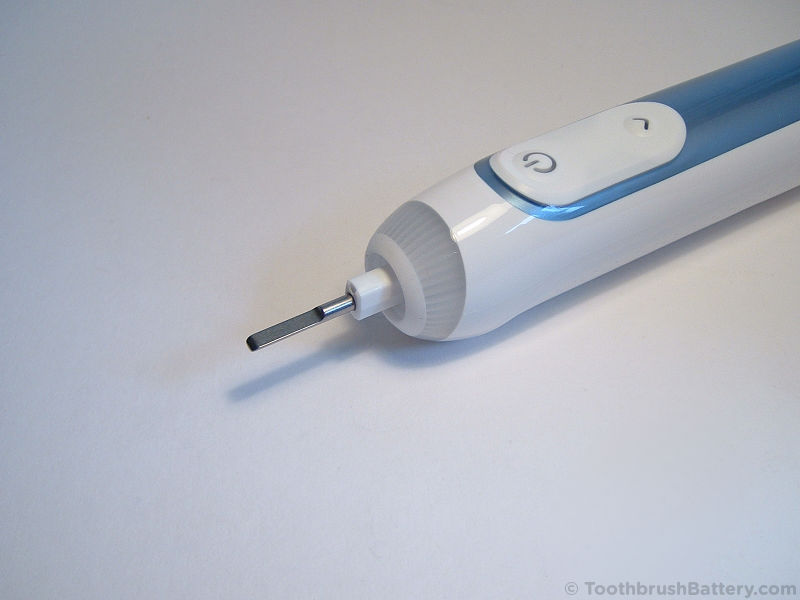
Unclip the white plastic LED surround, starting at the upper end.
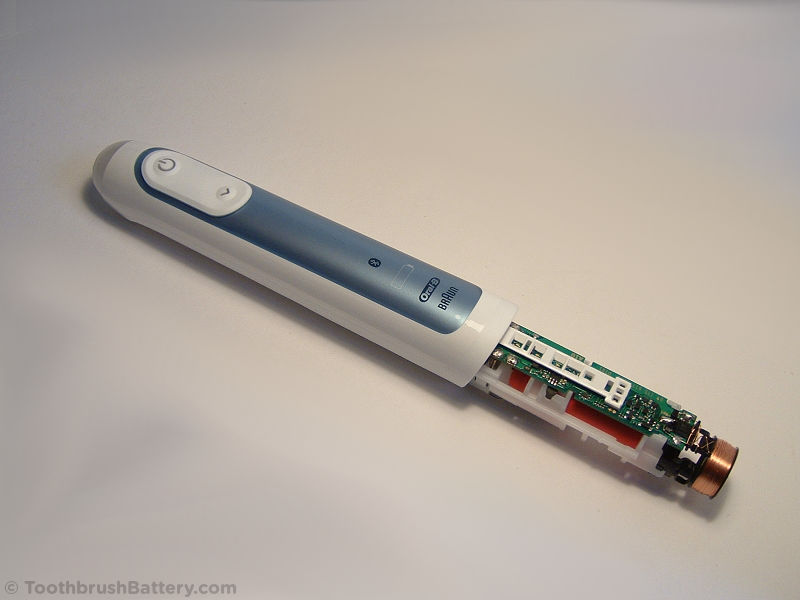
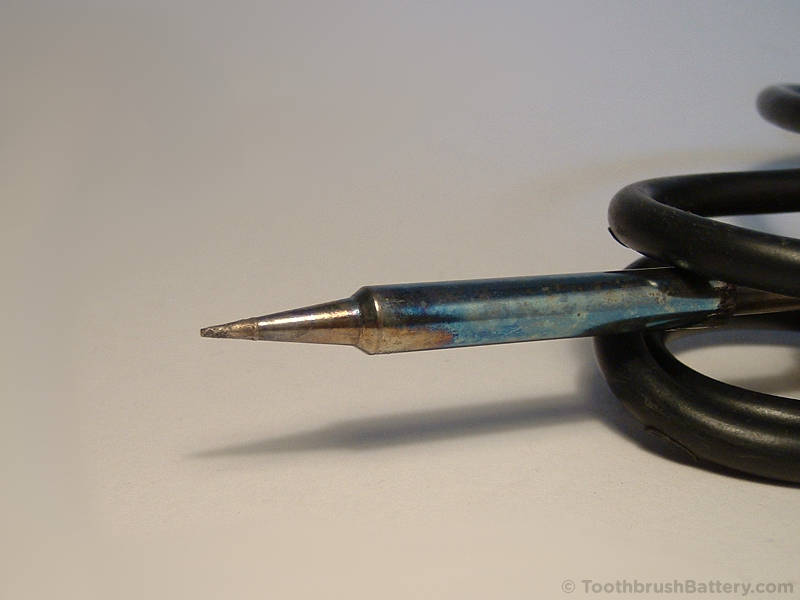
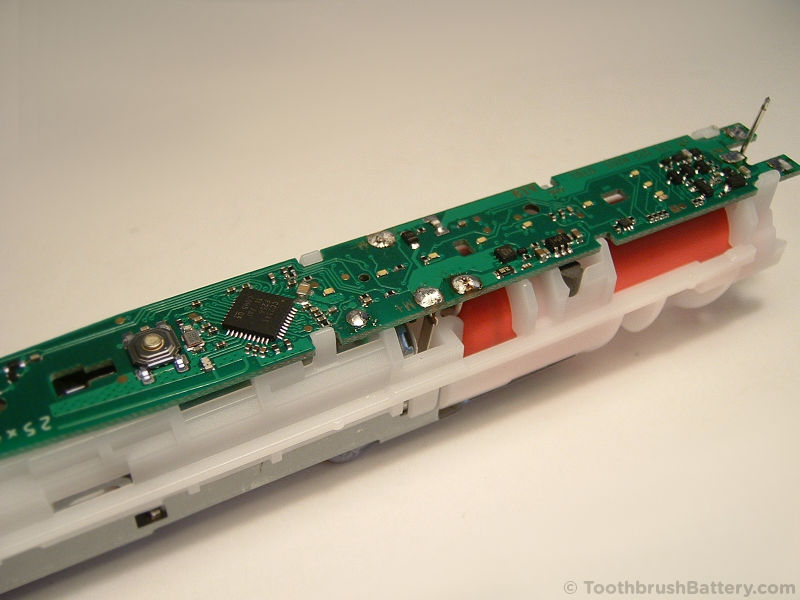
Time to get your soldering iron warmed up now! A soldering iron with a fine needle/cone tip is recommended.
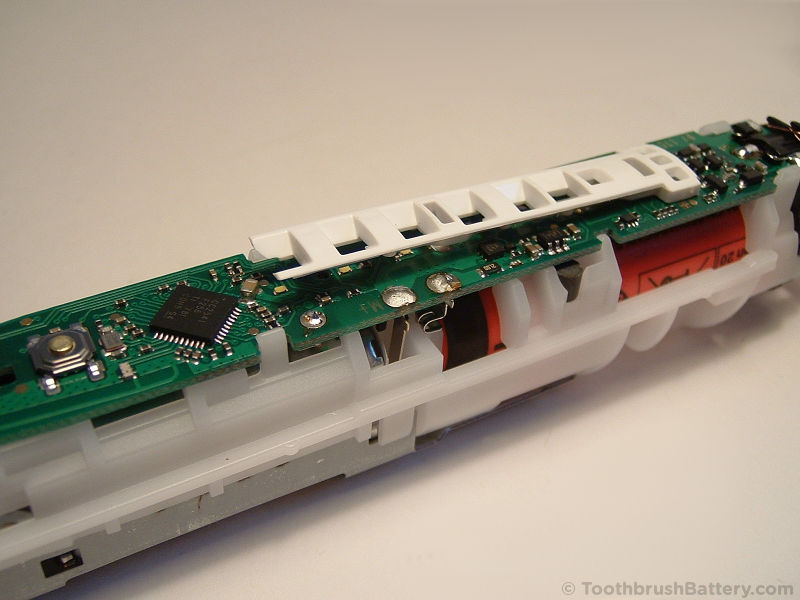
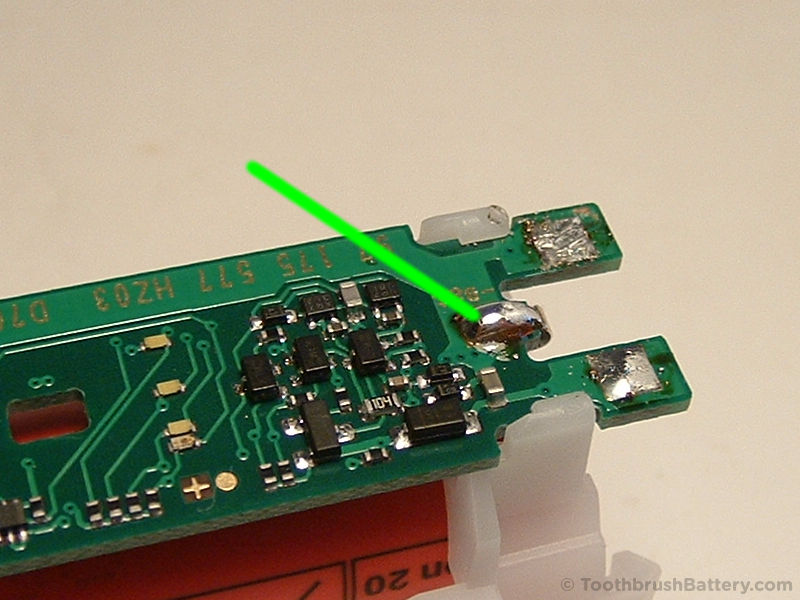
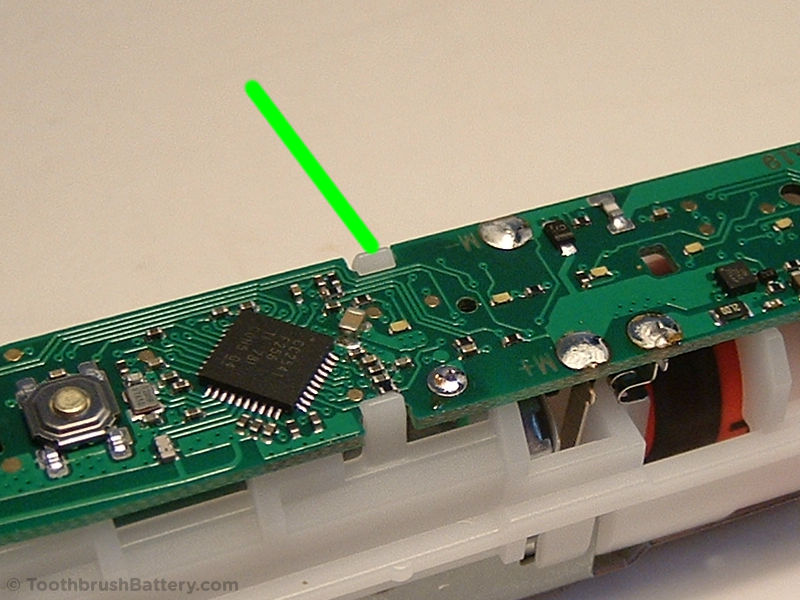
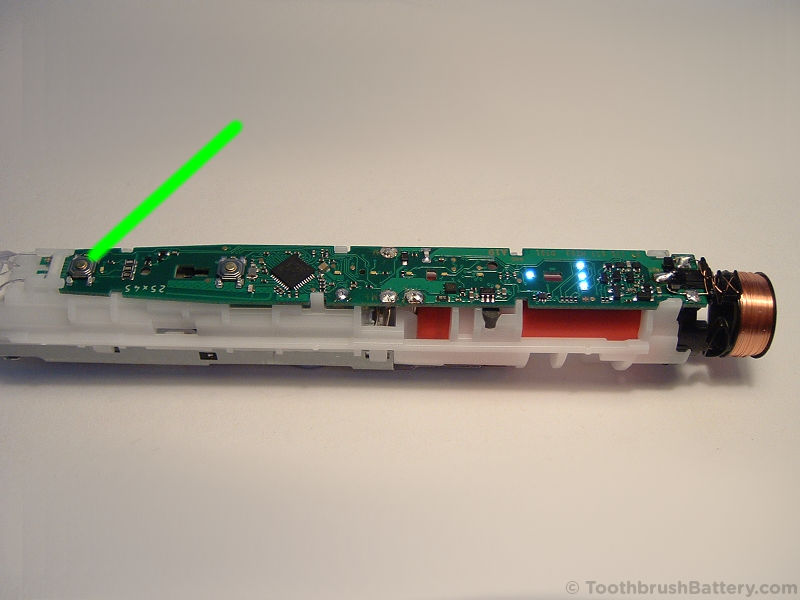
Locate the positive battery connection on the PCB (arrowed below.)
Remove some of the solder from the connection using the soldering iron and a solder sucker or braid. Then reheat the solder joint and simultaneously pull the battery’s solder tag away from underneath using the small screwdriver to bend it downwards.
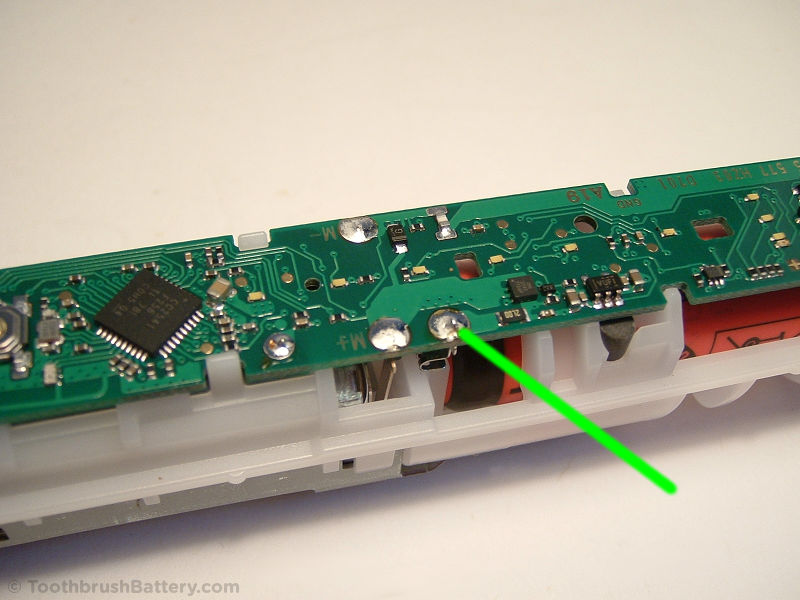
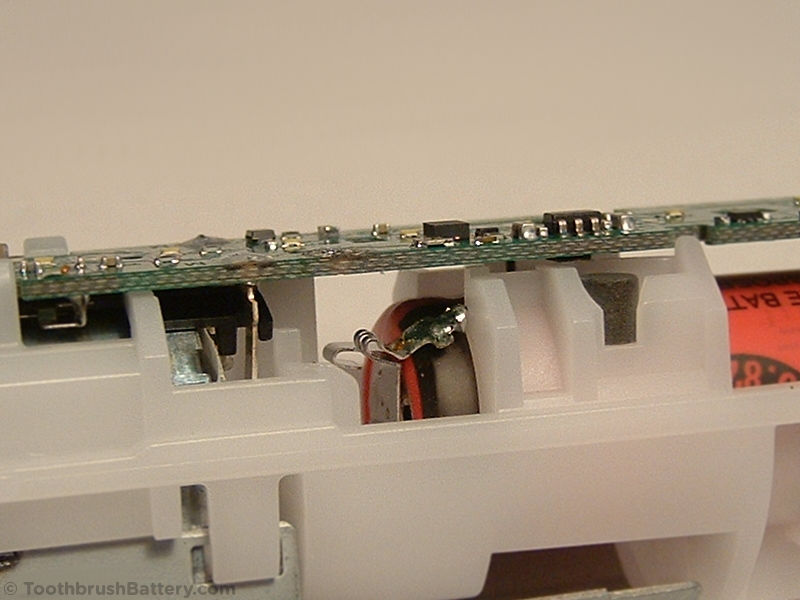
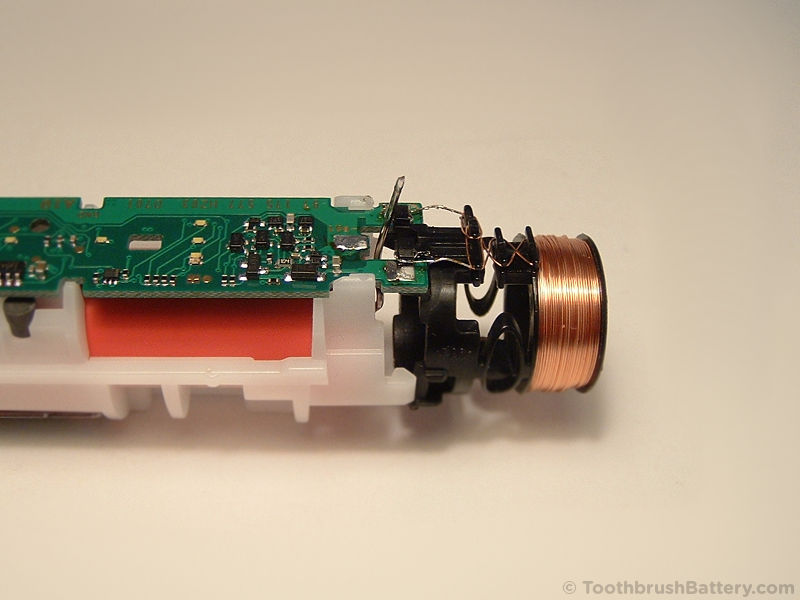
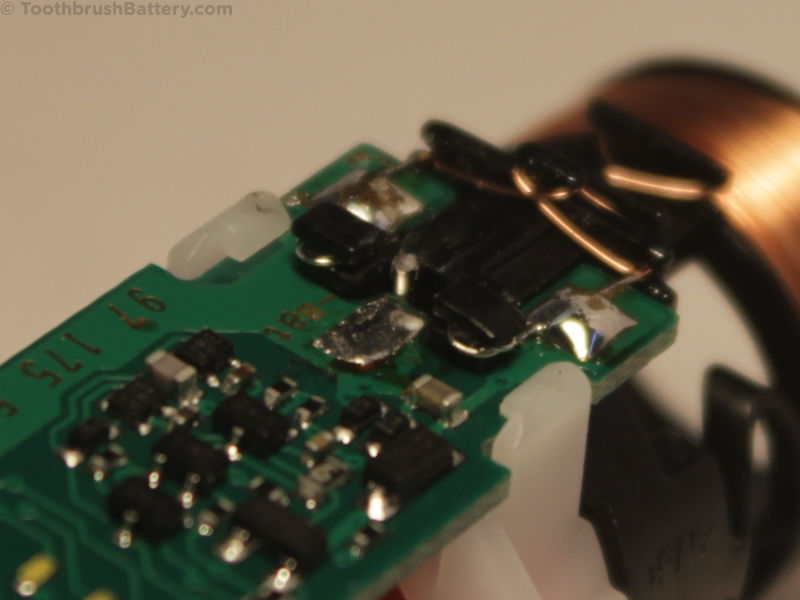
Locate the two copper charging coil wire connections at the lower end of the PCB (arrowed below.)

Remove most of the solder then lift the wires clear of the PCB using the tip of a craft knife.
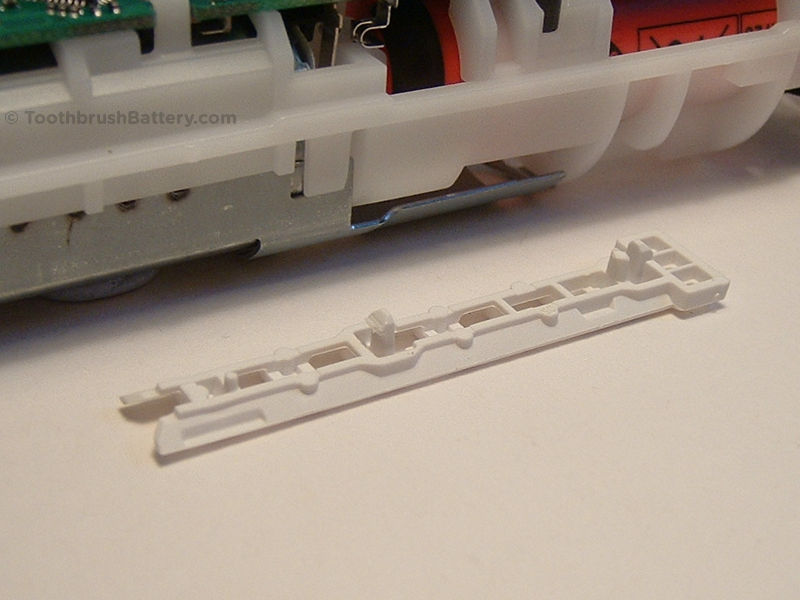
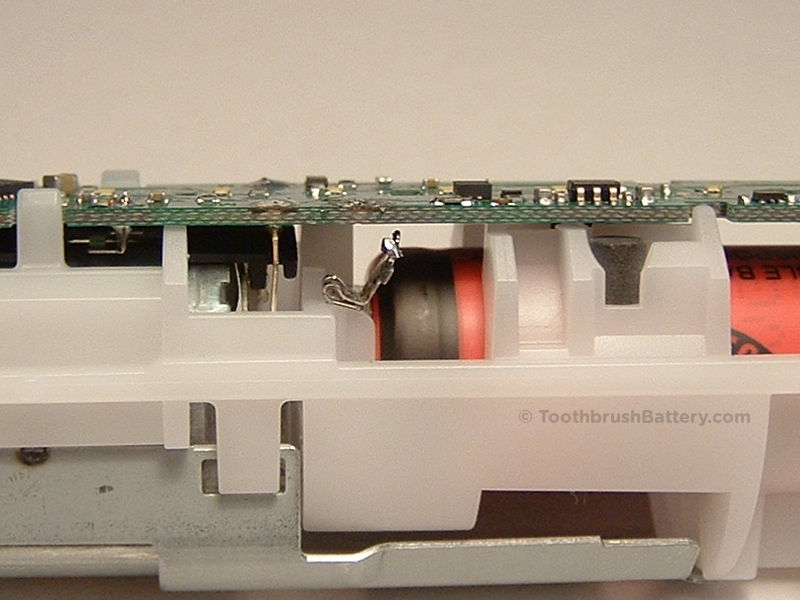
Release the white clips that hold the black plastic coil support in place.
Slide the coil support off the end of the PCB.
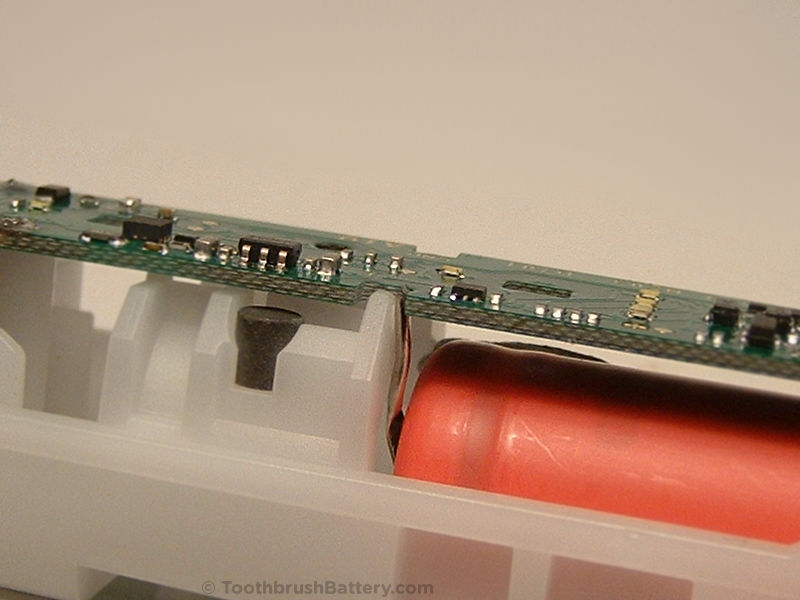
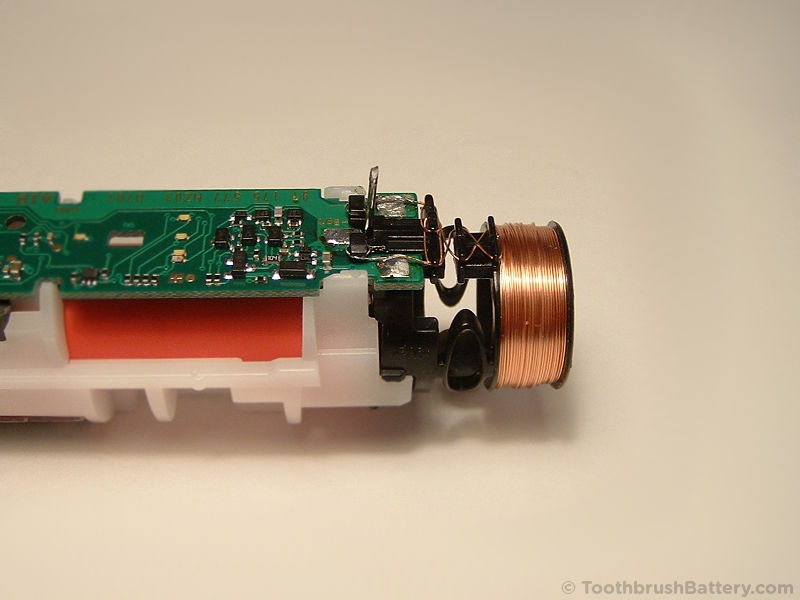
Locate the negative battery connection (arrowed below.)
Desolder the tag and bend it away from the PCB.
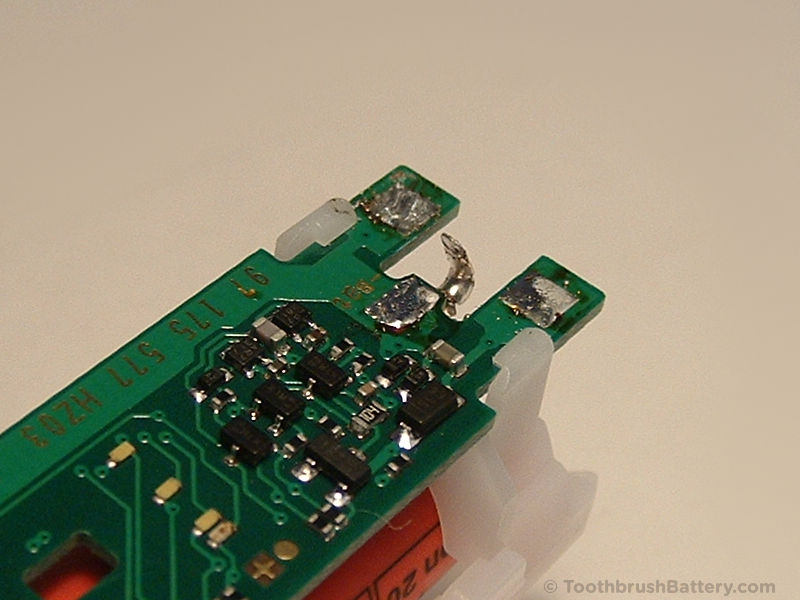
Fold the negative solder tag well clear of the bottom of the PCB.
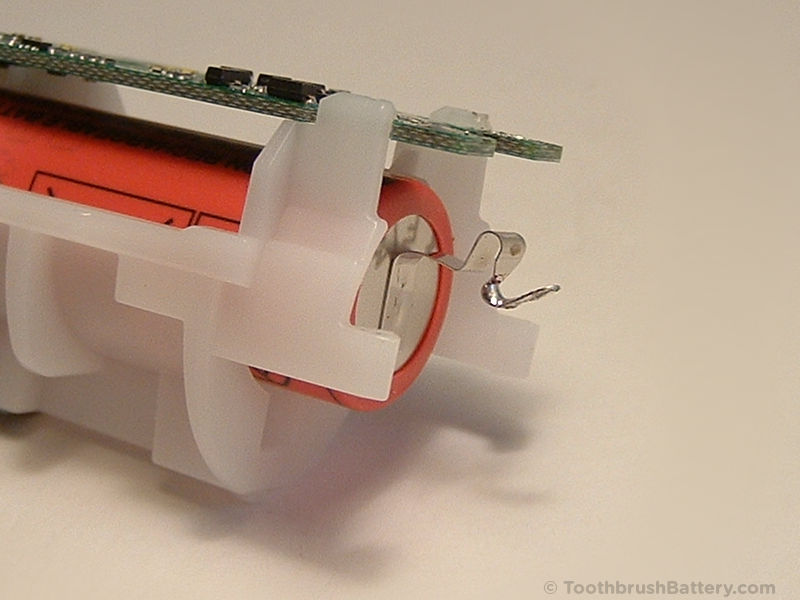
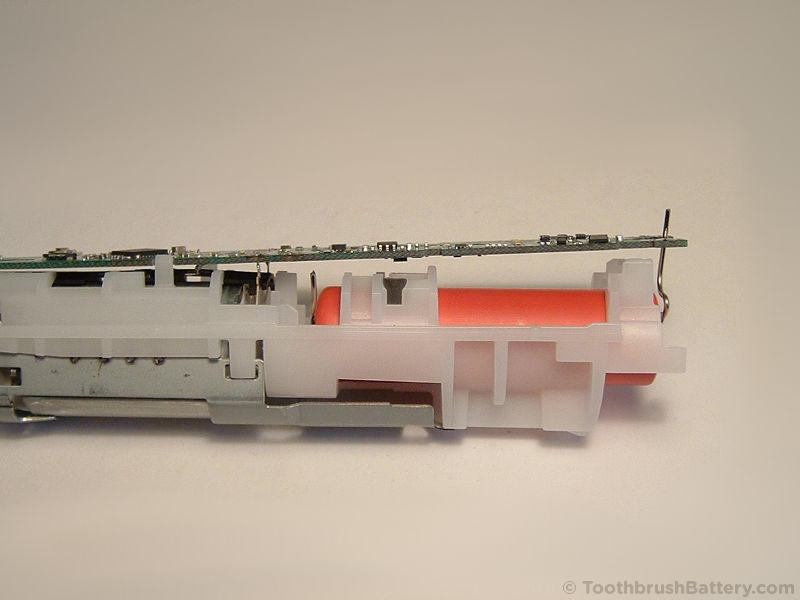
Fold the battery’s positive solder tag as close as possible to the body of the battery.

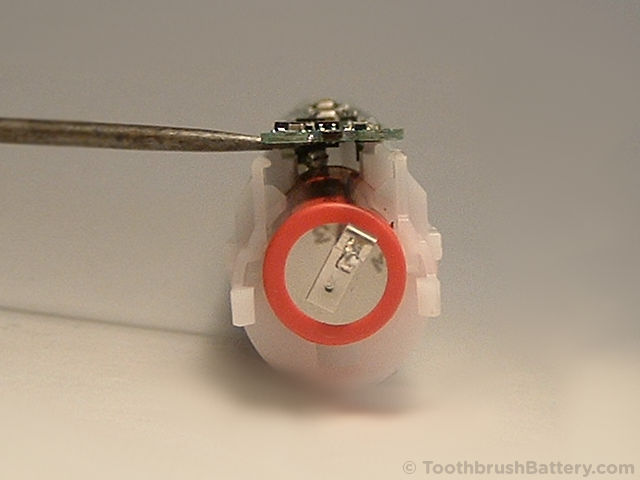
Slide the battery towards the bottom of the toothbrush by a few millimetres so that the positive tag is clear of the central white plastic structure. We will be rotating the battery in place.
Rotate the battery about an eighth of a turn clockwise (looking from the bottom of the brush.)
The positive tag might be touching the PCB, but there is no electrical hazard as the negative tag is not connected to the PCB.
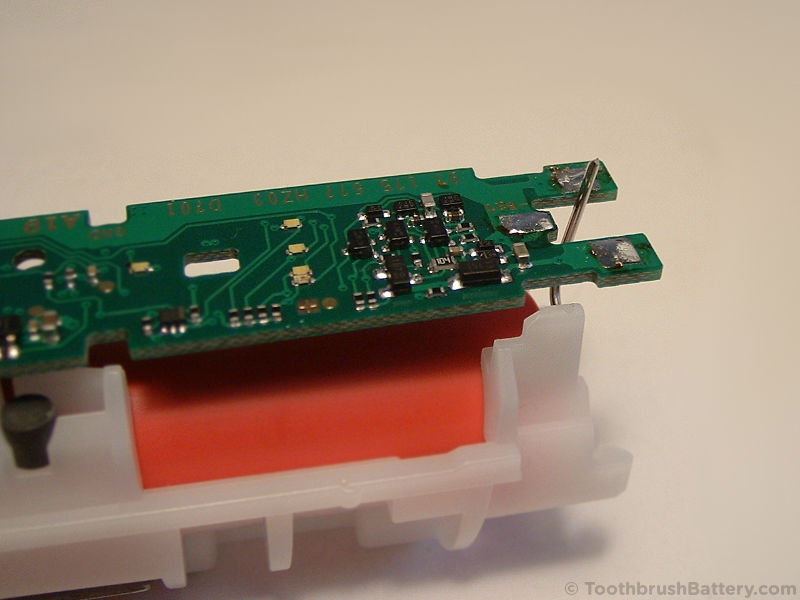
Locate the M+ and M- motor connections on the PCB (arrowed below.)
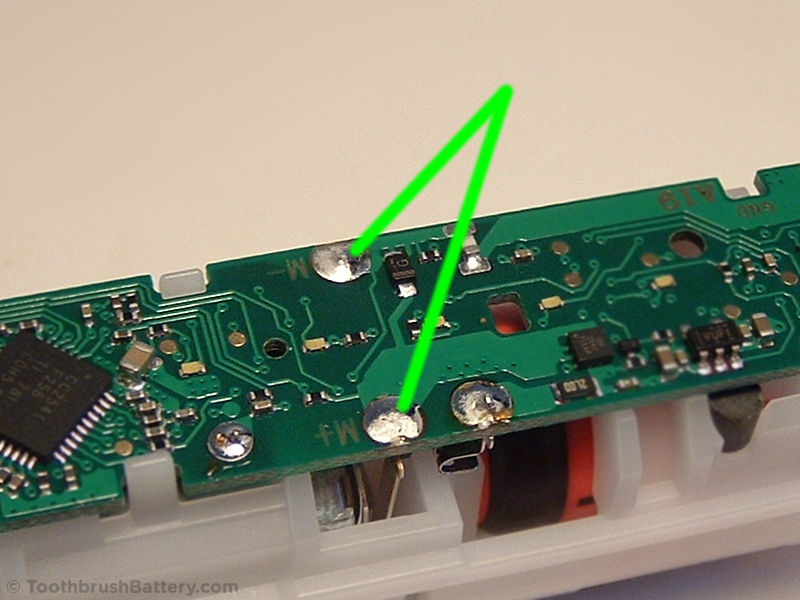
Partially desolder the motor connections, enough to let you lift the PCB slightly. You might need to unclip the nearest white plastic PCB clip to the motor terminals too.
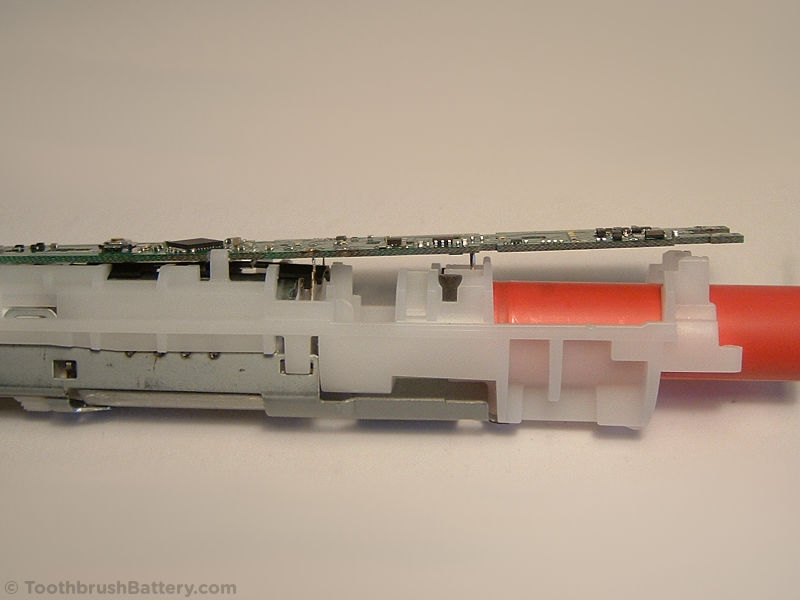
You can now slowly pull the battery out of the battery holder. Be careful not to scrape the lower surface of the PCB with the positive tag as you might break a PCB track. It might help if you gently flex the PCB upwards slightly for clearance.
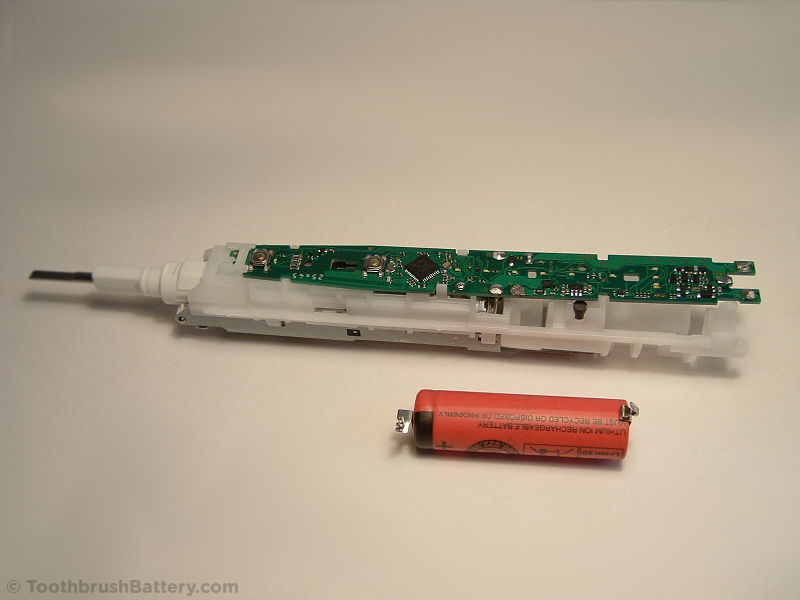
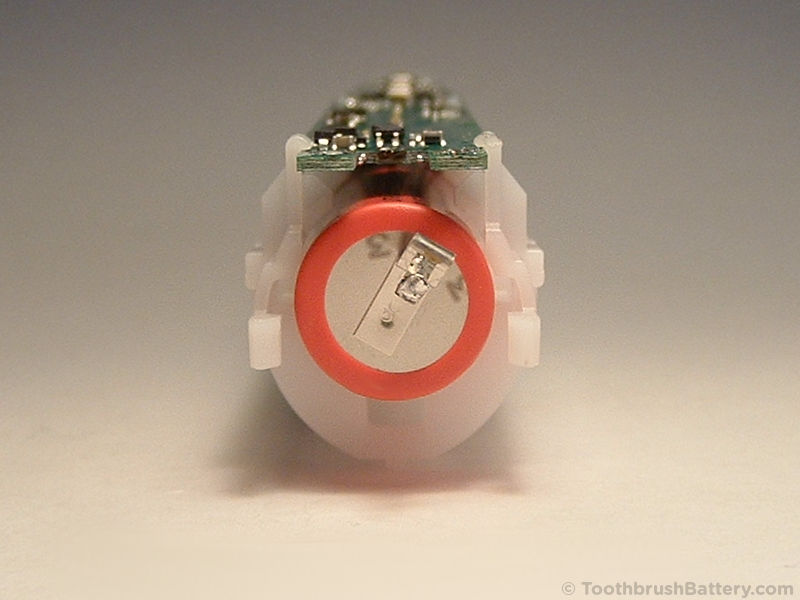
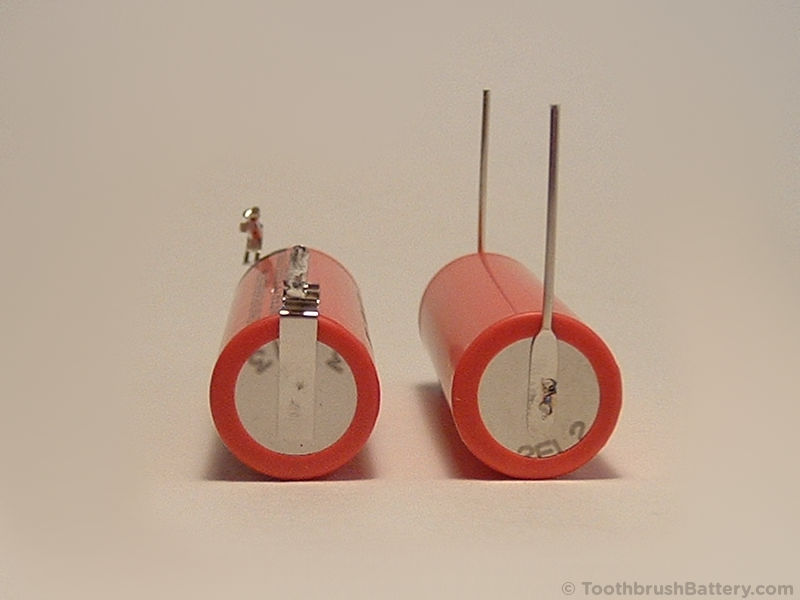
Compare the original Li-ion battery to its replacement. The groove around the body of the battery is at the positive end. These are 49mm long, 14mm diameter 3.6V Li-ion batteries. In the guide below we use one of our Li-ion toothbrush batteries with thin wire pins. Please support us with writing these repair guides by buying your replacement battery through our secure online shop at ToothbrushBattery.com here. You can also use one of our Li-ion toothbrush batteries with flat metal tags instead, available from us at ToothbrushBattery.com here. The flat metal tags on these can be folded and trimmed to shape with sharp scissors.
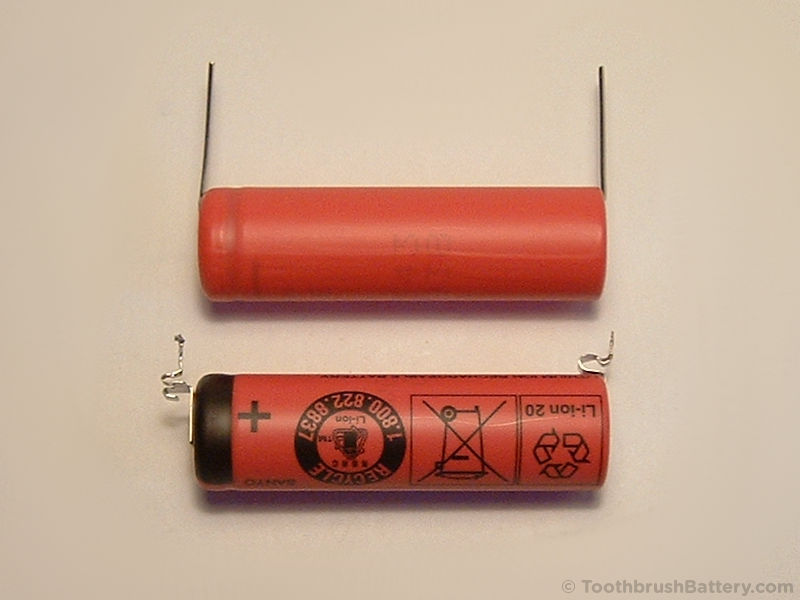
Positive battery terminals:
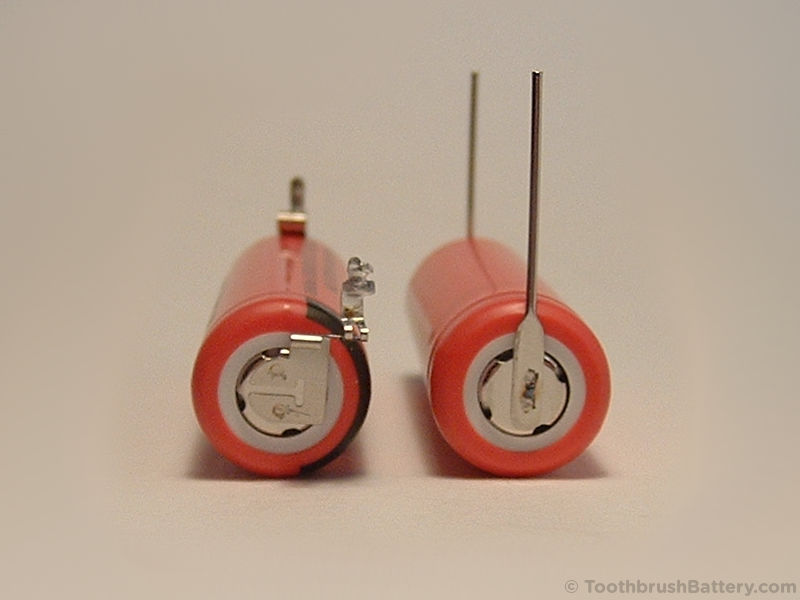
Negative battery terminals:
The wire pins on the replacement battery need to be bent and shaped to fit the toothbrush. When bending the pins there is the risk of pulling the pins off the battery where they are welded on. Hold the pins with needle nose pliers close to the welded section then bend the pin around the pliers by hand.
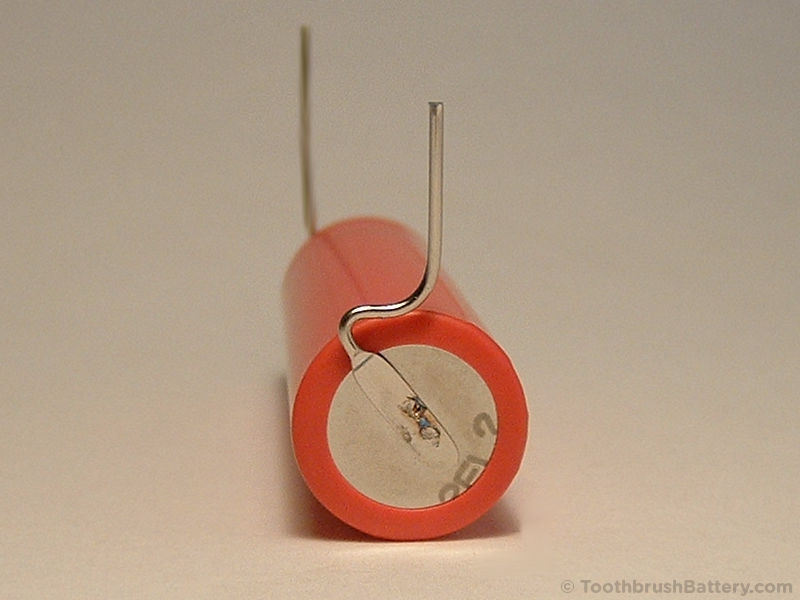
Looking at the positive end of the replacement toothbrush battery, bend the wire pin 45 degrees to the left. Make sure the bend is just where the pin reaches the edge of the battery. Rotate the battery 45 degrees clockwise so the wire pin is pointing up vertically.

At the negative end of the new battery bend the wire pin to the right by 135 degrees or more. The tighter the bend the better. Then at the edge of the battery bend the wire pin 90 degrees to the left so that it is parallel to the positive pin.
Hook the positive pin of the battery into the gap between the PCB and the white plastic frame as shown below.
Manoeuvre the positive pin right into the notch in the PCB next to the white plastic support.


Hold the battery down onto the lower surface of its holder then cut the wire pin using miniature side cutters level with the top of the PCB.
Gently flex the PCB upwards then rotate and slide the new battery into position without scraping the PCB. Bending the positive pin forwards slightly might give a little extra clearance.
Bend the negative pin away from the circuit board so it cannot accidentally touch the PCB.
Push the battery up fully against the white plastic stopper and bend the positive pin if necessary so that the pin is under its hole in the PCB.
Melt the motor connection solder joints and lower the PCB back into place, ensuring the positive battery pin goes through its hole in the PCB. Use lead-free silver solder to solder the positive battery pin to the PCB.
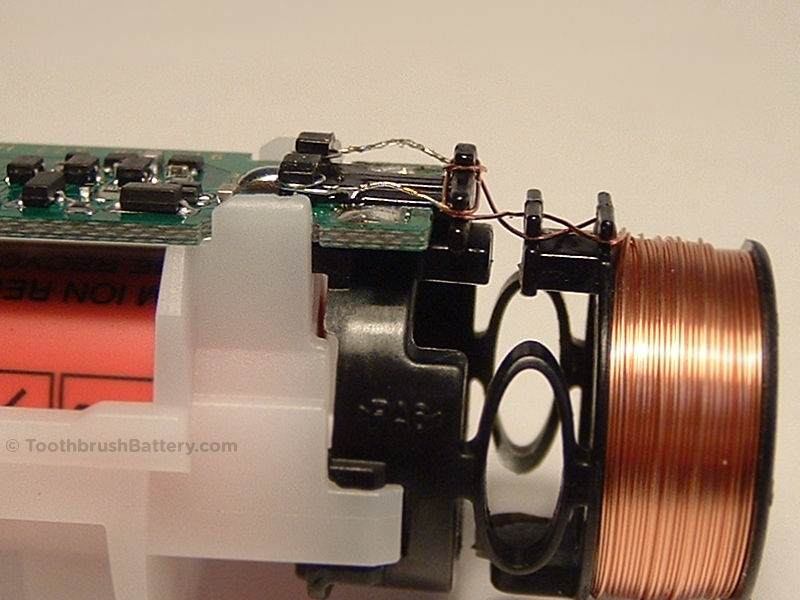
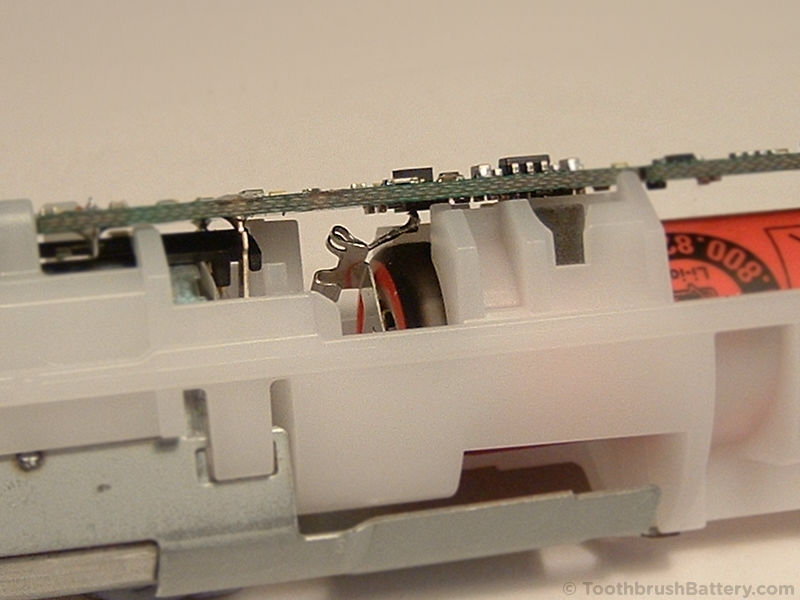
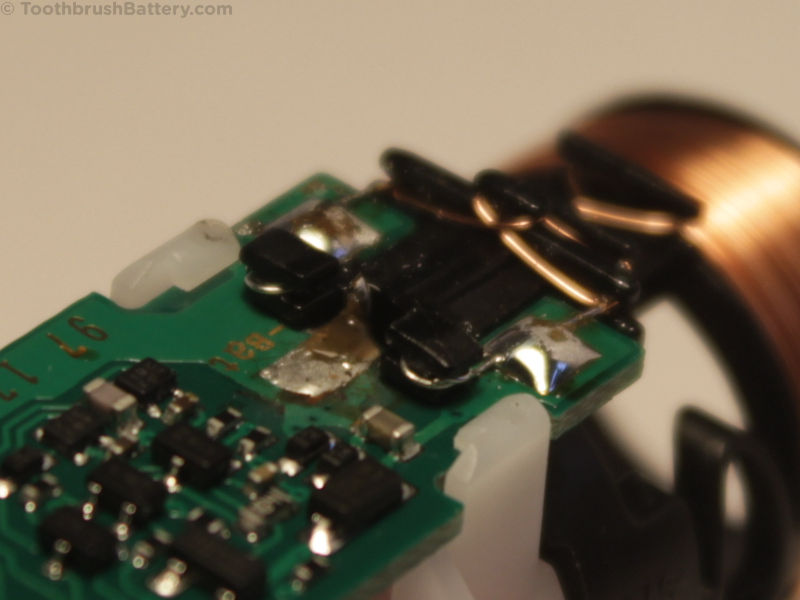
Slide the coil holder fully back on to the bottom end of the PCB. This will also push the negative battery pin against the edge of the PCB.
Solder the two copper coil wires to the PCB.
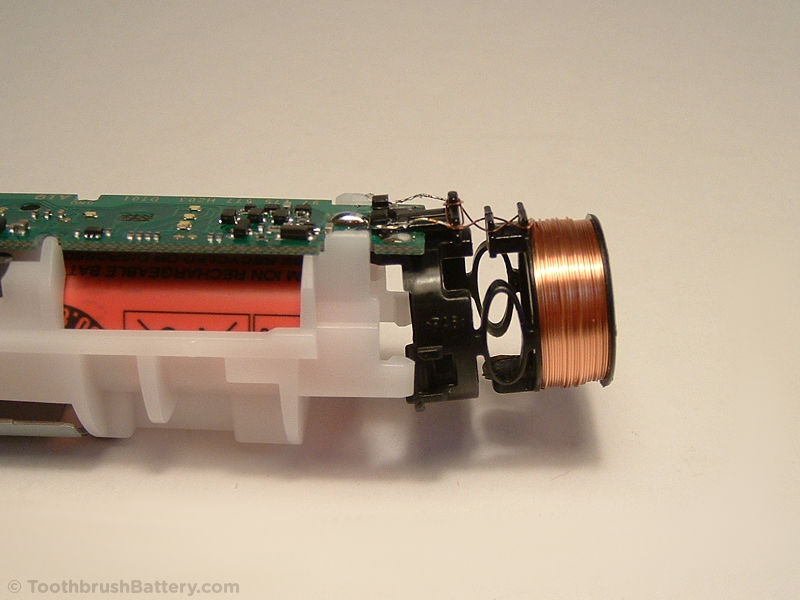
Cut off the negative battery pin level with the top of the black plastic coil support.
Using lead-free silver solder form a solder connection from the PCB to the negative battery pin.
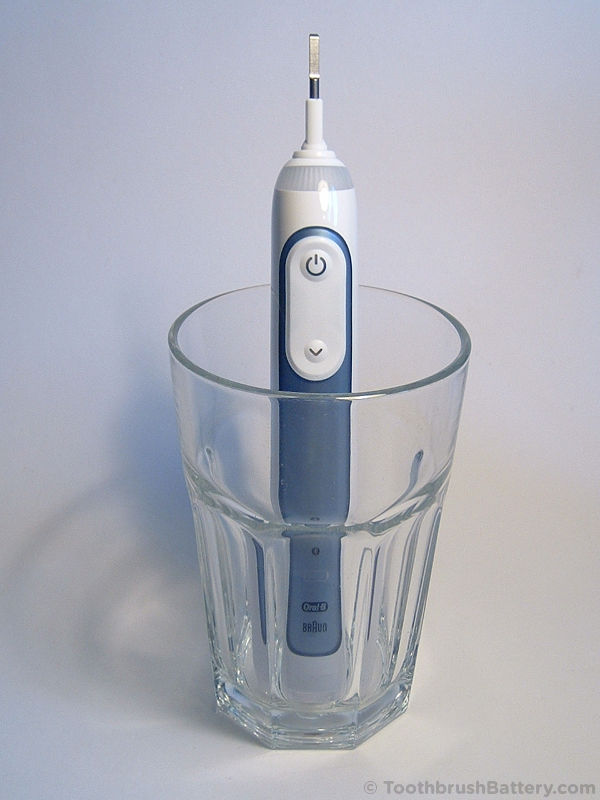
New Li-ion batteries are normally supplied partially charged so you can now test the battery. First plug in the charger then hold the toothbrush assembly over the peg on the charger. The LEDs should indicate charging has started. If it doesn’t light up check the solder connections.

Holding the toothbrush securely, press the upper button on the PCB to switch on the toothbrush. It should light up and start running. If the toothbrush appears to be dead you might need to ‘reactivate’ the circuitry by standing the assembly on the charger for 5 seconds. It should light up and start charging. Then you can remove it and try the switch again.
Clip the LED surround back on to the PCB.

Check inside the handle casing for debris then gently slide the innards of the toothbrush back into the casing.
Ensure that the plastic shaft surround has been fully pushed out of the casing.
Put the spring back inside the coil.

Clip the base cap back in to the toothbrush, hooking it in at the back first.

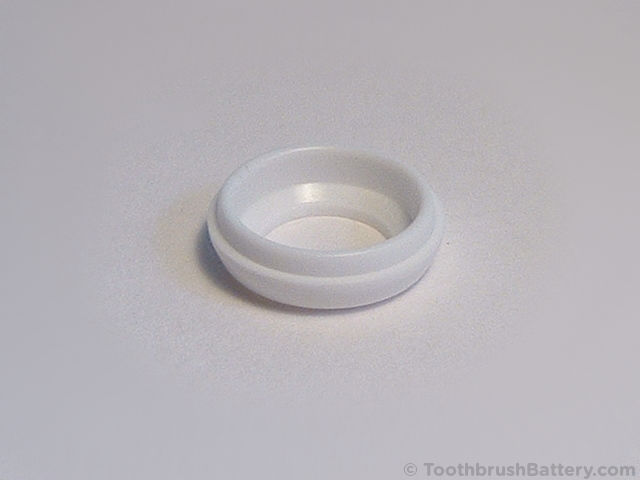
Fit the ring back on to the plastic shaft surround making sure it is fully clipped into place. You can use a 10 or 11mm spanner or an old brush head to force it on. Heating the ring in hot water beforehand helps it clip on more easily.
You now have a fully repaired Oral-B Genius/Smart toothbrush!
Give your toothbrush a full charge then it’s ready to use.
To recycle your old battery it is safest to pull the tags off with pliers first, then put sticky tape over at least one end. You can then take it to your local supermarket battery collection point or civic recycling facility.
Please leave any comments, questions or suggestions about this Braun Oral-B Type 3765/3771 battery replacement guide below. Happy brushing!
Hi,
thank you very much for this guide! Do you know the maximum battery length that fits in an Oral-B Genius 10000?
Hi Chris, it doesn’t look like you can fit a battery that is larger than the original.
My 3765 stopped charging. I took it apart, saw a solder was broken, fixed it and it will charge but only when the base is not attached. Without other base, it charges great. But when I snap the base back on, place it on the charger, it doesn’t charge. Any thoughts?
There is likely to be another broken or cracked solder connection, possibly where the copper charging coil wires connect to the PCB. Check that all these connections are solid and that the wires are not broken.
Very informative, thanks for sharing!
Great tutorial! My 3765 had a broken wire at the coil solder connection. Resoldered, reassembled and it works great. Thanks!
Are you sure that links to the batteries you posted here are correct?
Just want to make sure it’s using 3.7V and not 1.2V battery before i’ll order one?
What is the 4-digit Type number marked on the bottom of your toothbrush? And does it also say Li-ion or Ni-MH near the Type number?
Type 3765 and Li-Ion, you were correct it’s 3,6V 🙂
Hi, do you repair the base cap? I have an oral b genius 9000 rose gold electric toothbrush powered by braun which is broken it’s base cap.
Thanks
In what way is it broken? Has the plastic cap come off?
I have the same question. I dropped it in the shower and it broke. No longer clicks together.
Thanks for this tutorial! My 3765 didn’t react anymore when placed on a charger. Same as Ken’s case, it had a broken wire at the coil solder connection. Resoldered, reassembled and it works great. (I wonder how often in this model the copper wire breaks at the solder point.)
just repaired mine which had the same problem. Seems the tension on the connections from the coil is too great and an impact from dropping can shock it to stretch and disconnect.
Another +1. I think it may be worth mentioning this in the article, since it took a while for me to be in a position to buy a battery that I ultimately didn’t need. (I travel most of the time so receiving deliveries is challenging.)
This is brilliant stuff!
I didn’t need a battery replacement but had a cracked brush body that had caused it to stop working – opened up, cleaned a few corroded looking connections and its working again.
Thank you for the guide.
3771 Type how many Volt and what size of battery do I need
See the list of parts and equipment near the start of the article for the replacement battery.
Where can I find base cap for genius 9000 ?? my is broken , thx
Я не могу снять сменную насадку со своей щетки 10000N что за проблема как их вообще снимать никогда просто до этого не пользовался такими щетками.
Do you mean the replaceable brush head? The head should just pull off.
I’m in thailand so I have to find a battery locally. The guide is great, I found hot water at the charger end made it come off and by carefully using a knife that way the plastic didnt get damaged. Before I decided to buy a battery I carefully (you need to be a electronics person to do this) jumpered a 3v li ion battery across B + and – and this made it spring back to life so, ok it’s deffo the battery, as I thought it might be moisture on the microcontroller . I am going to put it back together with a spray of silicon (curtain glide) to protect a little from condensation and moisture. Thanks for the guide, I hope many others find this useful and save stuff from the dumpster that’s perfectly good. It doenst make sense, replaceable head but no easily replaceable battery!!
Where can I find, buy a base cap (3771) for a genius 200100 S ??
I have seen this question twice, but i don’t see an answer.
You’ll probably need to contact your country’s official Braun/Oral B service centre for parts – link
Unfortunally, Caps are not sold. This because of not beeing waterproof anymore.
Strange, because it is removable by a click system.
my toothbrush type 3771, it’s lighting but it doesn’t work (not spinning) although it seems to work I tried to turn it off or waiting to discharge then charge it again and there’s no spinning can i know why?
It could be internal damage caused by impact or water ingress, or it could be a failed battery.
Hi. Thanks for the guide.
Which type of battery do I need to buy? The one with the flat connectors, or the one with the long pointy connectors?
Hi John, either of these – the one with the flat solder tags or the one with the wire pins will work correctly. The choice of connection is up to you. The flat tags are easier to fold and trim down, but the wire pins are shown in the guide.
I need to replace battery on my toothbrush type 3771
I need more details about the battery
Thanks
The battery for your Oral B type 3771 toothbrush is available through our secure online shop here.
Hi, unfortunately while I was taking my toothbrush type 3765 apart I damaged the little white ring. So I was wondering where I could buy a new one ?
Same here
Thanks for the great explanation of how to replace the battery. The desoldering of the joints was a bit tricky to start with but I increased the soldering iron temperature to 430deg and used a slightly larger tip than you show, and then it worked better. (I also cut the old battery wires before removing the old battery.) The negative battery wire snapped off when I tried to bend it as described but I was able to simply solder it back on at the angle shown. Everything now works just fine, and the vibrations of the brush-head are back up to original strength!
Thank You!!
Hi as a lady in her 70’s I am not able to change the battery in my oral b Professional Care electric toothbrush. It just hmmm when I turn it on. I had it for a while so not sure if it’s time to buy a new one or it’s a battery problem I don’t know. Please can you advise me.
Hi Martha, Are you able to open your brush handle using the appropriate guide to check for water ingress? You can also look at the options for third-party repair services on our toothbrush repair service page.
My problem was that the small charging coil wire had broken just near where it is soldered onto the pcb. Adding some more solder repaired the toothbrush.
There is a common fault on the 3771. It appears to charge normally but when you turn it on, the motor either doesn’t do anything or starts then rapidly runs down and stops. This can be distinguished from a faulty battery as the LEDs will show the brush as charged.
The solution is to dismantle the brush as above then solder a small wire across the fuse often marked PP which is situated next to the battery positive terminal. This is a 3A PTC fuse which should not fail at the typical operating current of 0.5A but for some reason ages and can create a high resistance. If you have a multimeter you can check the voltage at the battery (usually 3.7-4V) and on the other side of the fuse which should read at least 3.5V – if it’s a lot less you have found the problem.
That fixed it for me, just put a drop of solder across the fuse. Thanks!!
That fixed it for me, too. (one drop)
Thanks!!!
As this is a fuse which are fitted for safety purposes, make sure you replace it with another suitable fuse rather than permanently bridge it.
Brilliant.
My brush is now working perfectly after bypassing the fuse.
Many many thanks.
For safety reasons do not just bypass the fuse. Replace it with an equivalent matching fuse.
First of all – really a great site! Thx!
Type 3765 (Genius X)
I tryied to replace the battery by a bigger one (Li-Ion, 2600 mAh, 3.6V) to have more operation time. It charges but the motor is not running.
Why it doesn’t work? The lab power supply doesn’t work too!
a) Which part of circuit is responsible?
b) Do you have a circuit diagram?
That sounds like a fake battery. Li-ion batteries of size 49mm x 14mm from reputable manufacturers such as Sony and Sanyo have a true capacity from 600mAh to 750mAh. Any battery of these dimensions that is labelled as over 1000mAh is fake and probably has a real capacity of 100-300mAh, if it even works at all. How long did the original battery last for before you replaced it?
I did this battery swap for my 3771 and it worked. I installed Ebay USA item number 303235779608 – a Sanyo 3.7V Lithium toothbrush battery, w/ tabs and shipping in the US. I had to cut the generic tabs to fit but that was easy. Other than that it fit perfectly and seems to be working fine. Hopefully it will last a while. The symptoms indicating battery replacement were the battery would show fully charged, all the lights and bluetooth were working fine but when I pushed the start button it the motor would run a second and then stop. Then after a while it wouldn’t even do that but when I put it on the charger it would show fully charged right away.
Hi where can I buy this battery?
Thank you
The link for the battery is in the list of tools and parts at the beginning of the article.
Very well put together guide!
Straight forward ordering process!
Saved me a couple of hundred pounds…
I only wish I did this with the Genius 9000 that I threw in the bin 2 years ago.
Thank you.
How do you turn of the night light at the top pf the brush handle on the type 3765!
It so brigth and late at night whne one is tired and ready for bed to have the brush spot light right at your eyes when yu are brushing your teech is toally annoying!!
This is probably configured through the Oral-B smartphone app. You could try to change the colour to red, orange or yellow – colours which are much easier on the eyes at night.
Thank you very much for your explanations. I find a battery to be delivered in France from your link on ebay. Caution of fake 1500mAh batteries!! Buy a real sanyo.
By the way, there was no need to desolder the motor connection.
I fixed two genius’ without a battery change. Some of the solder needed replacing. I think the issue is moisture getting in. Is there a silicone or rubber glue I can use to seal at the top? And do we replace the glue at the bottom? Thanks!!
There is no glue at the bottom, just a flexible seal. To stop moisture getting in, store your brush lying on its back with the head removed after each use. This will stop water trapped in the head seeping down the metal shaft and past the top seal.
Greetings to all at Ionic Industries from Adelaide Australia!!
Firstly I must express my appreciation in providing such a useful, dedicated and informative quality production of website content and advice. Attentive detail in procedural processes in battery replacement and additional supplementary expertise makes this operation so much easier and painless!!! I consider myself an expert in repair with most appliances, devices and electronic components, and can appreciate the time and energy invested in creating such a fantastic resource! Saves slowly investigating and navigating dismantling units without damage and a much faster process! Secondly, I sincerely appreciate the availability of QUALITY and REPUTABLE batteries both OEM for Oral-B (Braun) and alternate manufacturers. Makes for an easy decision and solution where to source reliable batteries. I cannot believe in 13 days from online order to receipt of required battery from the UK was a fantastic and pleasurable experience! I will definitely purchase again, as have quite a ‘museum’ of Oral-B power heads from many years (I am getting older too!) Only frustrating exercise was now requiring an illuminated magnifier as eyes are wearing out like batteries O:) Fantastic work and efforts! Duly appreciated and interesting work on all your behalf! PS – yes who HAS NOT broken the copper inductive coil fly leads?? Like me as used and wear out become old and fragile! Cheers for reading!!
Thanks for the compliments Brendan! Glad to hear your order got to Adelaide promptly and you got one of your collection of electric toothbrushes back up and running. Cheers!
Great tutorial, worked perfectly! Thanks
My battery gives 3.4V by multimeter. Do i need to change it. Charging led flashes red. When I put it in charger, it does not charge.
3.4V indicates that the battery is healthy but empty. If you leave the toothbrush on charge overnight does it charge the battery? If not, there could be water ingress inside the handle.
Hi there,
I have a Genius 3771.
The red LED flashes 16 times and the motor either doesn’t do anything or starts.
I have checked the voltage on the battery: 3.9V.
If I bypass the fuse, the motor works well, meaning the fuse is blown.
What is the type of the fuse?
Hi. Thanks for the guide.
I have a Genius X 3771. I changed the battery.
When I put the coil on the charger, the ringlight flashes white quickly. The motor doesn´t start.
Do you know what the flashlight means? I didn´t find anything.
It possibly means that a solder connection is broken. Or that there is a short-circuit somewhere.
Thanks for the great guide, so clear and easy to follow for my Type 3771. Saved about £80-worth of toothbrush from going to the tip. Great service supplying the battery too, ordered from the website over Easter and it arrived a couple of days later
There is a hole in the outer cylindical surface of the 3765 end plug. I inserted a blade screwdrver and pressed and turned it to detect a detant or set screw in an attempt to remove the plug.
Though the charging lights still come on, I’m concerned a damaged coil might cause problems.
My question is: When the plug is properly seated, could the screwdriver have contacted the coils surface?
It’s possible but if you use the method in our guide top open the handle you can inspect the charging coil for damage.
Hi:
Thanks for the tutorial. Very helpful.
Before I changed the battery, the toothbrush ran 5-6 times before dying.
After changing and charging for 15 hours, it stills only runs 5-6 times before dying. I tried holding the power button down for 10 seconds to reset it. But still the same behaviour.
Any suggestions? Thanks
Hi Chris, this brush might need 24 hours or more to fully charge the battery. Also see our troubleshooting tips page which might get you up and running quickly.
Any idea where or how to get a replacement for the top seal? (The white ring at the top). Mine was mistaken for a broken toy part and wound up in the trash. I got the tooth brush working, but now can’t keep it water tight. Is there a part number for it?
There are no official spares available, so no part number, but you might be able to buy a faulty brush off Ebay and take the sealing ring off that.
I was about to throw my toothbrush out and buy a new one, however I found this tutorial and tried to replace the battery myself. It worked. I baught a 1000mAh instead of the OEM 740mAh will this be an issue? How long would you say the first charge will take. The manual states 12 hours, should I really wait that long?
Thank you for your help.
A satisfied DIYer from hungari.
Hi Balázs, the first charge will need to be until the toothbrush stops charging. Depending on how much charge is in the new battery this might take up to 24 hours.
There are many unbranded batteries available with fake capacity markings on them. We tested one and it had a true capacity of only 255mAh! We recommend sticking with Sanyo or Braun OE batteries.
Hi, swapped the battery on my 3765 as per your great guide. All works fine until I put the innards back in the case. The induction coil only appears to charge if I hover the toothbrush just above the charging dock. As soon as I let the brush sit normally on the charger, nothing happens. Any ideas?
The coil could be out of alignment inside the base cap. Also check for broken wires running from the copper charging coil to the toothbrush PCB.
I’ve replaced batteries in two 3765 toothbrushes. I think maybe a couple of years ago. One we use daily, -three of us twice a day.
I’m sure when I replaced the first one, it would last for a few days before having to charge. Now it needs charging after two.
Is this normal?
Hi Bill, the rechargeable batteries will gradually fade over time with use, with fewer and fewer brushing sessions from each charge.
Just finished changing the battery on my 3765, it’s now working as good as new! It had gotten to the point that I had to charge it every two days, and they are so expensive to replace. But this was a fantastic way to save some money on a new one. Thank you for the step-by-step guide and the rapid delivery on the battery. Genuinely made it so simple to do!
Just posting thanks for this very well written article. I found the detailed steps and plentiful photos particularly useful. I just wish I hadn’t waited for the battery delivery, because I ultimately didn’t need it—just resoldering some of the external components made everything work like gold again.