
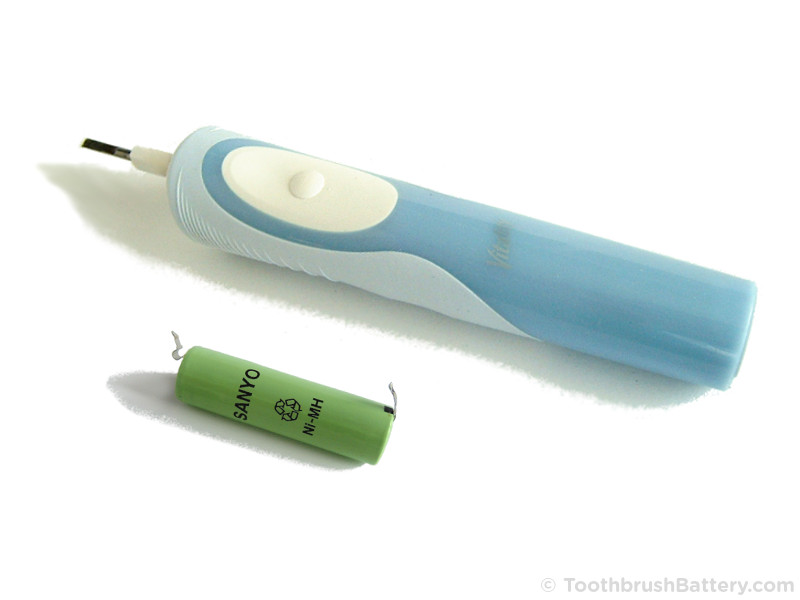
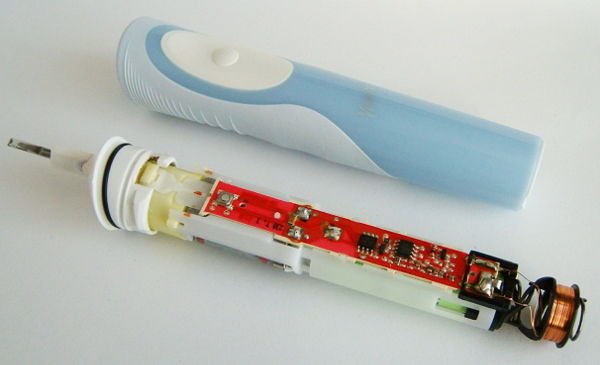
This guide will take you step by step through how to dismantle the Braun Oral-B Vitality Type 3709 electric toothbrush and replace the battery. These toothbrushes are nice and simple to use, so are well worth repairing.
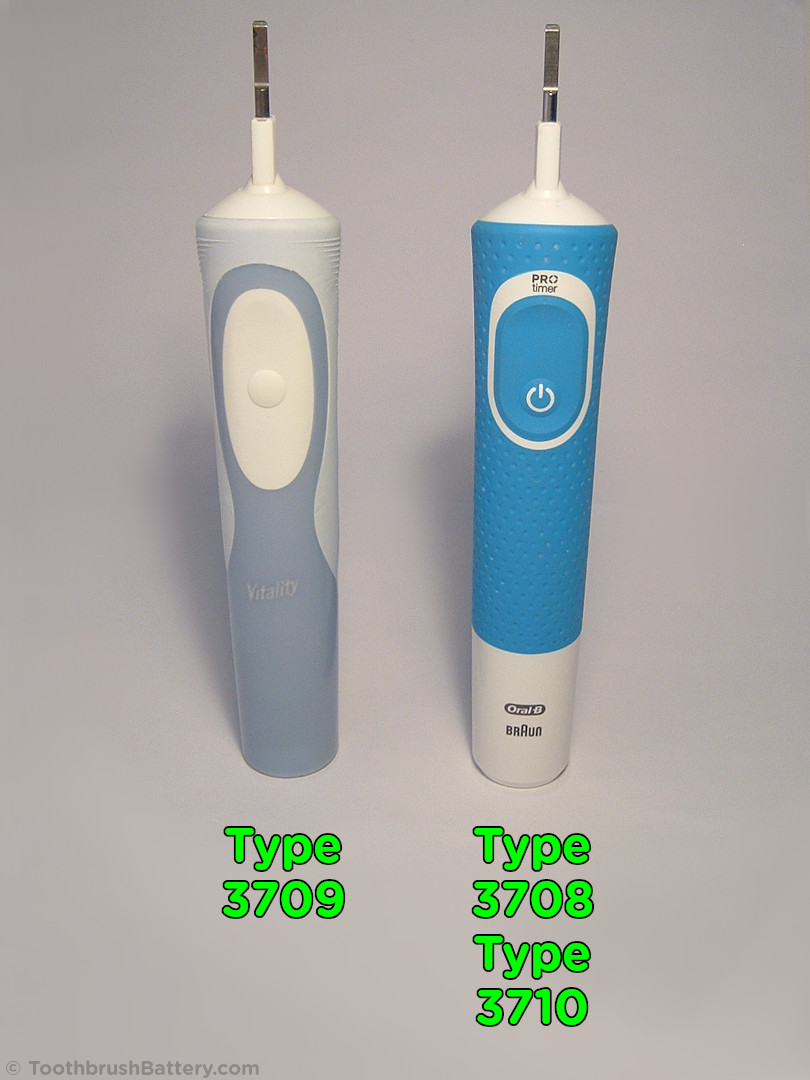
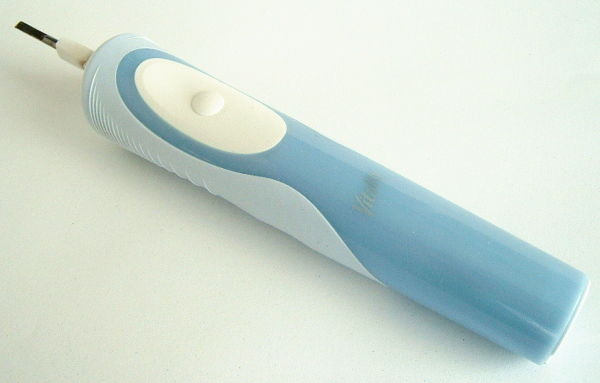
There are two versions of the Vitality toothbrush – the Type 3709 and the Type 3708/3710. The Vitality Type 3709 has a soft rubber grip around the back and sides with a wavy edge to it, and either one or two buttons on the front. The Vitality Type 3708 and Type 3710 have a soft rubber grip right around the handle with a straight bottom edge, and one button on the front. The differences are shown in the photo below. Click on the photo to enlarge it.
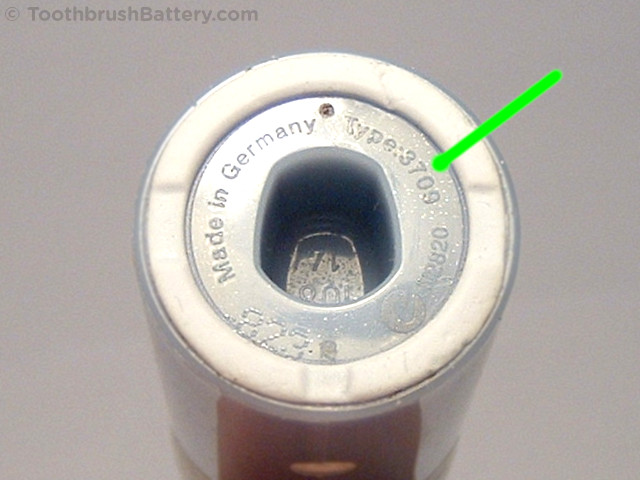
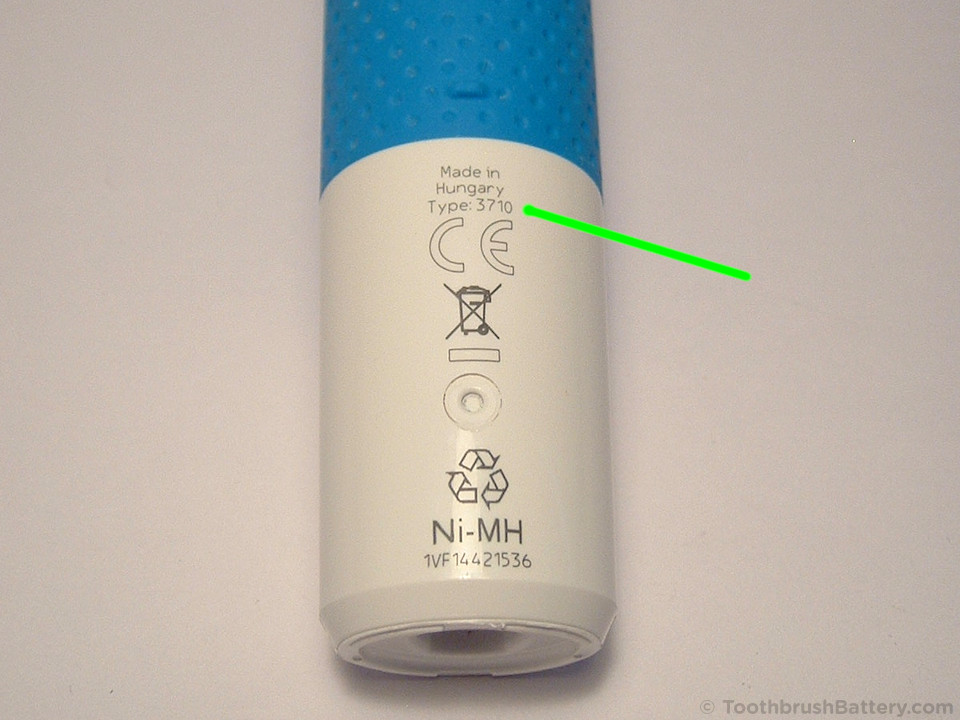
Also check the 4-digit Type number which is marked on the bottom or back of the toothbrush handle.
This battery replacement guide is only for the Vitality toothbrushes marked as Type 3709. The other Type 3708 and 3710 Vitality toothbrushes open up in a slightly different way which is covered in our Vitality Types 3708 & 3710 battery replacement guide here.
For other toothbrush models and type numbers the battery replacement procedure is different so please see our other toothbrush battery replacement guides instead.
The basic method for replacing the Vitality toothbrush battery is:
- Open up the toothbrush handle
- Desolder the two connections for the old battery
- Remove the PCB
- Install the replacement toothbrush battery, part number 131114466661
- Re-install the PCB
- Re-solder the electrical connections
- Reassemble the toothbrush handle
This is documented in detail below along with lots of pictures. Click on any picture to enlarge it.
Video
We have also created a short video from this guide to Braun Oral-B Vitality battery replacement here, which you can also watch below.
Disclaimer
Any damage to yourself, your toothbrush or anything else is entirely your responsibility. This guide is for professional, educational purposes only and is offered without guarantee or liability.
Tools / Parts / Equipment
- Braun Oral-B Vitality toothbrush (Type 3709 only)
- Original recharging base
- Soldering iron: Electronics grade (about 18-25 watts)
- Solder: Lead-free silver solder is great for this
- Solder sucker (also known as a desoldering pump) and/or desoldering braid/wick
- Scissors
- Craft knife e.g. scalpel, snap-off, retractable or Stanley type
- Small flat-bladed screwdriver: 2 to 4mm wide
- Replacement 49mm x 14mm battery with solder tags. Either:
- NiMH 1.2V version, part number 131114466661 (Support us by buying it here at ToothbrushBattery.com), or
- NiCd 1.2V version (Support us by buying it here at ToothbrushBattery.com)
How-To
To start with, remove the brush head from the toothbrush and stand the toothbrush upside down in some very hot water for 5 minutes, immersed up to the switch. This will soften up the plastics which should ease disassembly.
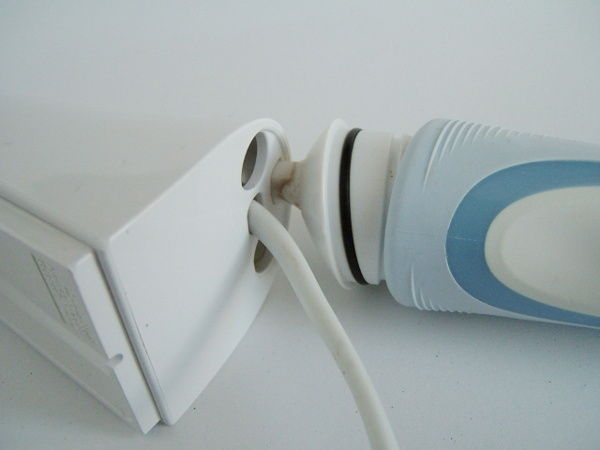
Insert the top of the handle into the middle hole in the back of the recharging base. If your charger does not have this hole, you can use an old toothbrush head held with grips instead.

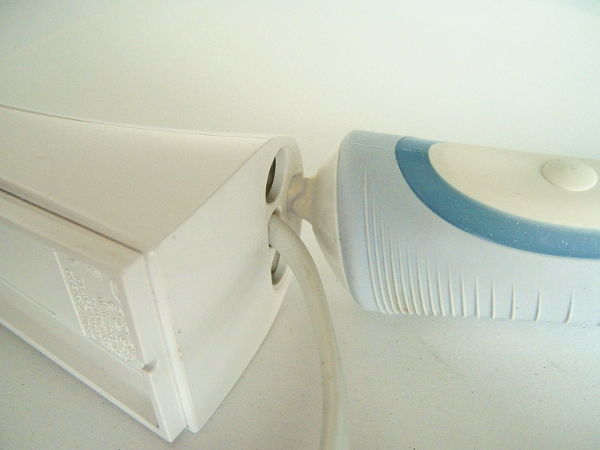
Carefully twist the handle anti-clockwise. It should start to open up but might be stiff so keep twisting it back and forth. It will only twist about an eighth of a turn and then you can slide out the innards. This is the most difficult step and there is the risk of shearing off a piece of your brush or splitting the charging base so be patient and work it loose little by little.
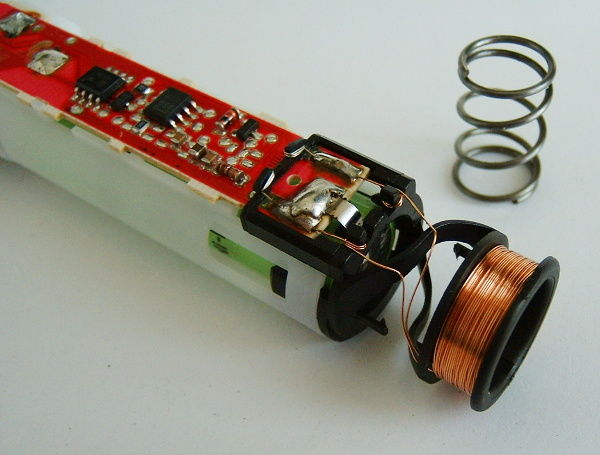
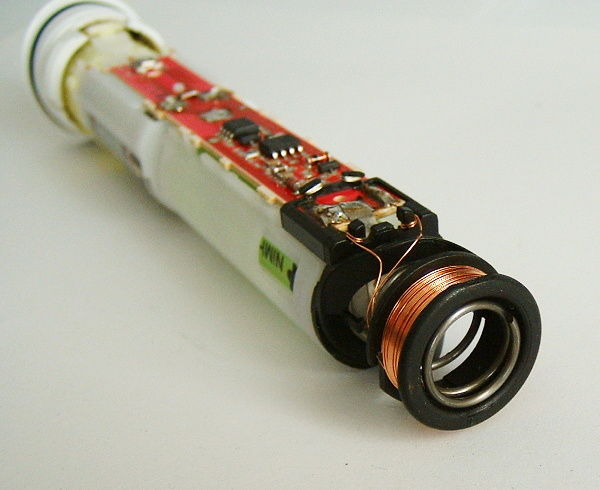
Now that the handle is open you can wiggle the innards out. The spring might fall out so don’t lose it!
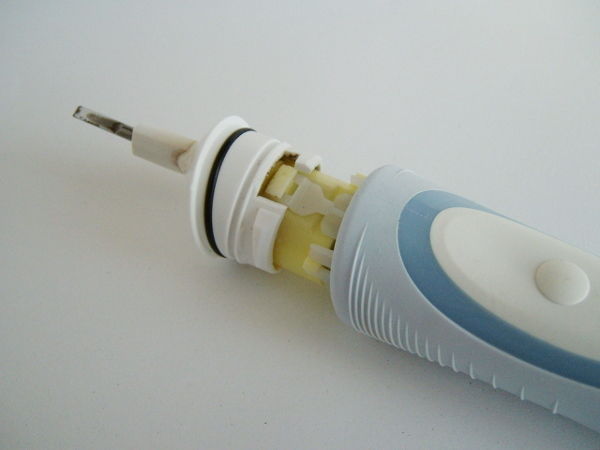
Remove the spring from inside the copper coil at the base of the handle and put it somewhere safe.
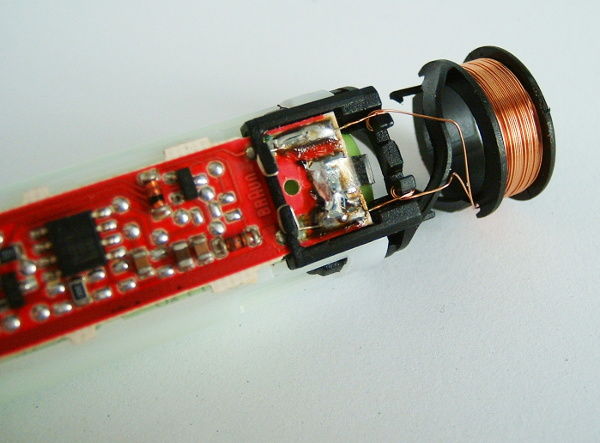
Below is where the negative battery terminal is soldered to the circuit board (arrowed):
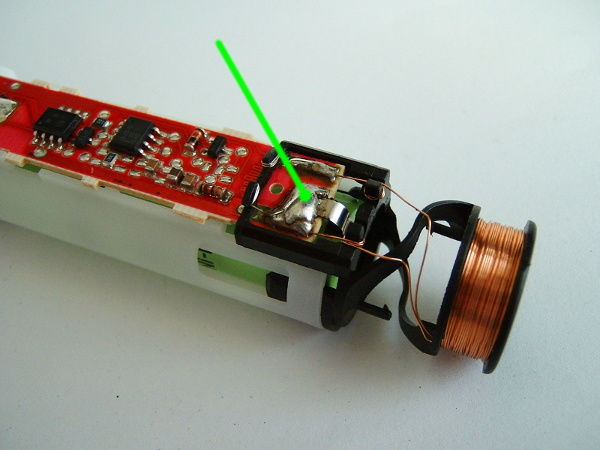
Using the soldering iron and the solder sucker, desolder the battery’s metal tag from the circuit board and bend it away from the board with the knife. We’re desoldering this first so that we don’t accidentally short out anything when working at the other end.
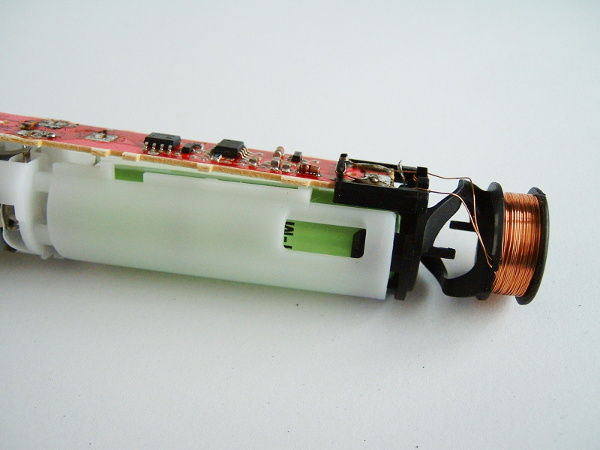
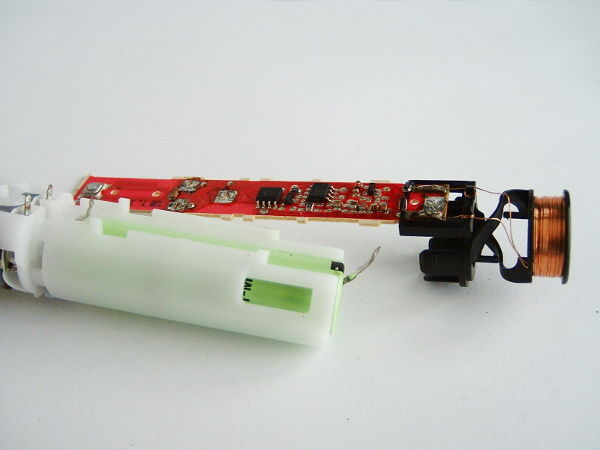
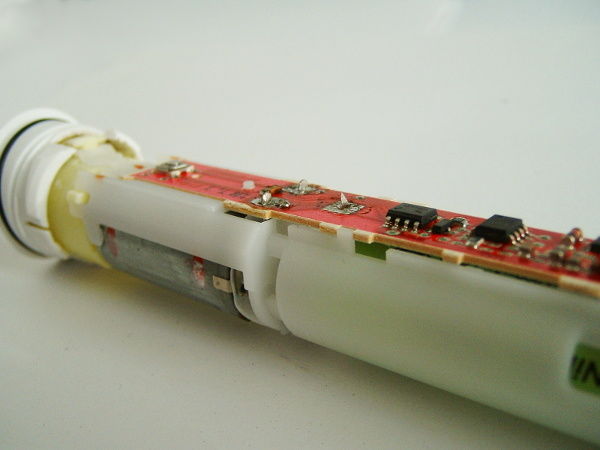
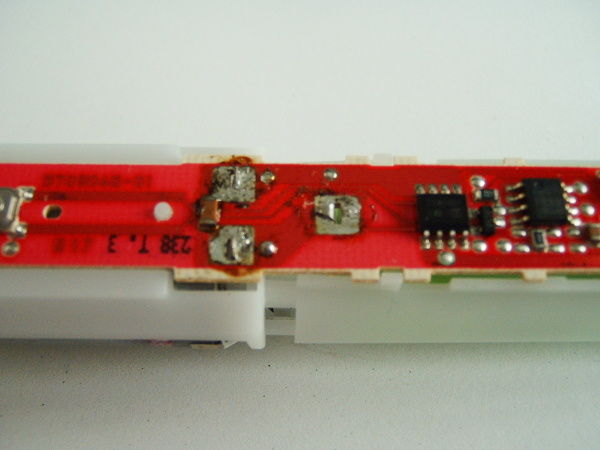
Moving up to the other end of the circuit board, identify the two motor terminals (arrowed, left) and the positive battery terminal (arrowed, right).
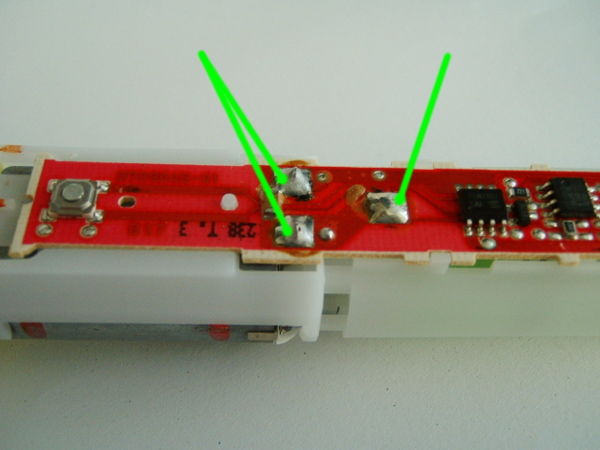
Desolder these three terminals and bend the tabs upright using the knife. You need to remove all the solder from these so that the metal tabs can move back and forth in their holes allowing the circuit board to be removed later. Desoldering braid or a solder sucker are ideal for this.
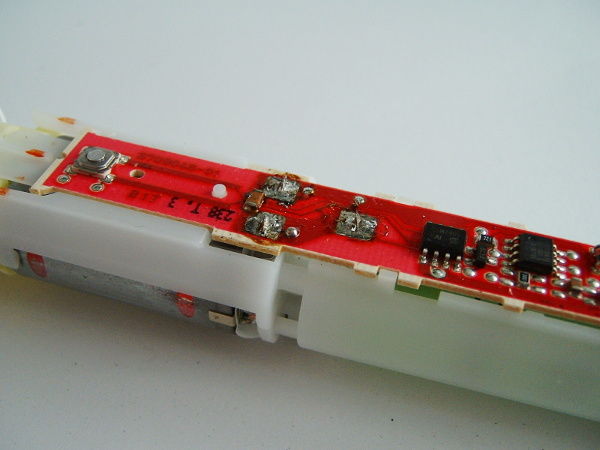
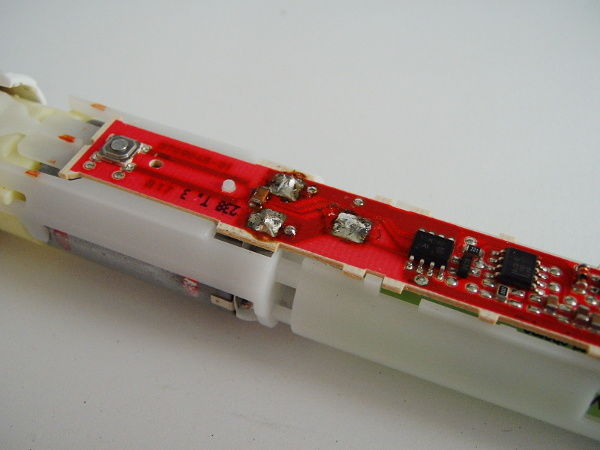
Gently pry the circuit board up at the power button end so that it pops off its plastic peg and starts to come up off the three terminals you just desoldered.
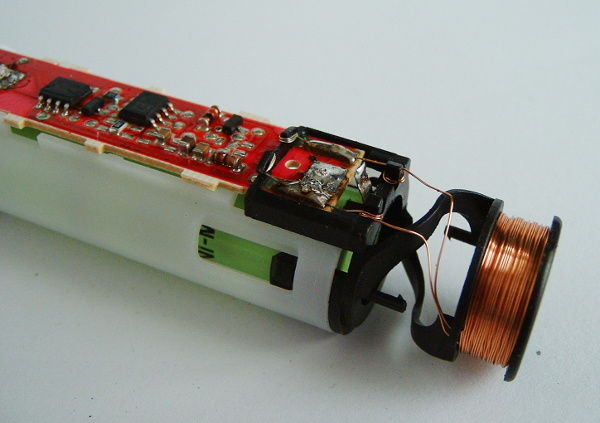
Heading back down to the negative terminal end, identify the two black plastic tabs that hold the coil to the white chassis of the handle. There is one on each side. See arrow:
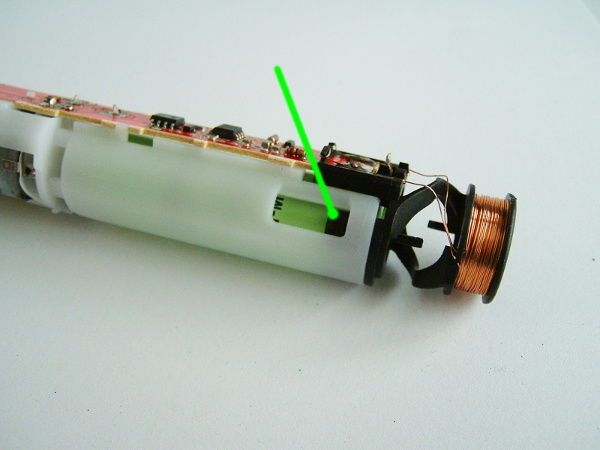
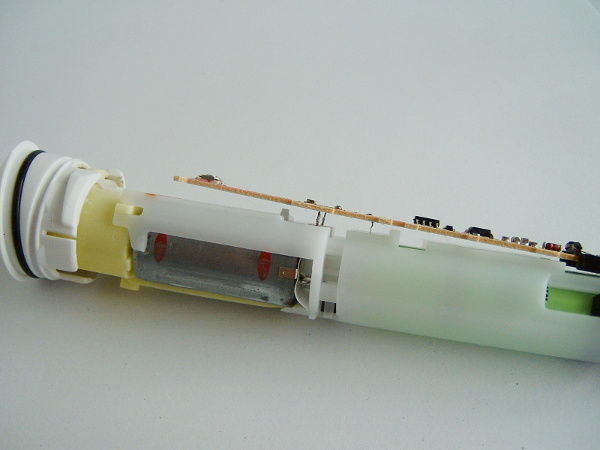
Use the screwdriver to gently pry the clips and then slide the coil and circuit board assembly out.
The battery might or might not come out depending on how well the clip (arrowed) at the positive end is holding it in.
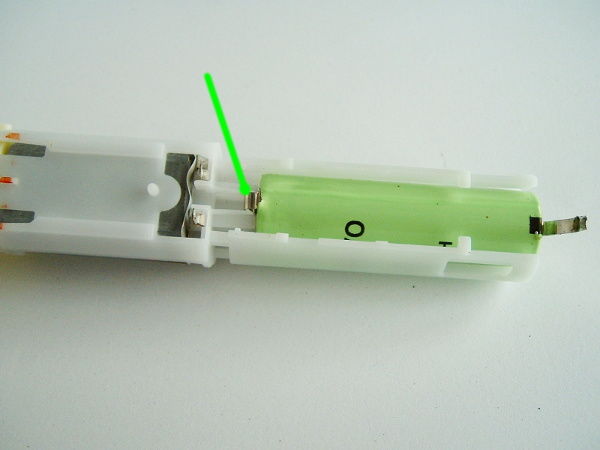
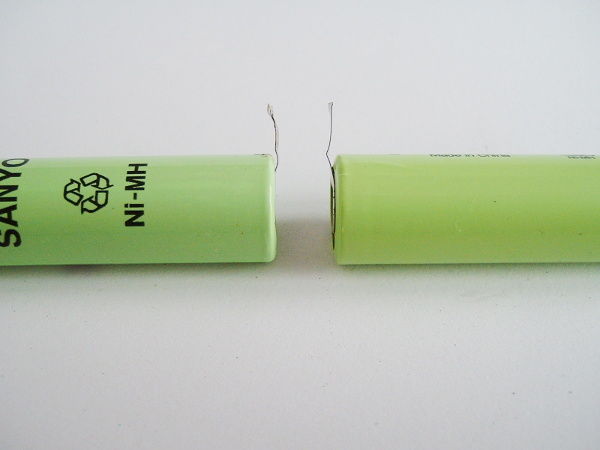
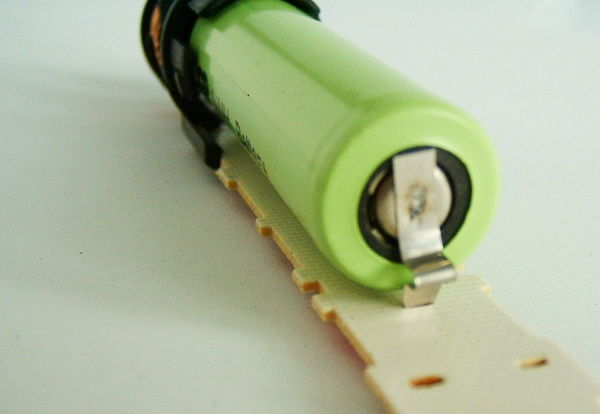
Remove the battery from its clip and check its measurements. This Braun Oral-B Vitality toothbrush has a 49mm long by 14mm diameter battery with welded on solder tags. Yours might be either an older NiCd type battery or a newer, higher capacity NiMH battery.
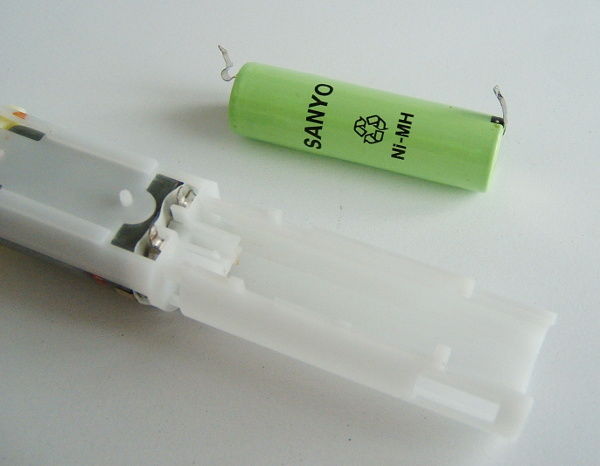
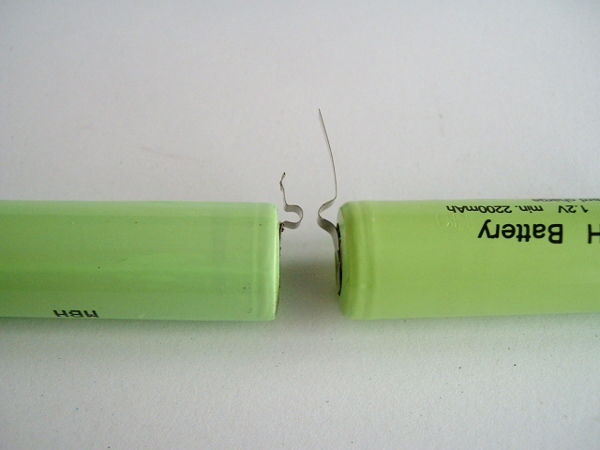
Compare your original battery to its replacement. We will be fitting one of our industrial-grade GP batteries, part number 131114466661. With an upgraded 2200mAh capacity your toothbrush will run for much longer between recharges. Please support us with writing these repair guides by buying your replacement battery through our secure online shop here at ToothbrushBattery.com.

The solder tags on the new battery will need trimming with scissors to a similar length as the old battery. Shape the positive tag of the new battery so that it fits in the clip like the old one.
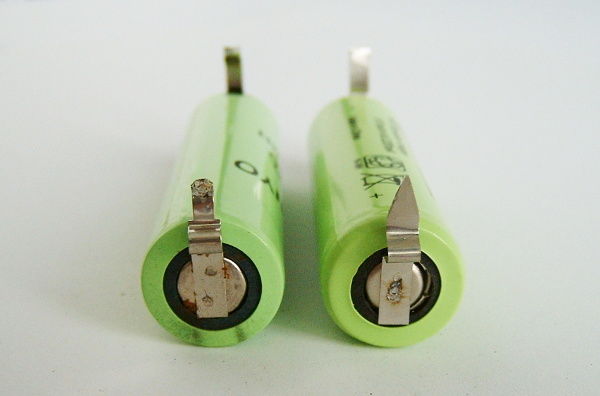
Negative terminals:
Positive terminals:
Test fit the new battery in the chassis of the handle and check that the clip engages with the tag on the positive terminal.
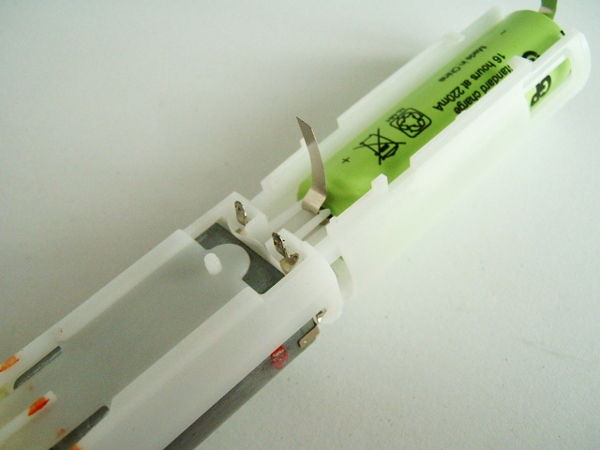
Once you’re happy enough with the clip, trim the tip of the positive terminal to roughly match the old battery. It needs to fit through the slot in the circuit board and have enough metal poking through to bend over and solder to the board.
Test fit the new battery to the toothbrush circuit board.
Once you’re happy with the shape of the tag, clip the battery back into the handle and carefully replace the circuit board and coil assembly so that the motor and battery solder tags poke through the holes in the circuit board.
Bend the positive battery tag over and solder it onto the circuit board, and also re-solder the motor terminals.
Move down to the bottom end of the circuit board and solder the negative tag of the new battery to the circuit board.
Replace the spring inside the coil then you’re ready for reassembly!
And that’s it! You now have a fully repaired Type 3709 Braun Oral B Vitality toothbrush. Our Ni-MH batteries come with a high level of charge in them so you can start using your toothbrush immediately with no further charging required. Once the motor starts to run noticeably slower put the toothbrush on for a full charge for about 16-24 hours. You can interrupt the charging part-way through to use the toothbrush if you need to.
To maximise the lifespan of your new battery do not store the toothbrush on permanent charge between uses. Lie the toothbrush flat on its back with the head removed when not in use to prevent water from seeping past the top shaft seal and damaging the electrics.
Please recycle your old battery either at a local civic facility or a supermarket battery collection point.
Leave any questions, tips or comments about the Type 3709 Vitality battery replacement process below!
Thanks I followed instructions and installed the new battery. When I connected the positive terminal to the PCB the motor started working but the on/off switch doesn’t work and it won’t turn-off. Had to disconnect the battery to stop the motor. Any advice?
First off, check that the battery is not connected in reverse (+/-). Some other possibilities:
The battery tags could be touching something metal such as the motor.
There could be a stray blob of solder causing a bridge on the PCB.
It could be the switch. There are two types on the Vitality – they are fitted with either a single electical switch on the PCB or a mechanical switch with two buttons. If yours has the two buttons make sure you’re pressing the correct one to switch it off!
Other than that, go back and check your soldering and check for short circuits.
Hope that helps!
Ok So I read a comment above. It appears that I had reversed polarity which causes the motors to spin with inability to switch off.
I can’t believe Braun didn’t put a simple diode somewhere to avoid the reverse polarity issue. Or a diode rectifier. I expect more for my $25. 😛
Thanks for your guide.
I am kicking myself as I threw away a perfectly ok but flat battered Bruan Oral B Triumph (cost me $199!) before I knew about the battery replacement hacks.
I also changed my battery inside the toothbrush. But I cannot start it with button.
It starts when I touch motor casing and leads on the left side of the PCB. Then it starts to spin and gradually slows down.
Maybe I burned the element between motor terminals.
Do you know what that SMD element is?
First check your soldering for short circuits and stray blobs of solder. The component connecting the 2 terminals of the motor is a capacitor. If you think it is damaged you can disconnect it to see if the toothbrush runs without it.
Just done my first battery replacement on 3756 using the longer battery. Had a problem at first when the motor would not stop running. Found I had fitted battery wrong way re polarity !!. Refitted correct way and all is fine and no apparent damage to the other components (phew!). I think this arose because the longer battery looks the same both ways (the shorter battery is very obvious re which way to fit). Next time I marked the battery + & – on the ends and opposite the tabs so they can be seen when assembled. Perhaps this point should be highlighted in your instructions (which are excellent).
Now for the second 3756 battery replacement.
Hello All –
Re: Oral B 3709
Can anybody tell me what the capacity of the original battery is (was!) please? I suspect it was nowhere near the replacement’s 2200mAh.
Thanks,
Ian.
Hi Ian, if the original battery was Ni-Cd then it would have been between 600mAh and 1100mAh. If the original was Ni-MH then it would have been up to 1650mAh. You can fit lower- or higher-capacity batteries and they will still run and charge fine. The only thing affected is how long they run for before they need recharging again.
Thanks for that. I suspected that the original was a bit weedy. Ian.
This is an awesome guide. Thank you very much!
700mAh
Thanks for a great work description! Battery is now replaced, 3709 reassembled and on charging. The only part I had problems with was the initial opening. Since I did not have the grip hole on any of my charging bases, I used the suggested “old toothbrush head and pliers” method. With this method the insides of the toothbrush came loose and started spinning. I resorted to carefully using the pliers directly on the handle tip, which worked out.
Have not actually put a new battery in yet but the dismantling instructions were brilliant.
Thanks
Hello to all. Thank you for these precious instructions. I replaced 2 batteries on 2 vitality brushes and both do not work anymore! I put them in charge for a whole day. I tried to replace even their batteries that worked badly but nothing, they are dead! What may have happened? The polarity of the batteries is correct and there is no welding dirt.
Are you able to measure the voltages of the old batteries with a multimeter? Get the brushes running with the old batteries, then try replacing them with the new batteries. We have some troubleshooting tips here.
If the original battery is a NI-CD and you replace it with the NI-MH, will the original charger work with the NI-MH battery or will you need a different base charger?
The original charger will charge the Ni-MH battery. There is no automatic shutoff in the Vitality toothbrush so disconnect your charger after 24 hours to extend the lifespan of the Ni-MH battery. Also have a read of our Ni-Cd to Ni-MH battery upgrade info.
Replaced the battery in my 3709 following the excellent instructions, just a quick tip – if you support the repaired internals on the charge base for an hour or so it will get enough charge to test prior to reassembly into the handle.
Re: My brand new Braun electric toothbrush (purchased October. 2019. Head will not vibrate although stem that holds the head vibrates fine. Help before I throw this out.?
Try a different head or take it back to where you bought it as it will be under guarantee.
Nice detail in instructions, but one question. I have a 42 mm battery length. Can I get a direct replacement battery?–All that I have seen are 49 mm. What extra steps are there to using a 49 mm battery in my device? Thanks Jack
Hi Jack, What is the Type number marked on the handle of your toothbrush?
42mm long batteries of various diameters are available in our online shop here.
Olá onde posso encontrar a bateria para a escova Braun 3709?
Olá Jose, batteries for the Vitality 3709 toothbrush are available from us here.
Hi – many thanks for these guides and fast delivery of batteries!
I successfully replaced the battery on an old Braun 3756, but I had problems with a 3710, which is the new version of the Vitality 3709. The redesigned rubber sleeve around the body hampers the removal of the handle top. After several (gentle) struggles, and as warned, the shaft-top broke! But it did enable me to see that the clips that hold the top into the main handle have been beefed up – there is no real ability to rotate the top out of the clip receptacles. I can send pics if required.
I’d guess gradual prying at the seams with a wide-but-thin blade would be more successful if the rubber sleeve can be moved out of the way: it is glued on! Or maybe gentle pre-heating per your other guides might help.
Have you had any success with a 3710?
Regards, Tony H.
Hi Tony,
We haven’t looked at the newer Type 3710 Vitality brushes yet but I heard there’s a knack to opening them. I’ve seen a photo of the top cap and it doesn’t twist, it just clips in place. It seems that squeezing the body at the sides might let the top cap unclip so it can be pulled out, perhaps after heating it all in hot water as you suggest. Do email any photos you’re happy to share with everyone to the address on our contact page if you think they’ll help us work out how to open it.
[Update]
We have now published a guide to opening the Type 3708 and 3710 Vitality toothbrushes to replace the battery here.
I had the same experience. I presume the method you explained should work. I only saw it afterwards…
Maybe some words in the first lines about the 3710 should help others to try open up the brush.
Great guide, thank you. Unfortunately, with my 3709, some small white plastic part inside snapped off while trying to remove the top in the first step. As I result (I’m guessing) the brush wouldn’t work when re-assembled with its original battery – I only disassembled it to get the battery measurements before ordering. Doesn’t work either in or out of the casing. Ah well, new toothbrush beckons!
Hello, great guide when replacing batteries. I just have to replace the motor, because the brushes must have hung up. Where can I get such an engine? Best regards.
Thanks for these excellent & thorough instructions. I succeeded in replacing my 3709’s original NiCd (which would stop before the 2 minute timer expired) w/ a 2200mAh NiMH (which can run continuously for over 1 hour & still going strong).
One trick I found: the new battery was fully charged before installation but the motor would not start after re-assembly. I placed it on the charger base for a few seconds, removed it again and the brush would then start & run. I think there must be some sort of shut-down/protection circuit which needs resetting by the charger base?
Hi,
I bought a spare battery off your website a while ago and thought I’d finally try and replace the battery on the 3709.
Is there a technique to sliding out the innards? I’ve rotated it 1/8 using the charger and it’s not sliding out. I’ve tried wriggling it and prising it open with a screwdriver, but don’t want to damage the plastic. Should it be sliding out relatively easily?
Thanks.
You might have to prise it gently with a large screwdriver or ‘spudger’. There is a seal around the top which is some friction to overcome.
I am able to gently twist the head using pliers directly on the plastic below the metal pin, but one side of the head seems reluctant to emerge from the handle. It’s had about an eighth of a turn and one side is free but the other seems not to be emerging. I am afraid of twisting more than the eighth of a turn. Have you come across this problem, and have you any tip to help me continue?
You don’t need to turn it any further but a bit of gentle prying should help release the top.
Hi guys, I tried to replace the battery of my 3710 model but I have a problem, after I fitted a 1.2V battery, I started the toothbrush ( unassembled) and it worked. After I reassembled when I press the button it doesn’t start.. if I remove the spring at the bottom, it starts but when I put the brushead and start brushing it stops. I’ve seen that applying even the smallest pressure to the metal part where the brush goes in, it will shut down the motor.
What could be the reason?
The battery that I put is just a bit bigger, as it have the notch at the + side. The original didn’t had.
And after I turn it off, I can’t turn it on again, I have to put it at least for one second to the charger and it will start again if I press the button.
Hi Sebastian, It sounds like a bad connection. Check your solder joints, plus the connections for the motor and for the copper wires from the induction charging coil.
The soldering is good, I’ve put enough and I used the version without Pb.
How may I send a photo?
It’s frustrating that at the smallest pressure applied on the brush it stops, and to be able to turn it on again I have to put it back to charger, I think to reset. Because if I put it only for 1 second, and take it out from charger it turns on..
If you want to send some clear photos of the PCB and soldering you can use the email address on our contact page.
Excellent guide – thank you. My switch had become a little displaced and I used your guide to get in and jiggle it. Fancy that little hole in the charger being for that! All good wishes.
Hello, my friends.. I have a problem when replacing the battery, and the capacitor connected between the electrodes of the motor has gone out with the solder. When I put it back and connected the battery, the brush does not work. If the capacitor is damaged, what is the capacitance or capacitance of the capacitor so that I can replace it!! Another question is that the capacitor must be connected between the negative and positive poles of the motor!? or now !! That is, does he perform a short circuit between the motor poles or not?!
The brush should run fine without the motor capacitor. Once you are back up and running fit a new capacitor across the motor. It is for electrical interference suppression so any interference suppression capacitor designed for use on a 1.5 volt DC motor should work.
I had a problem with a 3707, very similar to 3709, and it was not the battery, it was the motor, it grew conductive traces of worn metal between the 3 sectors of the collector, effectively shorting part of the rotor windings. As a result it sems powerless and it gets really hot. These brushes and collectors in these motors are subject to great stress. It was really tricky to repair, specially assembling the motor again. But it works. It is not normal to get very hot, just a bit warm. But I know it will fail again due to worn out metal, maybe it could last a couple years more, I added a drop of penetrating oil in the brushes just in case it can help with friction… However I got it for really cheap a few years ago. I hope newer motors in more expensive models do not have the same problem!
Just changed the battery in 2 Oralb Vitality. Great instructions. Thanks
Is there a link for the type 3710 model? I have been clicking links after links. And this was the closest model number I could get compared to my Toothbrush. My Toothbrush tyrp 3710 will not charge in its base type 3757. Not sure if it’s my base or Toothbrush that isn’t working. Would like some help please
[Update]
We have now published a guide to opening the Type 3708 and 3710 Vitality toothbrushes to replace the battery here.
Thanks for the brilliant instructions. Just upgraded my old toothbrush (with a dead 700mAh NIMH battery) to work perfectly well again for years! It even lasts three times longer now.
Thank you!
I got type 3709 brush that doesn’t stop running. Please help to find timer that seems to be stuck
If the power switch won’t turn it off then this is likely caused by water ingress. Open up the handle and let the internals dry out for 24 hours. Always store your brush between uses with the head removed and the handle lying flat.
Great tutorial. I’m a retired engineer and I found your pictures and explanation invaluable.
Once I had the replacement battery in place, as a typical engineer, I decided to check my work before the dicey case reassembly. To my shock (and horror) the motor did not turn on when I clicked the switch. I knew the battery had plenty of charge – I feared that I had damaged something on the PCB. I discovered (in another tutorial) that the system just needs a few moments on the charger to reinitialize the circuitry. Sure enough, a few seconds on the charger resurrected the brush! (Of course I hadn’t read your instructions to the end to discover the “don’t be surprised if it seems dead after reassembly” comment.)
Thanks again for the detailed and well documented instructions.
Yeah, this is happening to me pre replacement as well with the factory battery, I think my brush battery is so low(or maybe stray water) that sometimes it starts on its own, and sometimes it doesnt start on the button at all. At those times I just need to tap it on the charging point to do some sort of soft reset to start.
I replaced the NiCd battery on a Braun Oral B Vitality. The instructions were excellent. I did find a small snag: the positive lead on the replacement battery was too wide to fit through the rectangular hole in the pcb. I used a very sharp pocket knife to elongate the hole by scraping gently at the ends. This did not damage the solder pads on the other side of the pcb so I was able to fit the lead through the enlarged hole and solder it in place.
Good work James, glad you got your Vitality brush back up and running again. You can also narrow down the battery tag with small sharp scissors so it fits through the PCB hole.
Unfortunately, I wasn’t able to order a replacement battery from you, but I would still like to thank you for these detailed instructions, which enabled me to repair my toothbrush without any problems.
This “magic” spring can destroy thin connector from battery to PCB. I have just fixed completly dead tothbrush by soldering this connector again.
I had some difficulty in dismantling the toothbrush. I soaked the removable part in very hot water (just off the boil) for a few minutes. Once I had done that, it came apart quite easily.
Maybe consider adding this suggestion to your instructions?
Thanks for the tip David!
My 3709 does not turn on when at first but later suddenly starts. Something must be loose. Took it apart as you describe but can’t see the problem. Now it doesn’t work at all. Help
This could be a broken solder connection. You could try re-melting the solder connections on the PCB for the motor, battery and charging coil wires.
Hi, might have botched it but when I run a multi meter between each terminal and the motor points I am getting continuity. Tried after pressing the battery several times.
You will get continuity from one battery terminal to the motor, and across the motor. Are you able to measure the battery voltage?
Hi,
I own a Braun Oral B Vitality Type 3709 but, it appears the battery has died -. will not charge.
It normally sits on the charger – permanently.
As a point of note, l have never used the Toothbrush but have regularly powered it up and, just recently it got slower and slower and slower and now nothing.
I read your very interesting guide on how to change the Battery but – the base of the Charger is nothing like your illustration (it came with the Toothbrush when bought new some years ago), so l am stuck on Stage One of the Battery renewal.
Please help and advise on the solution please.
Best regards and Thanks,
Paul
Hi Paul, If your charger does not have the hole in the back as shown, you can use an old toothbrush head held with grips instead.
Leaving the battery on permanent charge without using the toothbrush will have damaged the old battery. After replacing the battery only recharge the toothbrush once it has been used enough that the motor has slowed down significantly. Then recharge for a maximum of 24 hours.