This guide will show you how to open and dismantle the Braun Oral-B type 3766 and 3767 electric toothbrush models and repair them by fitting a replacement Li-ion battery. These are great toothbrushes so they are well worth resurrecting with a new battery.
This battery replacement guide is only for Pro and Smart toothbrushes from Braun Oral-B that are marked as either Type 3766 or Type 3767 on the bottom. These brushes are fitted with a Lithium-ion battery (Li-ion). Click the photo below to enlarge it and compare the ‘Type/Tipo’ number marking to your toothbrush:

Also note the ‘Li-ion’ marking under the recycle symbol in the bottom of the hole.
For other type numbers, makes and models the toothbrush opening procedure, battery replacement procedure and battery specification is different so please see our other guides to toothbrush battery replacement for these toothbrushes.
The Type 3766 and 3767 toothbrushes from Oral B/Braun go by many different names on their packaging including Pro 2, Pro 3, Pro 4, Pro 600, Pro 1000, Pro 1500, Pro 2000, Pro 3000, Pro 4000, Smart 4, Smart 5, Smart 1000-6000, Smart Teen, Smart Junior, Smart Professional and often have ‘Professional Care’ marked on the handle itself. These marketing names are also used for other types of toothbrush so the only reliable way to tell which model you actually have and therefore the best guide to use for replacing the battery is to check the type number marked on the bottom of the handle as shown in the photo above.
The basic method is:
- Open up and dismantle the toothbrush handle
- Desolder PCB connections
- Remove the PCB and the original battery
- Solder in the replacement toothbrush battery
- Reassemble the handle
The type 3766 and 3767 toothbrush battery replacement process is documented in detail below along with lots of photos. Click on any photo to enlarge it:

Disclaimer
Any damage or injury to yourself, your toothbrush or anything else is entirely your responsibility. This guide is for professional, educational usage only and is offered without guarantee or liability. Lithium-ion (Li-ion) batteries are dangerous if short-circuited or mis-handled and can go into thermal runaway and self-ignite if you do not observe all handling precautions. Always wear safety glasses when soldering and cutting.
Video
We have created a short video to complement this guide to Braun/Oral B type 3766 & 3767 battery replacement. The video is published on our YouTube channel and you can also watch it below.
Tools, Parts & Equipment
- Braun Oral-B Pro/Smart type 3766 or 3767 electric toothbrush
- Original charger
- Soldering iron with fine needle/cone tip: Electronics grade (about 18-25 watt)
- Solder: Lead-free silver solder with a flux core is recommended
- Solder sucker (also known as a desoldering pump) and/or desoldering braid/wick
- Craft knife e.g. scalpel, snap-off, retractable or Stanley type
- Large blunt flat-bladed screwdriver: 5 to 7mm wide
- Needle nose pliers
- Miniature side cutters
- Adhesive putty such as Blu Tack to hold the toothbrush to the work surface
- Replacement 3.6V Li-ion battery. Either:
- Li-ion toothbrush battery with thin wire pins – Support us by buying yours from ToothbrushBattery.com here
- Or Li-ion toothbrush battery with flat metal tags – Support us by buying yours from ToothbrushBattery.com here
How-To
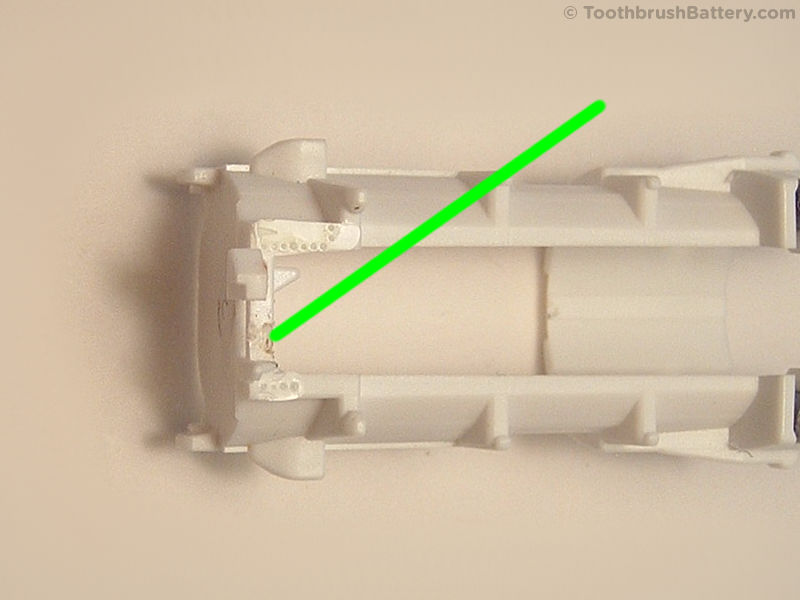
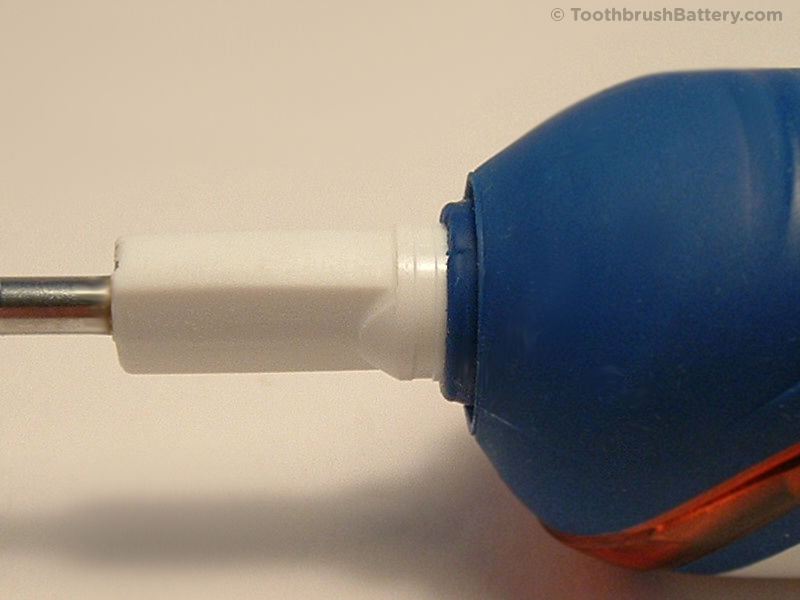
To start with, remove the brush head from the top of the handle and stand the toothbrush, tip downwards, in hot tap water for 5 minutes to soften the plastic ring.
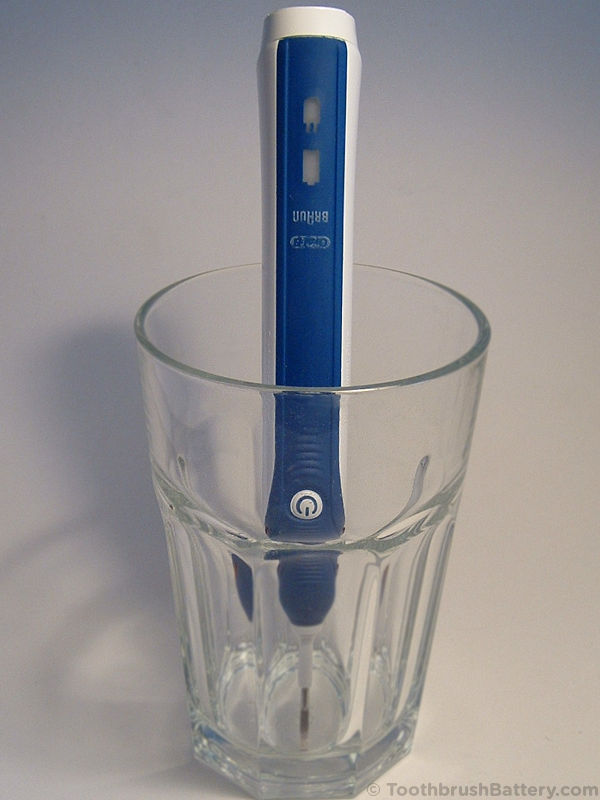
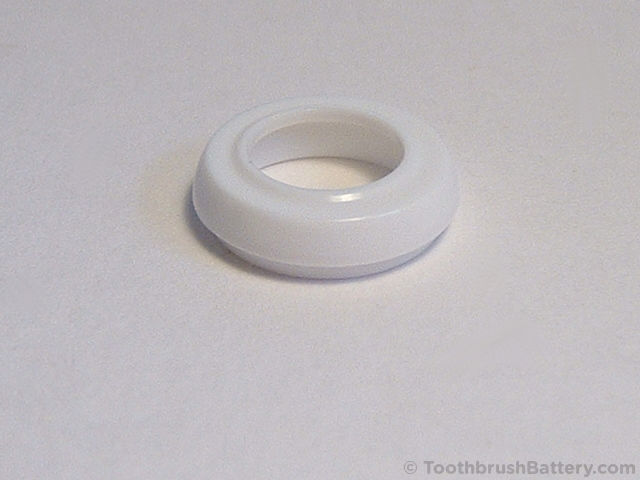
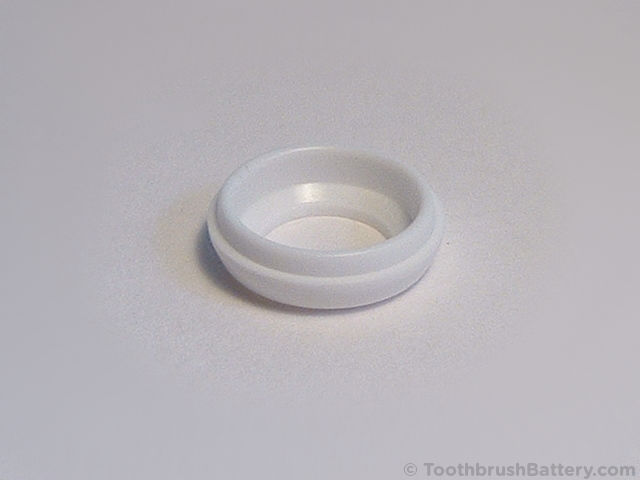
Using the large flat-head screwdriver start to pry off the plastic ring from around the shaft. The ring is stepped so press down into the soft casing to get under its lower edge. A screwdriver with blunted edges is less likely to mark the toothbrush, and prying from the back side of the handle will hide any marks.
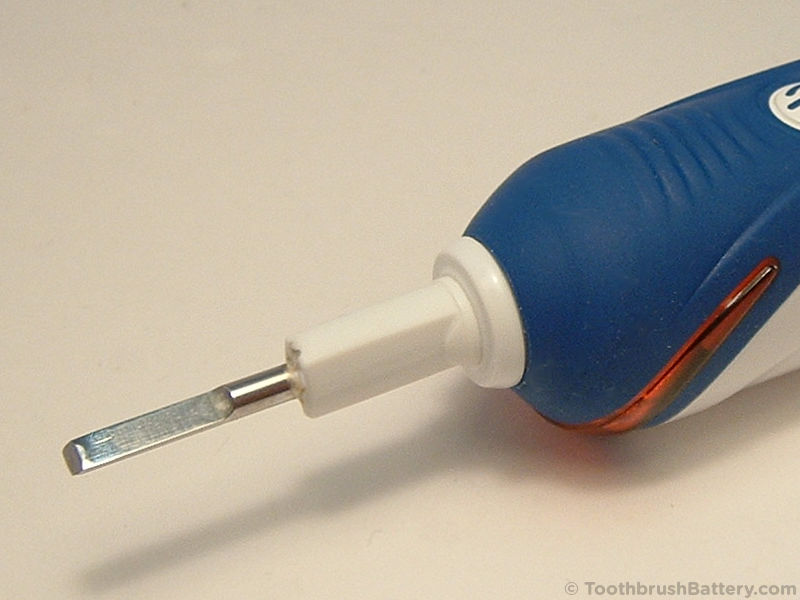
Store the removed ring safely.
Stand the toothbrush in hot water again, tip upwards this time, for another 5 minutes to soften the seal around the base cap and the cap’s internal plastic clip.

Dry off the handle with a towel then stand it on its unplugged charger.
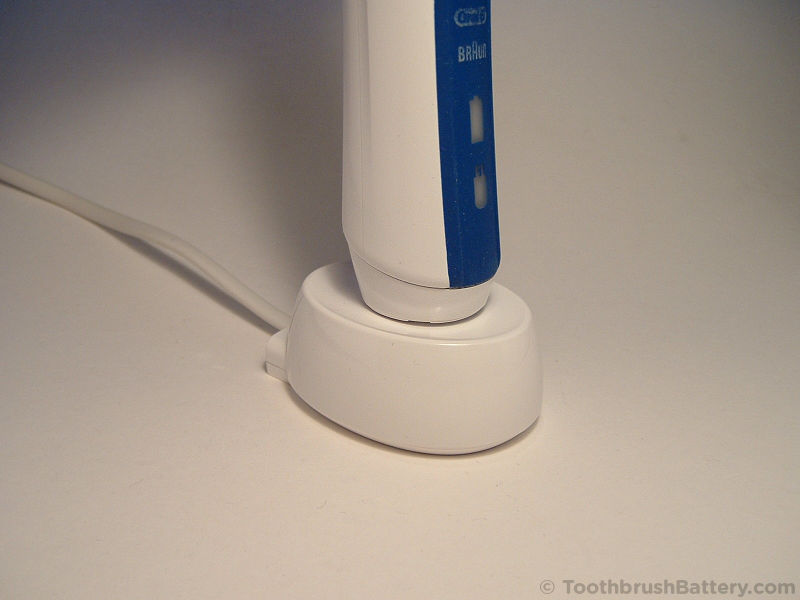
Carefully bend the toothbrush backwards so the base cap is levered open at the front.

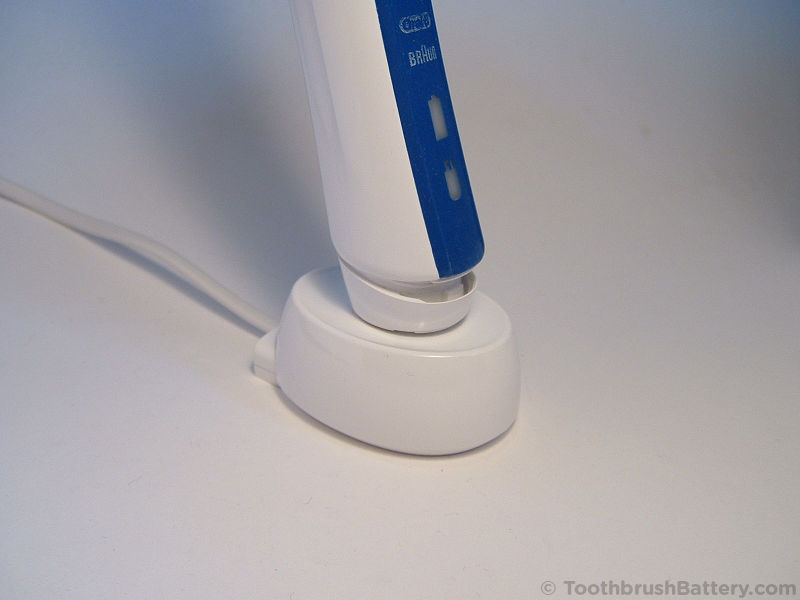
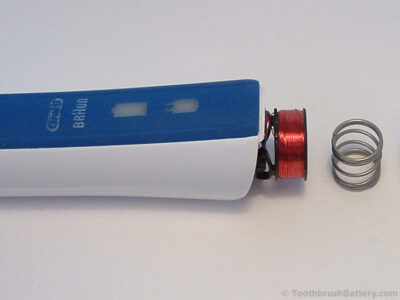
Lift the toothbrush off the charger and remove the base cap. The spring might fall out and roll away so don’t lose it!
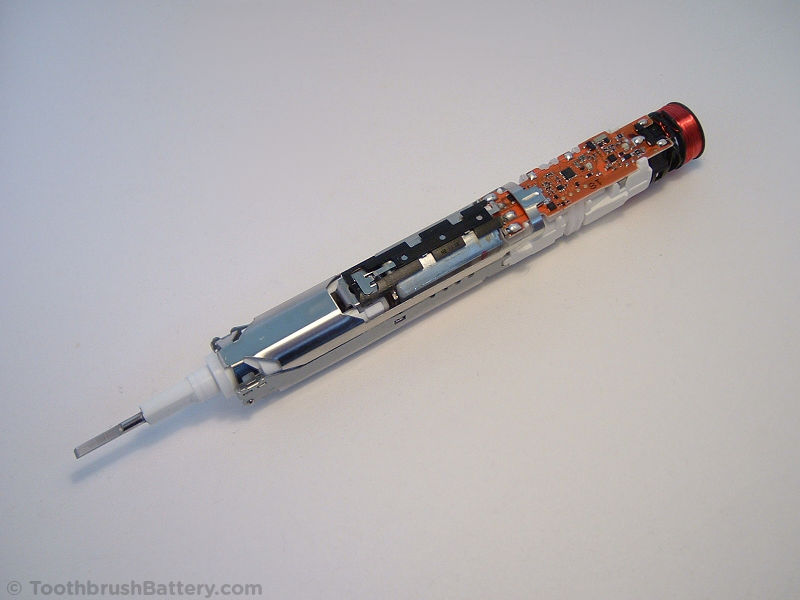
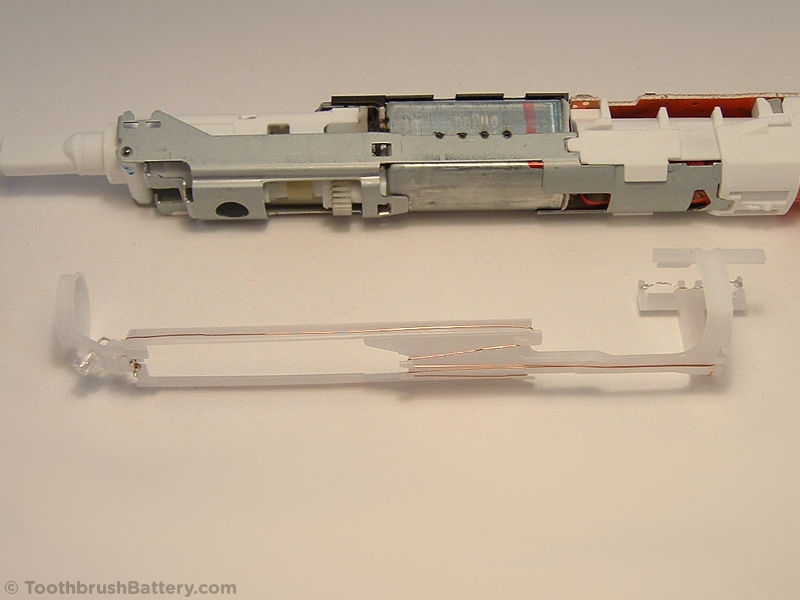
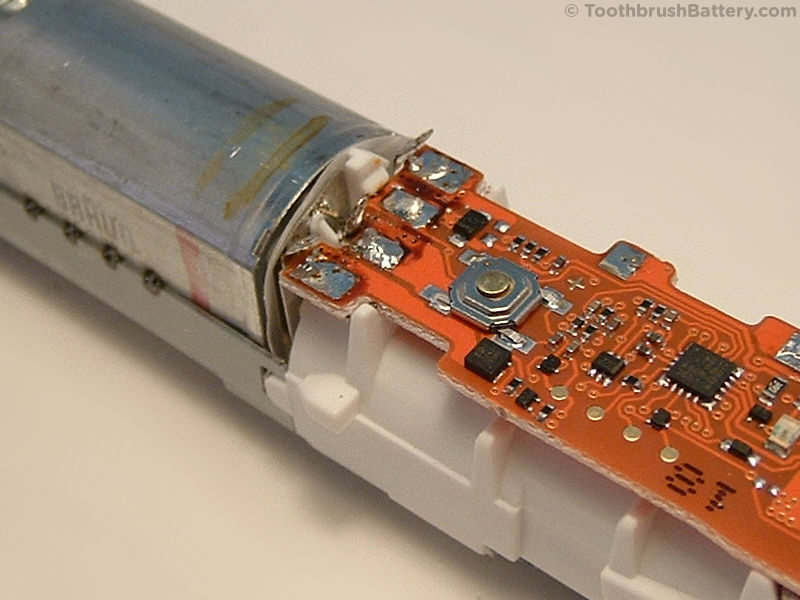
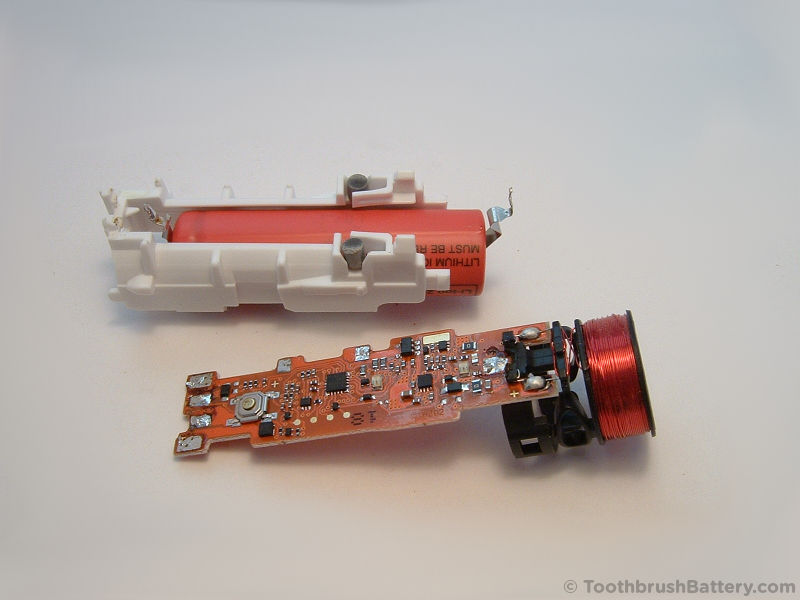
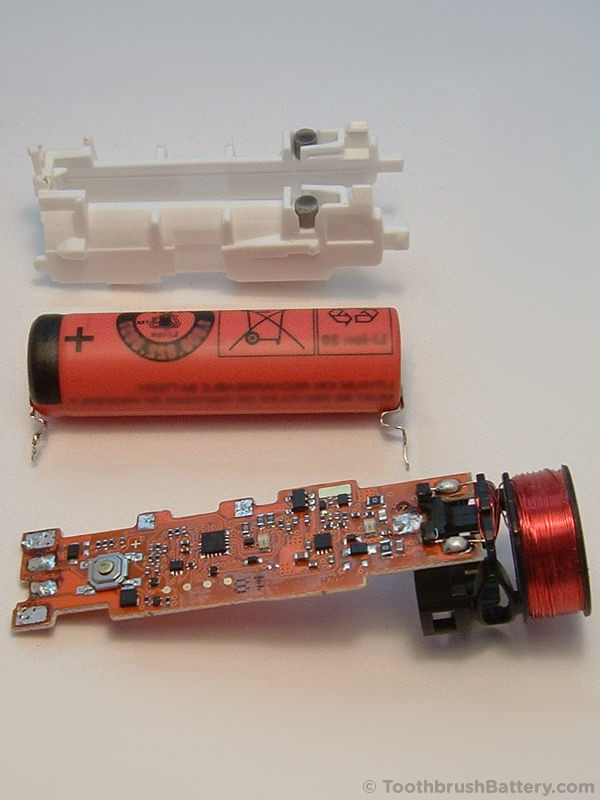
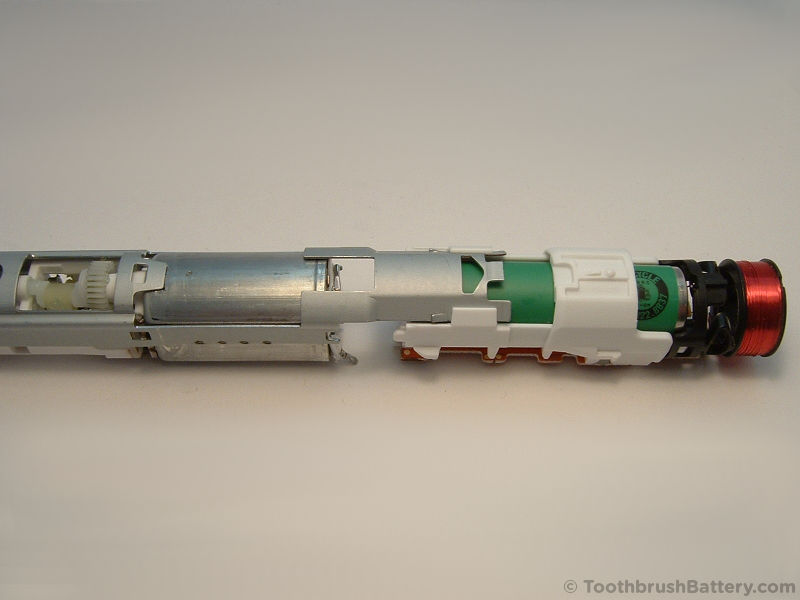
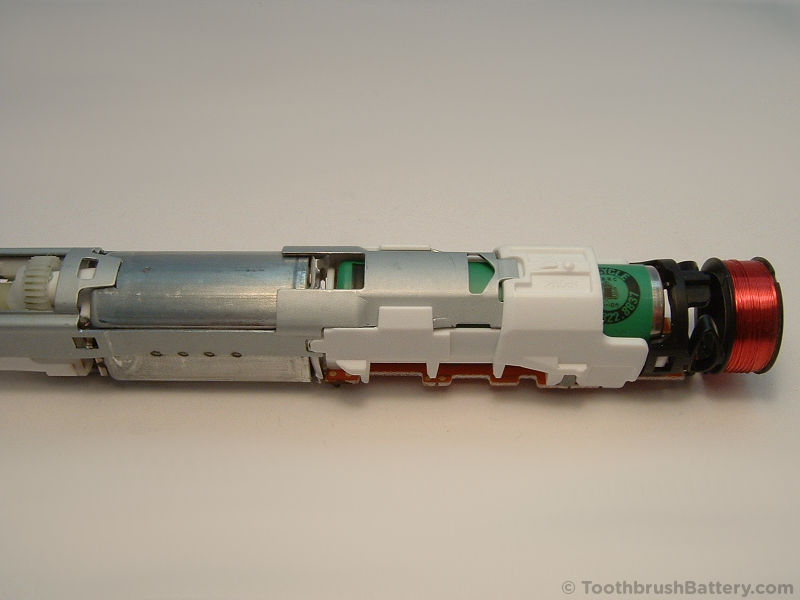
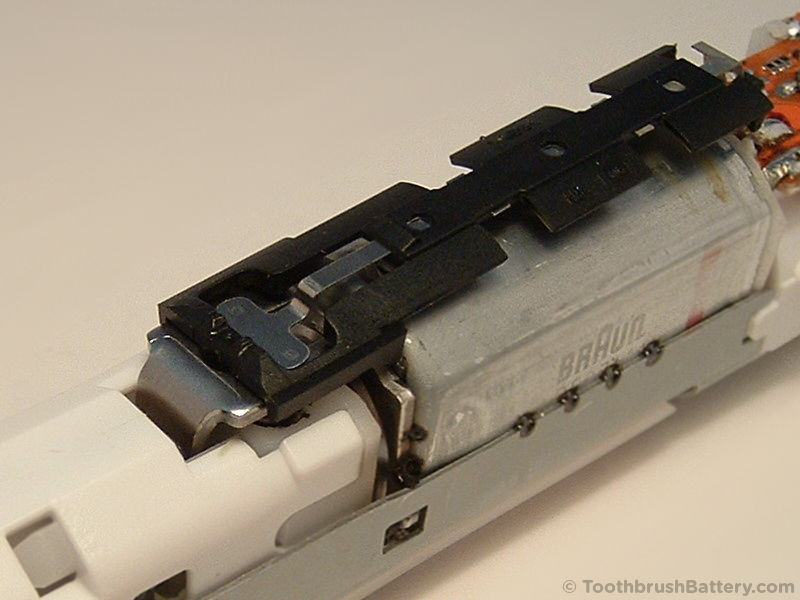
Push the top metal and plastic shaft into the main body of the toothbrush handle so that the toothbrush innards start to slide out.

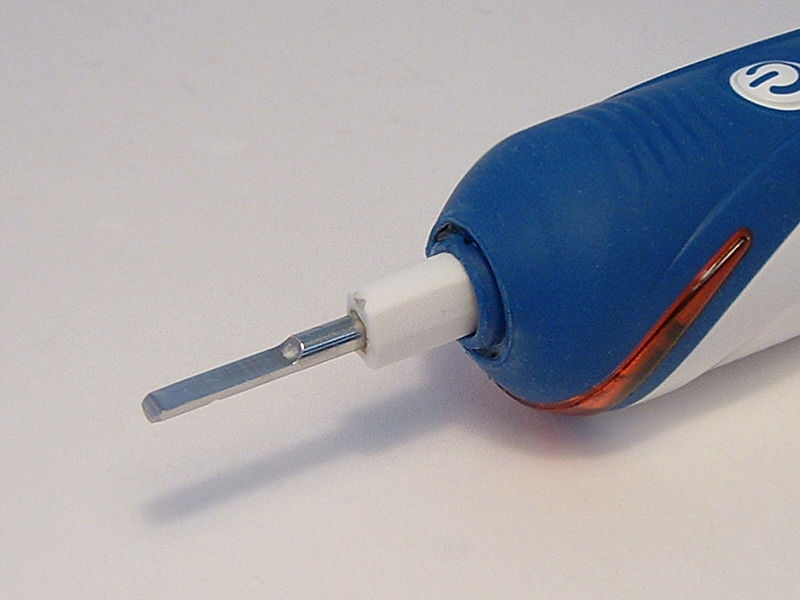
Fully remove the inner workings of the toothbrush from its handle casing.
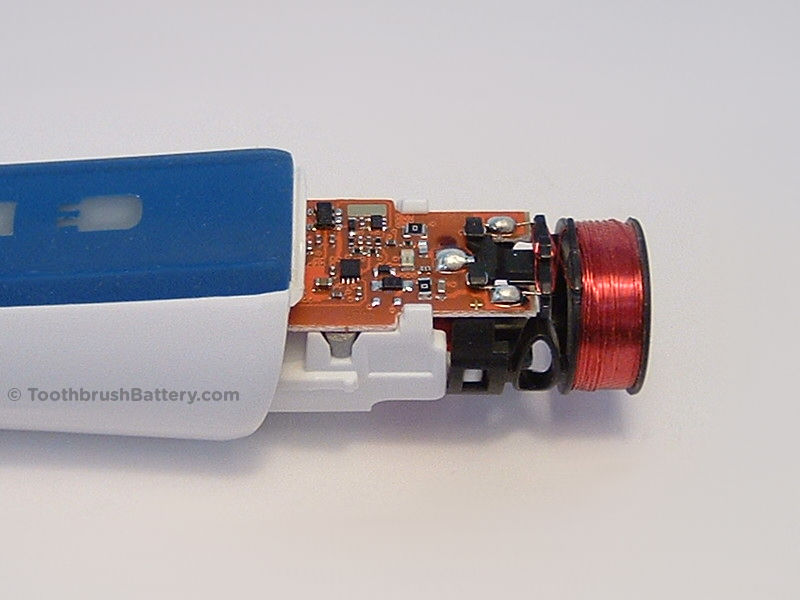
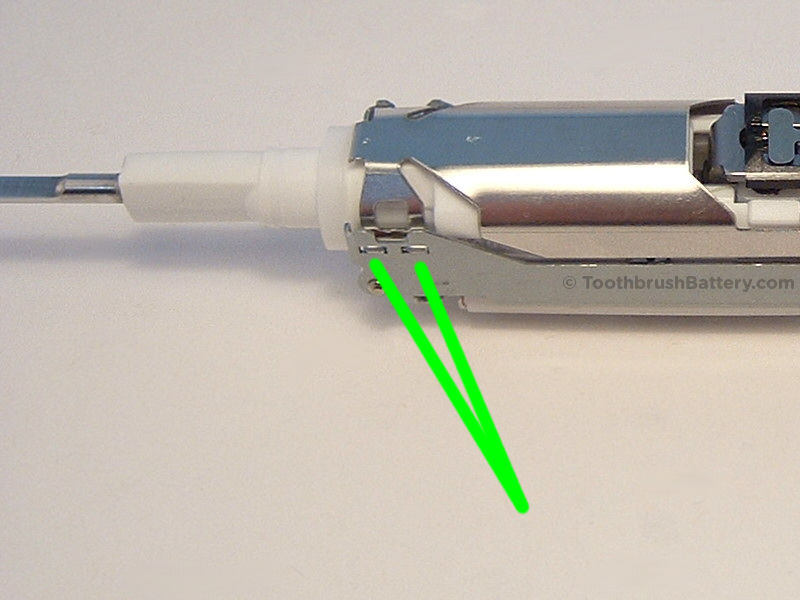
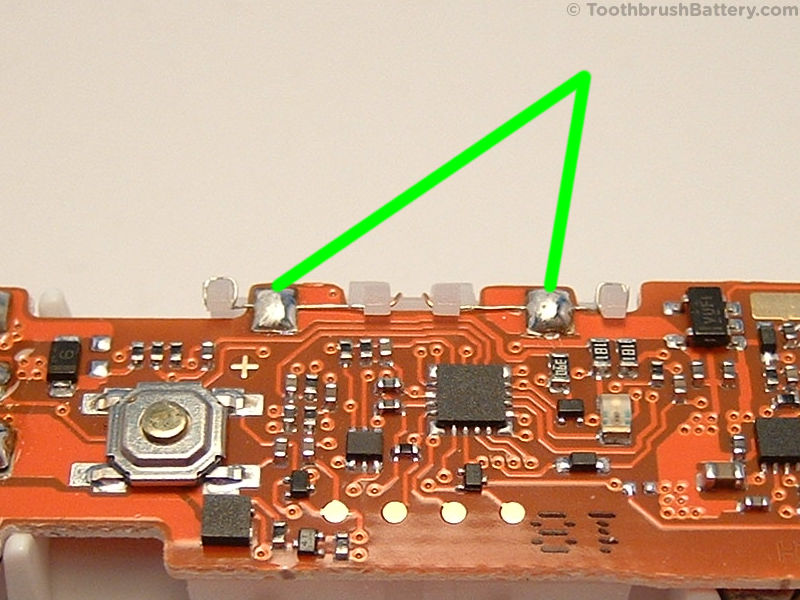
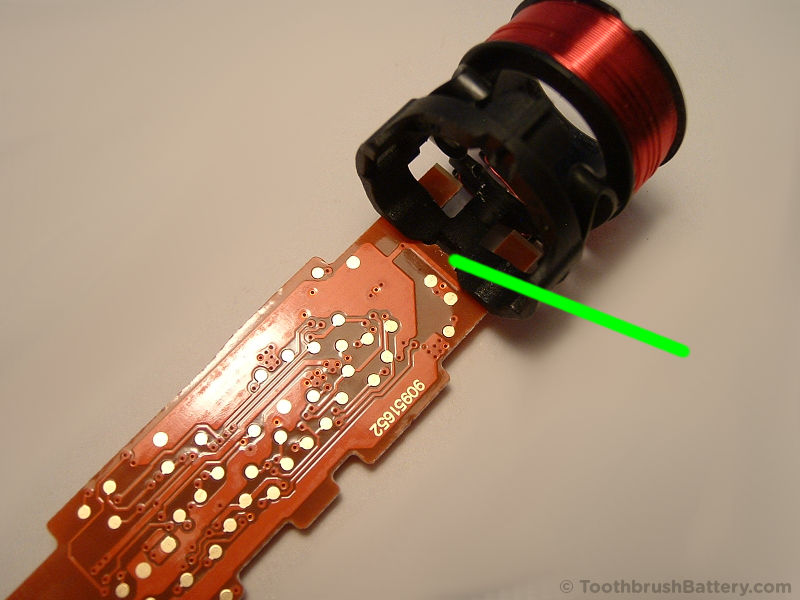
The power switch cover plate needs removing. It clips into two holes on each side, arrowed below. Unclip the plate from its holes on one side first, then the other, to remove it.
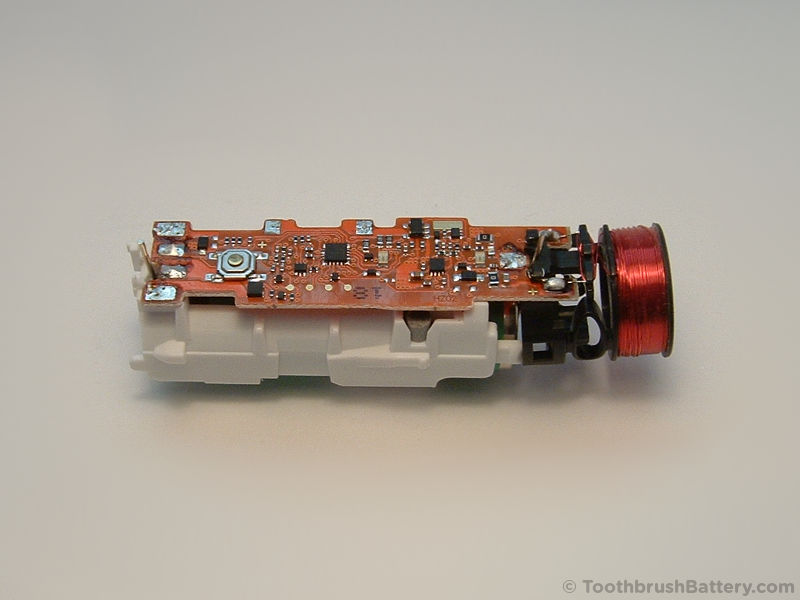
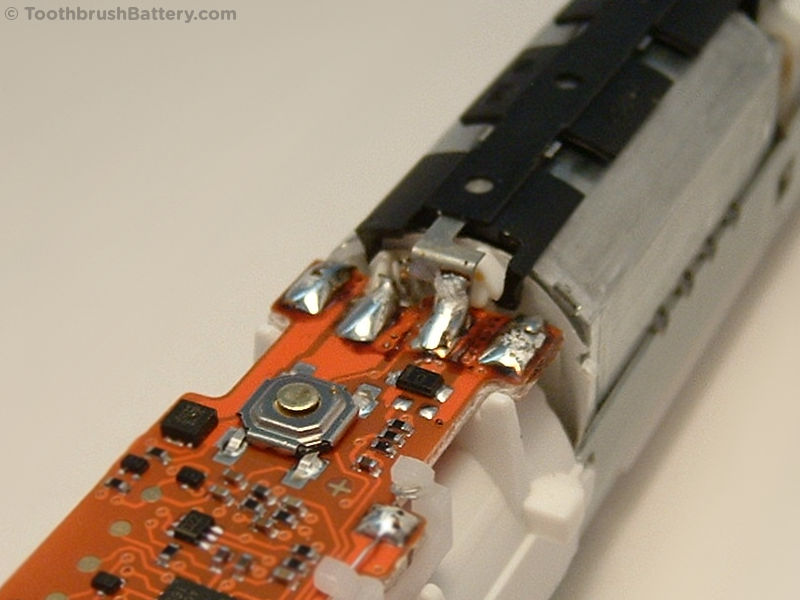
Now’s the time to warm up your soldering iron! A soldering iron with a fine needle/cone tip is recommended for working on these toothbrushes.
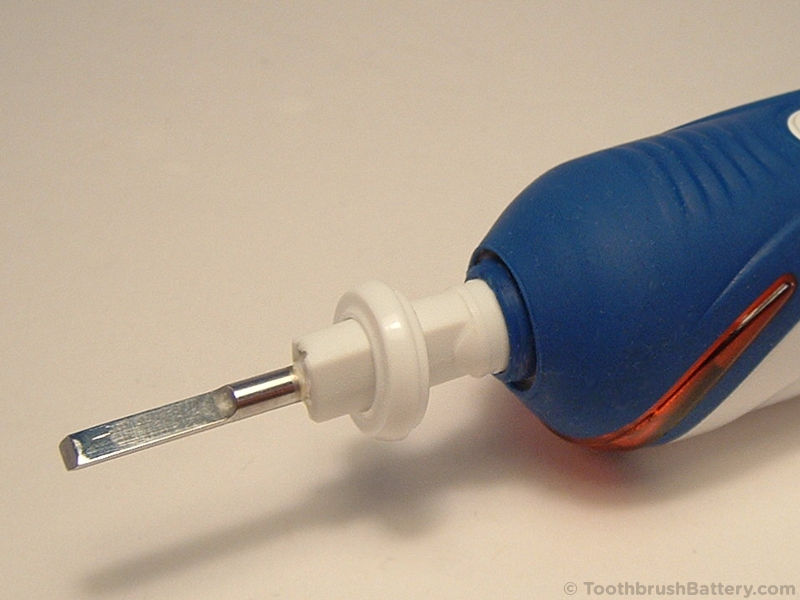
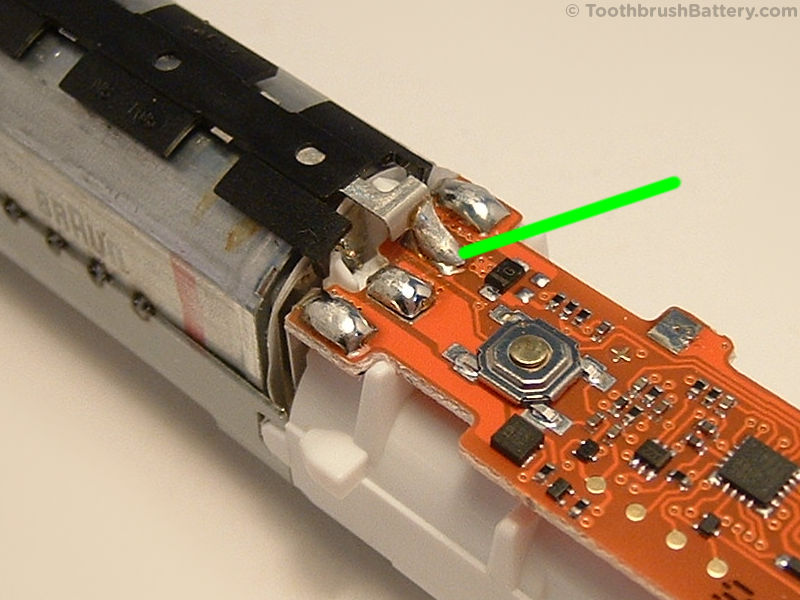
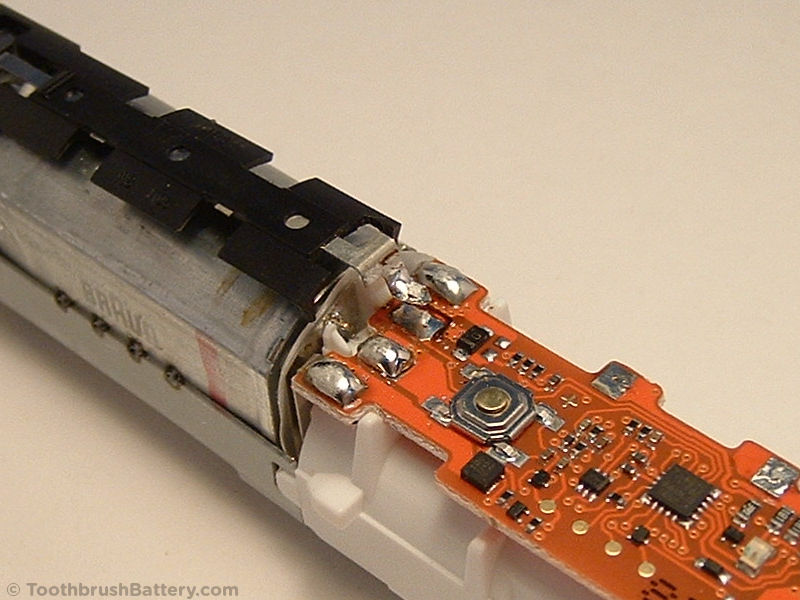
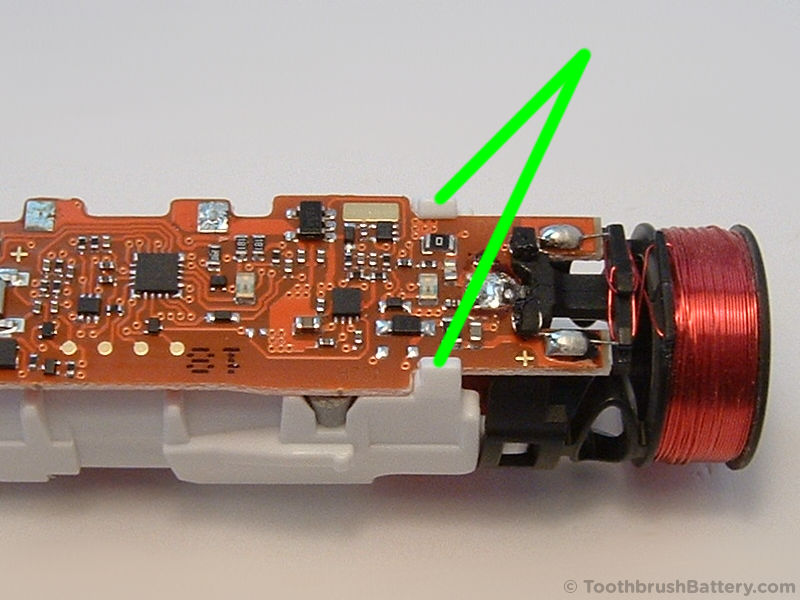
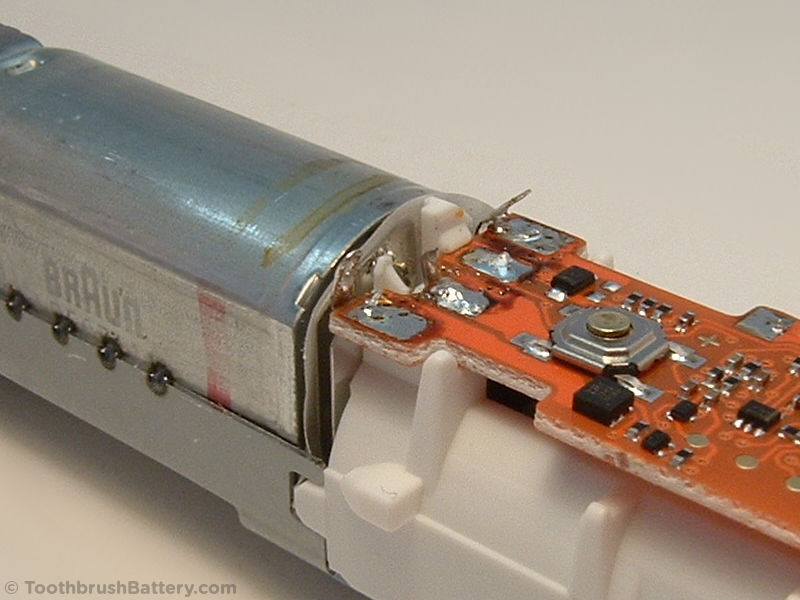
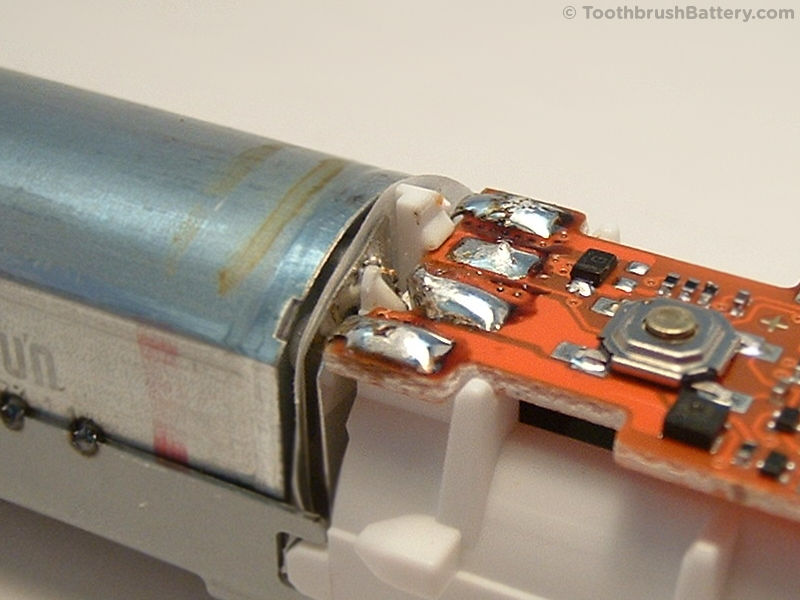
Arrowed below is the battery’s negative terminal connection. Ignore the + symbol shown on the PCB which refers to something else. This is the negative (-) battery terminal.
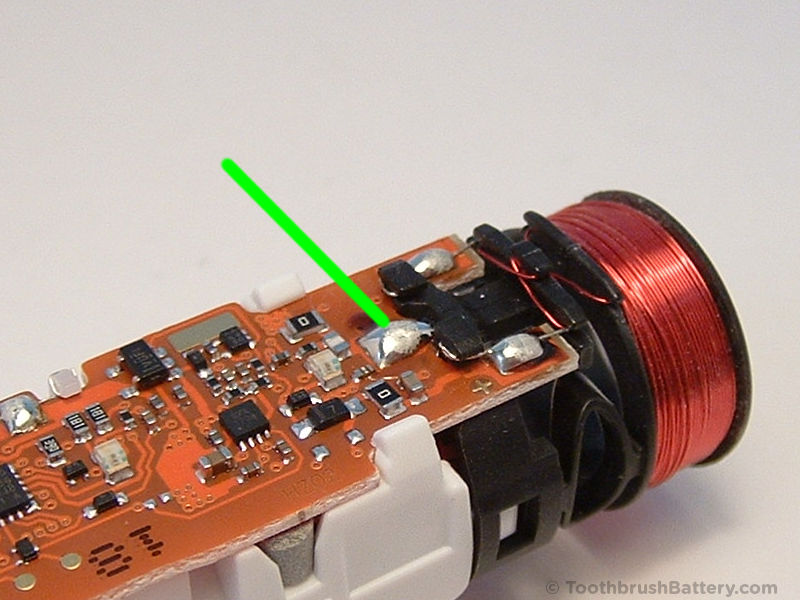
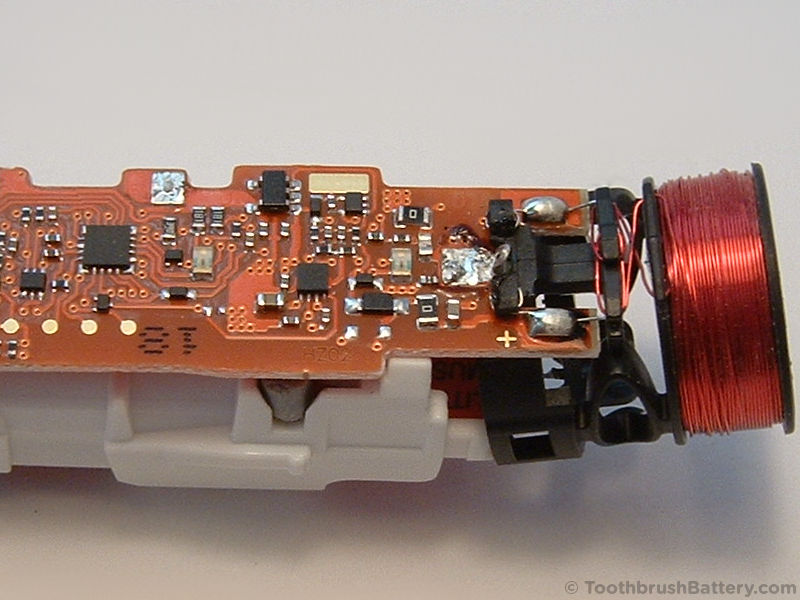
Remove some of the solder from the connection using the soldering iron and a solder sucker or braid. Then reheat the solder joint and using a knife blade lift and bend the solder tag so it is vertical.
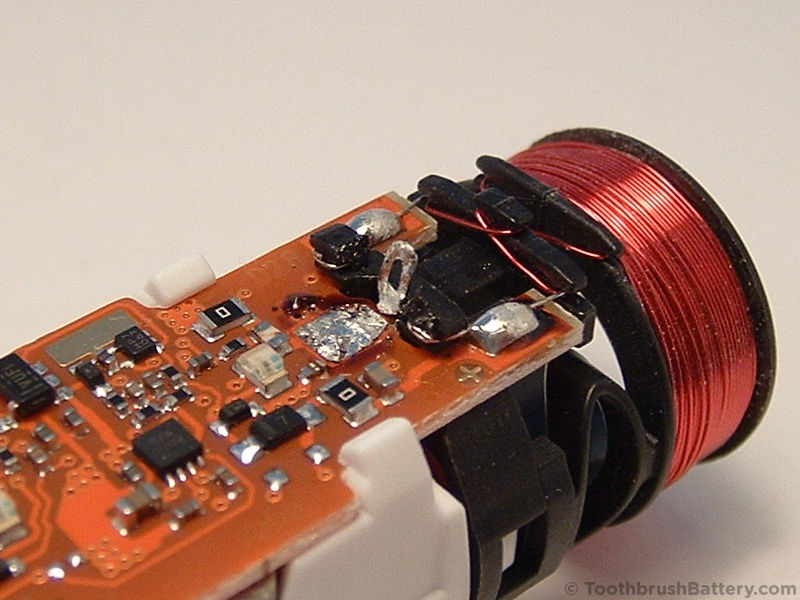
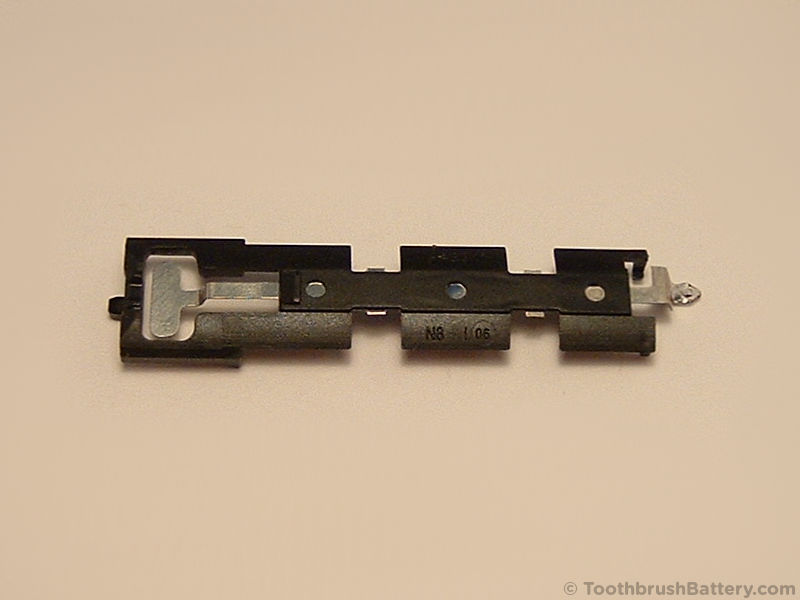
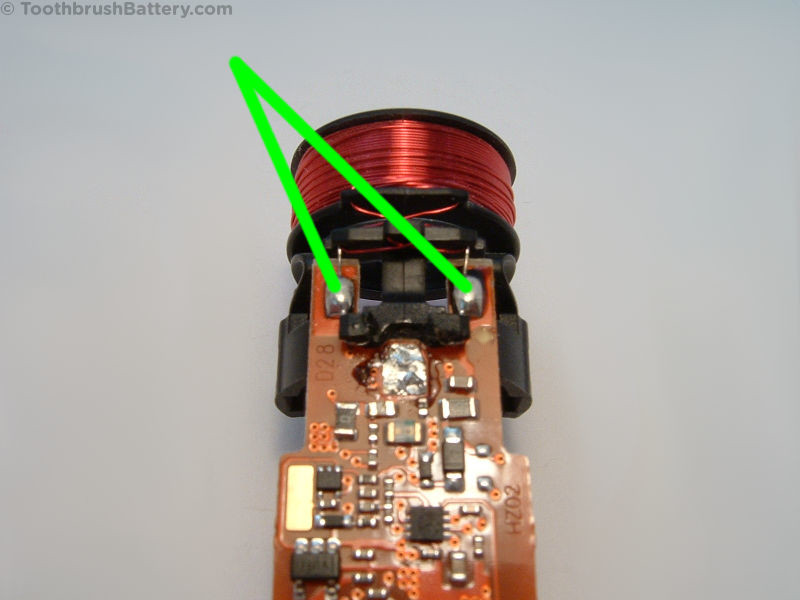
Desolder the two connections for the wires from the pressure warning light, arrowed below, and lift them away from the solder pads. Take care not to melt the white plastic wire carrier.
Unclip the carrier from both sides of the PCB.
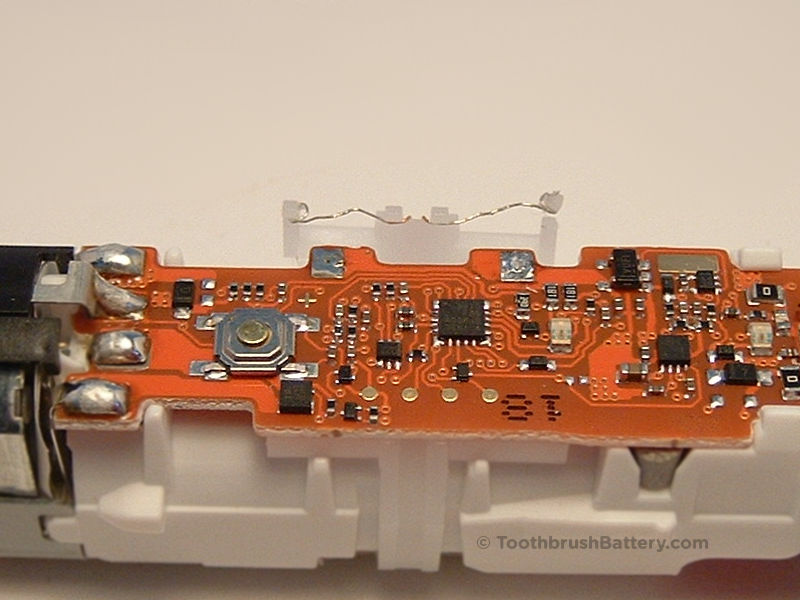
Fold the carrier away from the main mechanism and slide it off the top of the toothbrush.

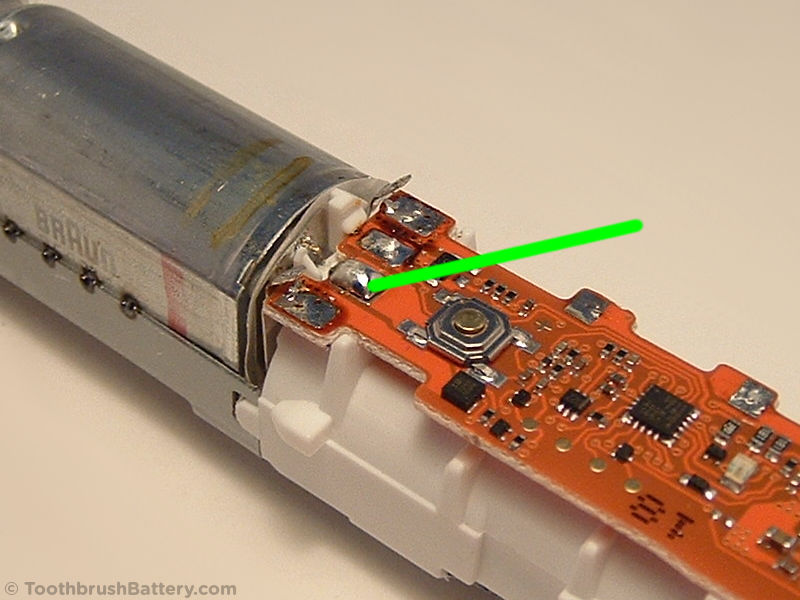
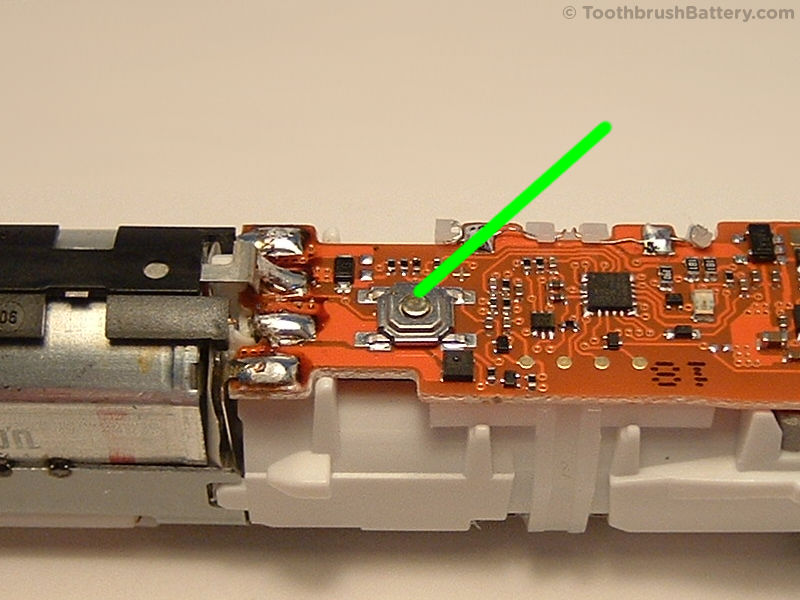
Desolder the connection for the pressure switch from the PCB as arrowed below.
Unclip the pressure switch from near the solder connection end then gently lift it up and out. It is hooked in at the other end.
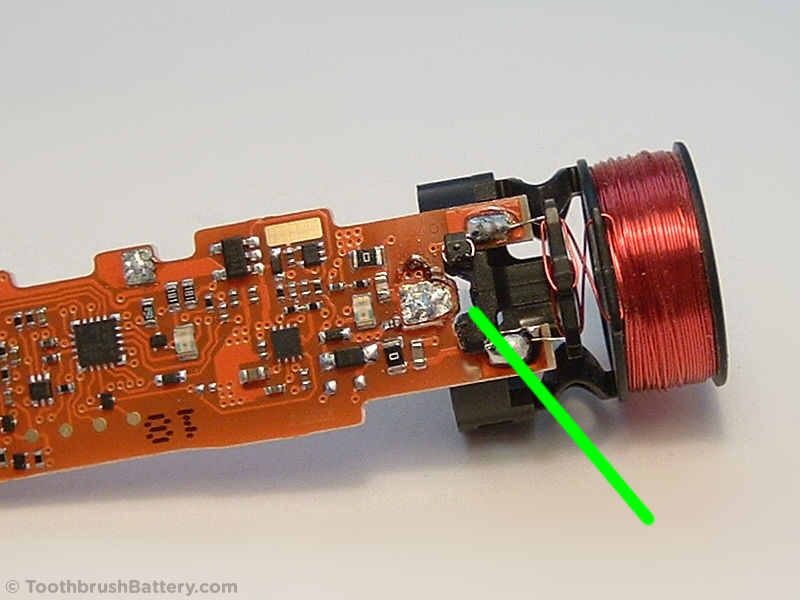
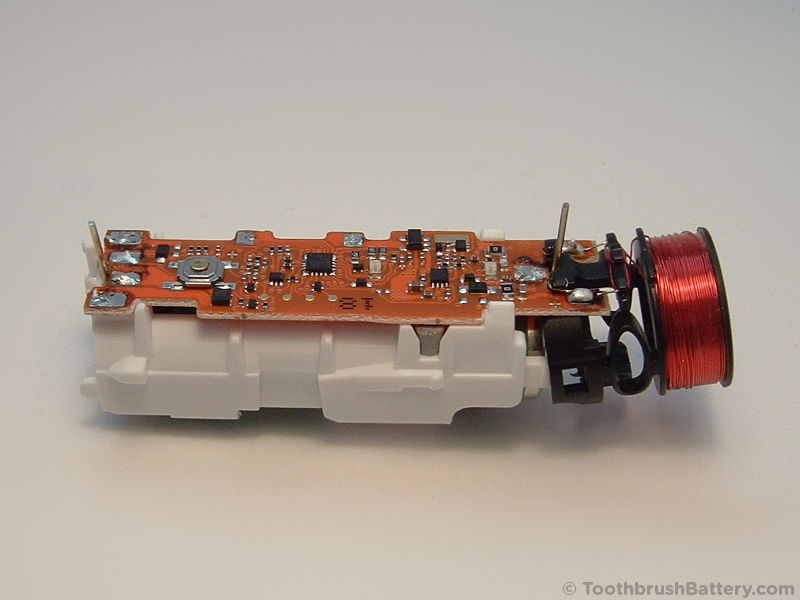
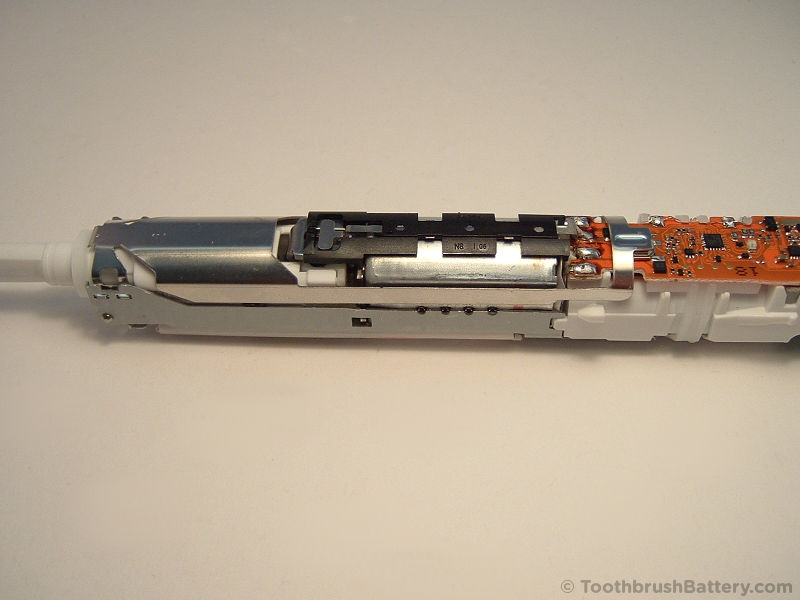
Desolder the two motor connections, arrowed below, and fold them up and away from the PCB.
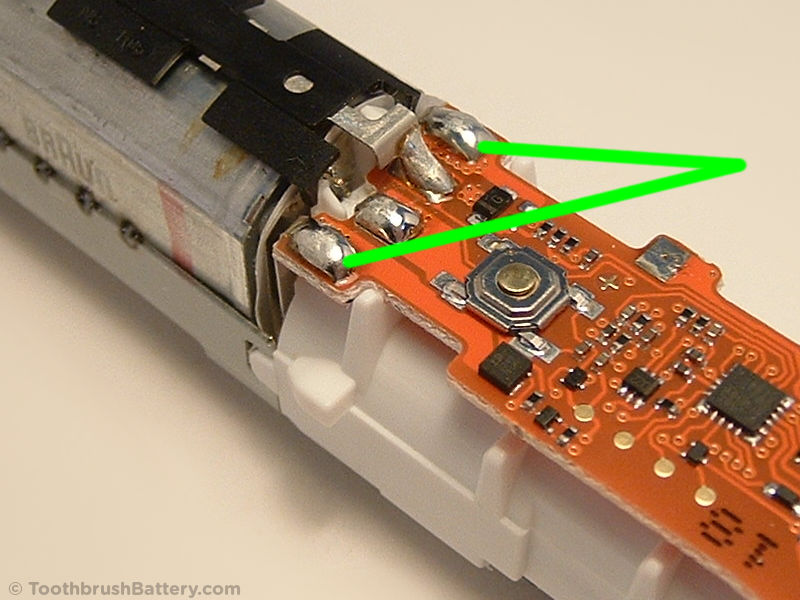

Desolder the positive battery terminal and fold it upwards away from the PCB.
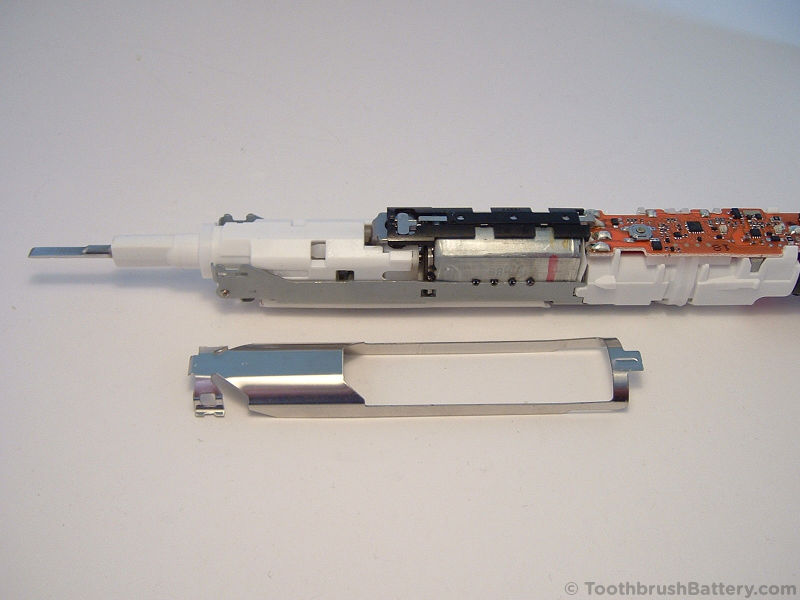
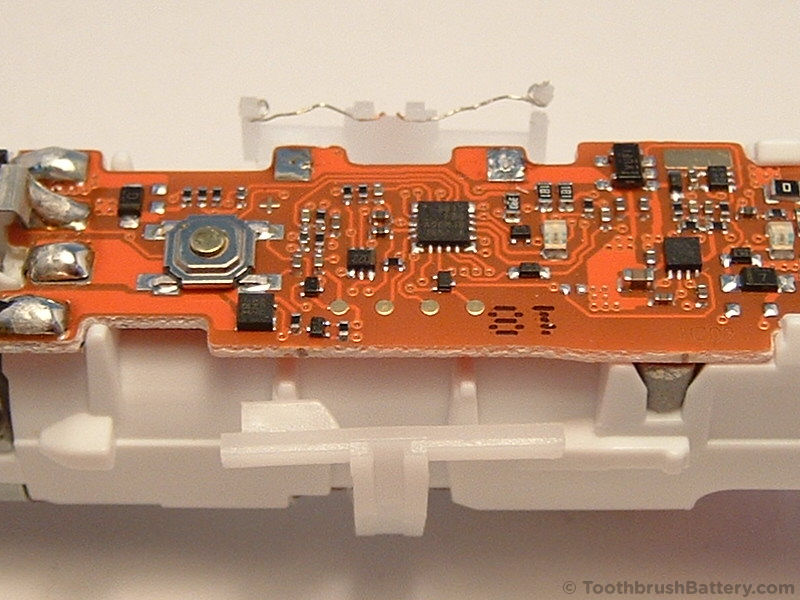
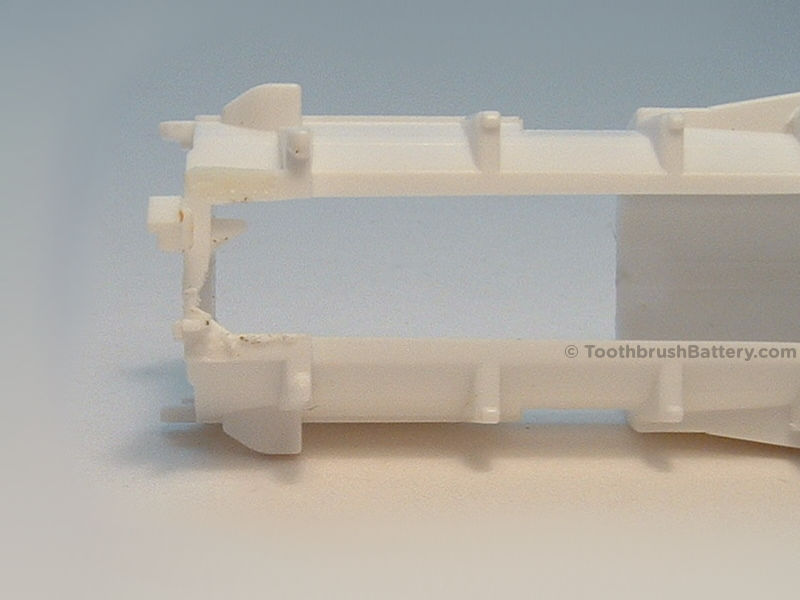
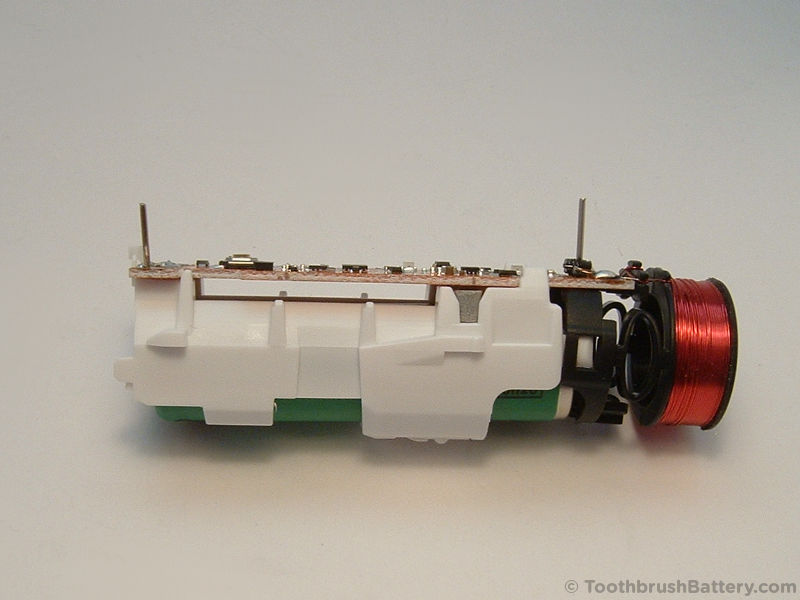
Turn the toothbrush over and inspect the white plastic battery carrier. It is held in place by two tabs in the metal frame.
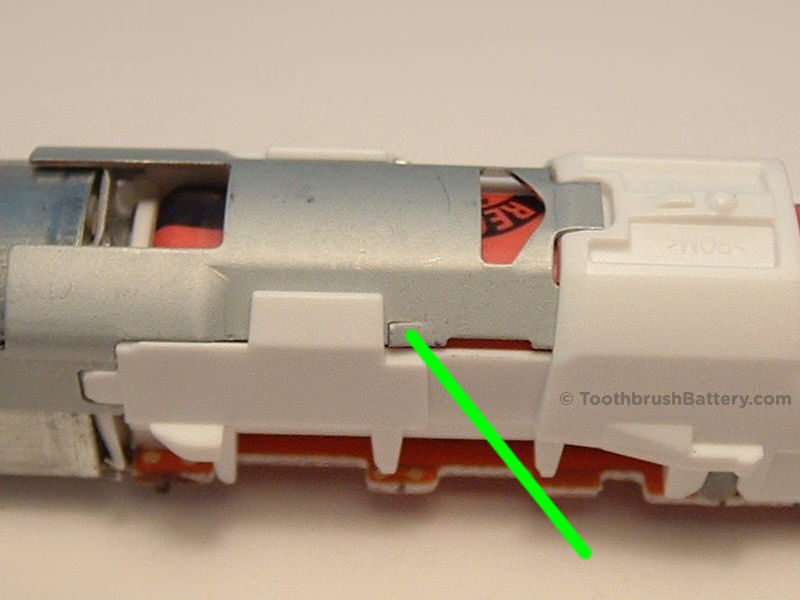
Gently pull the plastic battery carrier along the metal frame while using a screwdriver to pry the plastic up and over the metal tabs, one side at a time.
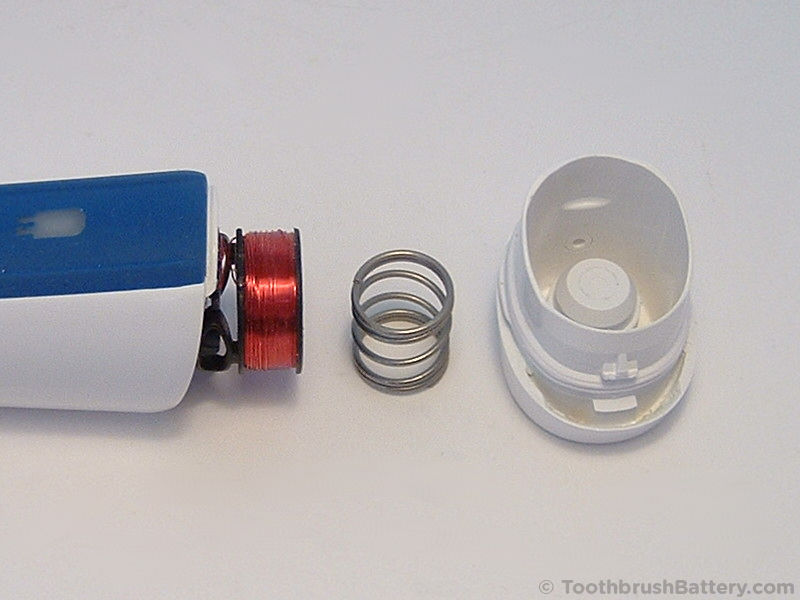
Slide the battery carrier off the metal frame.
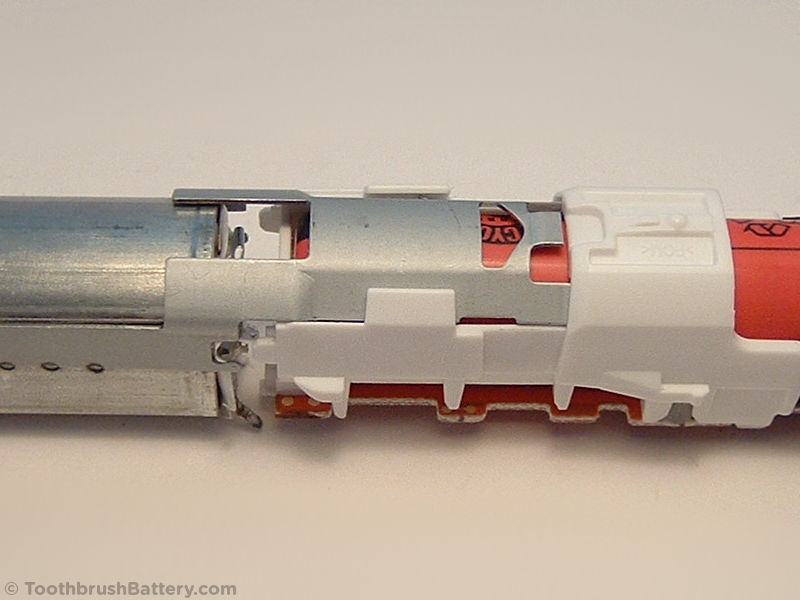
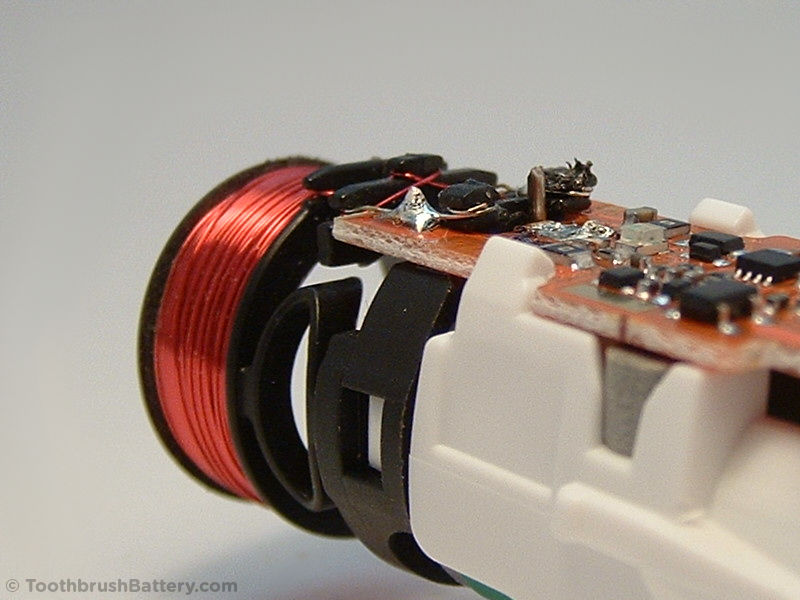
Release the clips holding the black coil carrier to the battery carrier and bend the coil carrier away slightly.

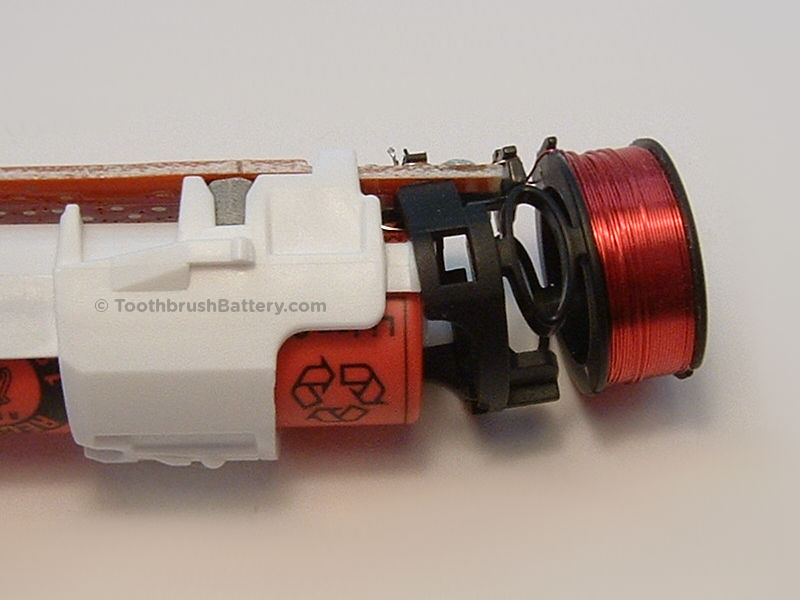
Release the clips holding the PCB to the battery carrier.
Lift the PCB off the battery carrier.
You can now slide the battery out of its carrier. Be careful not to short-circuit the two terminals on anything metal.
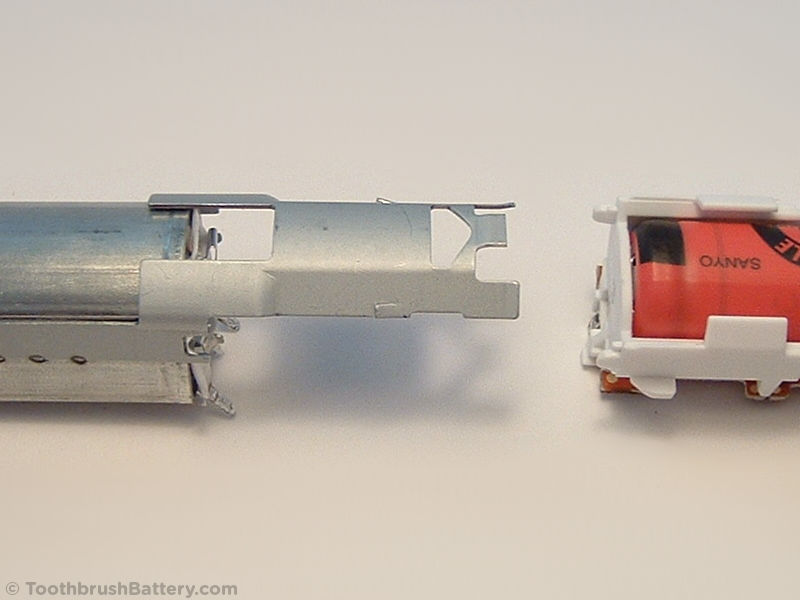
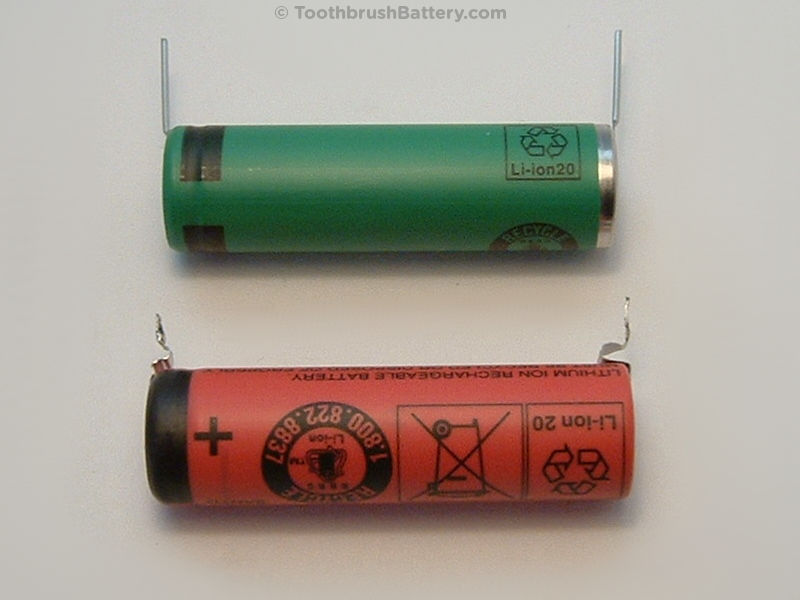
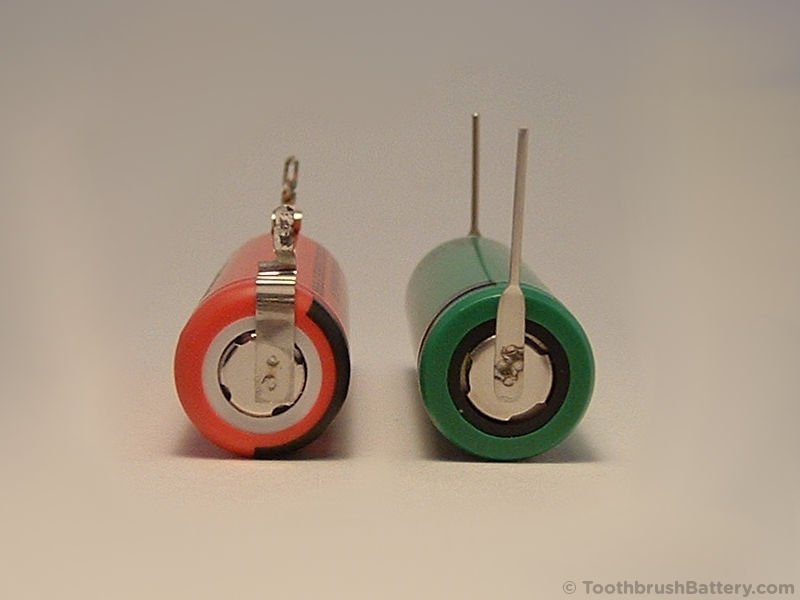
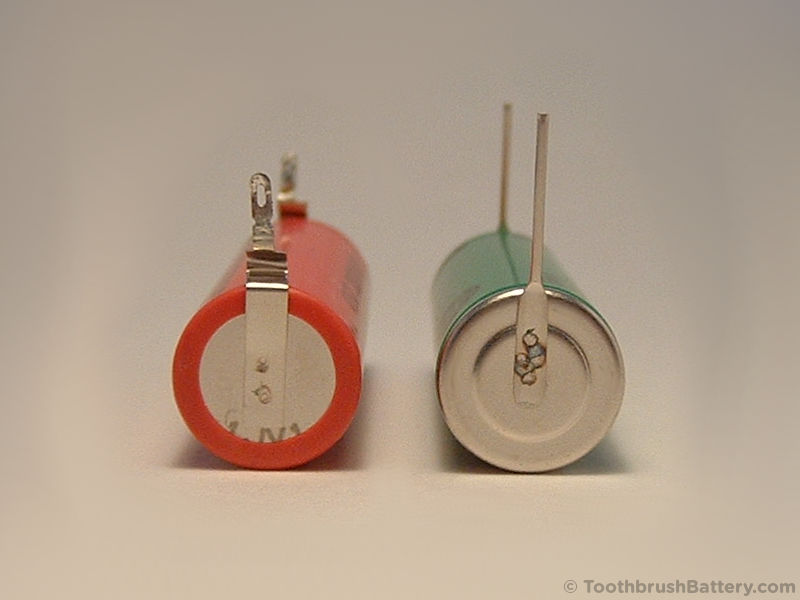
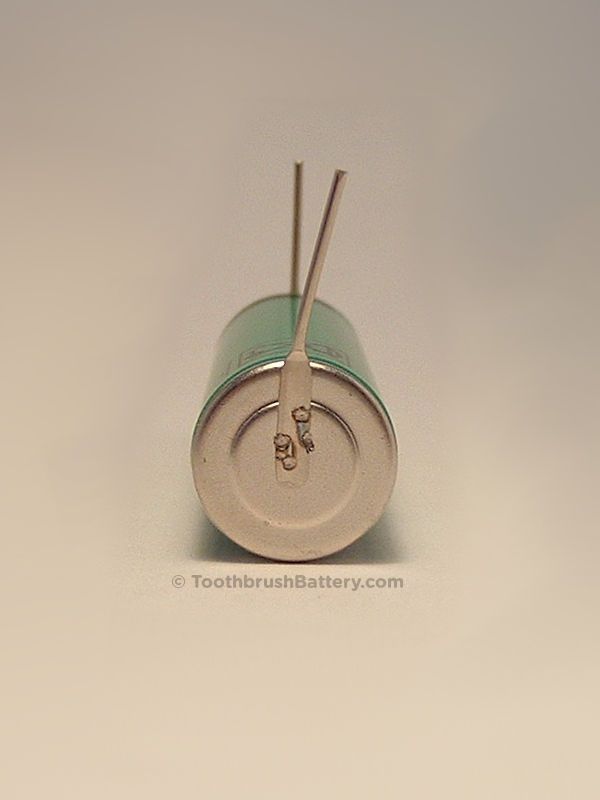
Compare the battery to its replacement as shown below. These are 49mm long, 14mm diameter 3.6V Li-ion batteries. In the guide below we use one of our Li-ion toothbrush batteries with thin wire pins. Please support us in writing these repair guides by buying your new battery from us at ToothbrushBattery.com here. You can also use one of our Li-ion toothbrush batteries with flat metal tags instead, available from us at ToothbrushBattery.com here.
Positive terminals:
Negative terminals:
A gap needs to be opened up between the PCB and the coil carrier for the negative pin on the new battery.
Melt the solder on the two coil wire connections and slide the coil carrier back a little to create a gap for the pin, as shown in the two photos below:
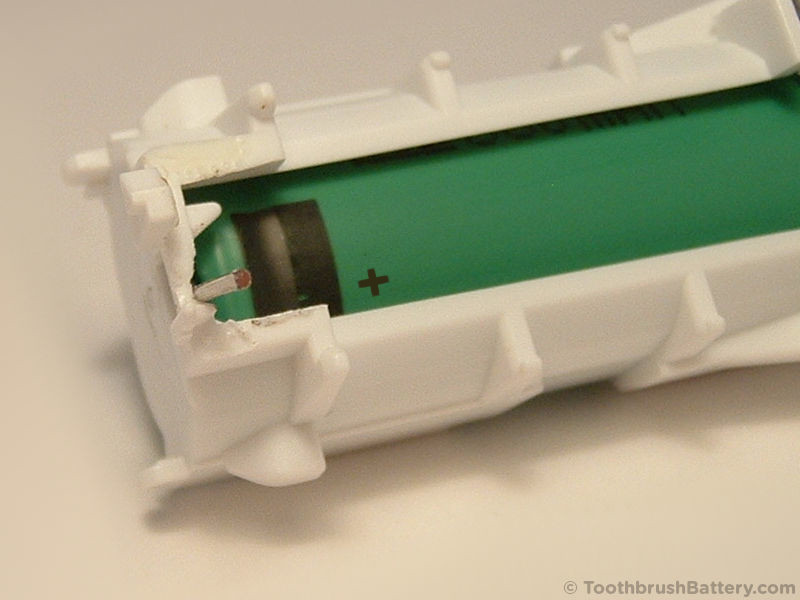
A notch needs to be trimmed out of the white battery carrier to make room for the positive battery pin. Use a craft knife to shave away the plastic (arrowed below.)
Bend the negative pin slightly as shown below. Grip the pin below where the bend will occur with needle nose pliers and bend the pin above the pliers so you don’t shear the pin off the battery.
Slide the new battery into the battery carrier so the positive pin is aligned at an angle in the notch and the negative pin ends up vertical.
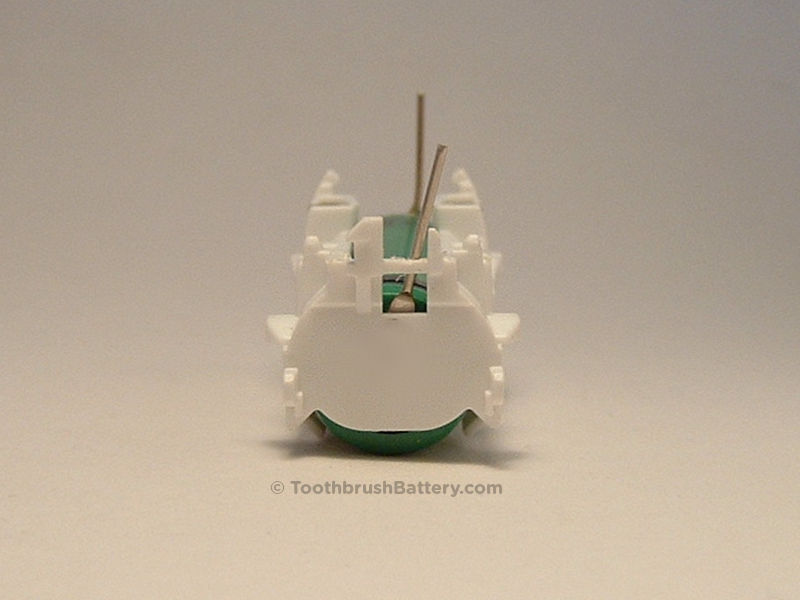
Slide the PCB and coil carrier over the battery pins and onto the battery carrier.
Clip the PCB onto the battery carrier starting at the postive end (left side in the photo below)
Using the miniature side-cutters cut the negative pin level with the top of the black plastic of the coil carrier.
Cut the positive pin to a similar length.

Slide the battery carrier onto the metal frame of the toothbrush and check it latches into place.
Fold down and solder the two motor terminals to the PCB.
Create a solder bridge between the battery’s positive pin and the solder pad on the PCB, making sure the pin is heated sufficiently so the solder forms a good join.
Fit the pressure warning light carrier to the top of the brush and clip it into place.
Solder its two wires to the PCB, trying to avoid melting the white plastic wire carrier.

Clip the front of the pressure warning switch in place.
Clip the rear of the pressure warning switch in place and solder it to the PCB.
After visually checking the PCB for any stray blobs or whiskers of solder you can now make the final battery connection.
Create a solder bridge between the negative battery pin and its PCB pad.

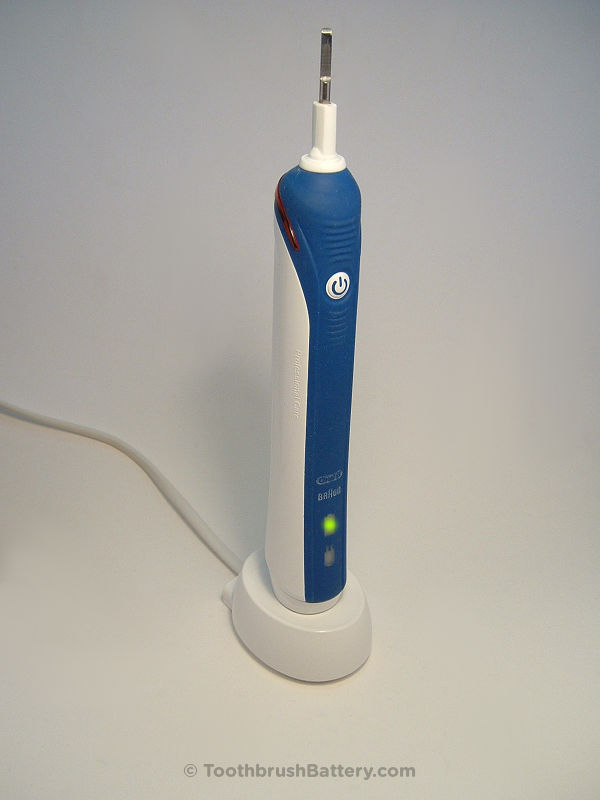
The PCB is now ‘live’ and you can test the new battery by switching on the toothbrush. Hold the brush firmly on either side of the motor then press the switch to turn on the brush.
If the toothbrush appears to be dead you might need to ‘reactivate’ the circuitry by standing the assembly on the charger for 5 seconds. It should light up and start charging. Then you can remove it and try the switch again.
Clip the switch plate back in place, one side at a time.
Slide the innards of the brush back inside the handle.
Make sure the innards are pushed in fully so you can see the groove for the ring at the top of the handle.
Put the spring back inside the coil at the bottom of the handle.
Clip the base cap back into the handle, hooking it in at the back first.
Heat up the ring in some hot water for 30 seconds, dry it, then push it back into place. You can use a 10 or 11mm spanner, or an old brush head to force it on if necessary. Make sure it is fully clipped into place.
You now have a fully repaired Braun Oral-B PRO or Smart toothbrush!
Give the toothbrush a full charge then it’s ready to use.
Please recycle your old battery. It is safest to cut or pull the tags off it with pliers then put sticky tape over at least one end to avoid short-circuits. You can then take it to your local supermarket battery collection point or civic recycling facility.
Please leave any comments, questions or suggestions about this Braun Oral-B Type 3766 and 3767 battery replacement guide below. Happy brushing!
Yes you can replace the battery in the Type 3766/3767 Oral-B Pro/Smart toothbrushes. Follow our guide above to see how to open up your toothbrush handle and replace the internal rechargeable battery.
Yes take a look at our list of battery replacement guides to see how to replace the battery in various models of toothbrush.
The type of replacement battery required for the Type 3766/3767 toothbrush is listed in the Tools, Parts and Equipment section of our guide above.
Is it possible to buy a motherboard for this toothbrush? Apparently the battery and engine of my toothbrush seem OK so I suspect the motherboard might be broken.
I looked for V3 D601 4L all over the internet but didn’t find any.
I haven’t seen any PCBs for sale anywhere 🙁
Repair of Oral-B Pro 2500 worked , thanks very much for the guidance!
How does the pressure switch operate?
It has a normally-closed electrical contact which is opened when the pressure against the brush head reaches a certain level. This triggers the warning light and sometimes reduces the motor speed.
The warning light is continous on and motor is not running.
Charging and on/off is still working. Can i short circuit the pressure switch?
Did this happen after replacing the battery?
no, the battery is the original from september 2019 production date. I desolder the positive side from motor. the motor still running with apart power supply , but start current around 1 amp.. The output to motor gives ca. 3 VDC and after puching the on/off it gives ca. 2.4 VDC and the red light of pressure switch still on. But it sinks to 0 VDC when motor connected.
It seems there is not enough power on the output, while the motor is running with direct connection to the battery from toothbrusch.
Also the green light starts flashing and stop when full loaded . Regards
This sounds like a circuitry fault. You might find that your brush is still under a 2 year guarantee, so contact your local Braun Service Centre to ask them about this.
thank you for the information.
It is also possible to prolounge the guaranty with 1 year when register the toothbrusch on the site.
Regards
Hi,
Thanks for the excellent instructions.
Unfortunately, as soon as I connect the negative battery terminal the motor switches on.
I can see any stray threads of solder… what is the likliest things i might have done to cause this?
Thanks,
Tim
Hi Tim, this is likely caused by the battery being installed in reverse polarity, or stray solder causing a bridge to a nearby component or PCB track. Check all your solder connections and also that no nearby components have moved off their solder pads.
Hello,
Thanks so much for the detailed guide. I have a mysterious problem with my toothbrush. It will not charge, but will charge when the bottom cap is off. It’s as if there’s something in the cap itself preventing it from charging, or that the inner coil isn’t strong enough. Did anyone else run into a similar problem?
Check that the fine copper wires that run from the onboard charging coil are intact and not broken.
Yes, I have this too with the 4729 charger with space for the mains cable in the back.. I suspect that having taken the end cap off the distance between the coils is very slightly too large, so the charging doesn’t work.
Please thank whoever did your instructions on how to remove and refit a new battery for their hard work. I would have opened it, taken one look and said “nah” and binned it. But now I have a new battery fitted and a working toothbrush.
Many thanks.
We write and photograph all the guides here at Ionic Industries. Good to hear it helped you! Thank you.
Hi Ionic
Can I congratulate you on your excellent guide – however, sadly it is way beyond my limited skills with a soldering iron. I hate to think of having to consign my toothbrush to the WEEE recycling scheme. Does Ionic offer any repair service? Or do you know where I might get someone to do the battery replacement for me?
Regards
Richard
Hi Richard, there are some third-party services listed on our toothbrush battery replacement service page here.
Superb guide which I have used twice before.,thank you. Is it feasible to replace my 3756 NMh battery with a 3766 Li-on battery to get the benefits of the claimed, much longer, running time between charges? Is it important to use the charger supplied with each type or can one be shared with the 2 models?
Hi Henry, For your type 3756 you can only fit Ni-MH replacements due to the voltage difference and onboard charging circuitry. If you fit the longer 49mm Ni-MH this will have the same energy density (in Watt-hours) as the Li-ion cells anyway.
Regarding the chargers, these are interchangeable and the 3756 and 3766 brushes both normally come with identical type 3757 chargers.
Excellent. Thank you.
Thanks for the excellent guide. I would not have known where to start without it and now I have refurbished toothbrush that hasn’t gone to landfill.
Just one tiny suggestion for a future update of the guide, you do not mention the spring in the re-assembly instructions. Fortunately, I saw it in the box I had collected all the parts in and put it in before I re-inserted the base.
Thanks for the tip Steven, I’ve updated the guide to add this.
Hello, I can see that the replacement battery is 680mah. What is the stock battery? Thanks.
Depending on the supplier for that batch of brushes the original battery will be between 600mAh and 750mAh. They all give similar running time on a charge because the charging circuitry doesn’t charge them to 100% full. This gives the batteries a longer total lifespan.
Thanks for the clear disassembly instructions. My problem is not with the battery (I think). Instead the charging function does not work. The battery is flat apart from being able to flash red when I press the on button. The base charger is fine. When I disassemble the unit and measure the voltage across the charging coil I get 1V DC. When I then put the unit on the charger I get the 1V plus a waveform of about 0.5V pk-pk at 50Hz. It seems wrong to me that there is a voltage across (hence current through) the coil when everything is switched off and not on the charging base. Surely this will discharge the battery over time. Any help welcome.
the coil may be interrupted. Probably near the solder connection.
where could we purchase type (tipo) 3766 brush head replacement please.
For replacement brush heads for your Type 3766 toothbrush see our replacement toothbrush heads page.
Hi.
I managed to fix my wife’s toothbrush using your guide. It was very satisfying doing some soldering for the first time!
The base didn’t clip as tight as originally designed although it clicked into place and was secure. I squirted on some liquid PTFE on the joint to seal and bond it just to really make sure it wouldn’t leak. My only question is, if any water did get in would the power cut out or give a shock to the user? I’m confident in my repair, I was just wondering?
Thank You!
Hi Dave, good to hear the repair went well! The base has a rubber seal so there’s no need to worry about water getting in through there. There is no shock risk as the voltages are really low. The main entry-point for water is at the top, so store the brush on its side with the head removed when not in use. Water ingress can lead to corrosion on the PCB and eventually circuitry failure.
Great instructions & really appreciate the time & effort it must have taken to put this together. in my case, once I’d opened it up as per your instructions, the fault was obvious – the charging coil wires had broken – a simple re-soldering job 🙂
Many thanks.
Hi great guide, I have a question, can I replace the battery for 3766 with a higher mah. Will it charge it fully if so? I have zero soldering skills as well could you recommend a desoldering tool for this please also. Thanks
We recommend sticking with Sony or Sanyo cells for reliability and safety. These will have the true capacity marked on them unlike some unbranded cells which have wild mAh claims on them. Watch some soldering videos on YouTube for soldering tips. A solder sucker is great for desoldering.
Hey Ionic, thanks for the guide, but I have a small problem now: when I solder the negative pole pin (or it simply touch the board) the toothbrush turns on and I have no way to switch it off.
Something went wrong in the process and have a “full-on contact”: what can it be?
Found that one: a little contact on the + pole was doing the trick. Now bigger problem: the button pressure thingy is not working (the one to press outside to turn it on and off). I think I broke the contact on the board (next to the + pin) 🙁
Any way to shortcut it?
If the push switch on the PCB is damaged you might need to replace the whole surface-mount switch. It is more likely to be a damaged PCB track, however.
Argh. Your instructions are undoubtedly very good; however I’ve somehow done something stupid with my inexperienced soldering. Putting it on the inductive charger makes the green light flash, which seems promising. But there’s no sign of life when I press the on switch at all.
If I directly connect the battery to the motor it’s very much alive, so the battery is definitely OK, as is the motor.
Can’t see any signs of bridged tracks or anything – anything particular I should look out for?
Hi Paul, did you fit the correct type of battery for your brush? The Type 3766 and 3767 brushes need a 3.6V Li-ion battery.
Hi. Yes – I checked with a multimeter and it’s 4.0 V – identical to the old dying-but-sometimes-works battery.
(Yes I originally bought the wrong one from you!).
Cheers, Paul.
The battery is a healthy voltage so the only suggestion is to check the connections. Also look for stray solder whiskers/blobs and for components on the PCB near the battery connections that might have got hot during soldering and moved off their pads.
I have finally managed to wear out my trusty 3756 after two full-sized replacement NiMH batteries. Its motor is noisier and I think is drawing more current and draining the batteries quicker. The rubber outer skin is perished too. This has got me wondering about the 3766/3767 brushes…
Anecdotally, what is the rough expected lifetime of the Li battery when compared to the NiMH cells we have been putting in our older brushes? About the same lifetime before replacement? A bit longer? A lot longer?
Hi Daniel, great question! The Li-ion batteries fitted by Oral-B have the same energy density (in Watt-hours) as our 49x14mm Ni-MH batteries for the 3756 so you will get the same running time per charge as these. In terms of overall lifespan, anecdotally, the Li-ion batteries are quite coddled by the charge circuitry in these brushes and so probably last a little longer in terms of number of full charge/discharge cycles.
I opened up the toothbrush fully expecting to replace the battery, as the green charging light was not working, but first decided to check the induction coil with a multimeter between the two solder points. I got an open circuit reading and on pulling the wire with tweezers found one to be broken from the solder point. I cleaned the enamel off the end and re soldered it. Problem solved! Thanks for a very good fixing guide and sorry I couldn’t buy a battery from you on this occasion.
Really good instructions on how to dismantle the 3766 toothbrush.
My problem turned out to be a broken contact from the battery negative end to the circuit board. I found this out when I tested the battery voltage before dismantling further. Fixed it by soldering a wire between the battery contact and the blob of solder on the circuit board.
Sorry I cant buy a battery from you this time.
Glad we could help you get your toothbrush opened up so you could repair it. Great work!
Awesome detailed instructions, thank you! I hadn’t realised it was so involved or that I would to need to invest in a soldering iron. I haven’t used a soldering iron since secondary school, I’m quite tempted to purchase one!
Thanks Mat, glad you liked the guide. Yes a small soldering iron kit is useful to have and can be used for science projects by all the family! Please get in touch if you would like any pointers or need a battery.
Thanks for this. My handle stopped charging after a couple of years of use.
On opening the case, I wondered what was going on, as there was a free end of coil wire which had been stripped of varnish, but showed no evidence of being soldered at all. After a bit of checking with a multimeter, I decided there was little to lose by soldering it to the pad on the PCB, and it is now (apparently at least) happily charging. So one more kept from landfill. No need for a new battery at this stage.
Bonjour,
Je voudrais vous remercier pour vos tutoriel de remplacement de batterie.
Ma brosse à dents fonctionne de nouveau.🙂
Merci
Salutations
Thierry
Hi, excellent detailed instructions.
I managed to get a 3.7v battery here in South Africa. Fitted it but after testing the red light flashes once when I press the brush switch, but the motor doesn’t run. But the charging works fine and when I hold the run button for 10 secs or so the green and a red LED on the PCB flash twice.
I also left it charge for about 30 minutes but still no joy. Is there another way to do a reset. Or have you any idea what could be the problem.
Thanks again for this super site, Martin
Are you able to measure the voltage at the battery terminals both before and after charging?
Thank you very much for the instructions.
I replaced the battery (with exactly the same battery) semi successfully.
Charging seem to work. But I am unable to start the toothbrush.
After pushing the button, I can hear a short and high tone from the motor.
The motor however works, if I directly connect the old battery.
Pressure indication also works, since the LED flashes once if I push start button with lifted pressure switch.
I know it is difficult to help remotely but maybe someone can help.
Hi, thanks for the fantastic instructions for getting into the toothbrush, my son has managed to snap the tip of the internal metal piece off his oral b 3766. I’ve got a head off an old oral b 3709 which looks the same, so I was going to swap it in. However I can’t work out how to get the metal piece out of the 3766 model, please can you help?
Do you mean the exposed metal driveshaft that slots into the replaceable brush-heads? You would probably need to start dismantling the internal drivetrain to get to this.
Yes, it’s the exposed metal drive shaft, sorry couldn’t think what to call it! I can’t work out how to get at the drive train…
Great instructions! A question: are there any common failures on the PCB? I checked the battery and motor and they work. Currently got the PCB on a lab PS, the PCB sometimes draws a few mA when I push the button but not very often. Any ideas?
Thanks for the great instructions. My problem is that the upper “battery” light flashes when I put the brush on the charger, but not the lower “charging” light. It was damp inside when I opened it up, but no obvious corrosion or broken wires. I don’t want to add to landfill if it’s repairable, but also don’t want to go to the effort and expense of replacing the battery if it’s unlikely to fix the problem. Thoughts?
The water ingress is likely to be the cause of the issue rather than the battery. Clean any staining or deposits off the PCB and after drying out for 24 hours reassemble the brush and see if it charges.
Is there any documentation about the voltages and waveforms of the charger? I suspect my charging coil is broken (ohmmeter shows an open circuit, no voltage when put on the charger)
Hi and thanks for the guide and the great discussion on this page!
As the battery of my toothbrush seemingly is dying, I had the idea to replace it with a bigger 18650 Li-Ion battery, as they are easier and cheaper to get.
As the 18650 battery is longer, it would probably be necessary to replace the base cap with a custom 3D printed version.
Do you see any other obstacles or is it worth a try?
Thank you in advance for your insight!
Unfortunately the 18650 batteries are far too wide to fit. A longer battery will also be prevented from fitting by the position of the induction charging coil.
Hello, sorry I am frenchspeeking. Some black drops comes out of the device at the front side (bresh side). What can it be please ?
Bonjour, if black liquid is escaping from the toothbrush casing this is water that has seeped inside. Use the instructions to open up your toothbrush and allow the internals to dry out for 24 hours. Then reassemble the toothbrush and check that it works. Always remove the head from your toothbrush after using it, and store the toothbrush horizontally.
Wow, what a quite wonderful ‘how-to’ guide. How much time and effort went into this. Much appreciated. My only issue is my brush has performed so well my issue is now wear on the head shaft, resulting in the brush head regularly coming off during brushing. I ‘simply’ need to replace the shaft due to worn steel, but I suspect there will be no replacement part, and a few months after doing this, the Li-ion battery or something else will then give up 😥
My toothbrush model is type 3757 but the handle looks like type 3767. But the guide for battery replacement for 3767 looks different on the Pcb. For example, I see no reason to desolder the 2 connections to the pressure switch or the 2 to the coil. Can you advise me here?
Type 3757 is a charger number. There will be a different 4-digit Type number on the cap on the bottom of your toothbrush handle. What is it?
Thank you. The handle reads type 3756 F527. 42257.
Great, we have a guide for the Type 3756 battery replacement that you can follow. If you can access the battery with less desoldering then it should be a quicker job for you.
Thank you for the fantastic guide and for supplying a high quality (Sanyo) battery.
I have managed to replace my Oral-B 3766 battery with the help of your guide and one of your batteries.
We have another three of these in the family so they will probably be getting the same treatment in the future. Thanks again.
I did see somebody ask about the voltages and waveforms from the charging coil. In case it helps somebody else, whilst I don’t have the waveform form from the coil, I’d expect it to be a 50Hz Sine Wave. The resistance of the coil on mine was just over 3 ohms and the voltage at 115V was about 17v AC and at 230V it was about 32v AC.
Thanks for the feedback Jason, glad to hear that the guide was useful and that your toothbrush is back up and running.
The lower AC output voltage at 115V input is probably due to the UK 3757 chargers being specced to only run on 220-240V input, and are therefore unable to function correctly at 115V.
Thanks a lot for the clear repair and dismantle instructions, which I used to repair my Oral B 3766. The brush did drop on the floor and stopped charging. All the rest worked still fine. Upon opening I found one broken charging coil connection which I repaired. However thereafter nothing works anymore. No lights coming up, the motor is not running anymore, while battery still has 3.5 V, no charging … Any idea what has gone wrong. I checked already for solder beads.
Check for broken solder joints on the battery connections.
Thanks for the guide. After dropping the brush one too many times I found one of the tiny wires connecting the coil to the board had come off. Re soldering it has fixed it and the brush now charges. Now I know where to come when I need a battery!
Great work Ross!
Bonjour,
j’ai besoin de la pièce de couleur blanche ou vient se fixer la brossette, parce que la brossette flotte malgré que j’utilise des brossette de la marque oral-b. La brosse électrique est la 3766 bleue.
Bien à vous .
GG
Hello, the white plastic shoulder at the base of the metal shaft is what holds the head of the brush in place. The shoulder also stops the head from twisting. The shoulder wears over time allowing the head to twist and float. Perhaps a thin layer of epoxy resin painted onto the white shoulder will solve the problem?
Bonjour
Ma brosse s’est déclenchée toute seule la nuit. Au début, elle se mettait en route quelques secondes avant de s’arrêter, puis elle s’est déclenchée jusqu’à épuisement de la batterie. Maintenant, elle ne se recharge plus. Je l’ai démontée et nettoyée, mais rien n’y fait. Je soupçonne un composant électronique mais lequel?
Cdt, PP
When a toothbrush switches itself on this is normally due to water ingress. Allow the internals to dry out for 24 hours. Clean off any crystal formations and stains from the circuit-board with isopropyl alcohol. This might restore the functionality.
hello
braun-oral-b-type-3766-3767
can i use a capacitor with higher mah?? as this one?
thanks for your help, maybe you have a recommodation?
regards winfried
You must use a 3.6V or 3.7V rechargeable Li-ion battery. The capacity will be between 700-800mAh. Many of the batteries that claim higher capacities have false ratings. See the details on our Oral-B Li-ion battery page for suggested suppliers in your country.
When I soldered the battery back in, the toothbrush came back on.
After much searching, I think the short was happening between the motor and the positive tab coming from the battery. The tab on the battery I recieved was quite wide so I couldn’t manoeuvre it out of the way of the motor. However if I flexed the device, I could squeeze some electrical tape between the motor and the battery tab.
While this seemed to resolve the issue, as I was putting the pcb back into the toothbrush case, any force on the bottom half of the assembly was turning the toothbrush back on.
Didn’t really feel confident with my fix, so have some spare parts now.
Hi Luke, Below the level of the PCB there should normally be hard plastic separating the battery tab from the motor, plus a small air gap. If you used a battery with flat metal tags these are flexible enough to be folded to a suitable shape. Above the PCB make sure the metal tag comes up from the battery against the PCB edge and folds over directly onto the solder pad, without folding near to the motor. Alos check that there is not a stray blob of solder on the motor terminal which could be shorting to the battery tab.