
This guide will take you step by step through how to open up and dismantle the Braun Oral-B Triumph Professional Care v1 electric toothbrush then repair it by replacing the internal rechargeable battery.
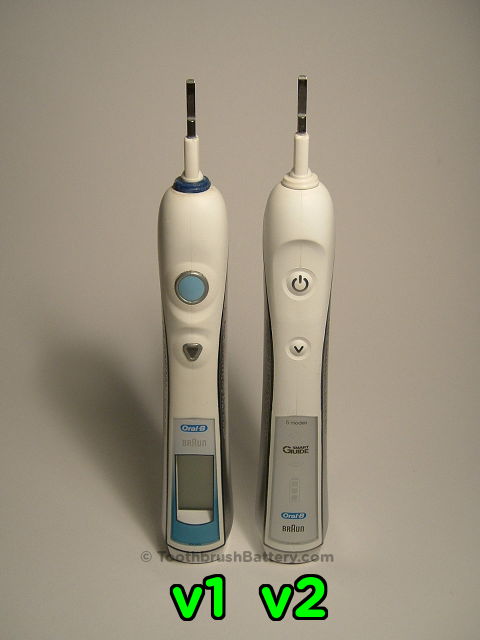
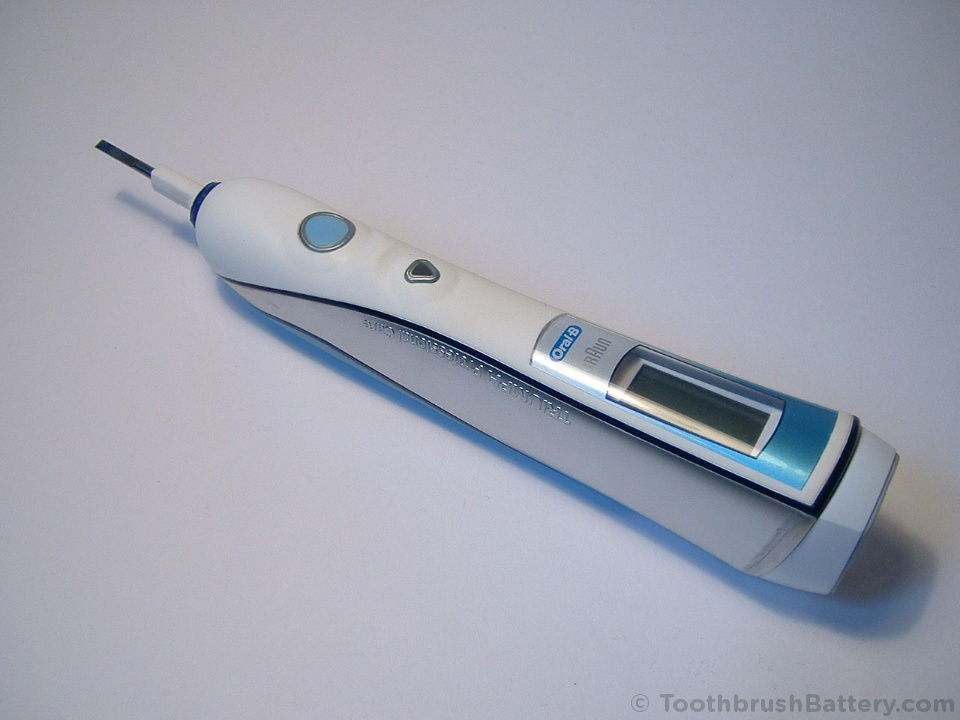
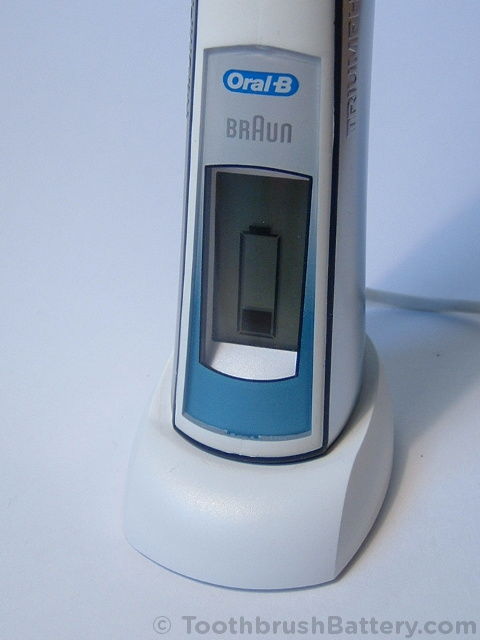
There are two versions of the Braun Oral-B Triumph toothbrushes, the v1 and the v2. The v1 Triumph models have an LCD screen built in to the handle showing battery state and other information as seen on the left in the photo below. The v2 Triumph models have no screen built in but instead have coloured lights as shown on the right in the photo below. Click the photo to enlarge it:
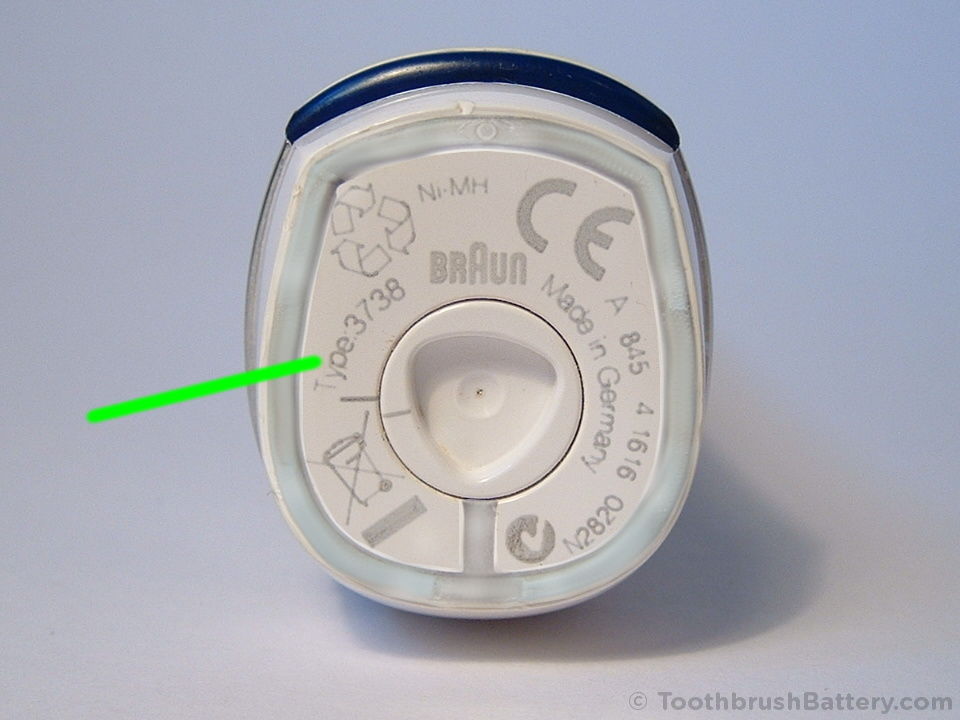
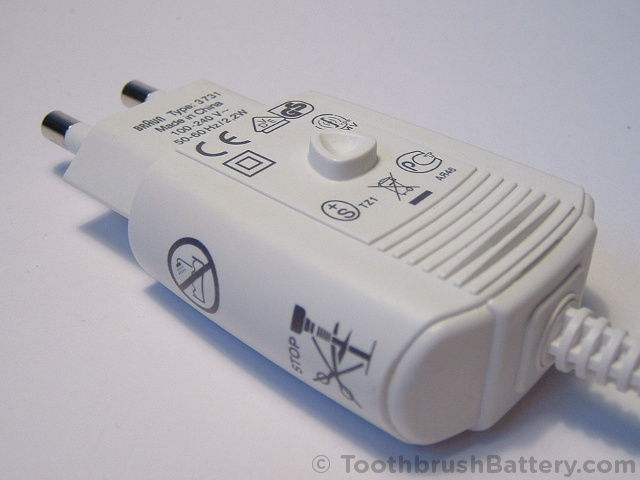
You can also check the type number marked on the bottom of the handle:
- Type numbers 3731, 3738 and 3745 are v1 models
- Type numbers 3761, 3762 and 3764 are v2 models
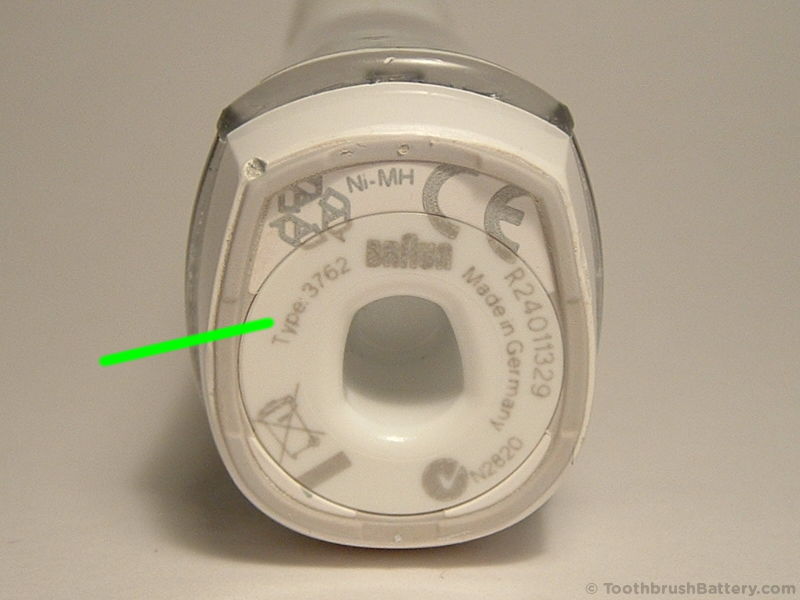
Also note the shallow triangular-shaped hole in the base of the v1 Triumph (top) versus the deeper hole in the base of the v2 (bottom).
This tutorial is for replacing the battery in v1 Triumph models. For v2 models the procedure is slightly different so please see our guide to battery replacement for Triumph v2 models instead. For other toothbrush models and type numbers the battery replacement procedure is different again so please see our other guides to toothbrush battery replacement.
The basic method is:
- Dismantle handle
- Remove LCD screen
- De-solder old battery
- Solder in new battery
- Re-fit LCD screen
- Reassemble handle
This is documented in detail below along with lots of photos. Click on any photo to enlarge it.
Video
We have also created a short video from this guide to Braun Oral-B Triumph v1 battery replacement on our YouTube channel, which you can also watch below.
Disclaimer
Any damage to yourself, your toothbrush or anything else is entirely your responsibility. This guide is for professional, educational use only and is offered without guarantee or liability.
Tools / Parts / Equipment
- Braun Oral-B Triumph Professional Care v1 toothbrush
- Original recharging base
- Soldering iron: Electronics grade (about 18-25 watt)
- Solder: Lead-free silver solder is great for this
- Solder sucker (also known as a desoldering pump) and/or desoldering braid/wick
- Scissors
- Craft knife e.g. scalpel, snap-off, retractable or Stanley type
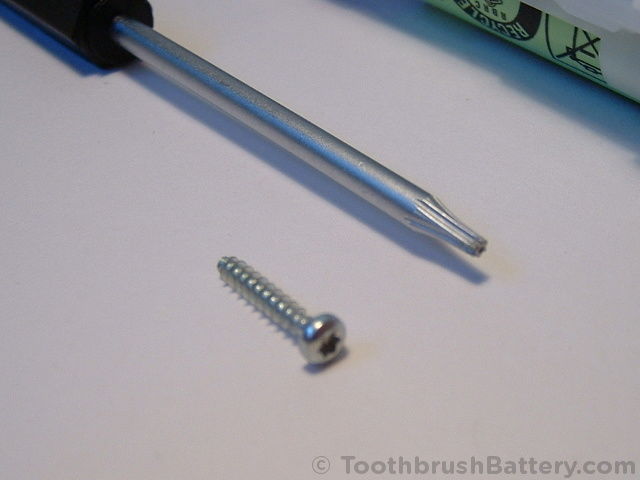
- T-6 size Torx (star) screwdriver: Available from ToothbrushBattery.com
- Small flat-bladed screwdriver: 2 to 4mm wide
- Replacement 1.2V NiMH battery. Support us by buying from ToothbrushBattery.com. Either:
- 42mm long by 17mm diameter 1.2V NiMH with offset solder tag, or:
- 49mm long by 17mm diameter 1.2V NiMH with offset solder tag
How-To
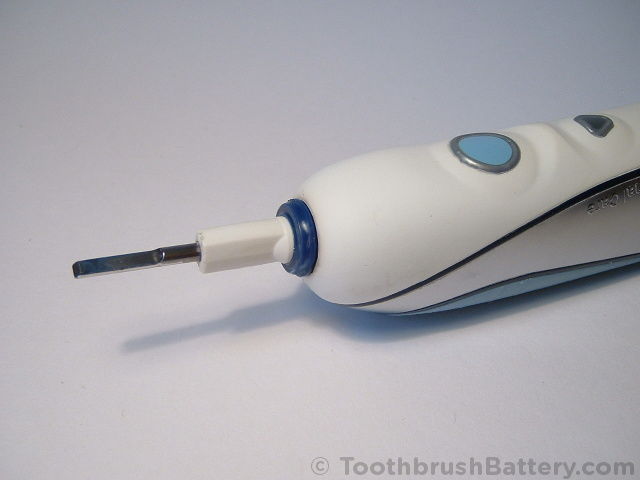
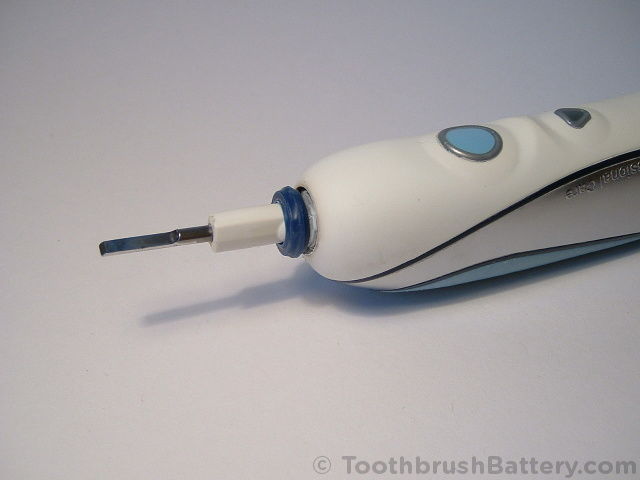
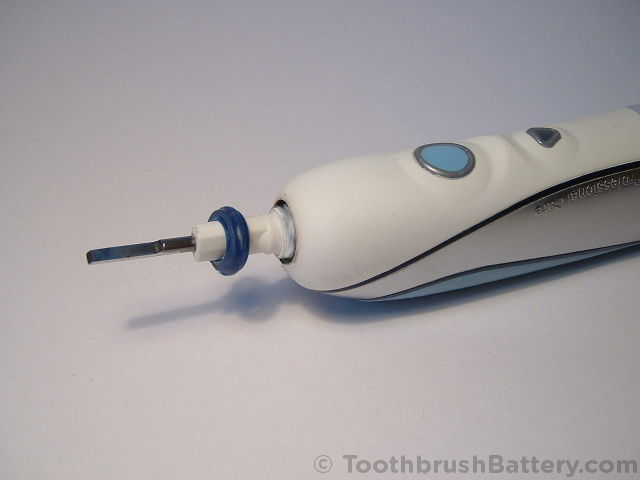
To start with, remove any brush heads from the top of the handle and stand the toothbrush, tip downwards, in hot tap water at about 60 degrees C (140 degrees F) for 5 minutes to soften the plastic ring.
Using the screwdriver start to pry off the ring around the shaft. The ring is stepped so you may need to push down into the soft surrounding material to get fully underneath it. Alternatively, you can use pliers to work the ring off using tape inside the jaws to stop them marking the ring.
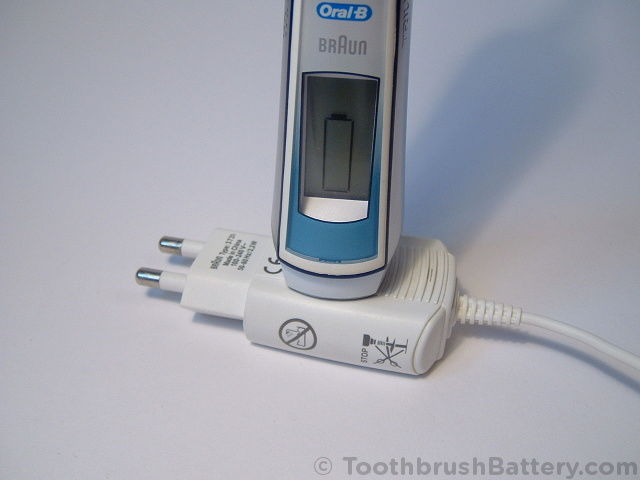
Place the bottom of the toothbrush handle on the triangular shaped key on the back of the recharging plug and start to unscrew it by turning the handle anti-clockwise. The base of the handle will start to separate off from the main handle. If the plastic triangular key on your charger is missing or rounded off you can use a screwdriver or ratchet socket with a T-50 size Torx (star shape) bit.

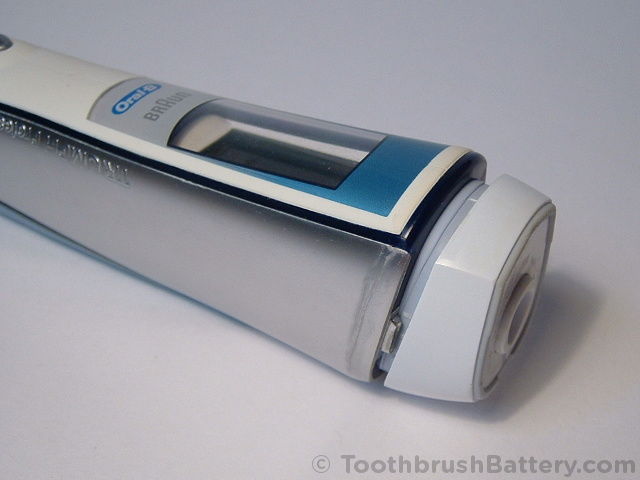
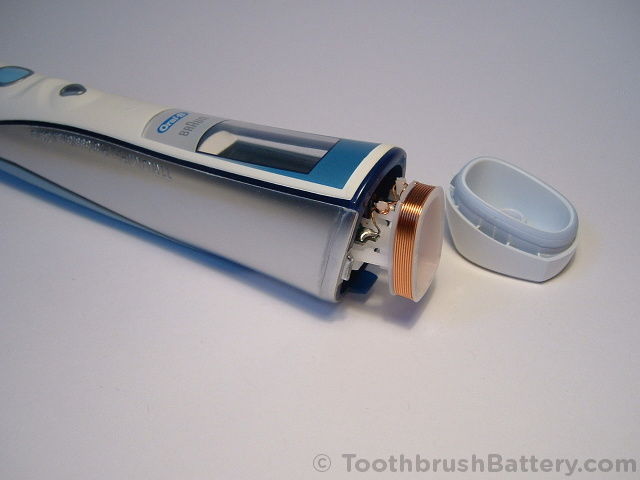
Keep unscrewing until you can gently pull the base off the handle, exposing the charging coil.
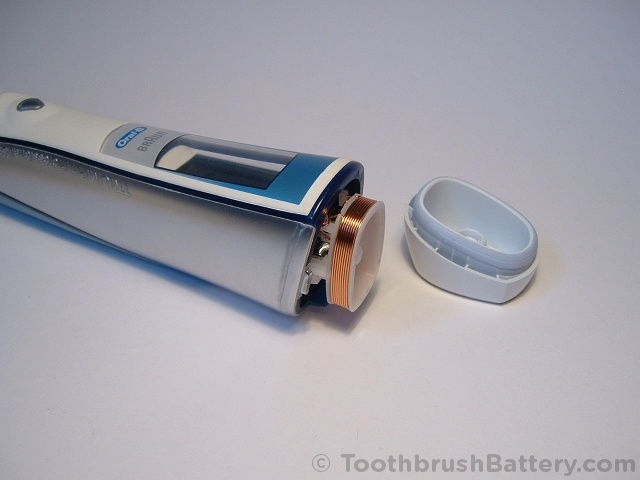
Gently pull the coil out a few millimetres until it clicks.
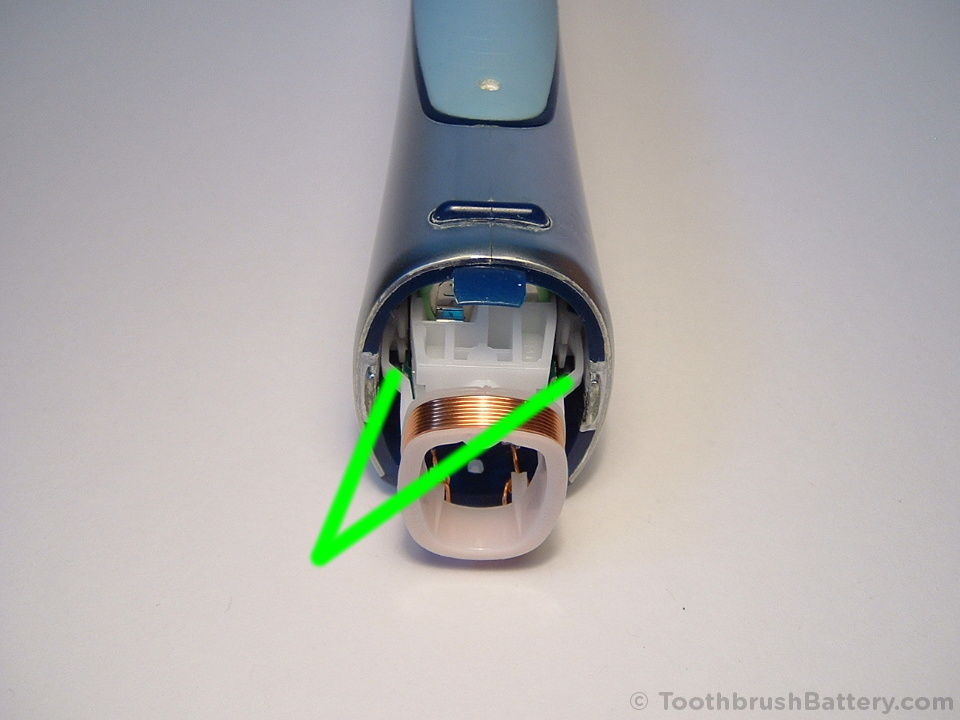
The two plastic prongs (arrowed below) can be gently squeezed together to release the catches holding the workings of the toothbrush inside the handle casing. Simultaneously squeeze the prongs together and push the metal shaft up from the opposite end into the handle. The innards of the toothbrush should start to slide out. You might find that a little gentle help is needed from the screwdriver to unclip the catches fully.

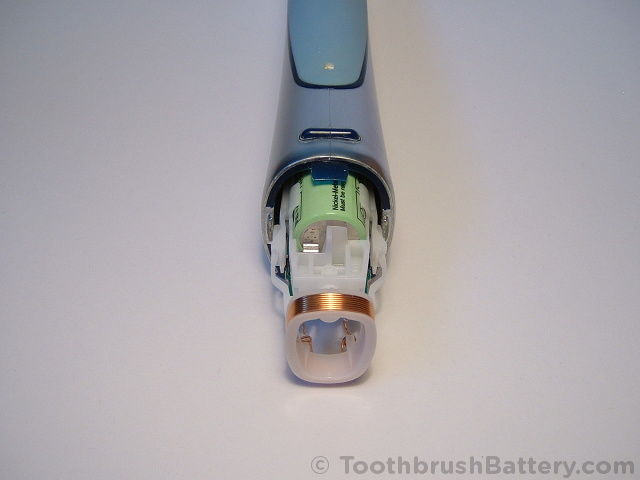
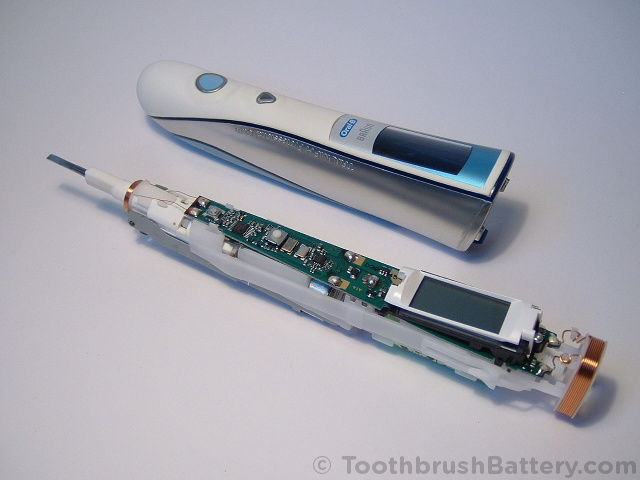
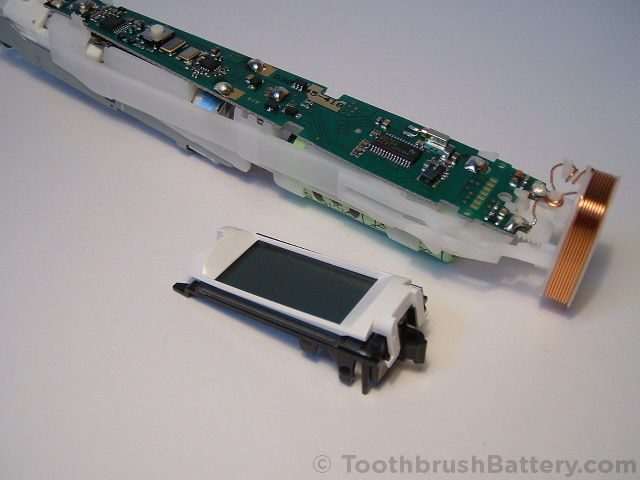
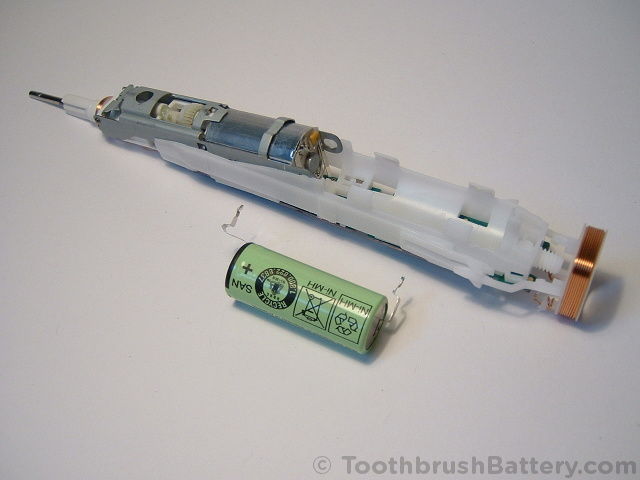
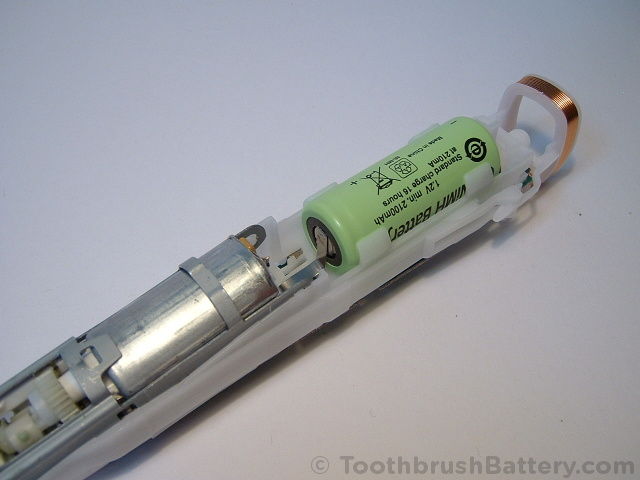
Fully remove the inner workings of the handle from its casing.

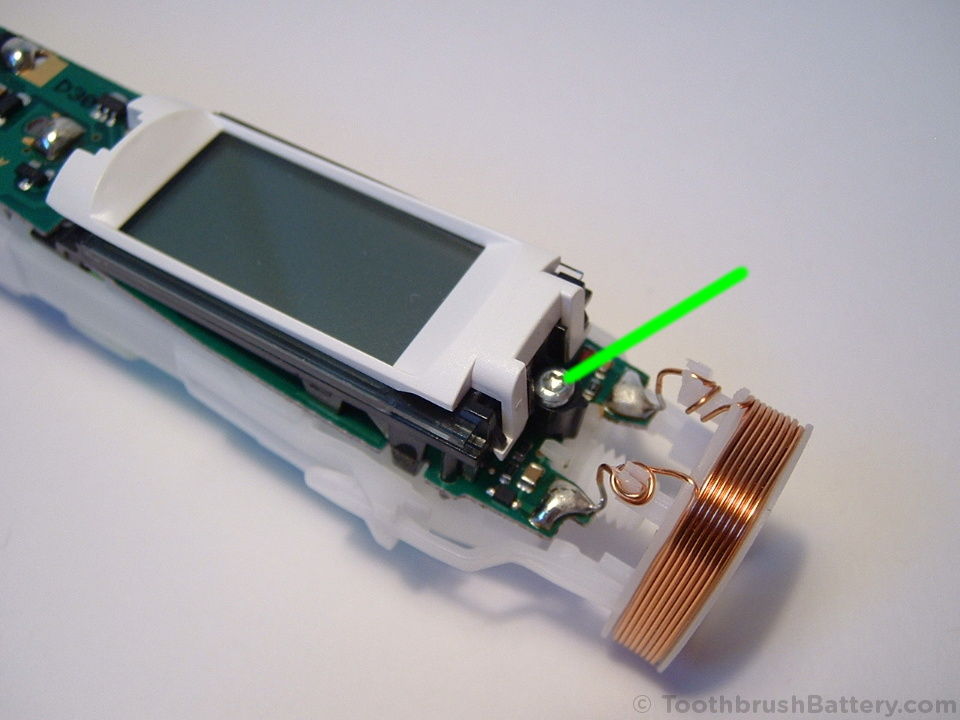
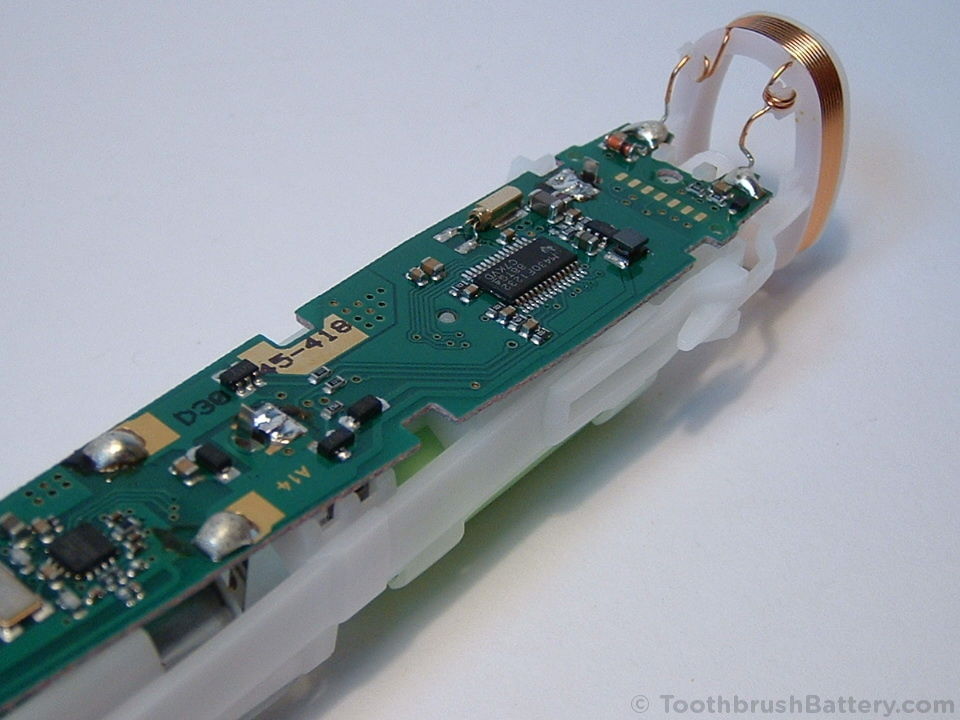
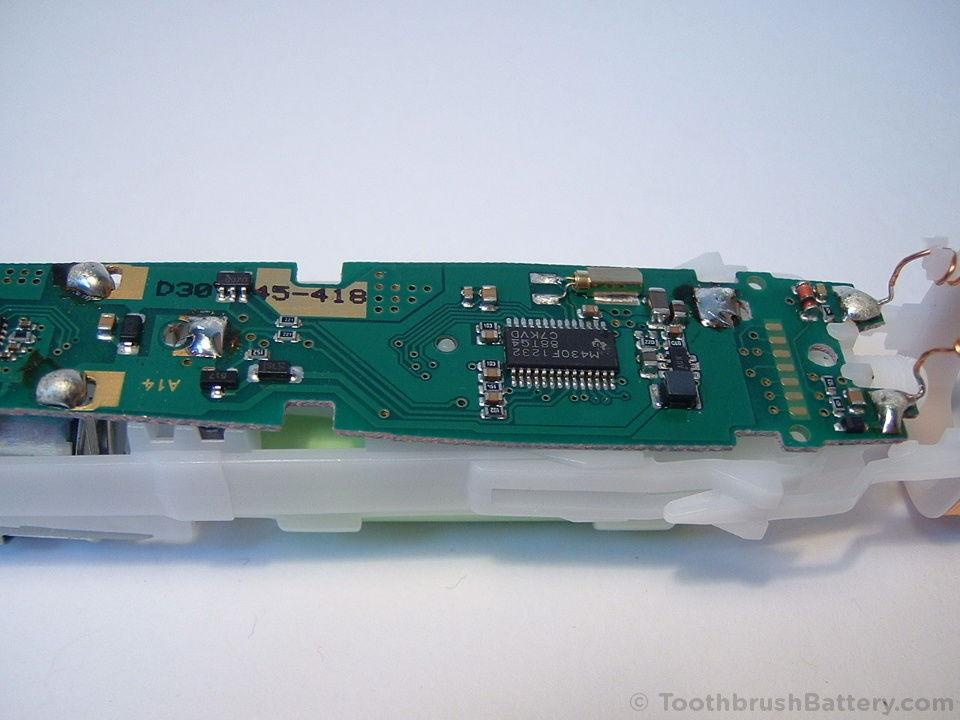
Use the correct T-6 size of Torx (star-shape) screwdriver to remove the retaining screw (arrowed below). These are available from our shop – direct link.
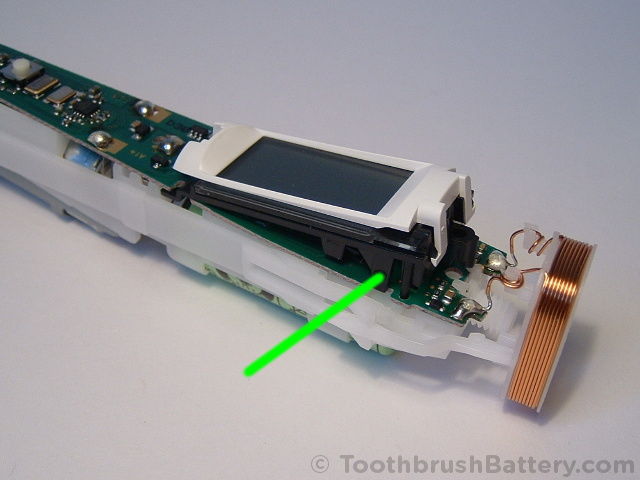
Gently pry out the clips from both sides of the screen (arrowed below) then lift it up and unhook it from the circuit board.
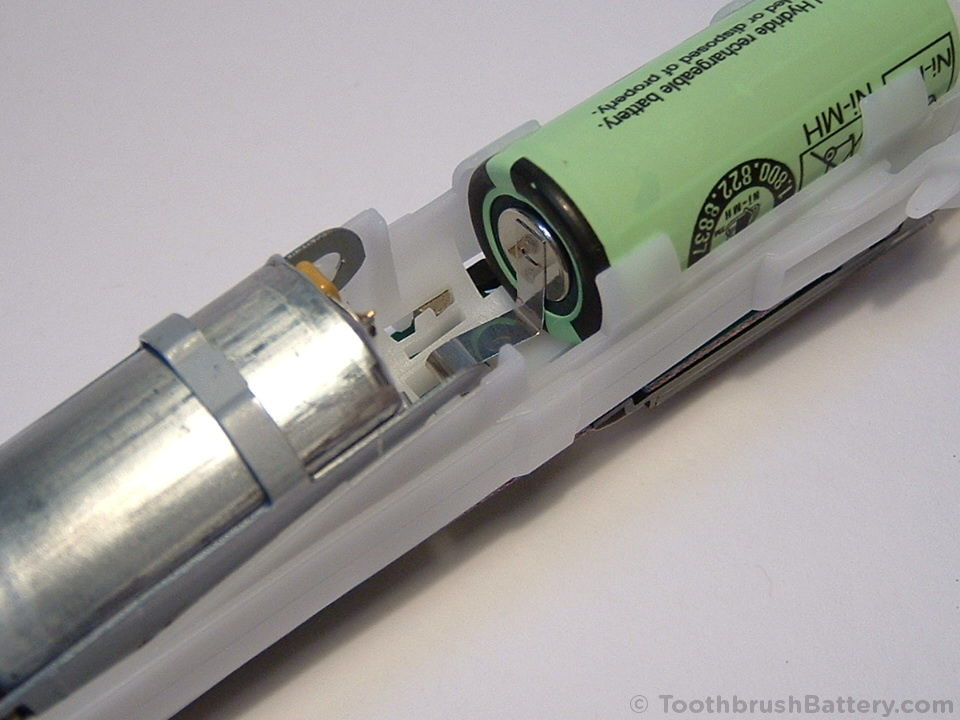
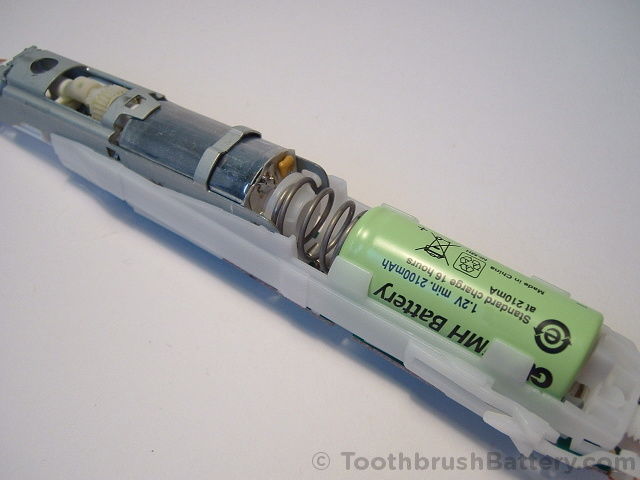
Turn the unit over and gently pry the spring out from between the motor and the battery. It is attached to a plastic spacer and you might find it easier to start at the motor end and pry the spacer out attached to the spring.
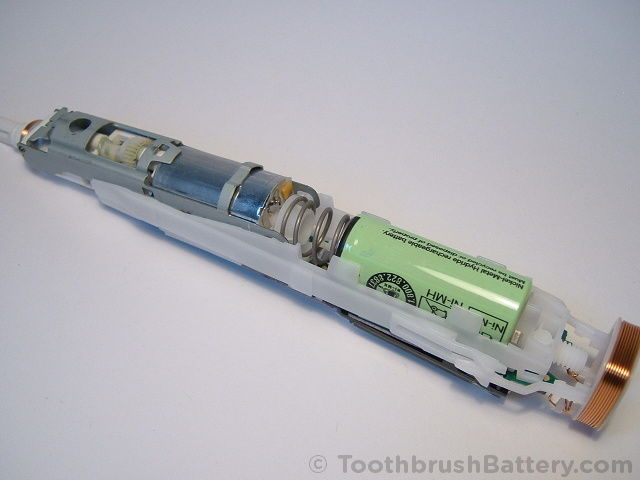
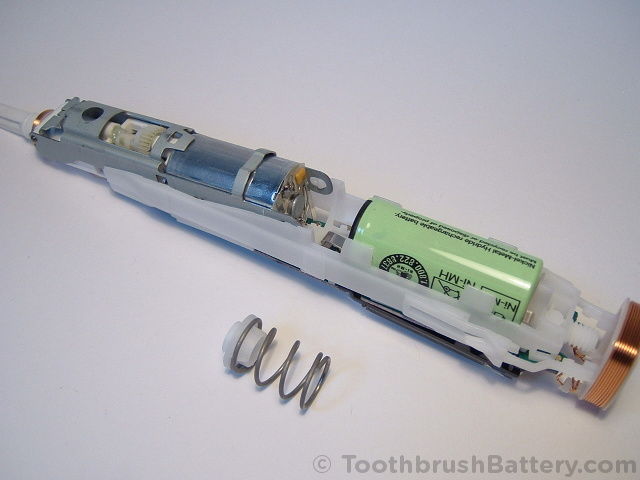
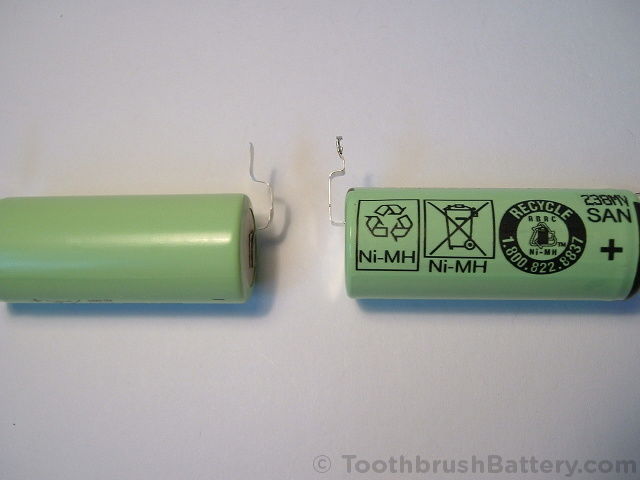
This particular toothbrush is fitted with a 42mm long by 17mm diameter battery. Notice how the tag on the positive terminal extends along the space filled by the spring. Some Triumph v1 models are fitted with a longer 49mm battery.
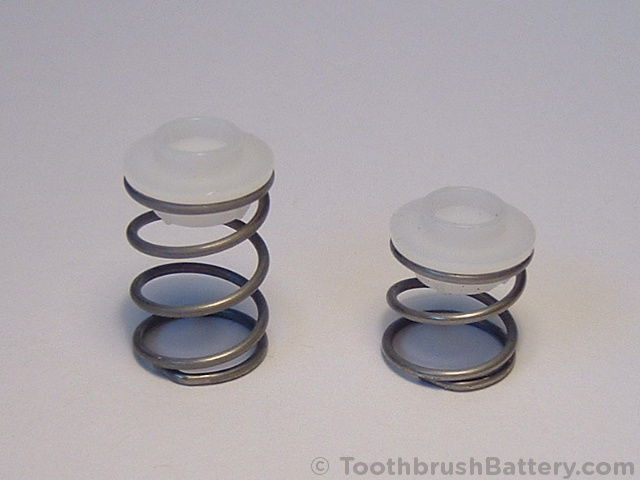
If your battery is 42mm long you might like to replace it with a longer and higher capacity 49mm battery which will run for longer before it needs recharging. This would involve cutting down the spring to make it 7mm shorter. The photo below shows the difference in length of the springs taken from different Triumph v1 models. The longer spring (20mm excluding spacer) is from a Triumph which was fitted with a 42mm long battery. The shorter spring (13mm excluding spacer) is from a Triumph model which was fitted with a 49mm long battery. If you do cut your spring re-fit it with the sharp, cut end against the plastic spacer rather than against the battery.
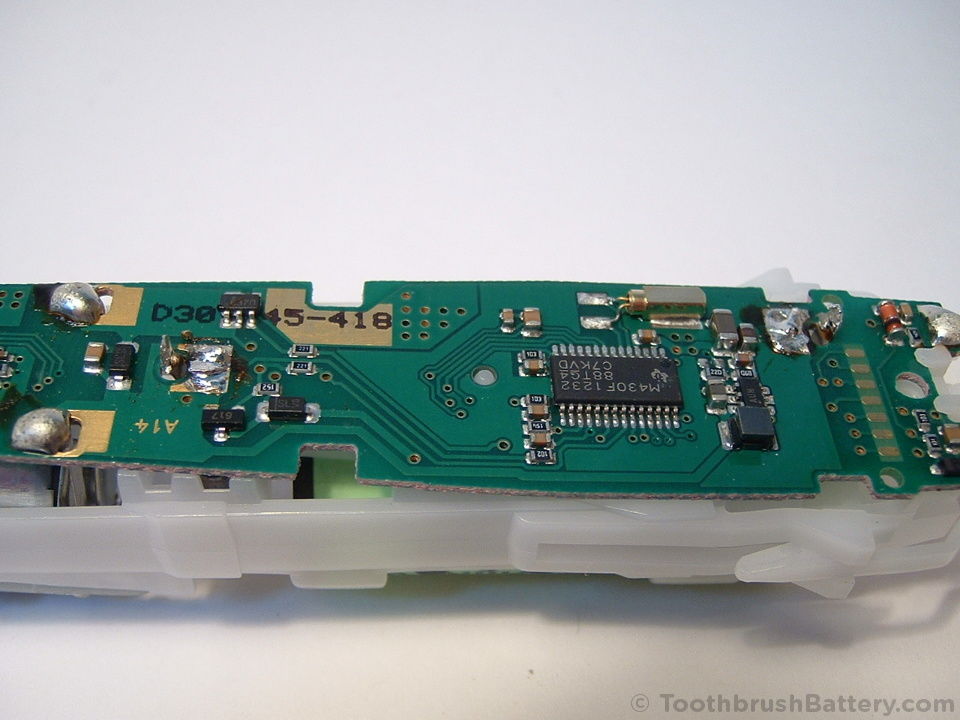
Time to get your soldering iron warmed up now! Using the soldering iron and desolder pump carefully desolder the battery’s positive and negative terminal solder tags from the circuit board (arrowed below) and bend the metal tags upright and away from the board with a knife so there is no solder left joining the solder tags to the board. Desoldering braid might also be useful for this.

Turn the assembly over and unclip the battery from its holder.
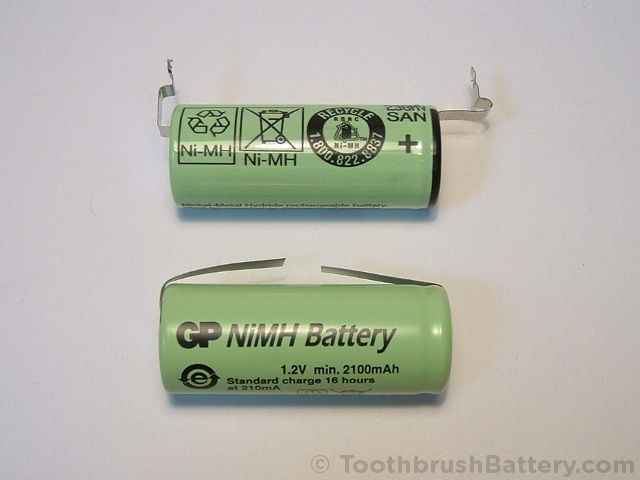
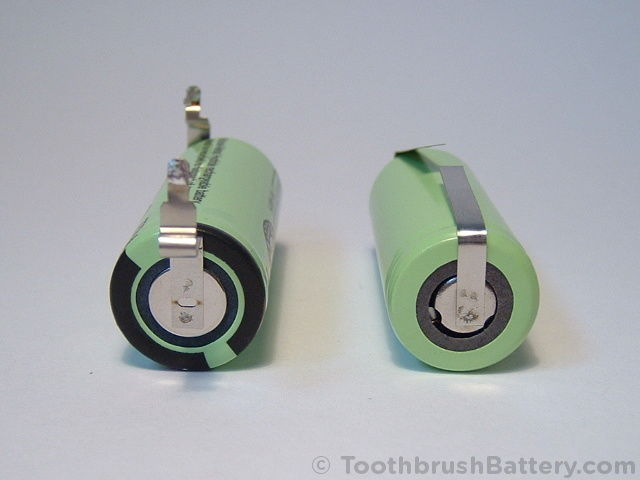
Compare the original battery to its replacement. Please support us with writing these repair guides by buying your replacement battery through the links to our secure online shop. The battery pictured is a 42mm long by 17mm diameter offset tagged battery. However, your toothbrush might be fitted with a 49mm long by 17mm diameter battery. Note how the solder tag on the negative terminal is offset to fit in the channel in the battery holder.

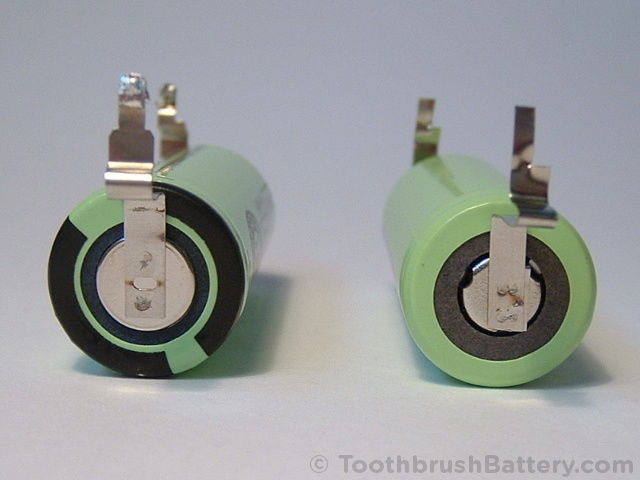
Shape the solder tags on the new battery in the same way as the tags on the original battery. The concertinas give a bit of flexibility in fitting the battery and also help to absorb any vibration but are not strictly necessary. Fold the tags over the tip of the screwdriver to get tight bends.
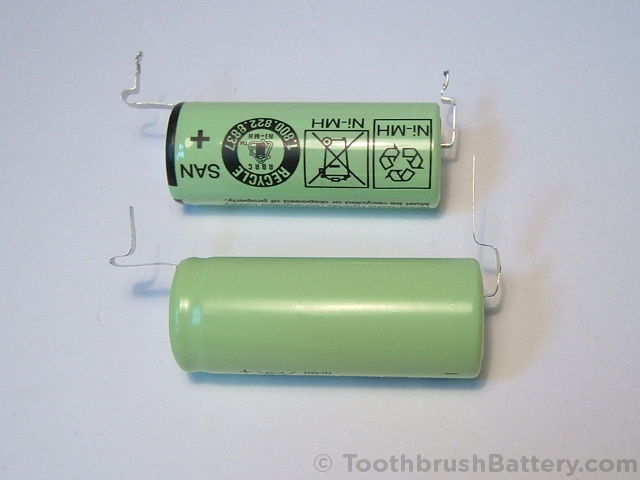
Using scissors trim the tags to the same length as those on the original battery.

Very carefully start to narrow down the width of the negative terminal solder tag by first snipping into the tag from the left. Careful not to cut right through! Just go a quarter at a time using the tip of the scissor blades. Then cut down from the top to remove the piece.

Do the same at the positive end.
Fit the battery back in its holder, making sure the solder tags go through the holes in the circuit board. You might find it easier to insert the battery at an angle, getting the negative tag through its hole first.
Bend the tags over the edge of their holes and solder them back on to the circuit board. Make sure you get good, shiny solder joints as bad soldering is a common cause of recharging problems.
Re-fit the spring and its insulating spacer between the motor and the battery. The plastic spacer must go between the motor and the spring to prevent short circuits. It is okay for the spring to touch the battery as long as the spring is insulated from the metal casing of the motor. If you cut the spring to a shorter length, re-fit the spring so the sharp cut end is against the plastic spacer otherwise it can damage the battery.
Hook the LCD screen back onto the circuit board and clip it into place. You might find that the screen starts to flash.

Secure the screen with its screw.
You can now slide the innards of the toothbrush back inside the handle casing. The charging coil will push back into the end of the assembly. Make sure that neither of the copper wires from the coil is broken as this is a common cause of recharging problems.
Re-fit the base to the handle and screw it in by standing the brush over the triangle on its charging plug and turning clockwise.
Test your work by temporarily placing the toothbrush on to recharge and check that the charging indicator lights up.
If all appears well re-fit the plastic ring around the shaft of the toothbrush. You might need to press it on with a little force so using an old toothbrush head, or a 10 or 11mm ring spanner or similar might help.
You should now have a fully reassembled Triumph toothbrush! Put the brush on to charge for a full 24 hours before use. Please recycle your old battery either at a local civic amenity or a supermarket collection point.
The built-in battery meter can get confused when the battery inside the toothbrush is replaced and can prematurely show the battery as ’empty’ when it’s not. If the battery meter shows as empty after recharging it and using it a few times then switch on your brush and leave it running constantly until the battery is completely exhausted. Recharge the toothbrush for 24 hours. Then leave it running constantly until the battery is completely exhausted again. This will help to recalibrate the battery meter. The toothbrush should now charge and run correctly and the meter will be more accurate.
Please leave any questions or comments about this guide below.
I have a type 3738 and received the replacement battery quickly but had to await solder wick from china before using it. The replacement guide was fantastic and easy to follow, tho bits were a bit fiddly. I found didn’t have the Torx #6 but 99p at the local Maplins fixed that. Its on charge now so all is looking good.
Many thanks for this website, its great being able to revive an expensive toothbrush for just a tenner – and a great sense of achievement!
Thanks for telling us about your experience with your Triumph toothbrush Martyn, it’s good to hear. Happy brushing!
Thanks for these excellent instructions. I would suggest adding that refitting the top ring can be made easier by first placing it it some hot water for a few minutes to soften it up.
Thanks for the tip Andrew, glad to hear the instructions were useful.
Thanks for the instructions – a quick Google search, using the model number of my wife’s toothbrush, brought me directly to them. Seeing as the instructions were so clear and helpful, I decided to buy the replacement battery from your site (was very well priced and turned up very swiftly!).
You’re spot on with all the instructions and I found your tip of using an 11mm ring spanner to re-seat the top retaining ring very useful.
It’s great to hear your success story Charles. I’m glad you found the guide useful and it helped you get your wife’s toothbrush repaired and running again with a replacement battery fitted. Thanks for the feedback!
Thanks for these instructions, which I followed today. Some warnings:
1. I almost gave up at the very first hurdle. Getting that ring off the top is next to impossible. Then I realised that the white plastic of the main body of the toothbrush is actually just a tiny bit squidgy. It’s possible to push a flathead screwdriver down into the body, so as to get under the ring.
2. If a toothbrush has been used for many years, it will have all manner of muck (e.g. limescale) that has crept into all the cracks that you are now trying to open. Be prepared for things not to just slip open easily. Also be prepared for cleaning.
3. In particular I found that using a pair of waterpump pliers to squeeze the sides of the toothbrush – carefully, but with enough force to actually, minutely, bend the plastic – I was able to break the “seal” and separate the innards from the case. Without this it would never have come out.
4. A small flathead screwdriver was also instrumental in reaching down into the case to press in the two white plastic clamps that otherwise would have permanently held the innards in.
5. Soldering is difficult. You can make a mess and ruin everything.
6. Bending the metal tabs on the battery appropriately is really fiddly. Sharp scissors worked really well for trimming.
7. Upgrading from a 42mm to a 49mm is possible, but requires some further consideration. (a) Snipping the spring to a shorter length requires some really sharp cutters with long handles, because the metal it’s made of is tough. I only cut through by putting the cutter in position, then squeezing the cutters closed with the waterpump pliers, i.e. leverage on top of leverage. Which wasn’t safe. (b) You’ll have to carefully work out how to bend the metal tabs on the battery – you won’t be able to just copy the bends on the shorter battery.
Hope the above is useful!
Thanks for the feedback and tips Virgil!
Further to number 1, if you stand the brush tip-first in hot tap water (around 60 degrees C) for 5 minutes it will soften up the plastic ring so it is easier to pry off.
Regarding battery upgrade from 42-49mm: I found that trimming the spring wasn’t feasible with my toothbrush because the plastic insulating washers do not allow the spring to fully compress back into the now smaller space. I thought – oh well, screw it, and placed a long piece of electrical tape down the length of the battery to help secure it to the handle. So far so good. Can someone explain the utility of the spring? Seems to me that it simply fills up space, so any means of securing the battery should suffice. Even a wad of cardboard shoved in that space would probably work. Right?
I’m not sure why a spring is used except perhaps to keep the motor and battery securely in place whilst being vibration-proof. If there was no spring then the battery could potentially move around in its holder, wearing away at the plastic and getting looser and looser until it breaks one of its connections.
If you have a 42mm battery and the spring has a plastic insulator at both ends, you can remove the insulator at the battery end to make space for a 49mm battery. Some Triumph v1 brushes were manufactured with a longer spring and an insulator at only the motor end. This means that generally it is fine for the spring to become ‘live’ and be touching the positive battery terminal. If your spring has been cut, keep the cut end against the motor insulator rather than the battery where the sharp edge could wear through the battery’s insulation. You might need to stretch the cut spring a little if it is loose when fitted. Rob 🙂
I have a quiete new looking V1 model. It has charging problem caused by the life time of the battery.
I requested to replace the battery to Braun official service in Turkey.
But the answer was to send my toothbrush to waste and buy a new one.
There is no way to replace the battery.
There is a step by step manual shown in this website and many comments that the battery is replaced and after the replacement toothbrush is working properly.
Then why the official service rejects to replace the battery?
Who from Braun is authorised to check if this service is capable to replace this battery.
If not why Braun do not train those people.
If there is no solution by Braun and If I have to buy a new toothbrush what would be reason again to buy a Braun toothbrush?
Like most manufacturers it seems that it is not part of the business model of Braun to repair their appliances outside of the guarantee/warranty period. Battery replacement can only be carried out by unofficial repair centres or by yourself.
A really good guide and even when I used the longer battery 49mm all went well. Now on charge and looking good. Why Braun didn’t make this easy with a normal unsoldered replacement battery is obvious. They will no doubt sell more toothbrushes, but there should be a law against it as there is nothing wrong with the toothbrush.
One other thing… using nail cutting scissors to trip the battery connectors down works best, altho I did start with a pair of normal scissors which worked but was difficult to be accurate with. Nail scissors are small and sharp and do an excellent job. I didn’t worry too much about the bending of the ends correctly. As long as they are isolated from other connections it doesn’t seem to make any difference. I was concerned that the spring metal touches the connector at one end, but that’s how it was initially, and doesn’t seem to be an issue.
Good work, and thanks for the tip Lewis!
Finially got around to replacing the battery and your instructions worked perfectly.
Thank you,
Hello, and thank you for the detailed quide. I have changed battery to my older Triumph now 2 times without problems. I now changed battery to type 3762. Everything seemed to go well. However, the battery does not charge. I have managed to charge the battery two times without the cover. In these occasions I found no reason why it suddenly charged without doing anything sensible.
There is a 0ohm resistance between the coil pads, so the coil should be ok.
I found some mystical comments from for example EBay replacement battery adds. “Some models are known to have issue with the charging circuit not operating properly after installing a new battery. As a bonus, instruction on solving it is provided free when battery is shipped.”
Anyone knows what could be the issue?
The Braun Oral-B Type 3762 and its related models (3761 and 3764) seem to have an electronic cut-off for when the battery is getting low on charge and this gets confused when the battery is replaced meaning the brush can almost lock up and refuse to do anything.
I’ve seen that comment from a U.S. battery vendor about the bonus instructions on solving the problem but I don’t know what their solution is.
If you manage to find out then let us know! For now however, a combination of running the brush until it stops, charging for a minute, running it down again, then giving it a full charge and running it continuously might help to recalibrate things.
new battery installed easily with wonderful instructions — but won’t take a charge — I am guessing the charger is what was broken in the first place? – ugh, hate to spend $30 for a charger only to find out I am just out of luck
It could be a broken wire from the charging coil to the PCB of the toothbrush. Have a read of our trouble-shooting tips here
Hi,
I’ve managed to replace the battery and it charges without any problems. However, when I turn it on, nothing moves. I can hear a buzzing sound as if power is transferred to the motor, but it just doesn’t move.
Has anyone experienced this? I’m suspecting the cause might be related to the latest comment about the brush locking up, but I’m not sure. Have tried to follow the instructions given, but it doesn’t work.
My model is a type 3738.
Would be grateful to hear any suggestions on getting this resolved.
Thanks!
/Christopher
Hi Christopher, Does the motor run if the inner workings of the brush are removed from its outer casing? It could be something simple like a piece of debris jamming in the gearbox when it was reassembled.
It does not. The motor gets quite warm though. I’ve given up and bought a new device. But thanks for the instructions anyway:)
You’re welcome. If others have this issue it could be something simple like debris in the gearbox (try turning the toothed gear by hand) or if the motor is getting warm but not running it could be seized.
Hi all,
Thanks for the comments. Learned some advice before beginning this project. My first soldering project. I’m from Canada, and am looking to use this solder for the job. Will it do?
http://www.thesource.ca/estore/Product.aspx?language=en-CA&catalog=Online&category=Soldering+Tools&product=6400013
Thanks,
Hi Shawn, Yes that solder looks fine. You won’t need much so you might have a friend/colleague who can give you a metre length.
Hi,
Got the top ring off but when I go to unscrew the base it won’t fully unscrew. The base (charger) will turn the bottom of the toothbrush (the centre part underneath it) and eventually it comes a bit out but won’t go any further. It’s like the screw is stuck inside and keeps resetting over the last thread inside. Not sure if sediment has created a seal. Any ideas or solutions would be greatly appreciated. Thabks
Hi Shawn, if the screw is undone and just keeps turning it means it has released and the base cap can now just be levered off. Dry toothpaste might be helping it keep sealed but you should be able to get base open. You can do the screw back up and stand the brush in hot water for 5 minutes before trying again if it seems stuck on firmly. This will soften the plastic.
I’ll give it a try tonight. I’m skeptical though. The base of this thing feels solidly sealed, not even a wobble. I tried pretty hard to pry it open after turning the screw as far as I could and I was breaking a sweat. I can’t image dry toothpaste giving it that kind of seal. I bought this “new” from ebay a few years ago, and the seller shipped it in a cardboard box (not original packaging). I guess “new” may have meant refurbished, and I’m worried the inside may be krazy-glued shut or something. If that is the case is there any other way to open the device?… or am I out of luck?
It’s quite normal for the seal to be firm and I doubt it was opened even if it was sold as “refurbished”. Once the screw is undone as far as it will (it will just keep clicking) just start levering all around the edge of the base with a large-ish screwdriver. You might end up marking the plastic with a screwdriver so you can use something plastic instead if you like.
Thanks for the great instuctions!
I just replaced my battery in my triumph V1 and I fully charged it before putting it in the brush via an nicore intelligent charger. However the LCD shows “empty” and the brush will not run at all. I know the battery is good as I have tested with a volt-meter) reads 1.486 V and have run other motors off of it so I know it has lots of juice. Any ideas?
Hi Rick, Glad the instructions were helpful! Even though the battery is full I’d suggest putting the brush on charge for at least an hour so that the battery meter knows there is some juice in the battery. Then you should be able to switch it on and let it run down until it is empty. The meter gets confused so you might need to do the charge/discharge cycle a few times before the brush lets you use the battery’s full capacity and the meter sychronises with the battery. Also see our trouble-shooting tips.
Got the base off! Turns out it was ancient gunk creating a extremely strong seal. Now proceeding to solder. Before I do so, I’ll be upgrading to the larger battery size (49mm) for the v1 model. In the tutorial, it mentions resizing the spring (cutting it shorter). Do i still include both plastic ends after resizing or do i remove one end as shown in the tutorial?
Thanks!
Great! If your spring has a spacer at both ends then you could just leave off the spacer at the battery end and you might not have to shorten the spring at all.
Success!
I Just wanted to follow up on my experience (for those curious about the process).
First, what a great way to save money! Electric toothbrushes aren’t cheap, so replacing the battery is really a great mini-investment (you can save yourself well over $100 bucks).
Second, a big thanks to ToothbrushBattery.com. If you follow their guide (and practice great care when soldering), you cannot go wrong (and everything pretty much goes as expected).
Now for the unexpected:
The blue plastic ring at the top can be pried off if with a butter knife/flat top screwdriver or something else (a little force is required). You just need to get under it (the area around it is soft and rubbery and you can squeeze a tool into it).
Don’t underestimate the power of ancient dried gunk (5 yr old toothbrush), it creates a really strong seal between the base and the shaft. I had to use a knife to pry open the base after unscrewing.
Getting the internals out is annoying. Find something narrow and flat that can be wedged into both sides to release (I used really tiny paperclips). Don’t give up!
Note: you will need a torx T6 screwdriver. I’m a man of substitutes, and no substitutes will do for the screw you need to remove from the display (not the tiniest allen key or those mini screwdriver sets will work).
Desoldering/Soldering… challenging but doable… In the end, I got a co-worker to do this for me. Someone with a bit of experience. I don’t regret it. At least watch some youtube videos or something if it’s your first solder DIY. I learned alot by watching. We had to replace the solder tip to get enough heat, and had no luck using a desolder wick. I strongly recommend a desolder pump. There’s not alot of space on the board, so patience and precision are key.
Now, the battery. I chose to upgrade to the larger 49mm length battery (why not?). It fits perfectly into the slot, but a bit of bending/cutting is required for the foil connectors since they don’t line up exactly with the holes. Not a big problem. What was a problem was the spring. I removed one of the plastic ends to make sure it fit when reinserting. This was a big mistake. If you’re upgrading the battery, don’t even bother with the spring. There are grooves which are perfectly spaced for that battery’s size which hold it in place. Despite this, we inserted the spring anyways (keep in mind it’s a small space) and we somehow made it connect metal to metal with the motor and I guess it started to deliver current because it heated up and began to melt the plastic around the head of the battery. After a moment of little smoke, we immediately removed the spring and things were fine (minus a bit melted plastic around the head of the battery). So forget the spring if you’re upgrading the bat size imho.
Long story short, I put everything back together, charged the battery for 24 hrs, and it works just like new!
Good luck!
Thanks for the excellent instructions and assistance. My question involves cleaning. The top end has a ring of black mold where the blue ring was. Can you recommend the best way to clean it – and the surrounding soft rubber of the case – without damaging that rubber? Thanks,
Hi Bruce, I’m not sure about the best way to clean mould off but you could try removing as much as you can with a brush, then wipe it with anti-bacterial wipes. Any staining will be hidden once you reassemble it so bleaching it wouldn’t really be necessary.
Hi. Thanks for the instructions. I have successfully replaced the battery and it is fully charged and working. However, I get a symbol on the LCD display that there is no signal for the smart guide and indeed the smart guide is not linked to the toothbrush. It is functioning (the clock is running and it was linked immediately before I replaced the battery). Any thoughts on a fix? I can’t find my instruction manual and Braun doesn’t seem to offer one on its website. My brush is a 3738. Thanks for any help!
Hi Mark, glad your toothbrush is now repaired and running! To turn on the SmartGuide radio signal for your Triumph v1 (i.e. take it out of flight/hospital mode) hold down both buttons for a few seconds. The little transmitter/radio aerial symbol should disappear, letting your SmartGuide work again.
Got it. Thanks! Works like a charm. Do you know of a source for an instruction manual? By the way, I installed the larger battery and was able to simply compress the existing spring enough to get it in without modification. Mine has only one plastic spacer, which I left, as is. Thanks again for a very helpful website.
You’re welcome! The manual for the Type 3738 is available on Braun’s site here.
I have just replaced the new battery on Triumph Professional Care 9000, followed all of the instructions. I charged the battery to full 100% but when I switch it on, the motor doesn’t turn, it’s just dead silence. The LCD displays correctly with different brushing modes but the motor and brush is not turning. I’m wondering what steps I may have missed and if you can provide some guidance on how to fix this problems. Look forward to any helpful hints and suggestions. Thanks in advance.
Hi Alfred, it could be a stray blob or whisker of solder causing a short circuit on the PCB. Also, check that when soldering the new battery to the PCB that any nearby surface-mount components did not get hot and move on the PCB.
Hi,
I just replaced the battery on Oral B Triumph Professional Care 9000 following all of the instructions. I then tried charging the battery but LCD display only says “Charging” with no bars displayed at all. I left it on the charger for 24 hours and the LCD display still only says “Charging”. There are no bars indication like it was before the battery change. The motor would not turn on and it just remain silence. Any helpful suggestions or hints would really be appreciated.
Thanks in advance!!
Hi John, have a read through of the troubleshooting suggestions on our customer support page. It is most likely a connection issue with the battery or copper coil wires.
i am considering doing this on my V1 triumph however when i search around for battery replacements some have an offset negative post and some centered. can the v1 circuit board be setup different on different ones or is one or the other always right for this model?
thanks
John
Hi John, the v1 Triumph models (types 3731, 3738 and 3745) always have an offset tag on the negative terminal of the battery. The only variation is the length of the battery. Sometimes the brushes are fitted with a 42mm long battery, sometimes it’s a 49mm long battery. You can open your toothbrush and measure the battery length without doing any desoldering.
These are our 42mm long offset tag batteries, and these are our 49mm long offset tag batteries.
Extremely clear and well illustrated instructions. A model for all types of instructions. My battery replacement went smoothly.
When I put it together the lowest bar was blinking on the LCD when I put it into the charger, making me think it was charging. Then I tried to use it and it ran very slowly and after a few seconds went totally dead. Nothing on the LCD screen, noting when trying to charge it again… ;(
I used a desolder sucker (pump) to remove the old tin and thought I was careful. But guess I did create a short somehow. I could feel it being a little bit hot before it died totally but thought it was from charging.
Hi Kent! Check inside the toothbrush handle that the copper wires from the charging coil have not broken. There is a weak point where they are soldered to the PCB.
Great instructional. One hour later and i have a fully working toothbrush again. I slowly sanded down a small allen key with 320 grit water paper to remove the internal screw. it took a while to get it to the correct size, but the whole job still only took 50ish minutes. well worth the effort. I dislike just throwing things away when they can be repaired.
Thanks for the great instruction.
The battery meter is confused and would shut off after one use. How can we keep it running continuously to drain down the battery? It would shut off after 2 minutes. I tried many cycles of charging for a short time and running it, but didn’t fix the issue.
If it shuts off after 2 minutes then you can put it back on charge for 10 seconds, then leave it running again. However, with the v1 Triumph models they don’t normally shut themselves off until the battery is drained. You might have a problem with the charging circuitry or coil wires so check out our trouble-shooting tips here.
Great instructions. Clear and precise. First time I have decided to do anything like this and pleased I have.
Trouble now is, the battery is on charge and only the bottom bar is blinking. Is this normal? Any advice appreciated
Glad the guide was helpful Steve! It’s normal for only the bottom bar on the battery charging display to be blinking when it’s first put on charge.
Is there anyway to just take the old tags off the old battery and apply them to the new battery? Instead of bending and soldering on the main board?
The tags are welded to the battery so it would be very difficult to remove them neatly. The tags on our batteries can be trimmed with scissors and are easy to bend, so doing that will give you the neatest and most reliable repair.
Having read through most of the posts, it seems there can be issues with charging the new battery. Is it likely to help if I make sure the old battery is completely discharged before removing it. It should at least be safer, avoiding any potential problems with shorts caused by metal tools in the wrong place!
Yes, good idea Steve. The main issue is that the battery meter gets out of sync. New batteries are partially charged so the meter generally needs to re-sync. See our troubleshooting page for tips on how to achieve this if the meter doesn’t re-sync after a few full charge-discharge cycles.
So far my attempt at battery replacement seems to have gone well. I completely discharged the old battery first, then installed the new one. I discovered it is easy to get the black prongs of the display module in the wrong place relative to the white clips on the main module, then the main module will not clip into place in the case. Once assembled the display showed the animated ‘plug me in’ icon. Charged it for about 22H and so far it has run for about 6 days with 2 users brushing twice per day and no sign of low battery warning. I will discharge fully and give it another 24H charge just to be sure the meter is calibrated. Thanks for providing an easy guide for this process.
Hi I have Triumph professional care Type 3762 5 modes V2. his battery is 1.2 v 1600mA I have changed it for a battery 1.2 v 2000mA and I have worked for two minutes and then one of his transistor is burned. I see the burned transistor but it is very little and I have not the information about it for changing it. can you give me the schema of it for recognizing the informations about changing that the transistor ? thanks
We don’t have any circuit diagrams, schematics or parts lists unfortunately.
Replaced the battery using your instructions and it worked great for a little while. Then got some condensation on the screen so opened it up to dry it out. All looks okay now except the screen now is stuck on choosing the language – I can toggle it to change from English to German to Danish, etc. How do I reset the screen/program to the operations screen so I can use the toothbrush. Each time I push the button it just changed the language instead of starting to operate.
Hi Julie, according to page 5 of the user manual for the Type 3731 (available here) once you have selected the language press the other button (mode button) to move the menu on. This will take you to the timer mode setting so press it again to return to normal brushing mode.
Changed my battery a week ago. Instructions were great, I installed the bigger battery with no problems. I let it charge for 24 hours upon first use I was a little disappointed as it’s isn’t feel any stronger. Let it charge another 12 or so hours and now it is just like new. Thanks
Hi,
I have the New 42m/m Battery and T6 Torx Star screwdriver: But only the Original Lead Multi-core solder! (Question:), Do l need to Buy Lead FREE solder to complete the Work of Replacing the Battery?
Which l received from; Ionic Industries in Yesterdays post 16/9/2017.
Now it has been Many, many years since l was involved in Electronics: Many things have changed. So my reasons for asking about Solder is more to what l should use because of “What is Best at this time.
I have a Very Good / Quality “Temperature Controllable” Weller Iron, plus, a Good De-soldering pump, so No problems should arise.
But l do look forward to your reply; just to re-assure me about the Solder?
When l Finally get to replace the Battery…… The Next day or so, l will post my experience with you.
Meanwhile, thanks for taking a moment of Time.
Hi David, it looks like you’re all set up for a good repair. As for the leaded/lead-free solder, as long as you remove most of the original solder you can probably use your current solder to make the new connections without any issues.
I’ve got a 3738 with a dead battery. I’ve removed the blue ring and the triangular screw on the bottom, but I’m stuck here:
“The base of the handle will start to separate off from the main handle.”
it won’t.
it seems to be sealed shut and won’t budge even a fraction of a millimeter, no matter what I do short of damaging the plastic. is there a tip like heating it up for the blue ring, to separate the base from the handle?
Yes, tighten the screw back in the bottom. You can then stand the brush in hot water for 5 minutes. This will soften the seal and any dried-on toothpaste from around the seal. Dry the brush with a towel and loosen the screw. You might need to gently pry the base cap off with a blunt screwdriver but it should then come apart okay.
thanks, it worked somehow. there was no toothpaste, just the seal was extra tight. although some water actually got inside despite re-tightening the screw, and the screen and the pcb became a bit wet, but I hope it is not too bad. I’ve ordered the new 49mm battery now.
maybe next time I should use a hair dryer instead of hot water 🙂
The battery replacement instructions for the V1 are among the most thorough I have ever seen for a repair of this type. Clear, concise, and correct. Well done, and a good example for other sites to follow. Who needs a video!
Good day, I managed to remove the plastic screw from the base, however, the base itself cannot be removed. My Type is 3745, V1
Hi, put the screw back in then stand the handle in hot water for 5 minutes. Dry it off, loosen the screw, and you should be able to pry the whole base off with a blunt screwdriver.
Hi,
I replaced the battery in my toothbrush according to this guide.the copper wires on the charging coil remained intact, the screen showed a charging indicator when I put it on the base.
However, the motor is really weak with the new battery. It seems to overheat quickly. The toothbrush gets very warm. Does this sound like a short? Any ideas?
Chris, If the brush is heating up it sounds like there is a short circuit. Desolder one battery terminal from the PCB and check for solder bridges, blobs or whiskers on the PCB. Ensure that the metal spring is insulated from the motor and that the spring hasn’t damaged the insulation on the battery itself.
I found your website completely by (google) chance but it’s a real goldmine of information! Our Triumph V1 was showing signs of battery fatigue, feeble running after full charge, short charge life etc. A replacement brush seemed to be inevitable until we found Ionic.
We bought 2 batteries and a T6 driver from you, then started work.
Your replacement guide was well-written, backed up with clear photos. You successfully avoided jargon, providing me with a measure of confidence before I started work. Removal of the base cap and blue ring were harder than expected, even with the 60C heat treatment, due to accumulated material after years of use (yuk!). After that, the job was exactly as described.
With another new battery in reserve (plus a new T6 driver), I’ve spent a fraction of the cost of a new (discontinued) unit.
My compliments for your excellent service and clarity!
Thanks Jon! Great to hear about your successful repair and that the guide was useful. Happy brushing!
Thanks for the battery and clear instructions. I now have a rejuvinated Oral-B Triumph V1 with a larger battery and at a tenth of the cost of a new toothbrush. Many Thanks.
The plastic “wrench” on the charger and the plastic hole on the bottom have deformed so they will not engage – I cannot remove the bottom of the toothbrush with the charger. Any suggestions as to how to accomplish this? Thanks!
If the plastic key on the charger is rounded off you can use a T-50 size Torx bit to unscrew the release from the toothbrush. Soften up the seal beforehand by standing the brush in hot water for 5 minutes first.
I changed the battery but doesn’t work!! It gets very hot and the lcd doesn’t work either!! If I disconnect the battery and I put the toothbrush to charge the lcd works and indicates like is charging! might something is burned?
It sounds like either the battery was connected in reverse (+/-) or there is a short-circuit causing the battery to drain at high current. Check the PCB for stray solder blobs causing a short-circuit.
I just replaced my battery on V1 model 3738 and completed a full charge cycle and used the Toothbrush once without any issues and placed back in charging cradle. Couple of hours later I walk into the bathroom and hear the toothbrush is running, tried to turning if off multiple time without any luck.
Battery discharged after about 45 minutes of running and I then placed it back in the charging cradle but now it will not charge. Took it apart again to check connections on charging coil to PCB and battery solder connections, all seem good.
I took it apart and cleaned the on/off switch alcohol swabs and then tried jumping a fully charged Ni-MH battery to the battery solder contacts, LCD came on and stayed on for a while but toothbrush still won’t run or will not charge. Also checked to make sure the gears were not jammed and they freely turn.
Is there anything else I can check or try to determine if the PCB is bad before I proceed with desoldering and replacing with a new battery?
It sounds like possible water ingress. Disconnect the battery and let it all dry out somewhere warm for 24 hours. Reassemble it, check for short circuits and check the copper charging coil wires for broken connections. The toothbrush should then both acknowledge being charged and run normally when switched on/off.
Amazing website please keep up the good work! You have definitely invested time and effort and you deserve the credit!
Hi,
I replaced the battery at the end of February 2018 with the Top Quality 49mm x 17mm Braun Battery with Offset Tag – Varta.
Work flawless until 3 weeks ago.
The led windows in blinking on the first block and not go further. As soon I remove the tootbrush from the charging stand, nothing appear on the led windows.
Any idea what could be the problem?
Thank you
Hi, it sounds like a broken connection inside the toothbrush. Take a look at points 3 and 4 on our customer support page here.
Hi,
I am looking for a replacement charger for 3738, charger got thrown out by mistake !!
Any ideas. Not available through Braun customer service.
Thank you
Have a look at our article about Type 3731 chargers that will fit your toothbrush here. There is a link for buying a replacement charger.
Hi, thanks for the concise instructions for the battery replacement of the model 3738 V1 oral b toothbrush. I’ve replaced the battery and the display is completely blank and the unit will not turn on. I set it on the charger for 24 hours but still have a blank screen. I have reviewed your troubleshooting section and disassembled, visually inspected and tested the connections, everything looks good. Should I be able to turn on the unit when out of the case? Thank you in advance for any support that you provide.
Hi John, yes you should be able to switch on the brush or charge it briefly without the outer casing in place. If the screen is blank, even when on charge, then there might be dirt trapped between the gold pads on the PCB and the screen’s edge connector.
I’m having the same problem as John, above. Showing 1.4 volts while charging. Display blank. Getting 3 volts from boost circuit. Cleaned connection with alcohol and a swab. Checked and cleaned under display for grit. Motor runs if we bypass transistor. What frequency should the crystal run at?
I’m not sure what frequency the microcontroller runs at. If bridging the output transistor runs the motor then perhaps the momentary power switch is faulty or a surface mount component has moved off its pad.
Couldn’t have done it without your guide!
I’m trying to unscrew the base but my charger is now not feasible and I brought a torx t50 piece which seems to be slightly small and just turns freely in the base. Any input?
It sounds like your T-50 bit might be slightly under-sized. You can try wrapping tape round and round over the six points until it is a snug fit in the base.
This is the second time I have replaced the battery – they usually last about 7 years – and have found your instructions very clear and comprehensive and easy to follow for a competent DIYer. Eventually the motor or a component will fail but this replacement has saved me a lot of money. Thanks
What is the coil at the top of the toothbrush for? I damaged mine removing the top ring and I cannot tell if it is just two wires coiled together or a coil loop (connected). Easy to fix, but cannot work out whether the wires are connected or not? Any idea what this is for and if this is one single connected wire in a coil?
It’s not clear what that top coil of wire is for – either for a system for detecting never-sold, chipped brush heads, or it’s for detecting the shaft speed. It’s a single length of coated wire wound into a coil with the 2 free ends connected to the circuitry. You could leave it disconnected and see if that affects the running of your Triumph at all.
Thanks for the swift reply. I thought it may have something to do with pressure sensing or even a bluetooth antenna. now I know what it physically is (a single coil of wire) I can now replace it. thanks.
When I pried the seal off I damaged it on my Triump V1 Is there any place to purchase a new seal
Do you mean the solid plastic ring around the shaft?
Hello,
I have the same question as Gary. I did not damage the solid plastic ring around the shaft but am experiencing water ingress into the chassis body. Might replacement of the ring reduce the water ingress? If so, are you able to advise the availability of a new ring (please and thank-you)?
Hi Peter, you could try adding some non-toxic grease around the seal and ring before assembly to help with waterproofing. Also see our toothbrush care tips to minimise the risk of water ingress.
In your otherwise outstanding video, it failed to prevent me from losing track of which was the spent and which was the replacement battery….I didn’t read all of the comments, so if this point has been raised and dealt with above, sorry about that.
You can email a photo of the two batteries to the email address at the bottom of this page (or on our contact page).
I am unable to reset the battery after it being replaced. It runs 2-3 times than dies and flashes empty. Read all the comments with no success. Any suggestions?
Please help…
Hi Slavi, have a read through our troubleshooting tips here.
Will try. Thanks.
The directions, pictures and video for the Brawn 3738 battery replacement were flawless. Thanks.
I have a type 1, 3738 10+ years old, with a 49mm battery. Battery and 6mm screwdriver bought from your website, followed your online guide and replaced battery with no problems. Various hints (eg replacing battery at an angle, negative end first) were very useful.
Some might find a magnifying glass or similar useful for the finer aspects.
Thanks to all involved in the online guide
Tolle Anleitung, meine beiden Triumph 9500 sind wieder wie neu. Habe den 49er Akku wegen der höheren Kapazität verwendet. Das zerlegen der Zahnbürsten ohne Beschädigungen auszulösen wie auch das auslöten des Akku und das einfädeln der Lötfahnen waren mehr als fummelig. Aber bei den Anschaffungskosten hat sich die Mühe gelohnt.
Vielen Dank !
My very early Triumph Mk 1 now back in running order thanks to your excellent guide. Very many thanks.
I have replaced the battery on two Oral B 5000 v1 units. I have found it easier to snip off the metal contact tabs at the old battery itself, and then to re-solder those contact tabs onto the new battery, rather than working with the solder on the printed circuit board.
Having read through the instructions, which looked very good and achievable, and gave me confidence, I bought a battery from you (by writing the instructions you clearly earnt that business, I didn’t even look elsewhere) and set to work. A little later and it was fitted and up running, and now has a new lease of life – I’m very pleased, with you folks and with myself.
The instructions were very good in practice. Just a couple of observations:
When trying to remove the base initially it just wouldn’t budge, but I kept trying, without excessive force, and suddenly it was loose. I guess I just pulled at the optimum angle. So keep trying!!
Getting the battery terminals to align with the holes was tricky. Again keep trying!!
For several steps I used a magnifier, and a desk lamp.
All in all, very good instructions made this a cost-effective, practical, and minimum waste repair. Very well done!
Thanks for the tips Richard and for your order. Glad we could help you get up and running again!
Worked a treat guys – quality site with great instructions on how to do it, and a quality battery supplied. will do it again when the next one goes!
Thanks for the detailed instructions! It is scandalous that you even need something like this to replace a battery. After all, the toothbrush cost around € 100!
Thanks, I upgraded my v1 from 42mm battery to a 49mm battery. The original decompressed spring length was 20mm, so when I fitted the new battery I used a dremmel tool to cut the spring down to 11mm (decompressed) – this new length works fine and gives about the same pressure on the battery as before. When I changed the battery the LCD flashed as if no charge was in the battery, so I charged up to 1 bar, the toothbrush wouldn’t turn on. Holding the power button for 10 seconds while still on the charger somehow reset the battery BMS (Battery management system) and once removed from the charger I could turn on the toothbrush without any issues.
To overcome this BMS issue I recommend that you temporarily solder a AA battery to the GND and 1.2v power points on the toothbrush motherboard. Once the new battery is fitted you can easily unsolder the temp AA battery and the BMS will not cause any issues.
Thanks for the tip about holding the button in for 10 seconds Alex. I’m not sure I’d recommend soldering in an AA battery in parallel while changing the main battery as you would also need to add some components to stop it over-charging the main battery.
Yes you are correct most AA batteries are 1.5v, however most AA rechargeable batteries are only 1.2v so these could be used instead – failing that you could also just use a diode to drop the voltage by around half a volt if you just used a standard AA battery instead of a rechargeable.
It’s not really needed – but it could solve some the issue that some people have with the BMS.
Ik heb een Braun 3738. De batterij is vervangen van een 42 mm naar een 49 mm. Vervanging ging goed en geen problemen. Solderen ook geen enkel probleem.
Probleem:
Laadt in eerste instantie volledig op, alle blokken vol. Bij aanzetten echter geen activatie motor.
Display geeft daarna een knipperend leeg batterij-symbool voor opladen aan.
Ook na 24 uur en langer opladen hetzelfde knipperende leeg batterij-symbool.
Tandenborstel weer opengemaakt en aansluitingen gecontroleerd. Spanning op contacten batterij is ongeveer 1,38 volt. Dezelfde spanning ook op contacten printplaat.
Contacten oplaadspoel zijn goed. Probeer het display geheugen te resetten met o.a.
10 seconden aan/uit knop met apparaat op oplader.
Ook met program-toets gelijk met aan/uit of apart. Lukt niet.
Contacten display op printplaat zijn schoon. Extra nog schoongemaakt met alcohol.
Printplaat gecontroleerd. Lijkt prima en geen beschadigingen.
Welke acties moet ik nog verder doen. Lijkt mij toch een reset-probleem.
—-
I have a Braun 3738. The battery has been replaced from a 42mm to a 49mm. Replacement went well and no problems. Soldering is no problem at all.
Problem:
Charges fully initially, all blocks full. When switched on, however, no motor activation.
Display then shows a flashing empty battery symbol for charging.
Even after 24 hours and longer charging, the same flashing empty battery symbol.
Opened the toothbrush and checked connections. Voltage at battery contacts is about 1.38 volts. The same voltage also on printed circuit board contacts.
Charging coil contacts are good. Try to reset the display memory with a.o.
10 seconds on/off button with device on charger.
Also with program button equal to on/off or separately. Does’nt work.
Contacts display on printed circuit board are clean. Also cleaned with alcohol.
Circuit board checked. Seems fine and no damage.
What actions do I need to take next? Sounds like a reset problem to me.
It sounds like the battery has charged up fully but the toothbrush does not recognise this. Have you tried disconnecting the battery for 5 minutes then reconnecting it?
I have disconnected battery. When make new soldering contact the battery symbol flikkering with 1 part of charge. Takes 24 hours. Then not extra parts. I took it of and after that the battery-symbol flikkering compleet empty. The voltage on the plus and min are good, 1.36 volt, also on the printed plate, so complete charged. What must I further do ?
It sounds like there could be a fault with the circuitry such as a short circuit or damaged component. Perhaps the switch is faulty if the toothbrush will not switch on?
I bought one of your 49mm batteries to replace the dead 42mm battery in my Braun Triumph V1. After I put it together and charged it for 24 hours, I tried to use it, and the head didn’t vibrate. I could hear a very faint mechanical noise when I held it up to my ear, and the LCD counter seemed to suggest that it thought it was working, but no movement.
I tried taking it apart again, and I shortened the spring down a little further than I already had, and, out of paranoia, I also wrapped the top coil of the spring in electrical insulating tape, and put it back together again, and it now works fine.
So it might be worth mentioning this in your instructions – that if the spring is too long even after cutting it down, it could be pushing too hard against the motor and stopping it from turning.
Thanks for the instructions; glad to have the toothbruh working again.
Thanks for the tips David. I can imagine how too much pressure from the spring on the motor could cause misalignment in the gearbox/drivetrain of the brush and jam it. Over time your insulation tape might get worn through by vibration. The plastic insulating spacer on one end of the spring should go between motor and spring otherwise you’ll get a short circuit, so make sure this spacer is in this position. Put the cut end of the spring against the plastic spacer so the sharp edges won’t cut into the battery. It’s okay for the spring to touch the battery, which is why the spring must be insulated from the motor’s metal can.
A totally Great guide….most comments were helpful, as well. Thanks. I would suggest the correct battery with the narrow pig tails and offset negative is close to necessary for the easiest replacement. Other batteries might work, but prepare for some frustration. Be sure your soldering skills and tools are up to the task…practicing on an old circuit board is good prep. Again, thanks to all. Know that if you are used to and like this toothbrush I could not find a direct new Oral B replacement for the Type 3731
Me again…When the guide says “Screen shows empty.” does that mean it displays the word “Empty” or is it simply blank though the brush works in either case? Mine is blank; brush works fine.
For the screen showing ’empty’, it means it shows a battery symbol with no segments filled, or flashing, rather than blank. There were at least two different styles of LCD screen fitted to v1 Triumph brushes – one a dot-matrix display, the other with shaped icons.
Got it. I’ve been using the toothbrush since last post (thanks to this site) and it works like a top, but no screen after two full discharges and recharges.
Anyone have a fix suggestion(s) short of taking the insides back out? Screen loss is not a big deal, but all else went so well , I wonder why it does not work, also.
If the screen is not working it’s likely a connection problem between the edge of the glass screen and the gold contact points on the PCB. If you remove the LCD and check the contact points are clean, then reassemble, the screen should work again.
Hello all! i tried these instructions, fitted the replacement battery successfully. But after several full charges and discharges I cant get the battery to sync. Only runs for 3-4 mins then shows empty. Has anyone successfully synced the battery after having this issue? Not sure what else to try. Any thoughts appreciated!
Hi Jay, Have a run through our trouble-shooting tips as this sounds like it could be a bad connection somewhere.
Have a Braun type 3725 electric toothbrush that needs the battery replaced. Can’t figure out how to remove old battery and install a new one. Thanks for the help.
For other models without their own dedicated guide see our notes on other toothbrush models. Your Plak Control brush is similar to the Advance Power Type 4716 so should come apart in the same way.
I am a 62 y/o female in the USA. I have this particular toothbrush, and needed a battery removal tutorial. This is the finest instructional guide I have ever used. Had I seen it beforehand I would have repaired my toothbrush rather than replacing it. I had already bought a new one. Thank you, Ionic Industries. Next time I’ll come here first.
Thank you for this tutorial!
Unit is charging but I get the German word ‘Aufladen’ which means charge, anyway to switch back to English?
To change the language of the menu display on your Triumph v1 toothbrush, from the manual:
Press and hold the brushing mode button until the name of the current language is displayed.
You can scroll through 13 different languages by briefly pressing the on/off button.
To confirm the desired language, briefly press the brushing mode button again. This will also lead you to the timer choice menu.
Po wymianie akumulatora na nowy silnik szczoteczki stal sie słaby, moge go zatrzymać palcem. Wymiana przebiegła bez problemu
I am glad the battery replacement went well. Regarding the weak motor, you can put a drop of light oil on the bearing at each end of the motor. Apply some light grease to the gears. Also check that the solder connections for the battery and motor are not cracked or broken.
Po wymianie akumulatora na nowy silnik szczoteczki jest słaby, bolec na który władza sie mozna zatrzymac palcem
Please can you email us a photo of the battery – contact@toothbrushbattery.com
Silnik w jednym miekscu sie przycina gdy wykonuje obrót
Fantastic directions, very easy to follow all the way through. I did have trouble getting the base off; even soaking in warm water didn’t help. Finally I put the base portion into a vise, tightening it very gently, and then wiggling the rest of the handle back and forth. That popped it off very easily, and left only a couple of small scratches on the base. If I had wrapped it with some electrical tape or something similar, I don’t think there would have been any evidence of the use of the vice. Just thought I’d post this in case anyone else had as much trouble with this step as I had.
Thanks for the help! I got the new battery in but when I click the main button it doesn’t start. No sound or anything. It’s still outside the casing though. If I hold down the main button it flashes some of the battery indicators. Also, my smart guide is not connected anymore as it stopped working one day. I just kept using it without it. Any help would be greatly appreciated!
Assuming the brush still ran a little on the old battery, this could be a broken connection somewhere, or a stray whisker of solder causing a short circuit. Also make sure that the plastic insulator between the spring and the motor is present.
just did it thank you for the mostly easy to understand guide! i would suggest making sure the old battery is properly disconnected off the board i almost pulled off the pad as it was still attached used tweezers quickly after warming it up with the soldering iron and it lifted up fine.
i had the short 42mm battery and bought the longer 49mm to replace. the spring i just cut it until it was slightly bigger then squashed it and pushed it back. make sure to put the sharp cut end against the plastic spacer.
swiss army knife scissors worked easier than normal sized ones. the base wouldn’t come off i used a jimmy tool ( very thin metal pry tool ) and it came off after rocking it back and forth in the front and back of the base. the top ring flat head screw driver worked but to put it back on i just pushed with the tip of pliers.
Happy user here. Found the awesome guide here while researching about replacing the battery, found that the price of the proposed replacement was fair – deal! Charging now.
I replaced the shorter battery with a longer one. Like others pointed, the spring is hard to cut but not a big problem – can be done with strong enough pliers. I filed the end and twisted it down a bit to try and avoid vibration to eat into the plastic.
My battery had been slowly dying for a couple of years, so I bought a new one and put it in my drawer and promptly forgot about it! On rediscovery, I did a computer search on how to replace the battery, got scared off by the 15-step process to simply replace a battery, then put the new battery back in that drawer.
Then the toothbrush finally died. A choice – $100-plus for a new toothbrush, or be brave and have a go at the replacement. Found your website with these fabulous instructions, which buoyed my spirits up and made me decide to tackle the job. I’m so glad I did. Yes, it looks scary at first, but the reality is that the process is relatively simple and can be tackled by someone with only limited experience. Just follow the instructions and everything will be okay. The first attempt didn’t work – the battery gauge was showing charging, but it wouldn’t retain charge. Then I had a look through the comments on your site and found the one that told me to make sure the solder connection was good and firm, so I dismantled it again and resoldered it properly this time. And it works! Result! – thanks so much for the really easy to follow instructions and screens. As with everyone else, the retainer ring around the bottom of the brush stalk was difficult to get off, but a spell with some 80-degree water from the kettle softened up the plastic clip. And nail scissors – actually the type of scissors for toenails – worked great for cutting the tabs so that I could stick them through the holes in the PCB. Thanks again for a great experience.
I replaced the battery but the screen stays blank. Not even the empty battery indicator. Then I put the old battery back in and still the screen is blank, even though before I opened the toothbrush the screen showed the empty battery until I removed the screen. What could be the problem?
This could be some dirt or debris blocking the edge connector between the LCD screen and the gold pads on the PCB. It might also take an hour of charging before the toothbrush wakes up and displays the charging status.
I managed to fix my toothbrush with your excellent instructions. Old battery was toast. Now the brush works as new. Thank you.
Thanks for everything! Battery arrived quickly. Replacement went well and it’s working like new again.
Hi there, I replaced my battery for my Oral B Triumph v1 Type 3745. (Battery purchased through your wonderful site)
I followed your instructions — everything went well. However, after 3 weeks of usage, I noticed that there was condensation on the inner side of the screen window (not on the LCD, but just the screen) and found out that that quite a bit of water (like a thimble) had accumulated inside the toothbrush.
Has anyone experienced this and know how to fix it? I inspected the blue ring at the top of the brush and it looks fine. I’m not sure what to do or how to fix this leak. My guess is that its leaking into the toothbrush after each brush.
Any insight would be greatly appreciated.
Thank you,
-Walter
Hi Walter, the blue ring presses a rubber seal (which is part of the handle casing) against the internals of the toothbrush. It is possible that the seal is folded, or that there is debris trapped in the seal allowing water through. Dismantle the brush and inspect and clean the seal. Then reassemble.
To reduce future water ingress, leave your toothbrush lying flat with no head attached when it is not in use.
A few notes with my experience…
1) It was not necessary to bend the battery leads in the same shape, particularly considering the only battery I could find did not have the negative lead attached offset from center. All I did was trim the ends of the leads narrow enough to protrude through the circuit board and then resolder.
2) Trimming the spring was futile. I have some very robust wire cutters and could just barely put a nick in the spring. I found that if I compressed the full spring with both hands, I was able to seat the spring and plastic spring base back in position. Yes it is VERY firmly in place now, but it works and was easier than trying to snip through hardened steel.
Thanks for your feedback Trig. Regarding the battery’s metal tags, we now have the 49mm batteries with offset tags back in stock to fit these Triumph toothbrushes. These eliminate the need to re-shape the tags and only require narrowing down at the points where they are soldered to the toothbrush PCB. Regarding the spring, this needs cutting with a grinder, cutting disc or dremel grinding/cutting attachment. Wire cutters or shears are unlikely to be strong enough, as you have found!
Great very detailed instruction. Type is 3731.
I had some problem to get the positive tab into the PCB. I soldered a piece of wire to the tab, had the battery down in the holder in negative end with the negative tab through the PCB hole, then put the wire through the PCB hole for the positive tab and finally pulled the wire when pushing down battery in positive end.
Additional comment: The step were you unscrew the bottom cap needs a little addition. When I unscrewed, nothing happened, but suddenly something snapped. Problem was that the cap was rather stuck so it didn’t get lose by itself. The screw inside had snapped.
I think instruction should be to unscrew maybe 2 complete turns, then bend the cap somewhat in different directions so it is not stuck, then continue to unscrew.
Thank you for these OUTSTANDING and thorough directions and photos. Not a single detail was missing or incorrect in my experience in replacing the ORIGINAL battery in my EIGHTEEN YEAR OLD unit (Ver. 1 Type 3738)! That battery endured nearly daily use in that time period. I had been astonished for several years that the original 49mm Sanyo battery just kept lasting. It finally started lasting inconsistently for only the 2-minute cycle or less before going dead in recent weeks. Seeing that an equivalent replacement was likely going to cost $350-400, I thought I’d give this method a shot.
The top ring and bottom base cover had indeed gotten pretty well “cemented” by toothpaste gunk in all those years, so having to pull on mine with pliers kind of gouged both of them. I had to sort of pound the unit out of the case by striking the toothbrush post upside down onto my workbench, but it finally released and popped out a bit and I could pry it out the rest of the way. I also accidentlaly snapped off a little plastic tab holding the unit in and one of the four tabs holding the battery pack, but they don’t seem to be missed at all as everything felt solid and tight when I put it all back together. I’m going to concentrate on avoiding water getting in the top and the bottom as I can easily imagine the original sealing (and now the lack of toothpaste cement!) is likely at least a little compromised. I’ll find out in the coming weeks or months.
Folding the metal tab on the negative post of the battery was easy to orientate it to be off-kilter as needed. Trimming the two tabs to fit through the holes was pretty easy but you need to be even more careful than I was trying to be. I nearly cut all the way though the negative tab, which would have left t too short, but I shored it up with a dab of solder. Getting those very soft tabs through the holes was a small challenge, but I was surprised by how quickly I succeeded. I easily imaged when I stared that this was going to the impossible task which would have made this a failure. But I got them through, soldered them, popped the battery fully into its holder (and maybe having broken off one of the four tabs made that a whole lot easier!).
Getting the spring back in was a snap and I maybe I was lucky that I originally had a 49mm battery because I had decided that I was going to replace it with a 49 mm one no matter what. So, I didn’t have to worry about cutting it somehow to shorten it. When I first tried to put it in, I imagined this was going to be another near-impossible task, but I got it in rather easily the second try.
The battery charged up well and completely within 24 hours and I didn’t need to “calibrate” the meter by draining the battery or anything. I am wondering, however, if doing so anyway is somehow best for the longevity of the battery and needed for “training” it and its cycle. Can anyone answer that for me?
So far, it’s working perfectly and not surprising to me, the power is more “robust” than it had been,. In addition to the elimination of being able to retain a full charge, I imagine it had lost some of its “oomph” as it died. It’s almost startling how much more powerful it feels!
I applaud Braun/Oral B for making a system in which the battery could be replaced this simply (such as by providing the tool needed to unscrew the cap built smartly into the charging plug), but I couldn’t help thinking they could have taken a few simple steps to make it as simple as swapping the battery out/in like you do with a AA battery or something. Not nearly as bad, however as some companies who make you buy a whole new product just because the impossible to replace battery went dead (I’m looking right at you Apple AirPods!)
I’m not supposed to include a link, so maybe my fellow American repairers can find the battery I purchased in the USA by searching for: “HQRP 49x17mm Battery Compatible with Braun Triumph ProCare Toothbrush Replacement,” the title of the battery I ordered.
Thank you again for creating such an excellent set of instructions, and for free! I wish I could have supported you by buying the battery here, but it is not currently possible to ship to the US.
Thank you for the detailed feedback Brian! Glad you could keep your Triumph toothbrush going with a new battery. To answer your question about recalibration, this will happen naturally each time you fully charge the battery, then use it until it runs flat. Happy brushing!
You’re welcome for the feedback.
Just to clarify your answer, do you recommend that I drain the battery fully at least once to “calibrate” it otherwise to optimize its capacity, life, etc.? The display seems to have been accurate from the get-go after I replaced the battery the other day and seemed to accurately display the growing charge until I had full bars in less than 24 hrs. After using it for a few minutes, I place it back in the charger and it flashes the final bar until it presumably charges to full and then turns steady.
I have always just left the charger base plugged in at all times and I return the unit to it after every brushing. I have never once left it out of the charger and used it for days/weeks, or let it run continuously until the battery was drained. And I got about 16-18 years of life from that original battery! Do you think I need to drain it fully at least once?
Leaving the brush on constant charge between uses is not the recommended charging strategy for Ni-MH batteries as it can shorten their lifespan. However, it seems to have worked for your original battery! Although it could have been masking the low capacity for years.
Regarding the recalibration, yes I’d recommend that you fully charge the toothbrush and then use it daily without any further charging until the motor will only run very very slowly. Then put it on for a continuous charge (without taking it off the charger to use it) until it is full again. This should recalibrate the battery level meter to be accurate at the low states of charge.
Happy brushing!