
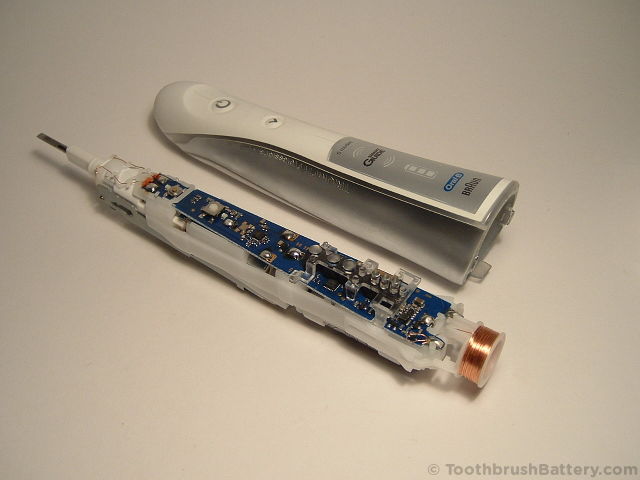
This guide will take you step by step through how to open and dismantle the Braun Oral-B Triumph Professional Care v2 electric toothbrush and repair it by replacing the internal rechargeable battery.
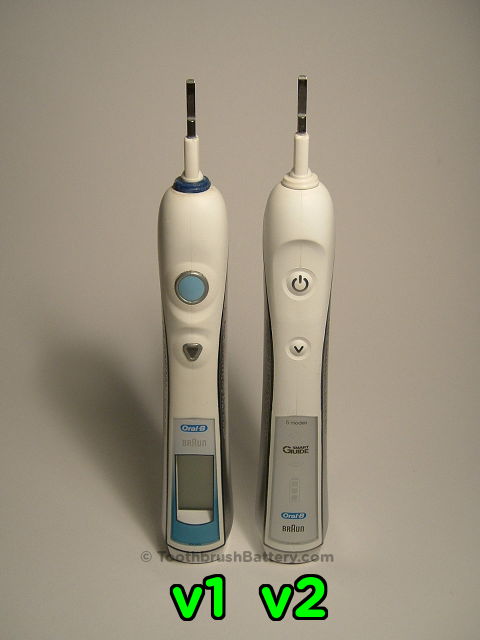
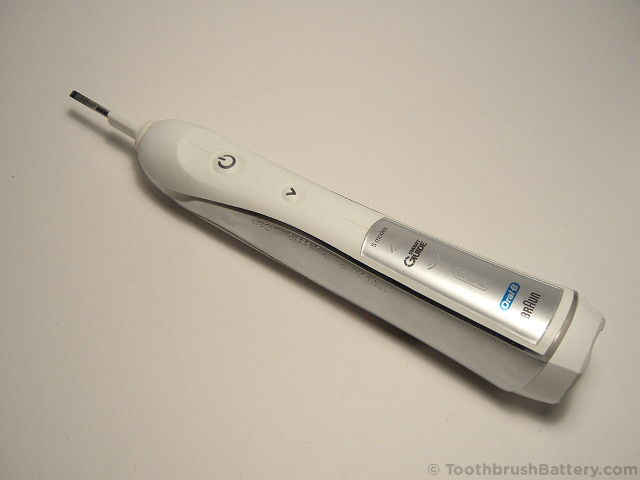
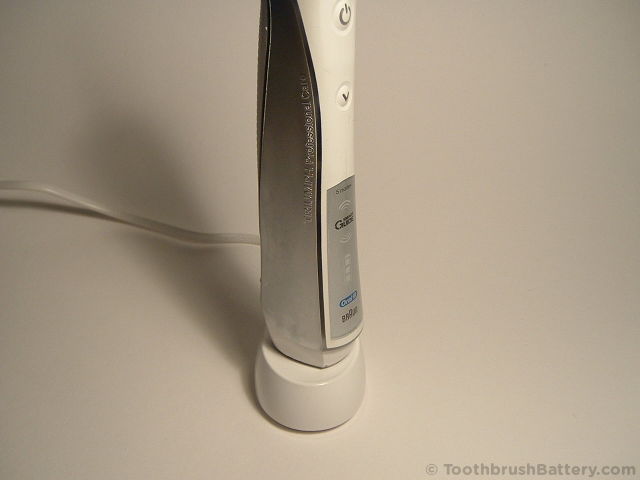
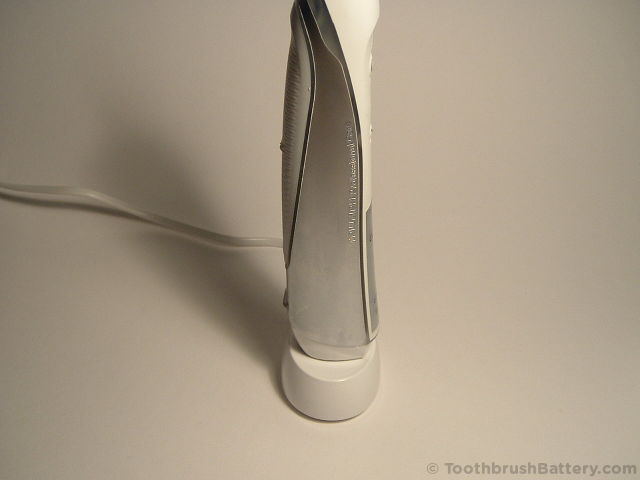
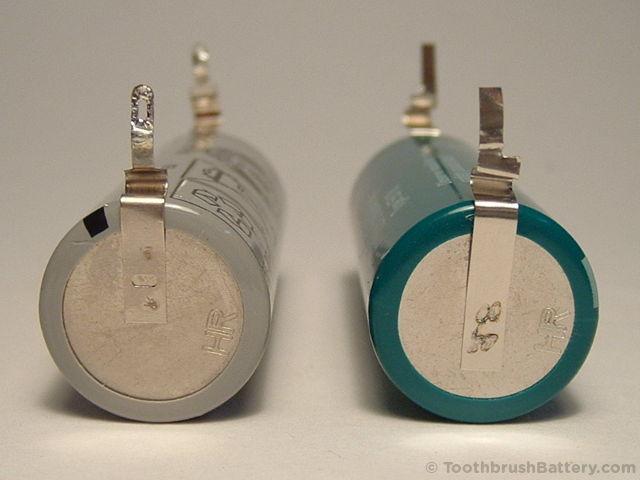
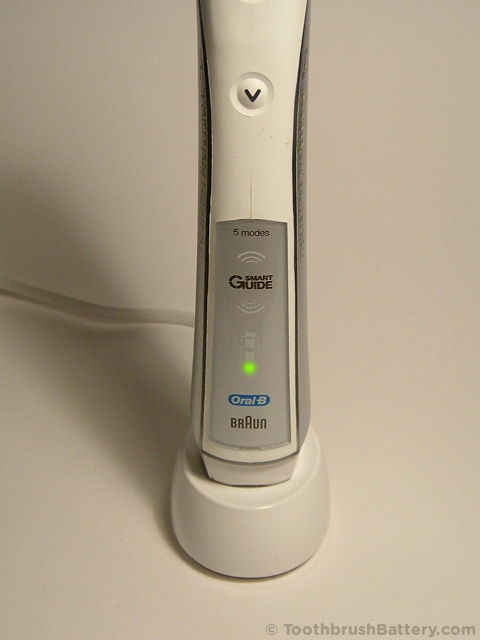
There are two versions of the Braun Oral-B Triumph toothbrushes, the v1 and the v2. The v1 Triumph models have an LCD screen built in to the handle showing battery state and other information as seen on the left in the photo below. The v2 Triumph models have no screen built in but instead have coloured lights as shown on the right in the photo below. Click on the photo to enlarge it:
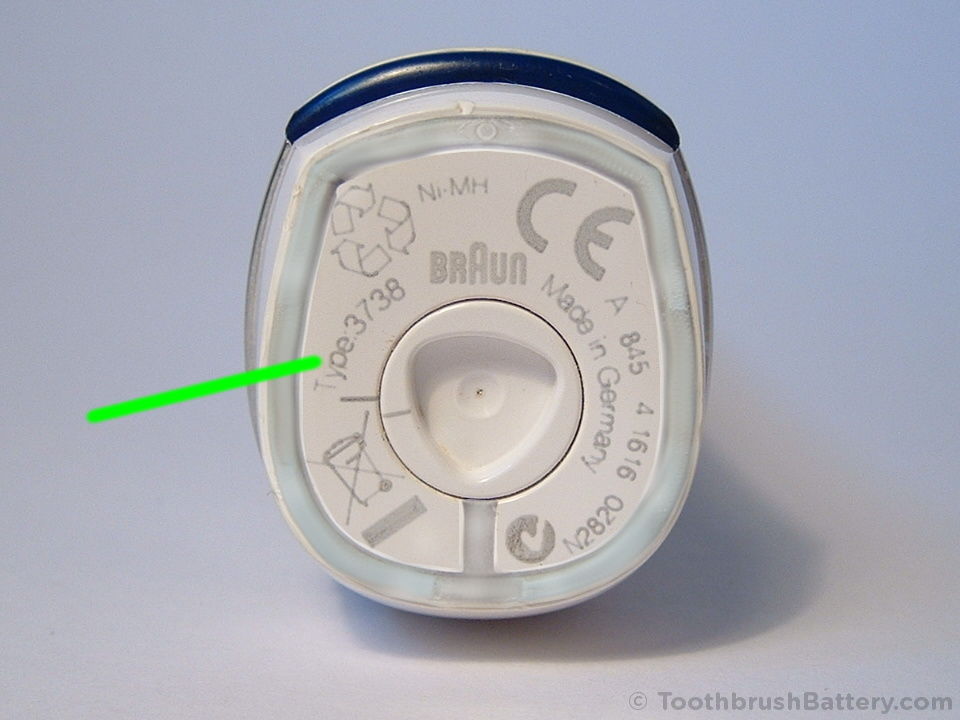
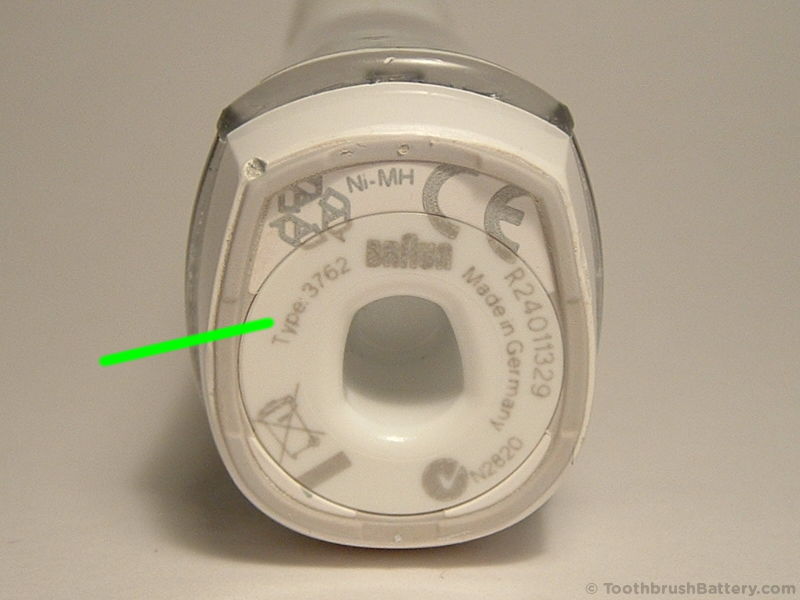
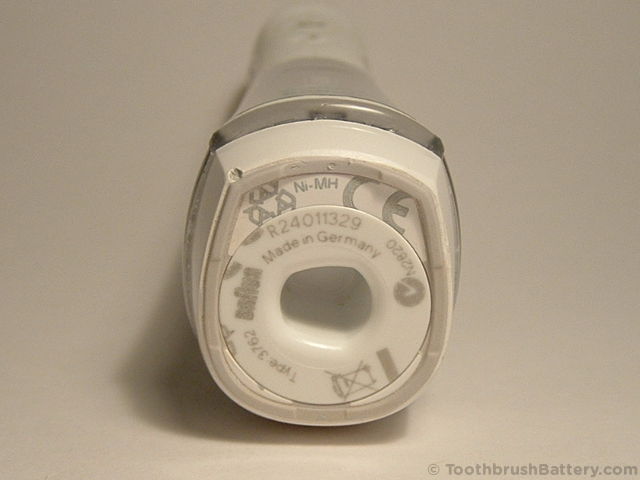
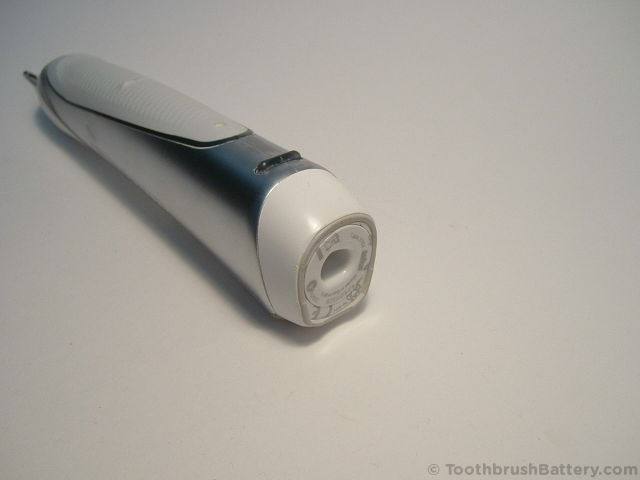
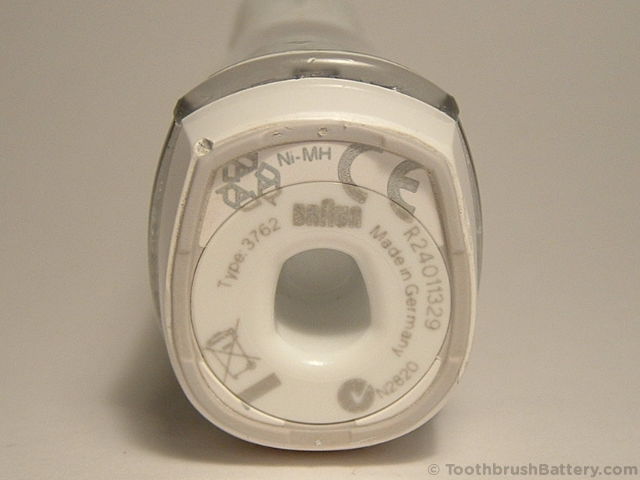
You can also check the Type number marked on the bottom of the handle:
- Type numbers 3731, 3738 and 3745 are v1 models
- Type numbers 3761, 3762 and 3764 are v2 models
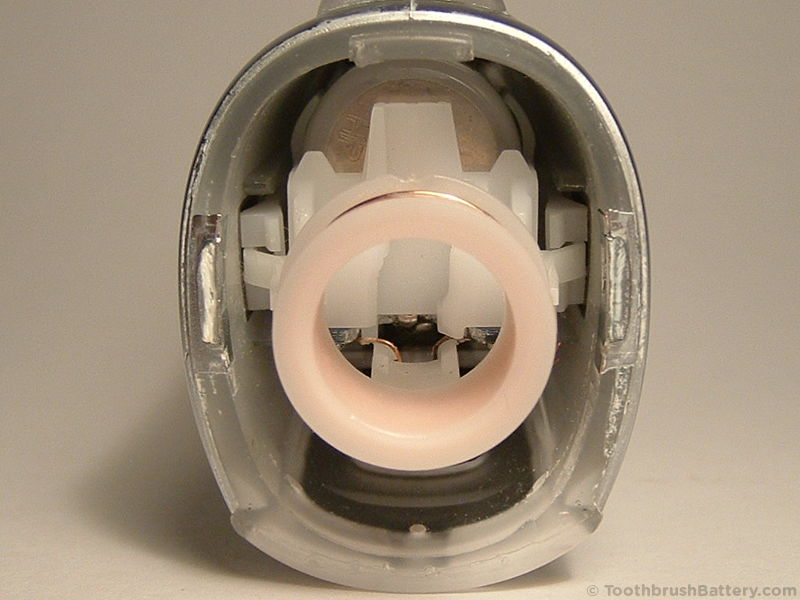
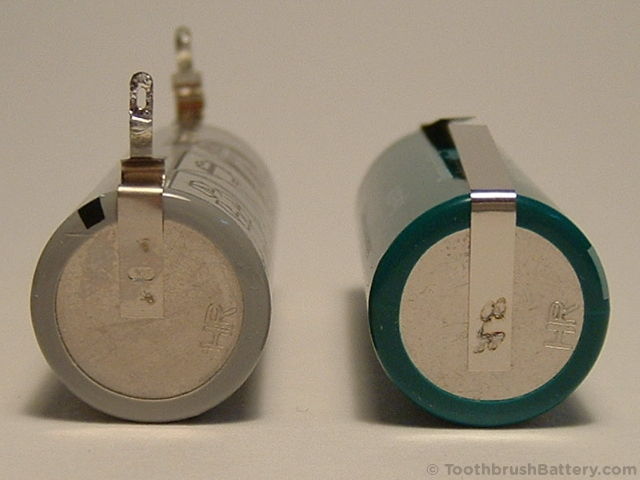
Also note the shallow triangular-shaped hole in the base of the v1 Triumph (top photo) versus the deeper hole in the base of the v2 (bottom photo.)
This tutorial is for replacing the battery in v2 Triumph models. For v1 models the procedure is slightly different so please see our guide to battery replacement for Triumph v1 models instead. For other toothbrush models and type numbers the battery replacement procedure is different again so please see our other guides to toothbrush battery replacement.
The basic method is:
- Dismantle handle
- De-solder old battery
- Solder in new battery
- Reassemble handle
This is documented in detail below along with lots of photos. Click on any photo to enlarge it.
Video
We have also created a short video from this guide to Braun Oral-B Triumph v2 battery replacement on our YouTube channel, which you can also watch below.
Disclaimer
Any damage to yourself, your toothbrush or anything else is entirely your responsibility. This guide is for professional, educational use only and is offered without guarantee or liability.
Tools / Parts / Equipment
- Braun Oral-B Triumph Professional Care v2 toothbrush
- Original recharging base
- Soldering iron: Electronics grade (about 18-25 watt)
- Solder: Lead-free silver solder is great for this
- Solder sucker (also known as a desoldering pump) and/or desoldering braid/wick
- Scissors
- Craft knife e.g. scalpel, snap-off, retractable or Stanley type
- Small flat-bladed screwdriver: 2 to 4mm wide
- Replacement 1.2V NiMH battery from ToothbrushBattery.com. Either:
- 42mm long by 17mm diameter (Support us by buying here at ToothbrushBattery.com), or
- 49mm long by 17mm diameter (Support us by buying here at ToothbrushBattery.com)
How-To
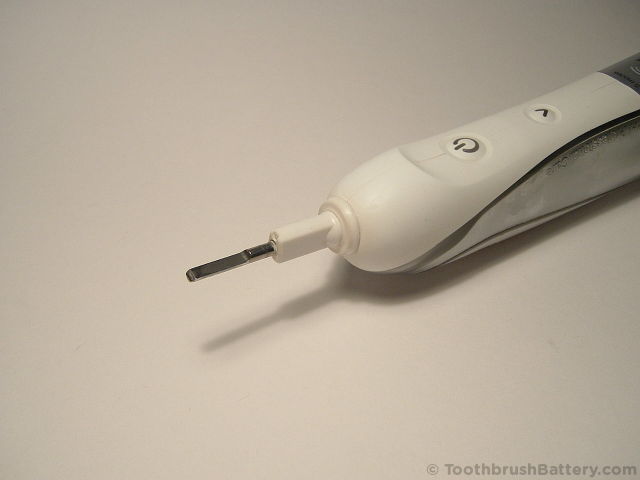
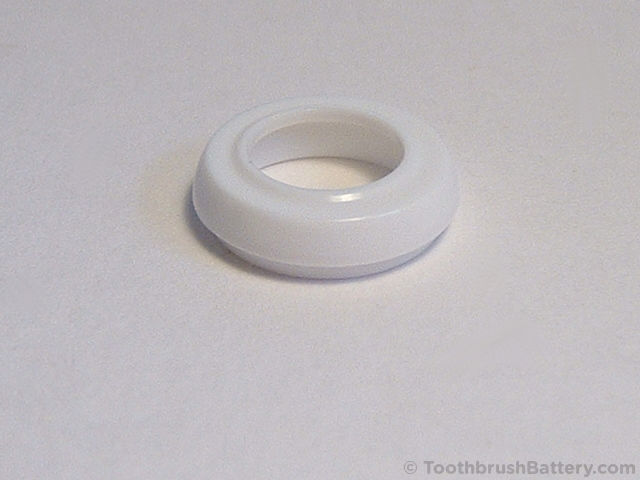
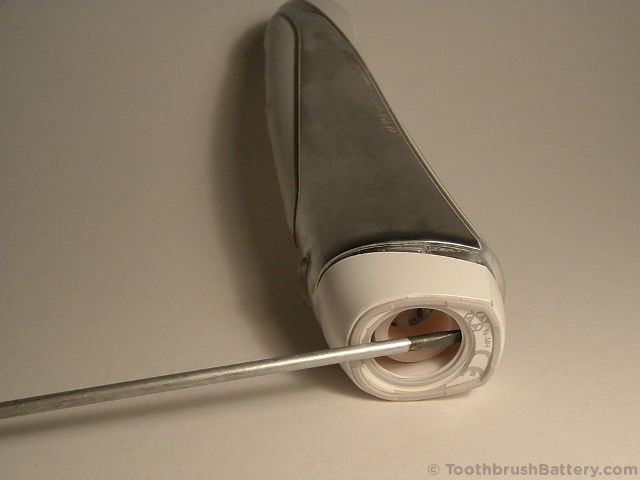
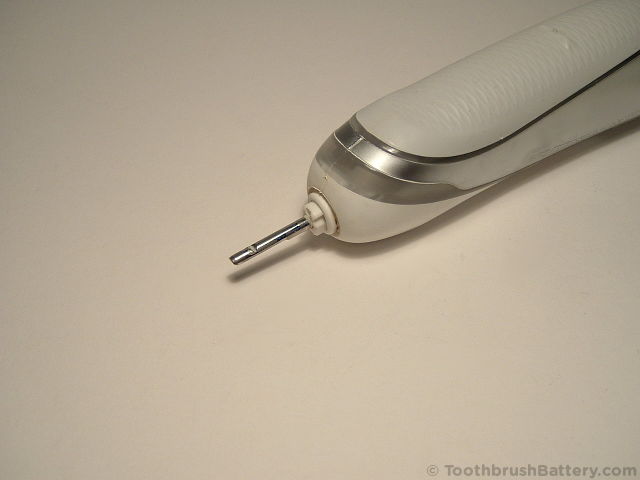
To start with, remove any brush heads from the top of the handle and stand the toothbrush, tip downwards, in hot tap water at about 60 degrees C (140 degrees F) for 5 minutes to soften the plastic ring.

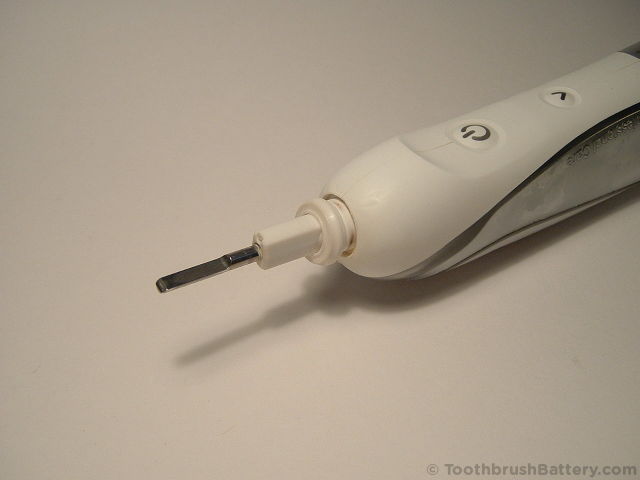
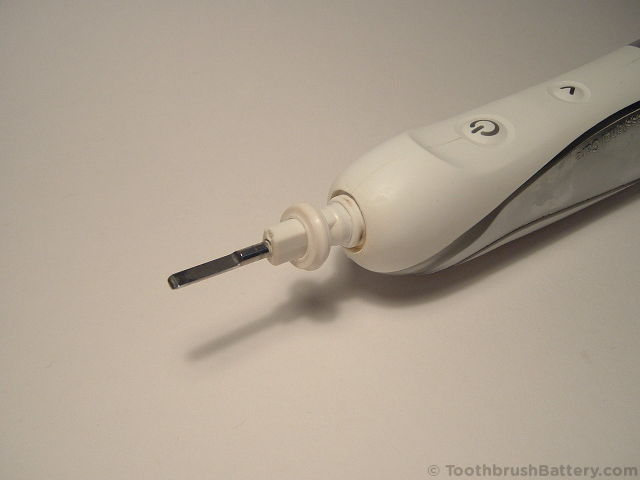
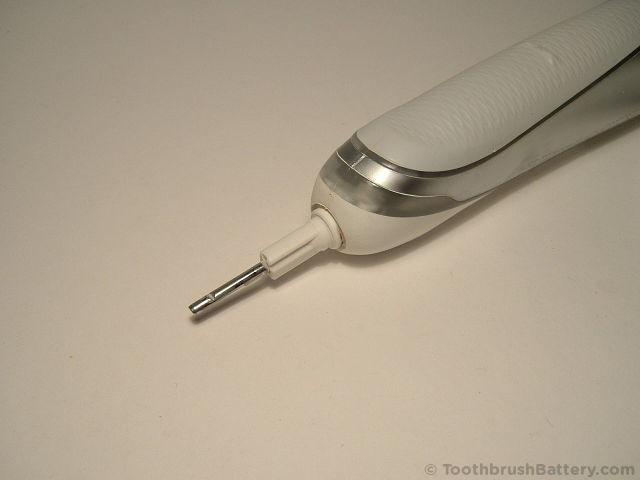
Using the screwdriver start to pry off the plastic ring from around the shaft. The ring is stepped so press down into the soft casing to get under the lower edge. Alternatively, you can use pliers to work the ring off using tape inside the jaws to stop them marking the ring.
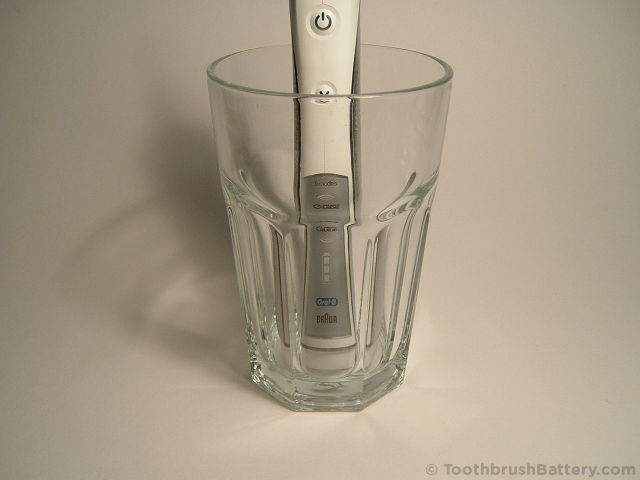
Stand the toothbrush in hot tap water again, tip upwards this time, for 5 minutes to soften the seal around the base cap.
Dry the handle with a towel then place it on its charger.
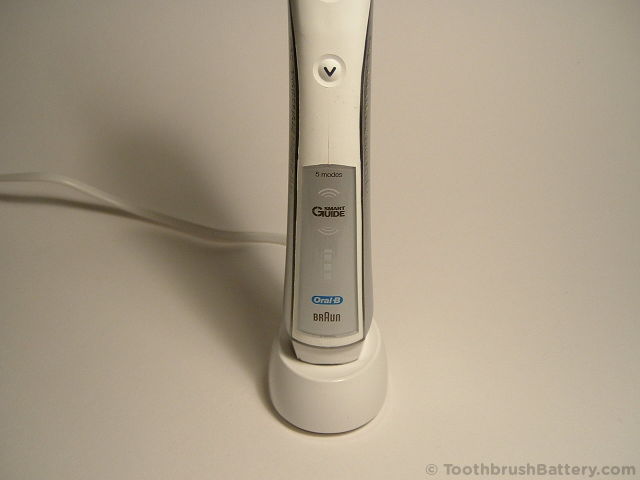
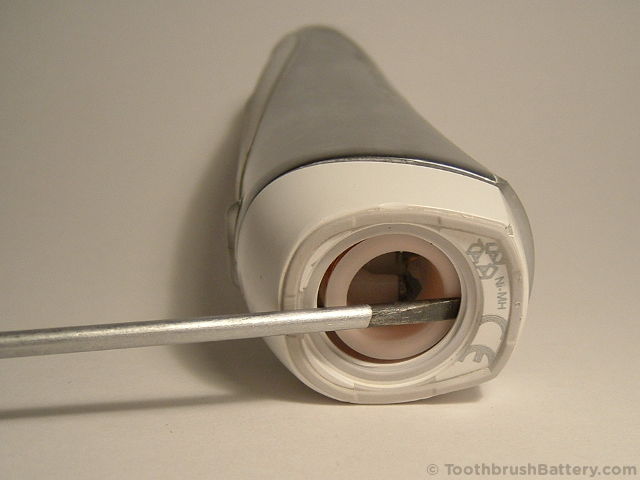
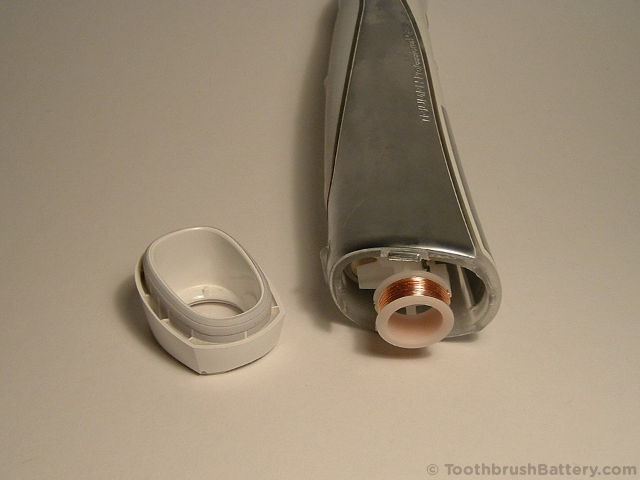
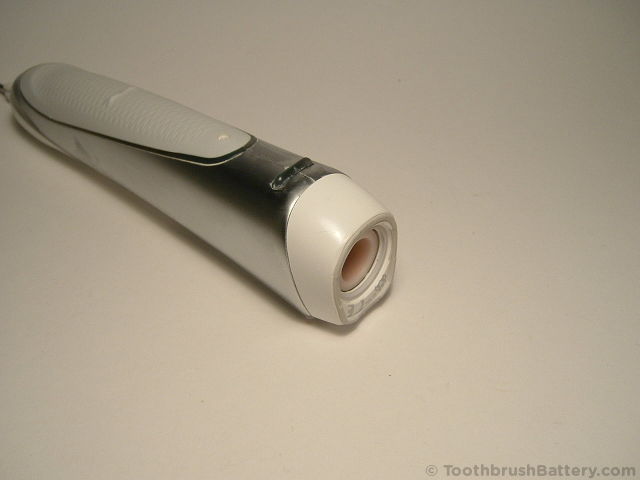
Carefully twist the handle anti-clockwise a quarter of a turn to release the plug inside the cap.
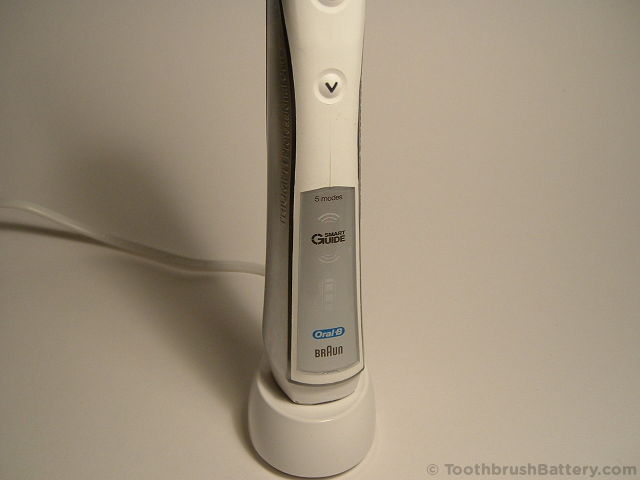
You can now try to remove the whole cap. If it won’t release by hand from the rest of the handle, remove the plug then use a screwdriver to lever the cap out slightly and break the rubber seal. In the photos below the screwdriver handle is being pushed away from the camera.
Note the white plastic catches inside the handle (arrowed below).
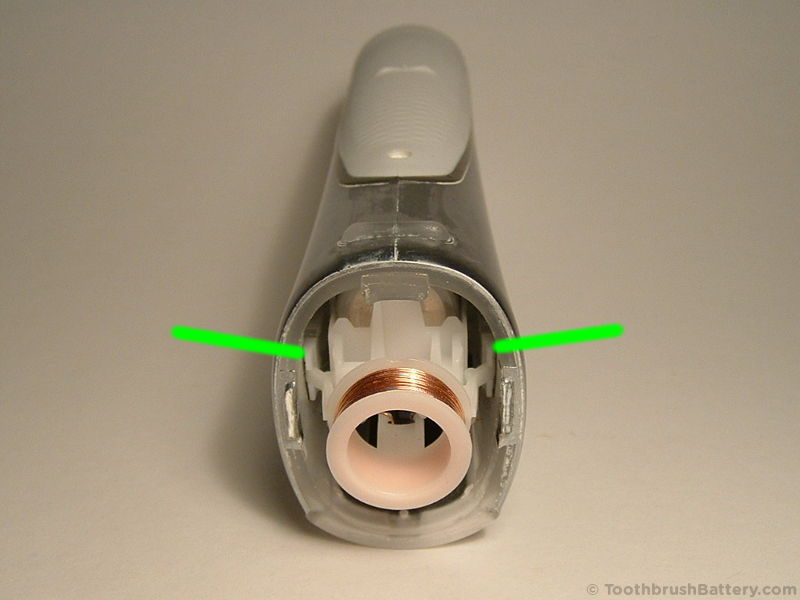
Use a screwdriver to release the catches on both sides.
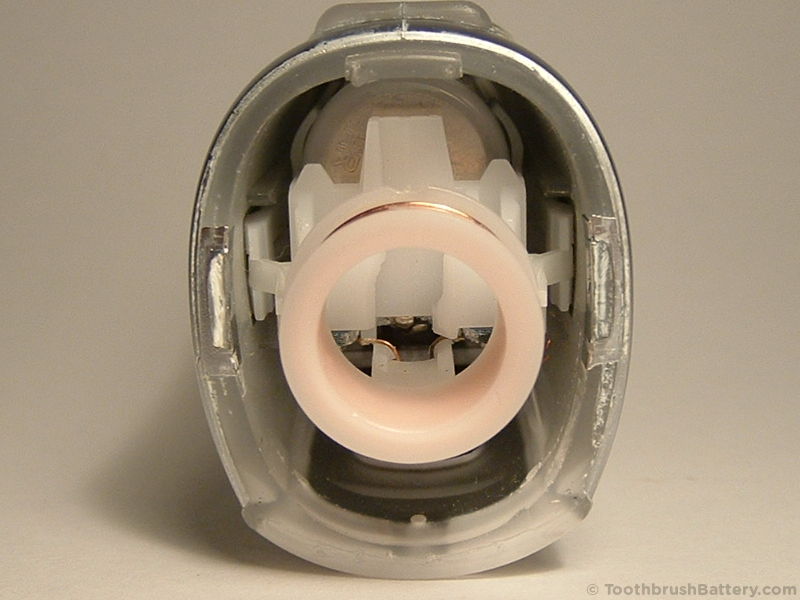
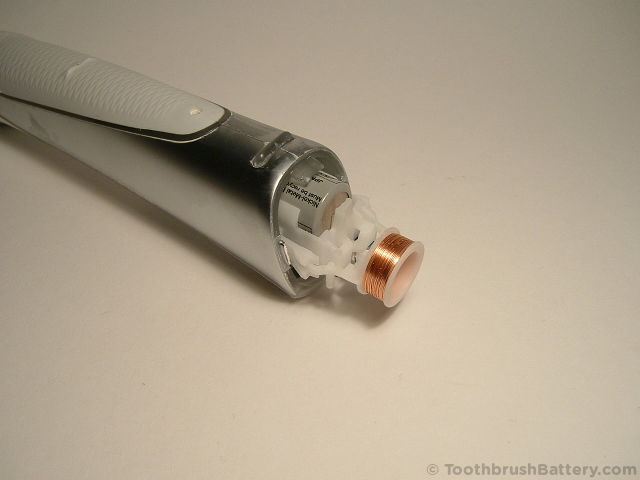
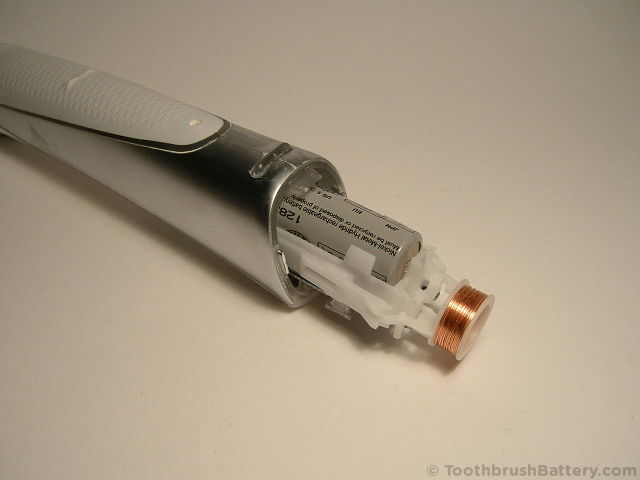
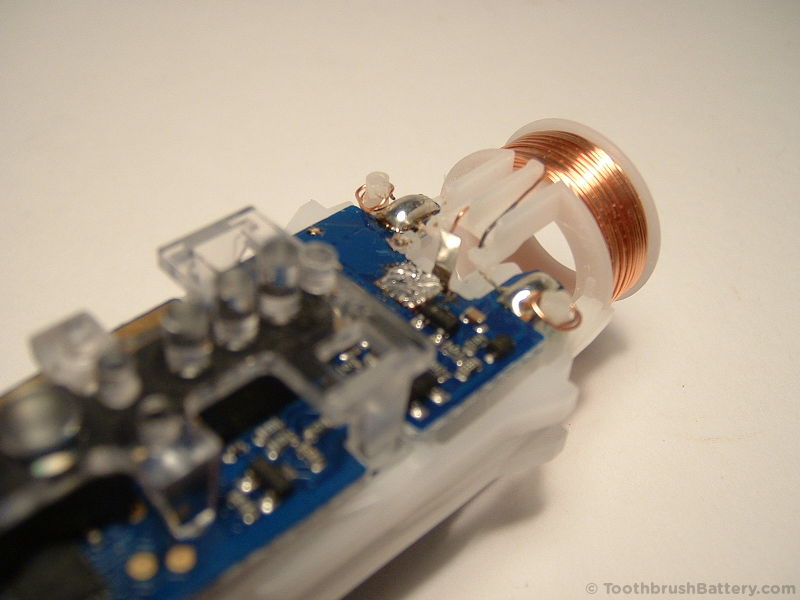
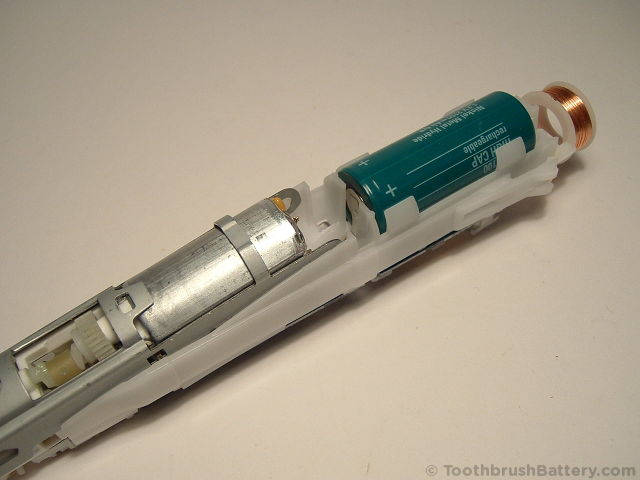
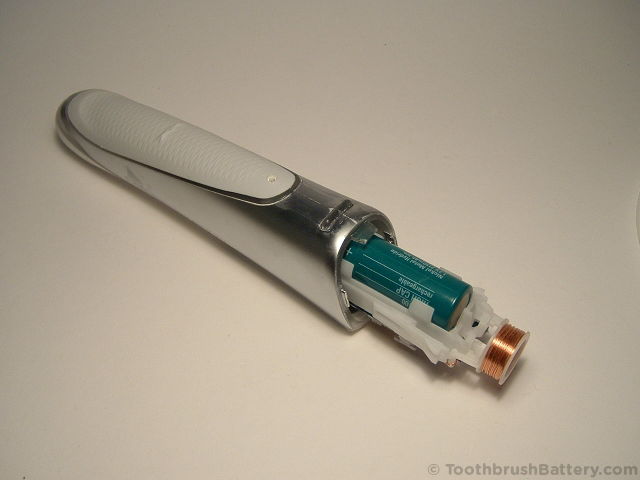
Slide the inner workings out of the casing of the toothbrush by holding the handle casing and pushing the shaft.


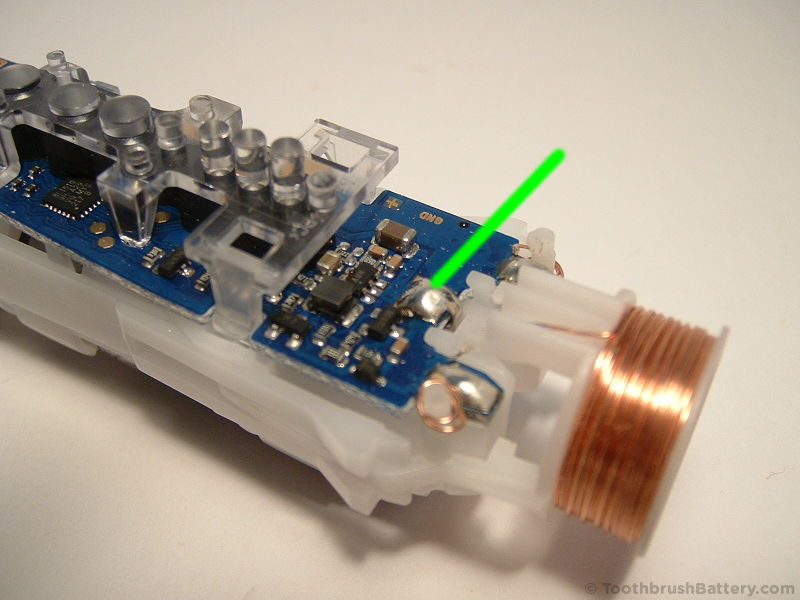
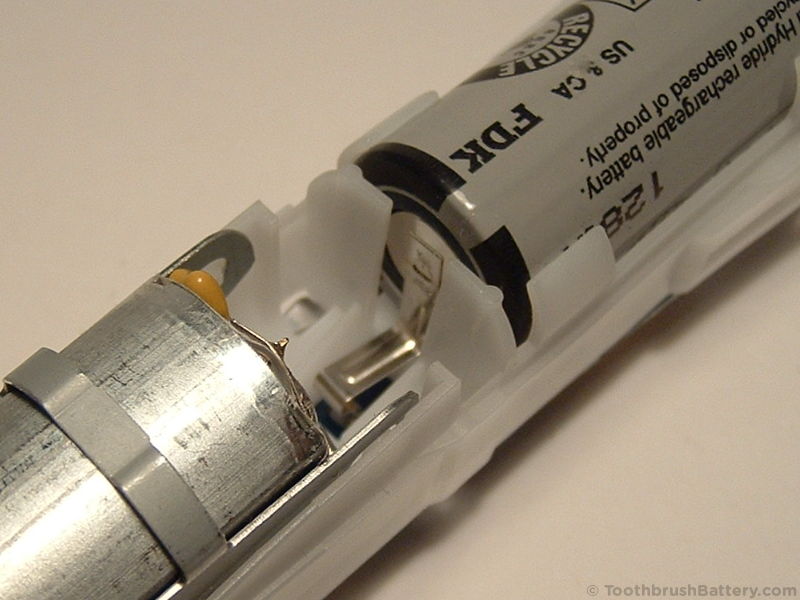
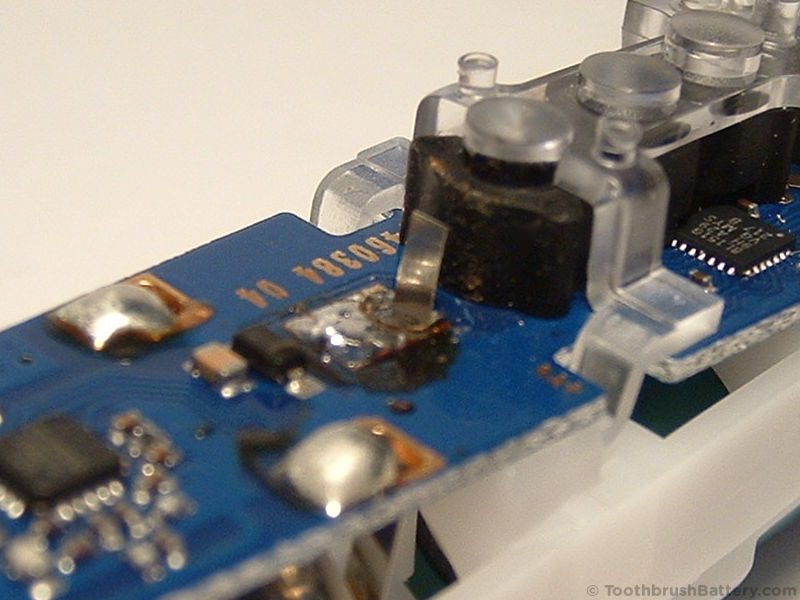
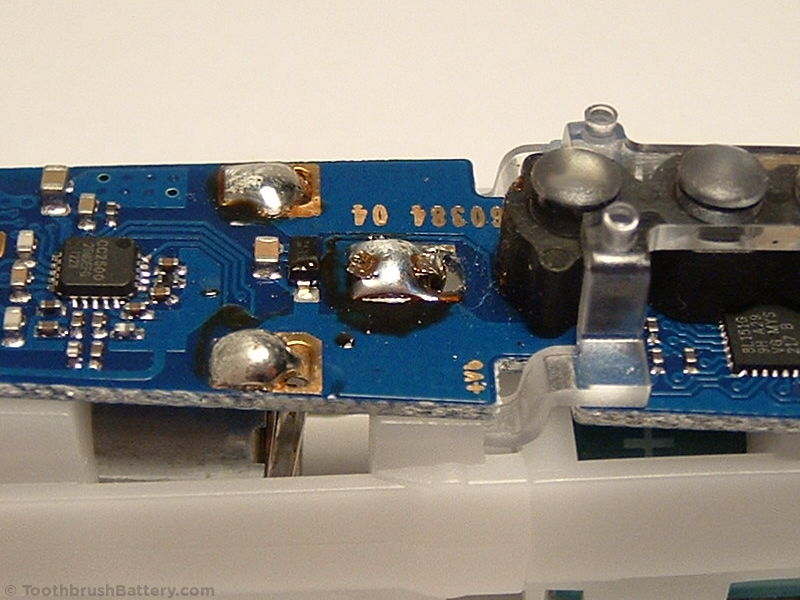
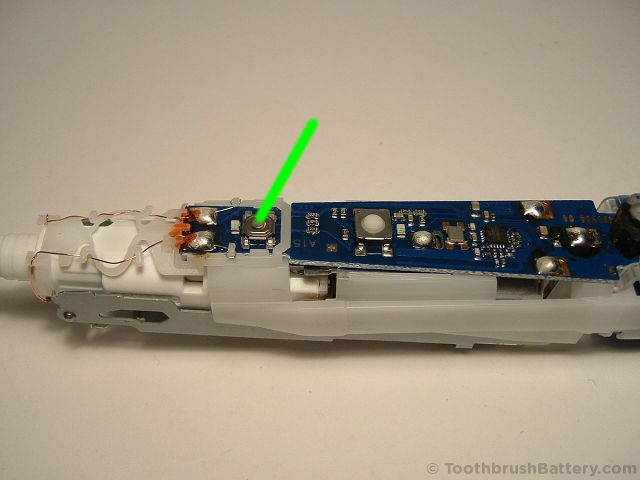
Locate the battery’s positive terminal solder point on the PCB (arrowed below).
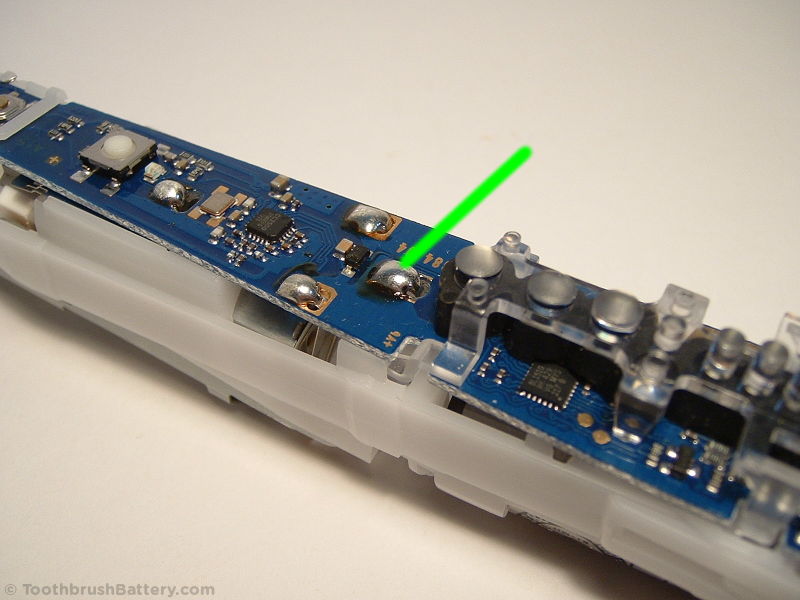
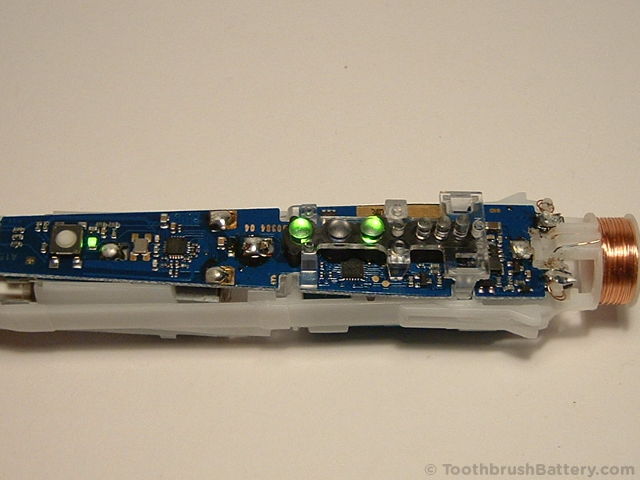
And the negative terminal solder point (arrowed below).
Time to get your soldering iron warmed up! Using the soldering iron and a solder sucker (desoldering pump) or desoldering braid desolder the positive battery connection and using a knife lift the metal tag away from the PCB pad.
Do the same for the negative connection.
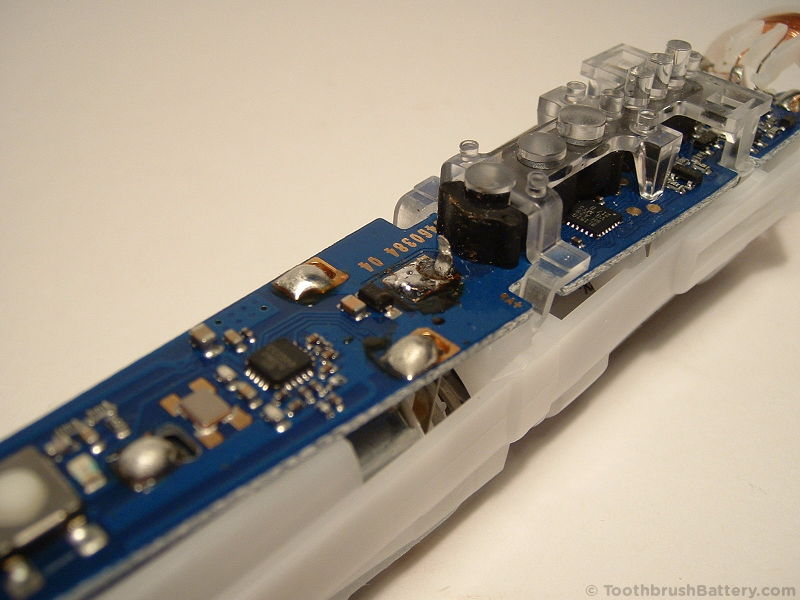
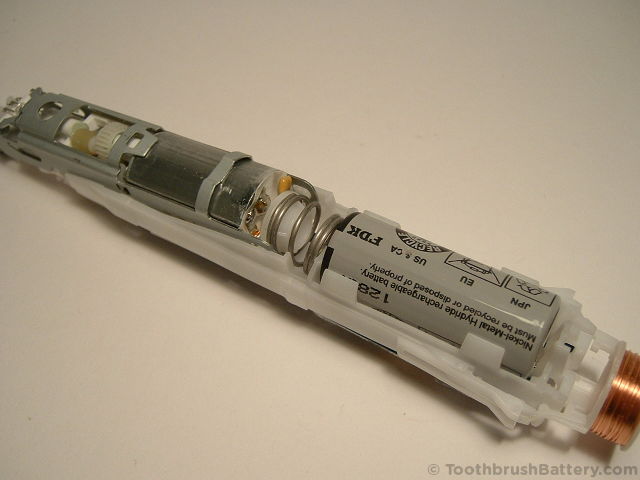
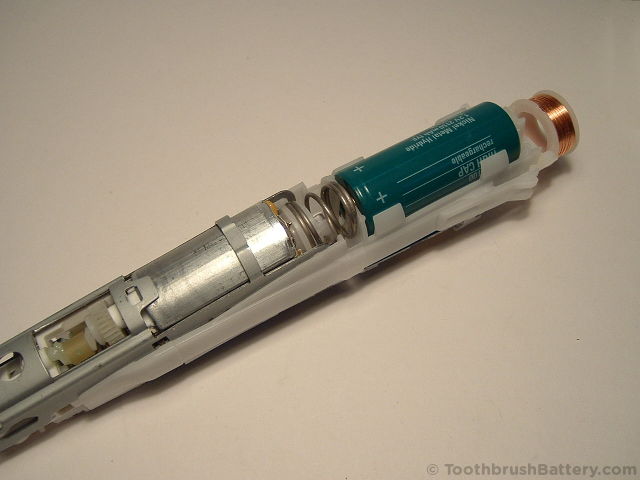
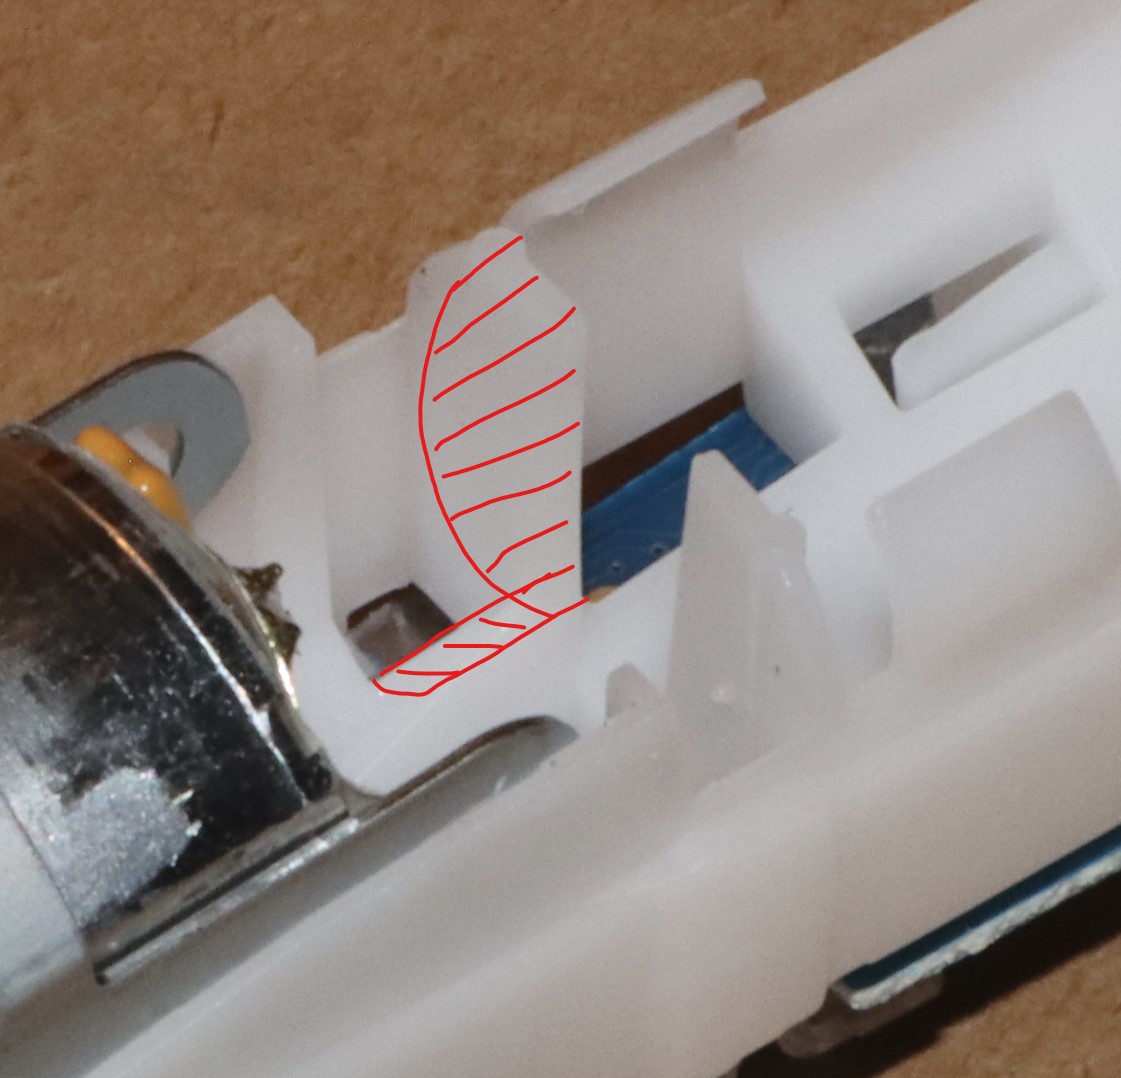
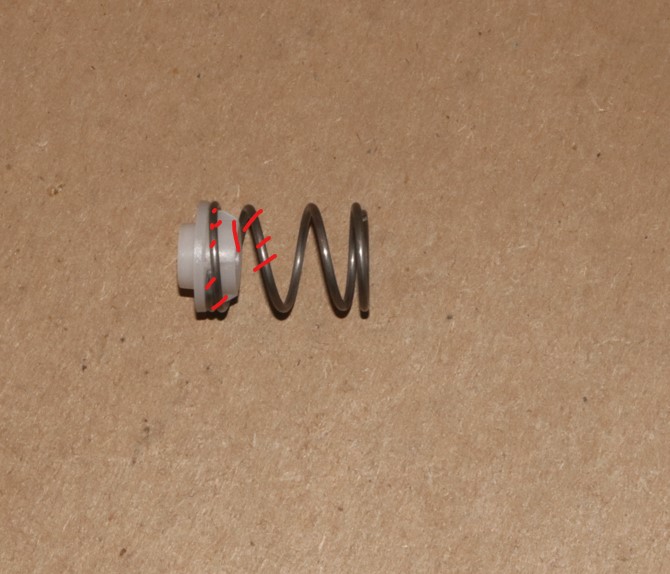
Turn over the mechanism and carefully lever out the spring and its insulating spacer. You might find it easiest to lever it out from the battery end.
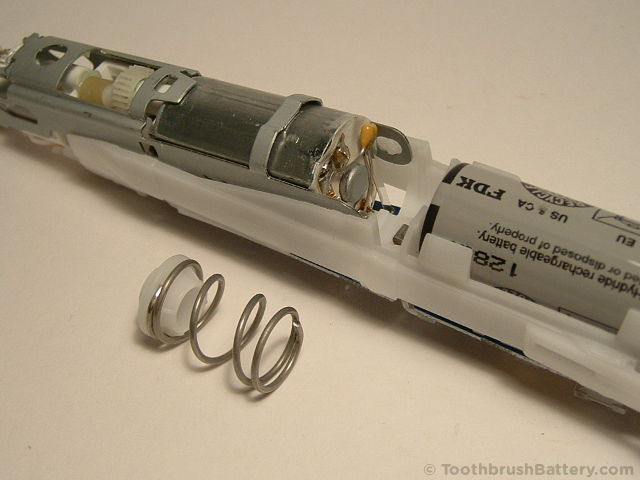
Note below how the positive battery tag extends through the gap under where the spring was before going through its PCB hole. If your battery is like this and you’re feeling adventurous you could potentially fit a longer, higher capacity battery to give your toothbrush longer running time between recharges. This would involve trimming away the plastic between spring and battery and cutting the spring shorter. That’s beyond the scope of this guide, however!
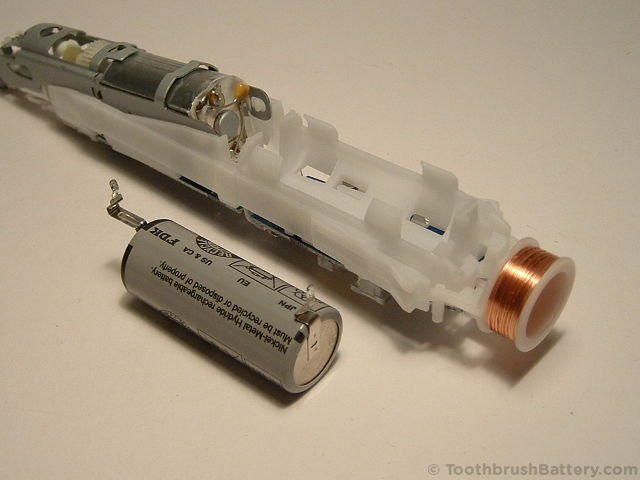
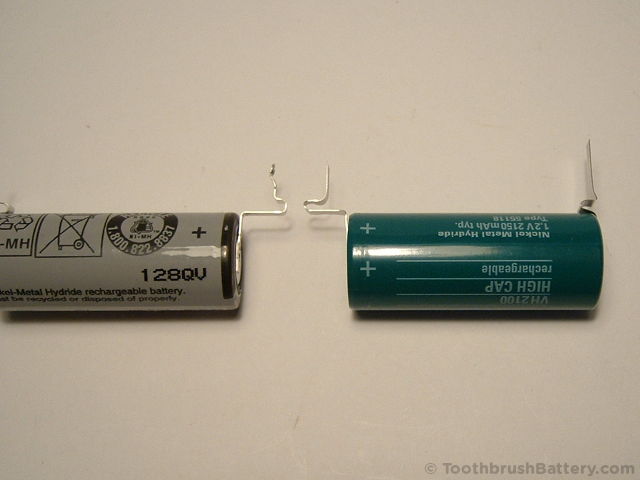
Remove the battery from its holder and compare it to its replacement. Please support us with writing these repair guides by buying your replacement battery through our secure online shop here at ToothbrushBattery.com
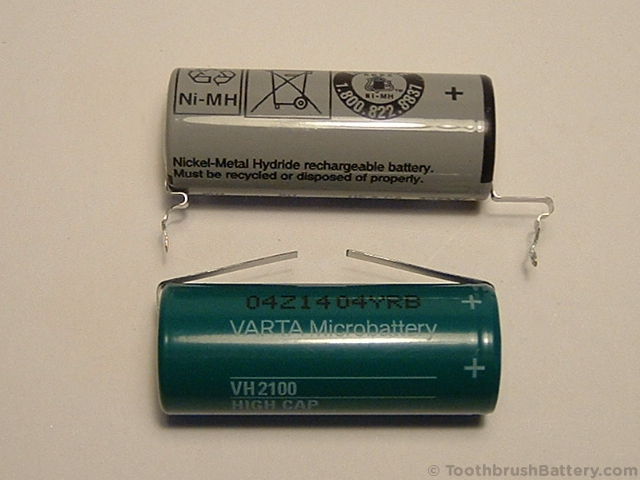
This replacement battery is a 42mm long by 17mm diameter 1.2V NiMH with centered tags to match the original FDK battery. However, your toothbrush might have been fitted with a 49mm long battery in which case choose a 49mm by 17mm replacement battery. All of our batteries are fitted with narrow 3mm width solder tags the same as the original batteries. Positive terminals:

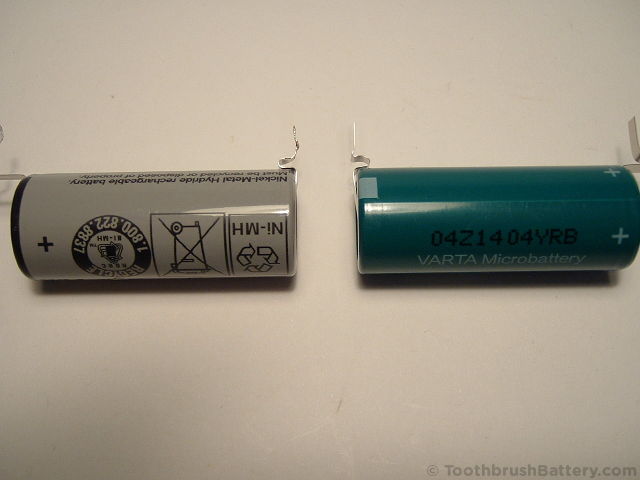
Negative terminals:
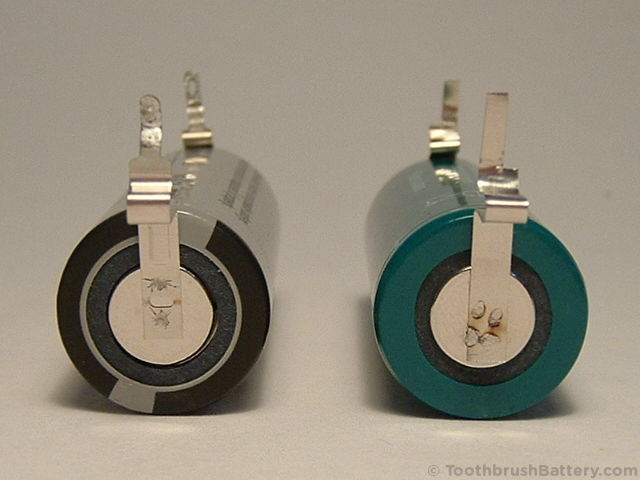
Shape the solder tags on the new battery in the same way as the tags on the original battery. The double bends give a bit of flexibility in fitting the battery and also help to absorb any vibration when the brush is running but they are not strictly necessary. Fold the tags over the tip of a screwdriver to get tight bends then use scissors to trim the tags to the same length as those on the original battery.
Very carefully start to narrow down the width of the positive terminal solder tag by first snipping into the tag from the side with scissors. Careful not to cut right through! Just go a quarter at a time using the tip of the scissors. Then cut down from the top to remove the piece. You only need to narrow it from one side.
Do the same with the negative tag.
Fit the new battery in its holder, making sure the solder tags go through the holes in the PCB. You might find it easier to insert the battery at an angle, getting the negative tag through its hole first.
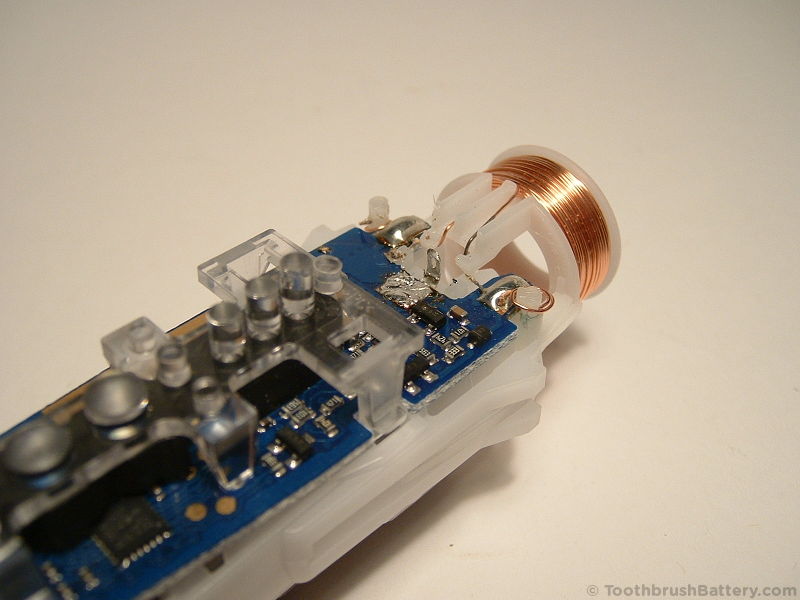
Starting with the negative one, bend the tags over the edge of their holes and solder them back on to the PCB. Make sure you get good, shiny solder joints because bad soldering is a common cause of recharging problems.
Fit the spring and its insulating spacer between the battery and motor.
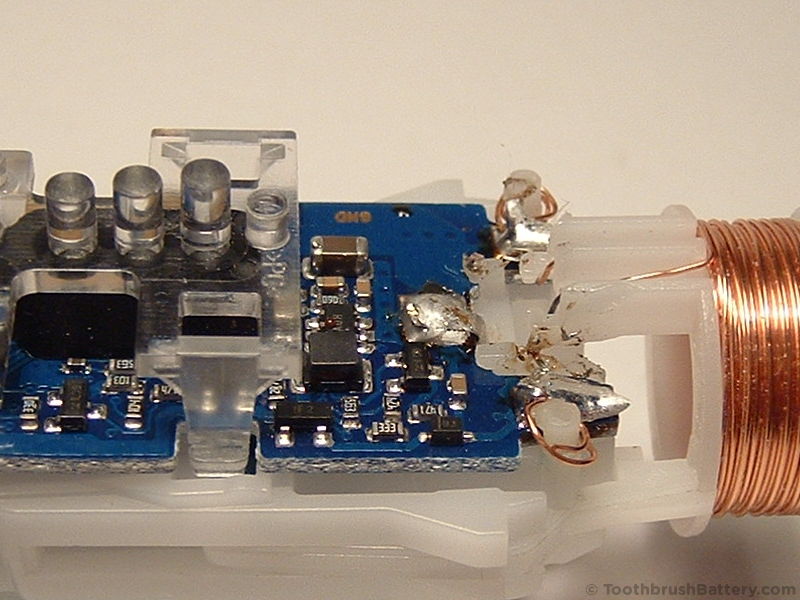
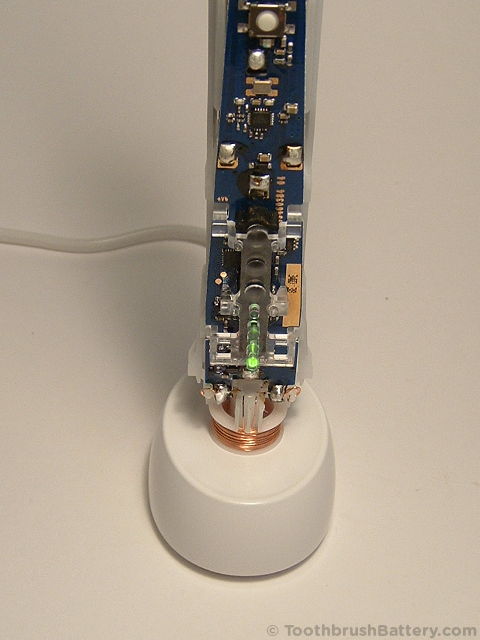
Plug in the charger and hold the toothbrush mechanism on the charger. The charging light should start to flash within 10 seconds. If it doesn’t go back and check your solder joints are good and there are no stray blobs or bridges of solder on the PCB. Make sure that neither of the copper wires from the charging coil is broken as this is a common cause of recharging problems. In rare cases, especially where the replacement battery is completely empty, it might take an hour or more for the brush to show that it’s charging.
You can test that the motor runs by holding the toothbrush firmly and switching it on by pressing the upper power button (arrowed below).
Slide the innards of the toothbrush gently back inside the handle casing.

Make sure the shaft is fully protruding.
The clips should engage on the inside of the handle.
Fit the base cap and insert its retaining plug.
Put the toothbrush on its charger and turn the handle clockwise a quarter of a turn to lock the plug in place. Don’t force it any further!
The markings on the plug and cap should approximately line up.
Re-fit the retaining ring around the shaft. You might find a 10mm or 11mm ring spanner useful for pushing it firmly back into place.
You should now have a fully reassembled and repaired Braun Oral-B Triumph v2 toothbrush!
Put the toothbrush on charge for a full 24 hours before use. Please recycle your old battery either at a local civic amenity or at a shop collection point.
Note that the built-in battery meter can get confused when the battery is replaced and it can prematurely show the battery as empty when it’s not. If the battery meter shows as empty after recharging and then using the toothbrush a few times switch on your brush and leave it running constantly until the battery is completely exhausted. Recharge the toothbrush for 24 hours. Then leave it running constantly until the battery is completely exhausted again. This will help to recalibrate the battery meter and the toothbrush should now charge and run correctly.
Please leave any questions, tips or comments about repairing your Braun Oral-B Triumph v2 toothbrush below. We love to hear your feedback!
Hello, I just used your guide to help replace my Oral-B Triumph v2 3762 battery which would only last about three days before needing charging again, well it was almost three years old!
Had a problem with the induction charging wires, as both promptly snapped upon disassembly, but a bit of resoldering and a dab or two of hot glue and it’s working fine.
Thanks!
Great to hear your success story Tom – glad to hear the guide was useful. Happy brushing!
I just followed your guide, which was perfectly laid out.
I did however accidentally cut the battery connectors tags too short on the positive terminal. Luckily I had some spare wire laying around, and sodered it from the end of the battery tag, to the positive terminal.
So far so good. I tested it briefly, and it seems to work.
At the moment I’m at the charging for 24 hours stage, so just playing the waiting game at this point.
Thank you so much for the hard work that was clearly put into making this guide. I’m sure it’s helped a lot of people.
Sincerely thank you for keeping toothbrushes out of the tech landfill for just a little while longer.
Braun Oral-B Triumph v2 toothbrush
Fitted new battery but only thing that happening when on charge is Bluetooth flashing as if it charging and one know what up
Help!!
I was replacing my battery and had also these copper wires snap.
I’ve done my best to unwind a small amount from the coil in order for me to have enough wire to solder back to the PCB.
I’m not confident that I’ve done a good job…
…case in point, I’ve put the toothbrush back together and get a red light indicating that there’s no power…
..I’ve put the toothbrush onto charge and can not see any sign of green charging lights at this stage.
I’m going to try leaving this on to charge and see if there’s any life in an hour’s time.
Please help, suggest anything, advise me as to the way forwards.
Best regards,
Louis
The snapped wires can usually be joined back together with just a blob of solder but if you’ve unwound some extra wire off the coil that should work fine. Check the solder connections and that you got the wire hot enough to burn off the clear insulation.
i have the same problem red light blinks 5 times then stops no power
Excellent step by step guide. It took two hours, including a trip to get desoldering braid and a cup of tea. It would be very difficult to do without using the braid. Total cost about £12.00 and I enjoyed doing it. Thank you
Great work Chris!
I repaired my TB before seein your video. I broke one of the little plastic clips that hold the coil on place and tore both small copper wires. No big deal to solder the wires. One clip is enough to hold the coil in place. Your trick to replace the ring at the top with a hex socket is a good idea. Thanks for making a quality video.
Hello! Thank you for your excellent instructions!
Tell me please, can I replace the battery for a full-size battery in this model?
I think this can be done by removing the plastic parts on the motor side.
But it is not clear just what to do with the spring … She will have to do less or do not need?
Hi Serj, yes you can fit a full-length 49mm battery in this model if you cut away some of the plastic housing around the existing battery at the positive end. You probably won’t need to do any adjustments to the spring – possibly cut it down by 2mm but first try without cutting it. Make sure you keep the plastic insulating spacer that isolates the spring from the motor casing. The full-size battery will be 49mm long, 17mm diameter with centred tags.
I know I need a kit for soldering, does any one know where to buy one?
You can get a soldering kit suitable for micro electronics in your local hobby shop or electronics shop. Depending on your country, somewhere like Maplin or Radio Shack.
Easy peasy with the excellent guide!
Even with modification for a 49mm long battery. A tip here could be to use a old/broken soldering tip to melt away the plastic – but do this in a well ventilated area!
The biggest “problem” was to trim down the width of the battery terminal(s), no need to do this on the negative side on my 3762 version.
Another thing to mention is that the motor will not run/switch on if the battery is too low. I was for a moment afraid I had broken something :O
First full charge and first brushing done, and everything seems just fine 🙂
Thanks for the feedback and the tips Tommy! When the battery is first installed, sometimes it just needs 10 seconds on charge to ‘reactivate’ the brush and it can then be tested to check that it runs/switches on.
It actually took more like a few minutes on charge before I was able to test the motor. Charging started within 10sec (even if it felt like forever 😛 ), so no problem there.
Maybe you could start selling batteries with the terminal width trimmed down? Or a small and sharp par of scissors? My regular scissors was to big and/or to unprecise for this kind of use 😛
For me, too, it took a few minutes of charging before the motor actually worked even though the battery was delivered at 1.26 or so volts. I would guess that the microcontroller prefers to measure the increase of voltage before actually enabling the motor.
Just followed the excellent and clear instructions, and now have a brand new battery charging in my Triumph v2. Like other posters, the induction wires snapped due to the manhandling, and one of the plastic legs on the induction ring had cracked (over time). Some soldering and Araldite have sorted those issues, so hopefully the toothbrush will be like new! Many thanks for such a good guide.
Both (are there two or three?)wires broken on my Braun 3762 toothbrush charging coil.
I’m confused, are there two or three coil wires running to the circuit Board? I’ve seen a drawing on the Internet that indicates 3 wires but I think that is a different model.
So, my question is, are there only two Wires? I solder tomorrow….
Hi John, there are only 2 wires on the charging coil of your type 3762 (and other v2 Triumph models.) It doesn’t matter which way round they’re connected.
Received my replacement battery within a couple of days of ordering – thanks for the prompt service 🙂
Spent about 10 minutes re-assembling my V2 Triumph following your very detailed and idiot-proof instructions. Brush now charging and seems to be working fine – far more satisfying to have repaired this item rather than have to throw it away. Thanks.
Great guide. Many thanks for this. Much cheaper to spend £10 on a battery than heaven knows what on a new brush. And more environmentally friendly too. The design of my v2 brush differs slightly from what you show – older or newer I guess but I don’t know which. There’s just a retaining ring to be removed at the shaft end; I didn’t have to pull out what looks in your photo like a fairly long plug. At first I thorough I’d broken it, but all was well.
Thanks again
Chris
Great guide. Without it I couldn’t have replaced the battery in my Oral B toothbrush. Very helpful indications for removing and replacing the ring on top.
Instead of using and clipping the strips on the new battery I made them shorter and soldered 2 solid wires upon the clips. This made it easier to get trough the holes on the PCB.
Thanks.
Thank you for this great guide! I’ve just installation of the Varta battery into my aged Braun 3762, and it’s a success! Had similar mishap as other posters re. the fine copper wire terminals of the induction loop but got it working eventually. Also the plastic collar was a swine to get on! Thanks again!
Hi,
Thanks for the great guide – always good to have a go 🙂
On my V2 brush I’ve changed the battery and when trying to turn on it flashes orange which proves the battery is installed and working, however it wont charge.
I’ve stripped it again and noticed the coil wires were both broken so one side can be easily redone but not the other side as this appears to be sat underneath all the other copper wire.
So will this tolerate me undoing all the wire, getting the right side back on again and re-spinning back around and connecting the left side? this is what I’ve done and still no charging lights.
Can the copper wire be soldered or glued to the contacts to ensure connectivity?
Am I missing something here?
So I’ve got no charge but battery is saying flat.
Do I need to spin the copper wire back around differently? or is it a contact issue?
Was working before but how can I test the charging base?
Hi Jamie, when a coil wire is broken you can unwind a turn of it from the coil and re-solder it to the PCB. If you have rewound the entire coil it shouldn’t make any difference. The main thing is the re-soldering. The wire is coated with a transparent insulating coating which needs to be burned off when soldering. Make sure the tip of your soldering iron comes in contact with the wire when soldering it to the PCB to make sure the clear layer is burnt off.
By the looks of this model the wire doesn’t look like it was soldered before it just looks like it made contact with the solder blobs.
So we’re saying this was soldered and should be resoldered whilst ensuring the coating is burned off?
Thanks for the speed reply. – You’re an ace website doing customers proud – Lets fix and not throw away, lets not be ripped off and add more crap to landfill 🙂
Yes it would have been soldered in place. As long as the soldering iron tip makes contact with the wire you can assume that the coating has burned off. Well done for trying to keep more electronic waste out of landfill!
Hi,
I have managed to change the battery on v2 model, checked all the copper wires were in tact. I have a red light which flashes for a couple of seconds which would indicate to me I have connected it properly! and then nothing. Any suggestions please
Have a read through of our trouble-shooting tips here. It might just need to be left on the charger for an hour before it acknowledges that it’s charging.
Hi,
I changed the battery of my Oral B 7000, When I received the new battery it showed 0.02V.
After 6 hours charging it’s now at 0.95V but still no light on the brush and it won’t start either. Is it normal ?
Regards
That voltage is a little low but the battery might just need to recondition if it’s been stored for a while (several full charge/discharge cycles.) Check your soldering and the coil wires as per our support page.
Thanks,
Soldering and wires seem ok, they should be since the battery was charging, right ?
I left it charging for the night and this morning it was at 1.02V It seems it’s bottoming out (0.3V in around 15 hours) ??
I can’t do a discharge cycle because the brush won’t turn on.
should I buy another battery ?
Regards
The brush can appear to be charging even if there’s a fault with the soldering or a broken coil wire. However, if you’re sure these are OK then perhaps the battery is faulty and one of our GP or Varta batteries will get you up and running.
Very useful step by step guide.
And very kind support from your site.
I got the battery 5 days after order was done.
Replaced it with the perfect guide.
Thank you
Has anyone come across issues with the toothbrush not being waterproof after replacing the battery?
The seal at the top is fully waterproof once the ring is refitted, so you shouldn’t have any moisture issues. For storage advice see our electric toothbrush care tips.
My tootbrush is not waterproof anymore after replacing the battery. It leaks down the shaft from the brush head. It started one week after replacing the battery the tootbrush was turning itself randomly on. The first time it happened in the middle of the night. It fell off the bathroom sink in our en-suite giving us a mild heart attack.
The workaround so far is to remove the brush head as soon as the brushing is finished, dry the shaft with a towel and store it horizontally. Would you have any other tips?
It’s possible that the innards weren’t pushed fully home when reassembling the handle. Check that the ring is fully seated too – you can warm it in very hot water before refitting to give it a bit of flex. Other than that, like you said, store it on its side. We have some other toothbrush care tips here.
exactly the same with my toothbrush! I opened it again to dry it, unfortunately it doesn’t work now. The battery leds are completely off, as well as nothing happens when pushing any button (either power and/or arrow down).
Any step-by-step procedure to check where the fault is?
Thanks.
Claudio does the charging light show that the battery is charging when it is on the charger?
Hi,
I bought from Amazon a battery 3 months ago, it worked well at first (1 complete week without charging) but after 2 months : completely flat after 1 use.
I thought it was the chinease battery so I bought the one advertised on your website (varta) and installed it this saturday. I let it charge until the brush was completely charged but the brush only lasted 2 uses. And now, it won’t even last 1 use !! (the battery is 2 days old. )
How is that possible ?
Regards
Hi Stephane, it sounds like you’re suffering from one of the common issues that crops up when changing the battery. Take a look at the trouble-shooting tips on our customer support page here. It’s likely to be a broken coil wire, your soldering, or that the meter needs a reset.
Hi, Thanks for the answer.
I let it charge for 24h yesterday and this morning let it on until it stopped : it lasted 2 minutes.
I dismantled it again and double checked the soldering and coil wires, everything is fine.
I then tried the 10 seconds method, the brush lasts around 5 secs before it stops. Did it 5-6 times. then multimeter says the battery is at 1.442V
Not sure what’s wrong here really ?
Regards
The voltage reading indicates that the battery is fully charged. Try running the toothbrush with the handle casing removed in case there is debris jamming the gearbox. The only other suggestion is to check for short circuits caused by blobs or whiskers of solder on the PCB near the motor and battery connections.
the casing was already removed during the whole process. Battery is still charging and indicates 1.483V now. I can’t find anything wrong with the soldering 🙁
Regards
Perhaps there is water damage to the motor or PCB from a leaking seal.
Hey!
You prepared a great guide. It was very easy to swap the battery on the Triumph v2 model.
Unfortunately I have the same problem as stephane… After the swap, the battery can only run for max 3min, even though it has 1.4v. The toothbrush can’t even run longer if I connect an independent powersource instead of the battery. It seems that I could have a problem 5 or 6 from the Customer Support. I will discharge it using the cycle described in point 6, but I wonder if there is any other way?
Best regards,
Von_Watchmaker
Yes the battery meter in the toothbrush can get out of sync with the new battery so needs resetting. With your Triumph v2 repeatedly trying the 10 second charge-then-run trick should reset the meter – there’s no easier reset method that we’re aware of! Customer Support page here.
Hi,
Could you help me?
I repleaced my battery. After its installation I tried to test it. The red LED was on for a very short time, when I pushed the ON button, than nothing. The tootbrush is totally dead. It does not work and there is not any lights neither.
I have checked by voltmeter, the charger coil works well, it can recharge the new battery fully.
What can be the root of the problem? Is there any solution?
Best regards,
GN8
Have a read through of our trouble-shooting tips.
great guide.. I replaced the battery for my Triumph 7000, now I can see the lights while charging. the first charge took around 20-24hrs. after fully charge I remove the toothbrush from charger, test it for couple seconds, seeing battery level is 3 lights, and then I put it on desk. by the time I want to use it (4-5 hours later), the battery it totally out… not even able to get the power level light up…. is it something wrong with the board? not the battery itself?
Hi Tom, take a look at our troubleshooting tips page and see if those checks solve your issue.
thanks, I am trying the re-calibration tricks now.. but one question, how can I know if the battery is truly empty? by doing the 10-second thing, I noticed that some times it will run for a long period, like 60+ seconds, some times it won’t even power up… it’s confusing when the battery is truly empty.
It will probably be empty when you start to see consistency after a 10 second charge e.g. it might run for 2 seconds then stop. Same result after the next few 10 second charges.
Hi, just completed the battery replacement for my Braun Oral B type 3764.
It was completely easy to do, just needed the right tools, a solder sucker and a fine tip soldering iron was borrowed and the instructions you provided were detailed and easy to follow.
It means that I’ve not thrown my toothbrush and it will hopefully last me for many years to come,
Many thanks.
Great work! It’s good when you can borrow the tools too.
Hi. Many thanks for a nice guide! I too, managed to snap the charging coil wires when diassembling. I have not found any guide that would fit this model, but it seems obvious enough that the two wires coming from the coil are to be soldered to the corresponding tin lumps. However, there is this weird 3rd wire of ~2 cm, that also is likely broken. If I solder it where I think it might go, it does not make any sense. It is now soldered in one end to one of the tin lumps. There is a piece of same type of wire next to the other lump, but it is not quite connected to it but just takes a few rounds around a plastic nob. Actually it touches the tin lump, but I guess it should not connect as it should have the isolation on. The lenght of the longer piece is just enough to connect it to this shorter piece, but I see no sense in it. If the shorter piece does not connect to the tin lump, then this is just a loose piece of wire leading nowhere, and if it does, then the too wires of the coil get connected and then it does not quite work.
I would be very grateful of any ideas.
Best
Jyrki
Hi Jyrki, the two pieces of copper wire that wrap around the plastic posts can be removed if they are loose. During manufacturing and before any soldering they were the wires from the coil, wrapped around the plastic posts. Then each wire was soldered to the PCB. If the wires snapped then the pieces wrapped around the plastic posts can be removed.
Anybody know a service that will do this replacement work?
Whereabouts in the world do you live? Have a look at our toothbrush battery replacement service page.
Not sure what is going on,but here’s what’s happening.
(1) Replaced battery and pressed power button,nothing happened.
(2) Put toothbrush on charger and it starts blinking.
(3) After a while,two leds are lit up,so I tried the power button again,nothing.
(4) I hit the power button while still on charger,and it starts up and the bottom led is blinking red. It won’t turn off unless I put it back onto the charger,don’t even have it hit the power button.
(5) Try the power button again,and nothing.
Any Ideas?
Have a run through of our troubleshooting tips. It sounds like it could be a short circuit, loose connection to the battery or a broken charging coil wire.
Hi, last week completed the battery replacement for my Braun Oral B type 3764.
The toothbrush works fine, the charging is ok, but the toothbrush cannot communicate with its Smart guide unit. I tried to pair them as I read in the user guide, but it does not work. Any idea? Maybe I wasnt cautious while soldering and the radio chip got too much heat?
It’s possible that the radio chip got overheated/moved/shorted by solder. Also check the user guide because you might also have switched off the radio function in the toothbrush.
I have already turn off and on the radio, but it doesnt work. The led is lighting on the toothbrush but it cant connect. Could you show me which one is the radio chip and where are its connections?
Sorry, we don’t have any schematic diagrams or parts lists. Check for stray blobs/whiskers of solder that could be causing a short circuit.
Thanks to the Ionic video and step by step chart I have replaced the old battery with new. Before I complete the re-assembly I want to know if there will be a problem if the spring touches the positive terminal of the battery? Please advise.
As long as there is still the plastic spacer between the motor and the spring, then it does not matter if the spring touches the positive tag or terminal of the battery.
Thanks for the great instructions. I had a replacement battery installed. There was no response from the toothbrush (lights or brush movement). Is the unit dead or is there a chance that putting it on the charger will get it going? Thsee results were at the repair shop. I didn’t have the charger with me. I am thinking of trying it again and bringing the charger in next time. Your thoughts?
Thank you!
Hi Jerold, verify that the solder connections to the battery are still intact, and that the fine copper wires from the charging coil to the PCB are not broken. Definitely put the brush on to charge for 2 hours – you should then get some response from the motor/lights.
Hello.
First of all I find your tutorial really great;))
I write to you from France so my English is not perfect.
I search for my part the head of the toothbrush because since can a black liquid flows from it (I think this is due to wear)
This piece is it for sale, can we buy it, I did not find it …
Heartfelt thanks.
There are no spare parts available. The liquid could be old toothpaste and water. If there is liquid inside the toothbrush you can remove the internals and let it all dry out for 48 hours. Then reassemble the toothbrush.
Every time you finish brushing your teeth remove the toothbrush head and store the toothbrush horizontally.
Thank you for your fast response.
I will try to disassemble the toothbrush with your great tutorial
Thank you very much.
Hi, the instruction video as well as the pictures were easy to follow and I replaced my battery within an hour.
The problem I’ve experienced was that the seal near the brush was leaking water which in a weeks time slowed the speed dramatically and the red lamp was on constantly. Re-opened the case and it was wet inside. Let it dry and greased the cogwheels as good as I could , re-assembled and put silicon instead of the little plastic ring.
It works perfectly fine right now!
Maybe silicon couuld be added to the instruction?
Roger
I am trying to replace the battery on the Oral-B Triumph V2. The guide is fantastic.
After following the guide, I can charge the battery and get a flashing green light. If I leave it on for 12-24 hours, I actually get 2 and eventually 3 flashing green lights, indicating a good charge. However, when I push the button to start the toothbrush, it flashes red and does not turn on. If I put it back on charger (even if it just had 3 green lights) it appears to start charging over at one light.
I’ve taking the handle apart again and checked all pieces and everything seems to be in place (I even resoldered to get some nice shiny joints). Any idea what could be going on?
Hi Jeff, it could be the charging coil connections. Have a read through our troubleshooting tips and if this still doesn’t help and you’re able to measure the battery voltage let us know what that is.
Great guide, thanks!! The problem that I encountered was that the replacement batteries that I purchased have tabs that are very difficult to solder to. I tried pre-tinning, lightly sanding, flux, etc. Finally, I snipped off all but about 1/2″ of a tab, then wrapped the remaining metal of the tab around one end of piece of copper wire (22 gauge). I used needle nose pliers to make a strong mechanical between the tab and the wire, and then soldered the joint. I repeated this with the other battery terminal, fed the copper wires through the holes in the circuit board and soldered them to the pads on the board. The copper wires were very easy to solder down, and the unit charged up overnight and works well.
I replaced the battery in my Oral-B Triumph V2, charged for 24 hours then tried it. It turns off after the first quadrant, when it should signal with one vibration. I read the troubleshooting, and tried to leave the toothbrush running until the battery got empty, but it turns off every time after 30 second, before it can vibrate once. It would take a week to get the battery discharge if I’ve to start charging again for 10 seconds after 30 seconds of running. Is there an easier way to get the battery empty?
If your toothbrush shuts off after the first 30 seconds of the timer then there is probably a stray blob or whisker of solder causing a short circuit on the PCB somewhere.
I took the brush apart again, but I can’t see any visible blob or whisker. Do you have any idea where should I look for a short circuit?
No, just around the areas where you soldered. It could be also be a damaged component, or water damage to the PCB 🙁
Hello,
I have exactly the same problem : after 24h charging, the third green led is flashing.
I use the toothbrush that works perfectly for the first 30 seconds. Then the toothbrush cuts, no vibration and the second period of 30″ doesn’t start, the red light is flashing. (like those 30″ completely flushed the battery).
When I put back the toothbrush on its charger, Only the first green led is flashing.
After 5 minutes of charging, it’s possible to use the toothbrush for 10-15″…
Great guide and website!
Im interested in reaplacing my battery with a low self discharge, like an eneloop. Do you sell these?
Also, is there any reason a standard AA NiMH (with tabs) can’t be used?
Thanks!
Thanks! Low Self-Discharge types are not relevant for toothbrush applications because in a toothbrush the battery will be run down through use after a few weeks. Standard Ni-MH cells will not self-discharge by any significant amount during this period. LSD types are designed for applications where the device will be charged up and will then be unused for many months or years, or for low-drain devices where you will only be charging it up about once a year.
AA size batteries won’t fit in Triumph toothbrushes without modification of the toothbrush, and if you want to modify then you may as well upgrade to one of our high-capacity 2700mAh Varta batteries (49mm long). Hope that helps!
Thanks for your reply, much appreciated!
Can you provide a link to the 2700mah batteries you sell? I can only see the 2500mah GP ones. Also, do you sell any soldering irons? It’d be a great addition to your shop if you sold an ‘all in one’ repair package!
You guys are doing a stand-up job!
You’re welcome! The 49mm x 17mm 2700mAh battery is available in our shop here.
Good suggestion about the soldering irons, however, they’re too bulky for us to dispatch. If your local electronics shop doesn’t have one you could try your country’s Farnell/element14 website or amazon/ebay. You might also find a that a friend/relative/colleague has one you can borrow.
Which is the best replacement battery option from your store for type 3762? GP or Varta? I would have chosen Varta but tags seems a bit short, judging from the pictures…
Thank you.
At the moment we’re stocking an FDK battery for a Type 3762 fitted with a 42mm long battery. These are made in Japan and are the best quality.
Sorry but English is not my native language, “stocking” means that FDK batteries will be soon available? If they are already available I did not find them, please point me the product page. Thank you for your help!
Just click on the words “FDK battery” above ^
They are available to buy.
Thanks for the guide! I’ve just replaced the battery, and the toothbrush charges fine without the bottom cap (the cap that is removed by screwdriver in the instructional video). However when this bottom cap is on, the battery doesn’t charge. Any ideas?
One (or both) of the copper coil wires is probably broken between the coil and the PCB. Check the wires including where they are soldered to the PCB.
Turns out the problem was with the charger, swapped it with a new one and it charges fine. In a separate issue, when putting the final top ring/seal in place, water got inside and now the tactile on/off switch doesn’t work and the toothbrush turns on randomly. Will try drying it out and using some CRC.
Hey,
first of all, thanks for the good guide.
But i have a small problem. I´ve done all steps and everything ist working.
The Battery is charging and the green lights are flashing.
But it needs more than two days till it´s fully loaded.
After 2-3 minutes of brushing it loses all battery loading and falls from 3 leds to 1 red leds and finally turns off.
Battery is brand new is there something more to do, or is my new battery simply a DOA?
Maybe a faulty charger?!
Greetings
Daniel
Hi Daniel, carry out the checks and tests on our customer service page.
Hello all,
Just replaced the battery.
All looks fine but doesn’t charge(blinking red). However when placed upon a different charger(not oral B, other company) charging begins (green light).
replaced the battery because it lasted for 3 days and then dies (from 3 green to red) at once.
But the old battery had 1.14 V inside as compared to a new one 1.24V.
Is it the charger or the battery or else? Has anyone encountered this before?
That’s a strange issue! It could be a bad connection inside the toothbrush such as a copper charging-coil wire is broken or a dry or broken solder joint. Carry out the checks and tests on our customer support page.
This is the second time I’ve used this guide to replace the battery in my Braun Oral-B Triumph v2 (3762), the first time I used a NiMH battery from RS, and this time I bought the Varta battery directly from this site.
Very easy to follow this guide, and it was very quick to do the second time around, my thanks to you for helping reduce needless environmental waste!
Replaced and all was working for a few weeks then the toothbrush started to slow down. i persevered but it seems yet again the top seal was leaking and now the brush wont do anything – completely dead.
I think you guys need to come up with a solution for the seal near the toothbrush – maybe sell these if you can source copies?
I’ll let it dry out but tbh I think mine is now dead 🙁
Hi Scott, Once you’ve opened up the insides and let it all dry out it should start working again. Always store your toothbrush on its side with the head removed between brushings. This stops water running down between the metal shaft and its plastic surround. We have some toothbrush care tips here.
Dear All,
I have a brand new Braun Oral-B Triumph v2 Toothbrush, but it doesn’t charge. The warranty is expired.
When i push the power button it starts flashing red.
I decided to change the battery, but the charging light doesn’t start to flush green.
May be you have had a similar case.
I would appreciate it if you would help me to fix it.
Thanks in advance.
I am looking forward to receive your reply,
With my best regards,
Ivo
Hi Ivo,
Sometimes it takes an hour or more of charging before the green charging light starts to flash.
What is the type and input voltage of the charger? Do you have a friend with a Braun Oral-B charger that you could use to check the charging of your toothbrush?
I have an Oral-B Triumph v2 toothbrush that has stopped charging. I suspect the battery needs replacing, so I have followed your guide to remove the battery. Can you please confirm which battery I need to order and whether a higher capacity one can be installed instead? The original is 1.2v 1600mAh.
You need a 17mm diameter battery with centred tags at both ends. The length will be either 42mm or 49mm depending on what was originally fitted to your toothbrush.
Hi. My toothbrush is around 8 years now and I’ve brought it back to life, thanks to your amazing easy to follow tutorial. I also snapped the copper wire but managed to unwind and re-solider.
My only problem now is that our toothbrush magically turns itself on in the middle of the night! It’s happened about three times now! Any ideas why this is happening? Guessing I should be worrying – as ?? it could be a fire risk?!
Good to hear about your successful repair! It sounds like water might be getting inside your toothbrush. Open it up and let it dry out in a warm room/cupboard for 24 hours. Make sure the sealing ring at the top is put back into place correctly. Then have a read of our toothbrush care tips to help prevent it from happening again. Hope that helps!
Completed battery change with no problems. Excellent. Can you replace the Ni-MH battery with a more up to date Li ion battery and use the same charger?
Glad to hear that the battery replacement went well! Unfortunately Li-ion batteries are higher voltage and require a different charging process so you cannot fit one to these toothbrushes.
I replaced the battery on my Braun 7000 toothbrush (the charging wires broke loose, but I re-soldered them), and the unit now charges and runs OK except that a light at the top back of the unit (right under where the brush end snaps down to the shaft and in back of the handle) now comes on and glows red when the unit runs. This had never happened before I changed the battery. I cannot find any information about a light in this location – HELP – what is this light for, and why is it on now?
Does the LED stay on when you run the brush with the casing removed? The LED at the top of the handle is a pressure warning light. It comes on when you press too hard on your teeth with the brush. Check the PCB around the top end for stray blobs of solder and also look under the PCB half way between the two switches for debris – this is where the mechanical contacts for the pressure switch are.
Hello. I replace my 5 years old purchase 1 July 2018, Oral B 4000 Triumph V2 3761 battery, with the 41mm x 17mm. I place it on the charger for 24 hrs. by which time the charging GREEN light had stopped blinking. It only ran for 30 sec. cycle and the RED light came ON, following the directions I press the ON bottom to make sure it was fully discharged and place it again on the charger dock for another 24 hrs. now after doing this five charging cycles, it may run for two 30 sec. or 60 sec. before the red light comes ON. I disassemble it to see if I found something array but all the solder connections and copper wires appear to be fine and the NEW battery tested at 1.31v. the old one almost two weeks after it last go still indicate 1.26v. Any suggestion
Hi Luis, it sounds like you have done all the checks of the solder connections and wires. Try point number 6 on our customer support page.
If that doesn’t work you can re-fit the old battery. If the old battery charges and runs correctly then the battery you bought has failed prematurely. If you bought it from us let us know your order number so we can send a replacement.
Hi,
I got the battery to Hungary within a week and repaired my “old” toothbrush easily. It works now fine and keeps running very long time.
Thanks and regards
Peter
Excellent guide. Removing the old battery and installing the new one took less than 30 minutes. Tootbrush passed the startup test and is currently charging. It took a while for the battery to arrive but it was worth the wait!
Hi
I replaced the battery on my 3762 model following your instructions.
Charging OK, but after three days, from 3 green leds goes to red and stops.
I followed your instruction for resetting the toothbrush (full charge, start till it stops and full charge again) but nothing change. The battery voltage is 1.36V but doesn’t start (red light)
Any sugestions?
Hi, how long did the brush continuously run for after a full charge? Check for dry or broken solder joints then give the brush a 24 hour charge.
Hi
Thanks for your reply.
I checked for broken solder joints but everythink is OK.
I measured voltages to the board and it seems fine (3V to MCU, 1.36V to the motor, and ~1.3V to an MCU pin where I believe is where it measures the battery.
I also did a 24h full charge and then it run for about 20 minutes (only).
It sounds like the battery has prematurely failed. Where did you buy it from? If it was from us please email us with your order details so we can arrange a replacement for you.
Hi, I repaired my Oral-b handle using this guide and water managed to get inside “I could see it in the transparent pressure sensor area of the handle”. I ended up super gluing the parts together however I noticed something that might be of concern to anyone who does notice water getting into their handle even if they haven’t opened it.
In the rear of the handle there is a small circular bit of plastic and when I was repairing my handle I did a clean of the build up all over the handle. While I was cleaning I noticed that that small circular plastic area was actually a hole that had build up in it which I cleaned out. I have a few theories as to what this is.
The hole may either:
1. Allow the handle to breathe to prevent condensation inside.
2. A design flaw in my particular handle.
3. Planned obsolescence, as in the hole was solid once but is designed to slowly open and eventually allow water to get in and destroy the unit after a few years (perhaps from toothpaste).
4. I accidentally damaged it while cleaning it out and maybe it was filled with a glue that was soft (I doubt this as I am extremely gentle when I work and the idea that it was filled with something soft is ridiculous).
Does anyone know what it is?
Note: I can see the battery through this hole so it definitely goes all the way inside the handle.
Hi Sebastien, yes on the v2 Triumph models this hole has a thin membrane of hard plastic across it, which easily breaks if poked or prodded. Many models have a round hole in this location and it is normally filled by the soft rubber material that is used for the handle grip. This could be left over from when the same handle casings were used for Oral B Oxyjet flosser units which have an external water reservoir and a pipe entering the handle in this location, as seen in this photo. It might also be to do with the manufacturing process.
Anyway, You can probably safely fill the hole with silicon sealant to make it waterproof again.
Thanks for that. I just want to add my charging circuit didn’t work (the handle still functioned normally otherwise) after the repair. After trying to resolder and checking the coil wires, I decided to clean the flux off the circuit board with methylated spirits (or isopropyl alcohol) and a soft toothbrush (dripped on brush not on circuit board) and allowed it to dry (this included the flux left over from manufacturing). This resulted in the charging circuit working again.
I read that flux can be slightly conductive depending on what you use (no-clean flux might be ok to just leave on) and the contaminants it picks up while solidifying. Just a tip for anyone that can’t get their charging circuit to work even if the coil wire is not broken :).
Hi, an update, my toothbrush suddenly turned on by itself this morning and wouldn’t charge of turn back on after I managed to switch it off. I opened it (which was hard because I had glued everything) and I found liquid had entered the unit. The top of the brush (where the metal spoke meets the plastic, is a gap that leads directly into the housing. My question is, can glue be poured down that gap? I think it would prevent the metal spoke from moving freely which is obviously bad. Does anyone have an opinion on this?
The gap around the shaft is normal and it is sealed further down, so don’t put glue down there as it needs to rotate freely.
Clean around the ring and around the soft seal of the handle casing where it seals against the plastic shaft surround. Reassemble it and always store your brush on its side with the head removed. This should stop any further moisture getting in.
Thanks for the response. I was considering the idea of using heat shrink tubing which might be flexible enough to allow the shaft to move just in case the the seal further down has been compromised but we’ll see (It would need to be thin enough to allow the brush head to slip on). It’s obviously a non permanent solution as it can be cut off if it is no good so I’ll try it and update here. I’m going to use hot glue to seal up the bottom and the top ring as I believe the seal weakens each time you open the unit. hot glue would provide a perfect waterproof seal but still allow the unit to be disassembled easily unlike other waterproof glues which will make disassembly destructive. What is your opinion on this?
Hot glue might work in addition to the existing seals, but the main thing is to ensure those seals are clean before reassembly and then always store the brush on its side with the head removed.
Hi, Great guide, easy to follow and informative .
I replaced my battery using this guide (model 3761 )and the brush has been working great for a couple of months. Just recently , when i turn on the brush, the red light is illuminated solid and the motor never comes on (brush doesn’t work). The charge lights show 3 solid green lights (full Charge?) What does a solid red light (only when i turn on the brush) indicate ?
thanks, Bob
Hi Bob, I’m not sure what a solid red light indicates on these brushes. I’d recommend running through our troubleshooting tips here to check for broken solder joints. Also check for water ingress and corrosion on the PCB.
Another successful battery replacement using your great batteries and clear instructions. We have a pair of Oral-B Triumph Professional Care v2 toothbrushes and a 240 volt travel charger and these battery replacements obviate the need to buy 2 new brushes and a new travel charger.
Great instructions. I bought the battery from you but also had to buy a soldering iron starter kit (last time I used a soldering iron was 20+ years ago). It was still much cheaper than buying a new brush of the same grade (which now comes just with an app, not a smartguide). But the satisfaction of resurrecting the old brush which was bought 7 years ago is priceless.
Cheers from Sydney.
We have this toothbrush and a red light comes on once in a while when using it. what does this mean?
Perhaps there is water ingress causing glitchy behaviour of the electronics.
If you are able to open up the handle (see the photos in the guide) and let the internals dry out for 24 hours this might stop the behaviour. Otherwise, if it still charges and runs okay just carry on using it! Do store the brush on its side with the head removed when you’re not using it so water can’t seep down the shaft and inside the handle.
I’ve been replacing my V2 oral B toothbrush for the past couple of years following this guide and I bought my batteries here too! Very nice and saved quite a lot of money! Thanks!
Dear Rob, Following your excellent guides and utilizing your battery replacements, I’ve been able to change the batteries in both a Oral-B 3278 and 3761, the latter being the easier. This has saved a considerable amount of money if I had simply purchased two new replacement units of equal standard. Thank you very much. Kind regards John
Thanks for the update John, great to hear about your successful repairs. Happy brushing!
Dear Rob, Thanks for the kind support investigating where my package could be. In the meantime the package popped up, and I could successfully finish the repair. I’m just waiting for the battery to charge. Thanks again! Regards, Attila Meszaros
Hi
I replaced the battery in my Triumph V2 using your guide and all very straight forward.
I put it on the charger and over a period of 24 hours all charging lights were sequencing up to 3 lights. However, the toothbrush charge only lasted about 40 seconds. I charged again for 24 hours and still the same result.
I have dismantled the brush again and checked all the wires and soldering. All OK.
I have now tried the 10 second discharge as recommended until there was absolutely no charge in the battery. I have now put on charge again and hope this cures it unless I am missing something?
Hi!
Thanks for a great guide! I have followed it twice and both times the toothbrush started to charge until all of a sudden it just died. No charging and the toothbrush won’t turn on so I can’t discharge the battery. The strange thing is that everything seems to work perfectly and then it just dies. When this happened I replaced the battery again but no luck.
Any ideas what I can do to fix this?
Hi Jonas, did you buy the battery from us? If not, what are the details and markings on the battery?
Hello! The power button on my triumph v2 was spotty for a while: it would turn itself off in the middle of brushing, and would sometimes take a few presses to turn back on. Now the power button does nothing (no lights or motion). The bluetooth button does light up when pressed.
Following this guide I took it apart, but I’m not sure where to look next. The bluetooth button on the pcb reads 3.2V across the contacts, so I think the battery is fine for now. The power button reads 0V, so either the button itself is broken or one of the traces/contacts leading there must be bad? The rest of the circuit looks to be on the underside of the pcb, does anyone have any experience taking it apart further, or know where might be good places to look?
Thanks!
do you not ship the batteries to brazil?
and could you put a different battery in place of the original battery?
At the time of writing we are not currently shipping to Brazil due to a high proportion of packages getting lost.
Does your Triumph toothbrush have a 49mm long or 42mm long battery in it?
All went well, Until I broke those fragile wire coils.
Resoldered them and all’s well.
Thanks again for the opportunity to purchase these battery’s and the guide.
I installed the base plug the wrong way around. I needed the charger base cord to protrude to the rear and the toothbrush face to be to the front. Just something to be mindful of when finalising the re-assembly.
Also, I put the new battery on a separate charger until it was fully charged. When installed on the toothbrush the toothbrush test run failed; nothing happened. I nearly gave up but then realised that the toothbrush has some intelligence that remembers the old (flat) battery. I pushed on and re-assembled and put the toothbrush on its base to charge. All good. Your instructions (towards the end) did warn of that but at the test stage of the instructions it wasn’t mentioned.
The instructions with photographs are really good. I would not have had the confidence to do the battery replacement without them.
I just replaced my 42mm with a 49 mm battery. It’s not a difficult job. The battery plastic holder is not easy to melt, so don’t be afraid, it’s quite easy to sculpt with the soldering iron. I cut one turn of the retaining spring on the plastic cap side (motor side) and reformed a flat part with 2 long nose pliers. I kept the original end on the battery side to be sure it will not damage the battery. I also previously charged the battery but the toothbrush didn’t see it as fully charged. I checked if it was charging and it was. So I reinstalled everything and put it on the charger.
I forgot to say that I didn’t have to copy the tab’s form. I just inserted the tabs in the circuit board, pushed the battery in the plastic holder, cut the excessive part of the tabs, then solder. Don’t lose your time forming the tabs, it’s not required, at least with the triumph V2 and the 49 mm battery. Holes perfectly align with the battery tabs.

Been looking to replace battery in a couple of electric brushes for some time. Came across your guides and links to batteries, so ordered a couple. First one, battery changed no problem but had induction coil break. Paired coil down and soldered and all working. On Second one managed to keep coil intact. Both brushes working great. Thanks.
I have Braun Oral-B Triumph Professional Care V2 (3762) and it has been running slow and at times will not start at all. I took it apart and measured the battery voltage to be 1.2 v at rest, and drops to 1 volt when running. I am concerned it may be related to the gear linkage and not the battery. When it is disassembled, at times it is difficult to turn the plastic gear by hand to get it to rotate. When it does run disassembled, it runs faster when horizontal and slows down when held vertical. There are small brown dust-like particles like ground coffee inside the unit near the anode/spring mechanism between the 2 switches. I would post a photo but I don’t see how to do that.
Is this a battery problem or a mechanical problem? TIA
Hi Barry, it sounds like moisture ingress. Put a drop of light oil on the bearing at each end of the motor. Lubricate the plastic gears with silicone or lithium grease and turn them by hand to free them up. After a full charge your brush should now run faster. If it will only run for a few minutes then the battery is probably past its best and could do with replacing.
Always store your brush on its side with the head removed to stop future moisture ingress.
Thanks for the reply.
Where do I find the bearing at each end of the motor so I can oil them? I have included photos. Are the bearings visible in these photos, if so can you draw an arrow where the drop of oil should go? Or do I have to disassemble the toothbrush some more?
TIA
Motor Top:
https://photos.google.com/share/AF1QipMJVxv-2pD719snrvZJ_ikdtUVW-fUGRU5yKrWjZ-s-TMP9juQy7iqaymGIToyMWw?key=ZHNPaWU3bi10VFZPM3pvdm81Tmp5QWlQc2RDdmRn
Motor Bottom:
https://photos.google.com/share/AF1QipNHG0h_H38cm-7UjTNZXT5MJKw9KJYErEuQVVhJVK-jJHT-bEBUSxb_e3X-Vg_HVA?key=MFN6QWtCQkdEa1ZCWXU2YUlwXzZodHBiVmREMDFB
Brown coffe-like splatter I was talking about yesterday.
https://photos.google.com/share/AF1QipPcEWNnZlH-S6bqUsbpyHdQwCUgFhPHIfKL-2SZtG3W2NUxECoSKDJt41KEFcJqgA?key=dmk4OHNseVdxRFdHakNiWkVzcVA1b3BEdE1SMjhn
Hi Barry, it looks like the motor bearing at the battery end is covered so cannot be accessed. However, you might be able to get a small drop on the bearing at the other end which is probably more important. The brown specks are probably rust. Once you’ve done the lubrication of the bearing and gears see how the brush runs then.
Good day. Your web page and knowledge are very impressive. OK I have a 3764 that will hold a charge but not oscillate. I broke the coil wires at the bottom but i can unwind and resolder them back. One tutorial said that a fuse was bad if the motor was not getting power. I cannot deduce which component is this power fuse. The leds’s all light up and it was a very good toothbrush. I could not find a wiring diagram and would like to repair this unit. If you think resoldering a fuse a adding solder over the old fuse is too much for a novice then perhaps I should just let this one go. I do have a 20 w solder, gun, silver solder and a wire braid.
There might not be a fuse on these toothbrushes. If you have replaced the battery, check your solder connections and also that no nearby SMT components have moved off their pads.
Regarding broken coil wire… I think that happens in this step:
“You can now try to remove the whole cap. If it won’t release by hand from the rest of the handle, remove the plug then use a screwdriver to lever the cap out slightly and break the rubber seal. In the photos below the screwdriver handle is being pushed away from the camera.”
The coil wires wrap around a rubber tube that forms a seal with the cap. Be careful in separating that rubber tube from the cap. I think it may the the “levering” part that breaks a coil wire.
I used a thin flat blade screwdriver to separate the cap from the body from the outside. You could also use a putty knife. After that the cap popped off without having to use a screwdriver to lever it off.
Are the two battery lengths interchangeable? I.e. if, when I open up the toothbrush, it has the shorter battery fitted but I have bought the long one in advance, can I still fit the long one in place of the old short one?
If your brush has the shorter battery fitted you can cut away the plastic of the battery holder between the battery and the spring. This will allow you to fit the longer battery. Make sure there is still a plastic spacer between motor and spring otherwise you will create a short-circuit.
The issues I had were all self created. But having purchased a battery and following the detailed instructions provided I now have a fully working and rejuvenated Oral B electric took brush. Cannot recommend the detailed instructions highly enough. Thank you.
I have a Braun Oral B 7000 whose battery has died. After 4 years and 1 month the rechargeable battery died.
Several questions:
1) I can clearly see the number stamped on two places “3764” on bottom of the toothbrush. Preceding “3764” in one area is a number that I can’t decipher the number could be “6656A” or 6858A” or “6856A” or 6658A.” Is “3764′ the model # of the battery I need to purchase to replace the failed battery? If not, what is the correct battery model #? Could you suggest a vendor from whom I can purchase the correct replacement battery?
2) At 77 my hands are as steady as they were at 70. Can you suggest a vendor who will perform the battery replacement for me?
Hi Ed, to answer your questions:
1) 3764 is the Type number of the toothbrush so you have found the correct battery replacement guide for it. You will need one of our 42mm x 17mm Ni-MH batteries with centred solder tags at both ends available here.
2) We maintain a list of some suggestions for how to get the repair carried out along with some potential providers on our replacement service page.
Hello there, thank you for your helpful instructions. I have the Triumph V2. I was successful at changing the battery. It was charged for 24 hours and then used. The next time it was used it did not work. It shows that the battery is fully charged. The only way it will run is to stand it on the charger and press not the power button, but the selection button, it momentarily shows an empty battery and will run for about 30 seconds and stop. To drain the battery, I have to repeat this process endless times until the battery is empty. Is this a calibration problem? Should I drain the battery until empty, then follow your instructions. Thank you.
This sounds like it could be a circuitry fault i.e. a short circuit somewhere on the PCB, or a damaged component.
many people seem quite confident in taking the brush apart to change the battery, but they end up breaking something anyway. I am not one of those people, however, if I had the battery replacement in hand I might find someone else to take on the task. I don’t know how clear the instructions are until it’s apart and in progress but what I won’t do is even try until I have the replacement battery in hand. problem is, it seems the 3762 V2 is either a 49mm or 42mm. Altering the space for the 49mm when it’s supposed to be a 42mm puts me at greater odds to screw it up. In case you haven’t guessed, this is not my area of expertise and will more than likely end up packing it up and getting something else or breaking it and tossing it out. Is there a code somewhere that will tell me which battery is inside before taking it apart.?
Hi Gale, There is no known way to tell from the serial number but your Type 3762 is more than likely going to have a 42mm battery rather than a 49mm. The 49mm batteries are very rarely fitted.
Replaced my battery very easily with the help of this guide! No damage to any wires while doing it either! My best advise is to have everything you need to hand and take your time! Thanks for the guide ⭐️⭐️⭐️⭐️⭐️
Hi and thank you for the informative guide; I never would have been able to take apart my toothbrush without it, much less try to repair it. My goal was to replace my battery. I ordered one from you site but mistakenly got the the 49mm vs the 42mm which I needed. Is it possible to alter the area where the battery fits to accommodate this size?
Thank you for any advice.
Glad the guide was useful. Some customers cut away the plastic between the battery and the spring so the positive end of the longer battery can extend through and press against the spring. It is only electrically safe to do this if there is a plastic spacer between the other end of the spring and the motor.
Hi,
Can I replace the NiMH battery of my toothbrush with a Li-ion one?
Thanks.
No, they are incompatible voltages and Li-ion needs different charging control circuitry than Ni-MH.
When I put the new battery in, the toothbrush ran indefinitely once I turned it on. I noticed that a 6-pin chip on the right-hand side of the board, slightly below the top LED and directly above the large gold pad was getting very hot – I believe it was even smoking at one point.
I thought that maybe this could be some sort of power regulator or charge control chip, which made me wonder if I had somehow accidentally connected the battery the wrong way round. As far as I can tell, I have not: the positive terminal is at the top, just as in all the pictures I have found here and elsewhere on the internet.
Unfortunately I didn’t think to take a photo of the internals of the toothbrush when I first opened it up, so I can’t be 100% sure that my toothbrush isn’t somehow different, but continuity tests with a multimeter have all pointed to the idea that my toothbrush is indeed normal w.r.t. the polarity of the battery connections.
I’ve now put the original battery back in but the toothbrush does not work – the blue lights are on constantly (both when on and off charge) but the motor never runs. The chip from before reached around 80°C when I initially reconnected the battery, but it’s now hovering at a steady 60°C. While on charge, the battery voltage has been steadily going down (!), which is again quite confusing because it would normally suggest to me that it’s connected the wrong way around.
I’m somewhat annoyed with myself for not taking more care with this process, and I think something that I’ve done wrong has damaged the little chip to the point where it no longer works properly (or certainly not well enough to drive the motor anymore, if indeed it is at all responsible for that).
I can’t imagine that there’s any realistic fix for all this, but I just thought I’d put a comment here to see if anyone has any idea what might have happened?
For what it’s worth: I’ve very carefully checked and I can’t find any shorts caused by stray blobs of solder etc. anywhere on the board. I genuinely have no clue what’s happened.
This sounds like a short-circuit somewhere, caused by stray solder or a surface-mount component that has moved off its pads. The 6-pin chip you mention is likely the main switching FET for the motor which switches the connection between battery negative and motor negative. This can overheat when the battery is connected in reverse polarity. The negative terminal of the battery itself is large and flat compared to the small round positive terminal.
Hello, I have an Oral-B 5000 Pro V2 model type 3764. The toothbrush worked just fine until it suddenly started exhibiting the following behaviour: Toothbrush does not turn on when power button is depressed. When on a charging base, both blue bluetooth lights are flashing. Tried two different bases with the same result.
This sounds like water ingress. Open up the handle and check for condensation and signs of past water ingress such as rust on the motor, and staining or corrosion on the PCB. Allow the internals to dry out for 24 hours. Also measure the voltage of the battery which should be over 0.9V.
There is indeed some lime color staining inside. Batter measured at 1.1v so its probably fine. Sounds like the water ingress killed it?
This sounds like water ingress. If you use some isopropyl alcohol and a brush to remove the staining from the PCB this might restore functionality. Otherwise it might be permanently damaged.
Disassembled per these instructions. The switch would not turn it off. There was some green corrosion at the on-off switch. Cleaned with electronic cleaner. Reassembled and all is good. If I had followed the first video I found on the web, I probably would have broken the lock tabs off of the internal assembly. Thank you for a very complete and clear set of instructions. Two thumbs up.
Followed your helpful guide successfully and the new battery is working well. Thanks.
I have replaced the battery in my old Braun/Oral-B toothbrush. Triumph V2.
Your How-To guide was excellent! (I’m a retired teacher and I have written quite a lot of instructions. I think I know how easily it is to leave possibilities for misunderstanding.) The only problem was to figurer out what temperature to set on my welding station. But after a while it worked.
Thsnk you for a good instruction!