
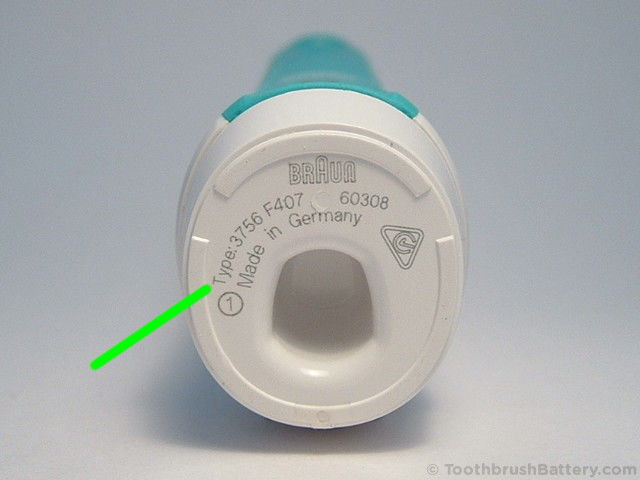
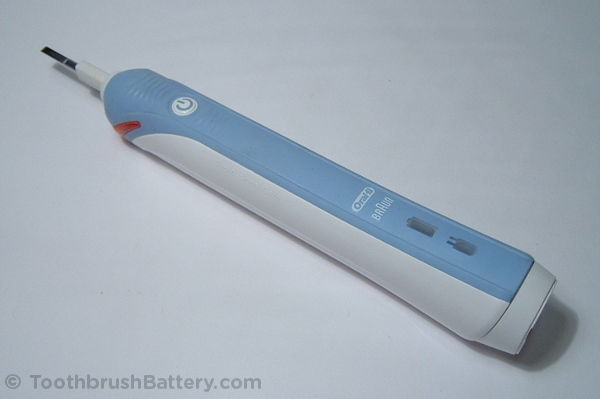
This guide will take you step by step through how to dismantle the Braun Oral-B Professional Care Type 3756 electric toothbrush and replace the battery. The tutorial is based on the Type 3756 toothbrush but also applies to Type 3754 toothbrushes. These include the Professional Care, PRO and TriZone 600, 1000, 2000 and 3000 model names, and others. The type number of your toothbrush is marked on the bottom of the handle.
For other toothbrush models and type numbers the battery replacement procedure is slightly different so please see our other guides to toothbrush battery replacement instead.
The basic method is:
- Dismantle handle
- Desolder old battery and other connections from PCB
- Remove charging coil, pressure warning light, pressure switch, PCB and battery
- Replace battery
- Reassemble PCB and other parts
- Solder in connections for parts and new battery
- Reassemble handle
This is documented in detail below along with lots of pictures. Click on any picture to enlarge it.
Video
We have also created a video from this guide to Braun Oral-B Professional Care Type 3754/3756 battery replacement here, which you can watch below.
Disclaimer
This guide is for educational purposes only and is offered without guarantee or liability. For professional use only. Any act carried out by yourself is entirely at your own risk. Any damage to yourself, your toothbrush or anything else is entirely your responsibility.
Tools / Parts / Equipment
- Braun Oral-B Professional Care toothbrush (Type 3754 or 3756)
- Original charger
- Soldering iron: Electronics grade (about 18-25 watt)
- Solder: Lead-free silver solder is great for this
- Solder sucker (also known as a desoldering pump) and/or desoldering braid/wick
- Scissors
- Craft knife e.g. scalpel, snap-off, retractable or Stanley type
- Small flat-bladed screwdriver: 2 to 4mm wide
- 10-11mm ring spanner or tool with similar sized hole
- Instant glue (e.g. superglue or other cyanoacrylate adhesive)
- Replacement battery. Either:
- Original size 42mm by 14mm 1.2V NiMH with tags (Support us by buying from ToothbrushBattery.com here)
- Or upgrade to 49mm by 14mm 1.2V NiMH by modifying your brush as shown. (Support us by buying from ToothbrushBattery.com here)
How-To
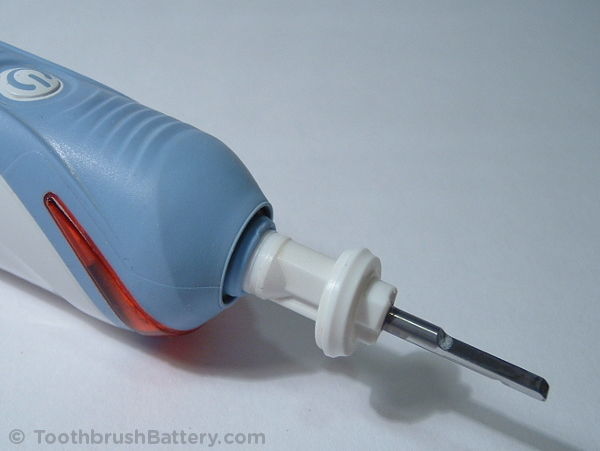
To start off, remove any brush heads from the top of the handle. Stand the toothbrush tip-first in hot water (60 degrees C) for 5 minutes to soften the plastic and make the ring easier to remove. Use the screwdriver to pry off the plastic ring from around the shaft. Note that the ring is stepped so you might need to press down into the soft coloured surrounding material to lever the ring from underneath. Alternatively you can use pliers with tape inside the jaws to stop them marking the ring.
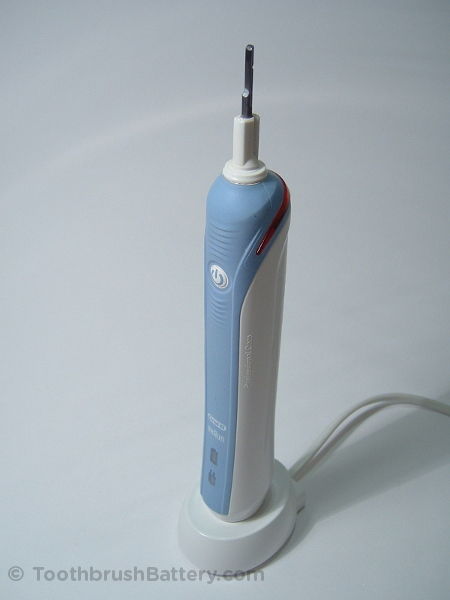
Put the brush on its charger.
Holding the charger and the toothbrush gently bend the handle backwards so that the base starts to lever open. Standing this end of the brush in hot water for 5 minutes before bending it back will help to soften the plastic and will make the clip release more easily and be less likely to break.
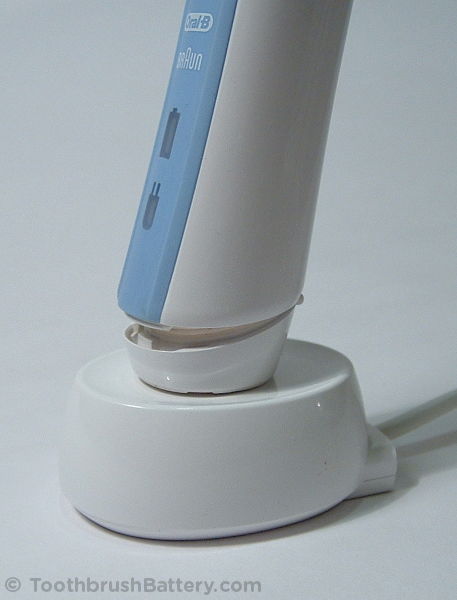
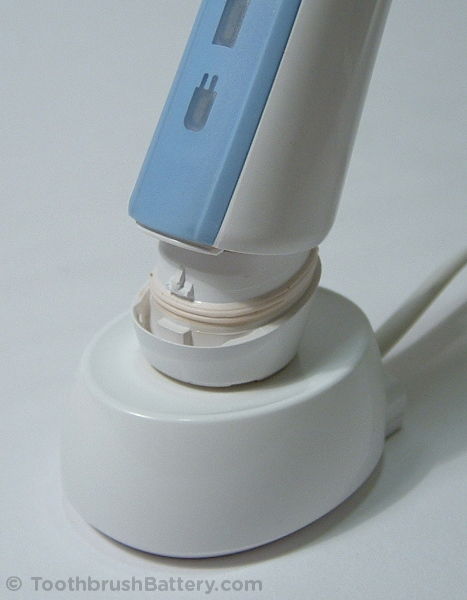
Remove the handle from the charger and the base of the handle should come off. The spring might fall out so don’t lose it!

At this point you might realise that you have fallen victim to Braun’s designed-in obsolescence and non-repairability if the plastic tab at the front of the base breaks off. This makes it more difficult for the toothbrush to be repaired (see below.)
Don’t worry if this breaks off as we can use glue at reassembly time.
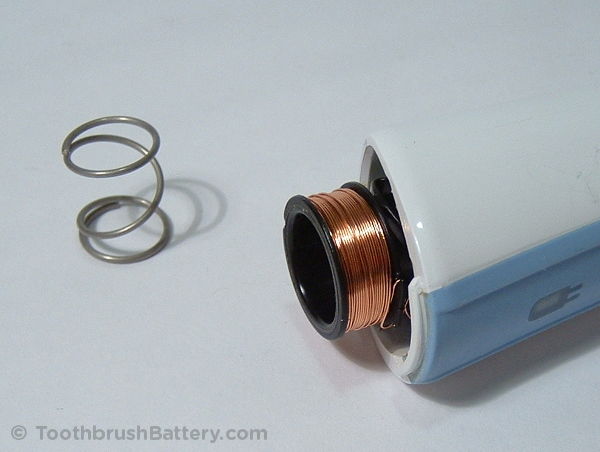
If it hasn’t already fallen out remove the spring from inside the coil in base of the handle and put it somewhere safe.
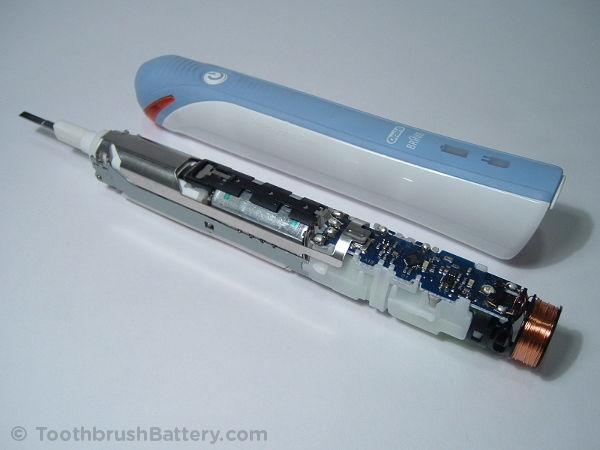
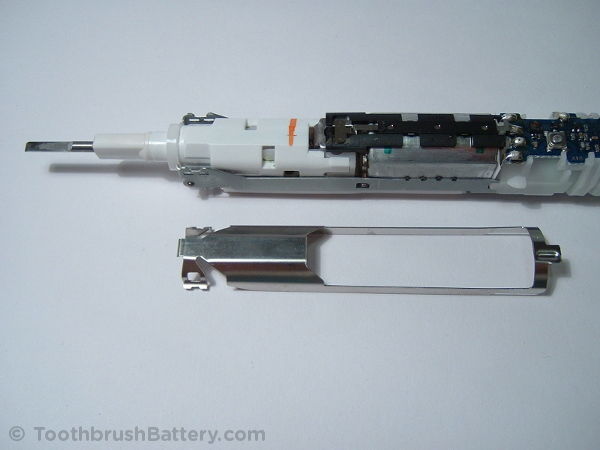
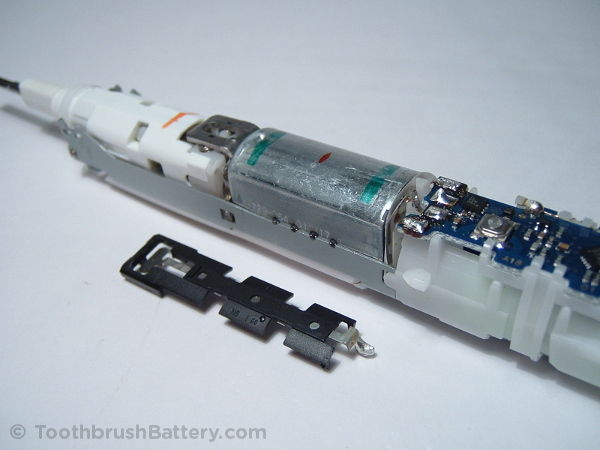
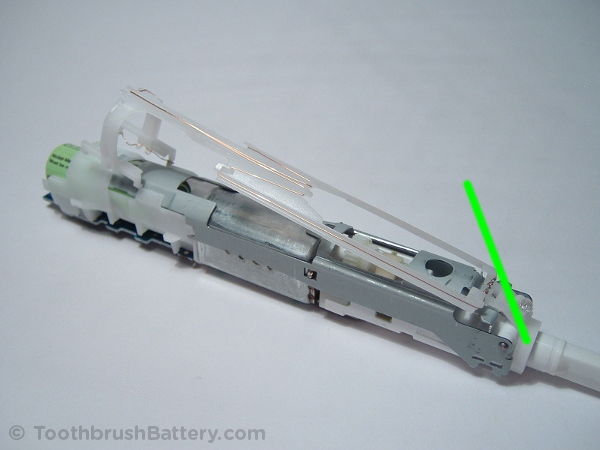
Remove the inner workings of the toothbrush by pushing the shaft in from the top.

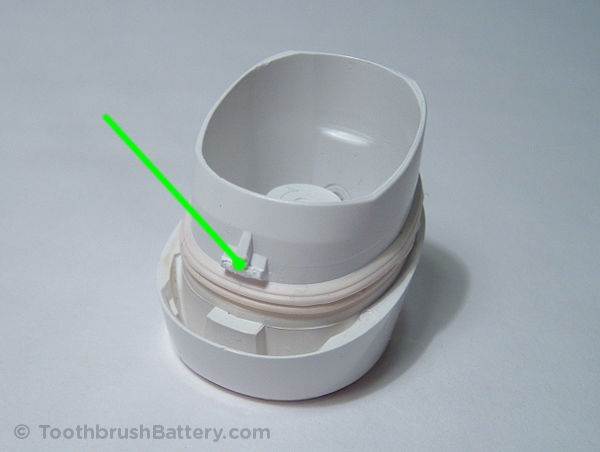
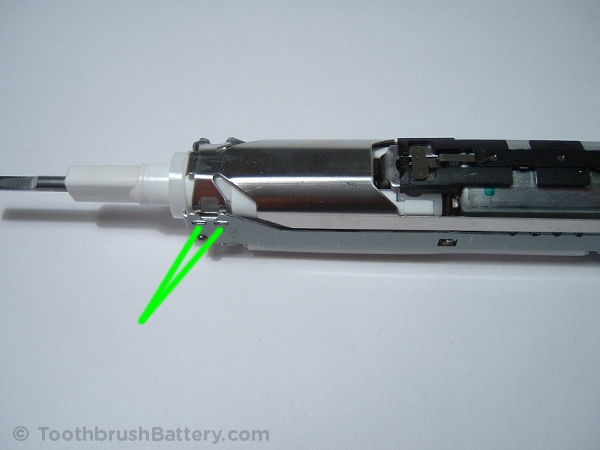
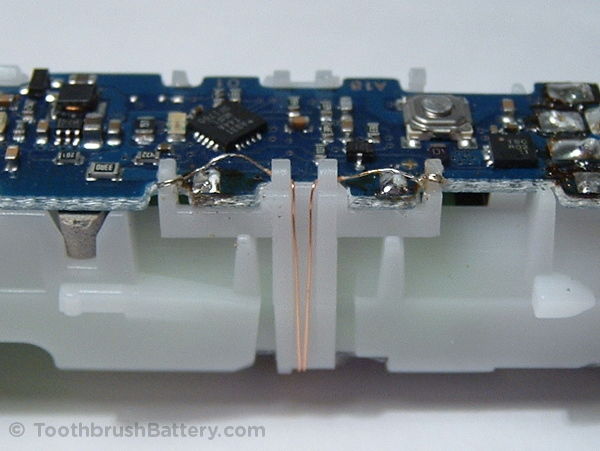
The first piece to remove from the internal assembly is the power switch plate. This is clipped in on both sides at the top of the brush, see the arrows below. Carefully unclip it from one side, then the other:
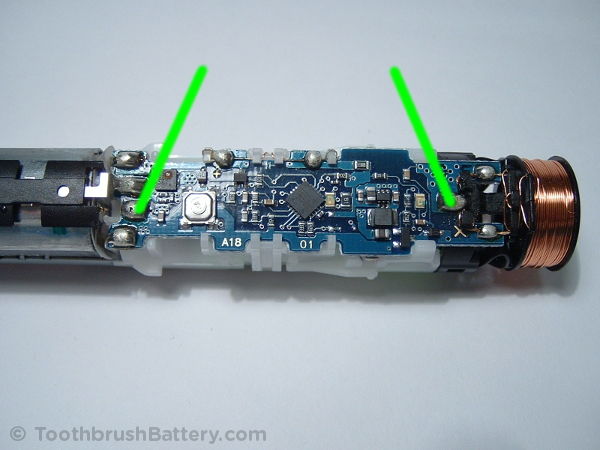
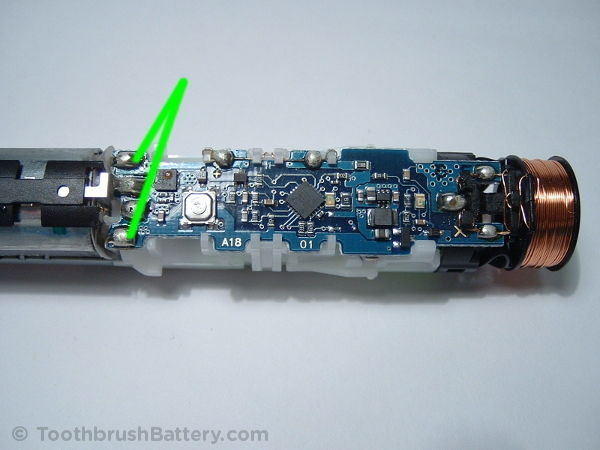
Time to get your soldering iron warmed up now! Starting with the negative one (nearest the coil of copper wire), use the soldering iron and desolder pump to carefully desolder the two battery terminals on the circuit board (arrowed below, positive on the left and negative on the right) and bend the metal tabs vertical and away from the board with a knife so there is no solder left joining the solder tag to the board. Desoldering braid might also be useful for this.
If fitted, locate the solder point for the pressure warning switch (arrowed below) and desolder it. Then unclip the switch and put it to one side.

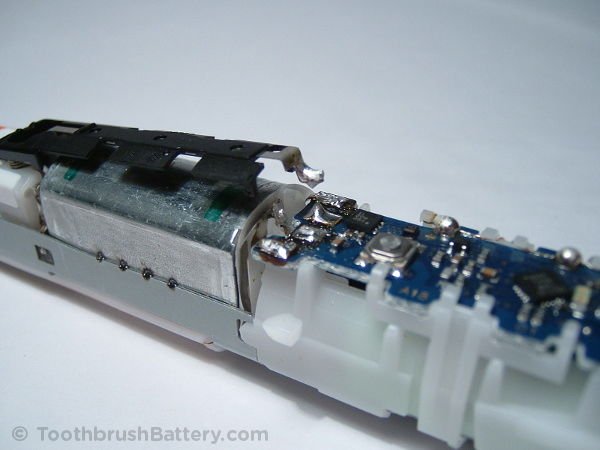
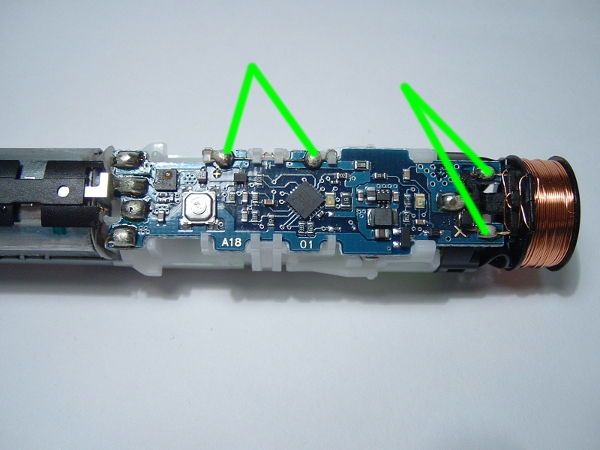
Locate the two solder points for the motor (arrowed below) and desolder them, bending the tags upright with a knife so they are disconnected from the circuit board.
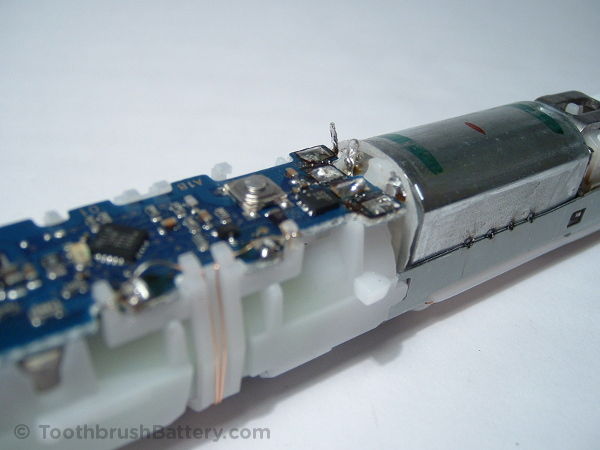
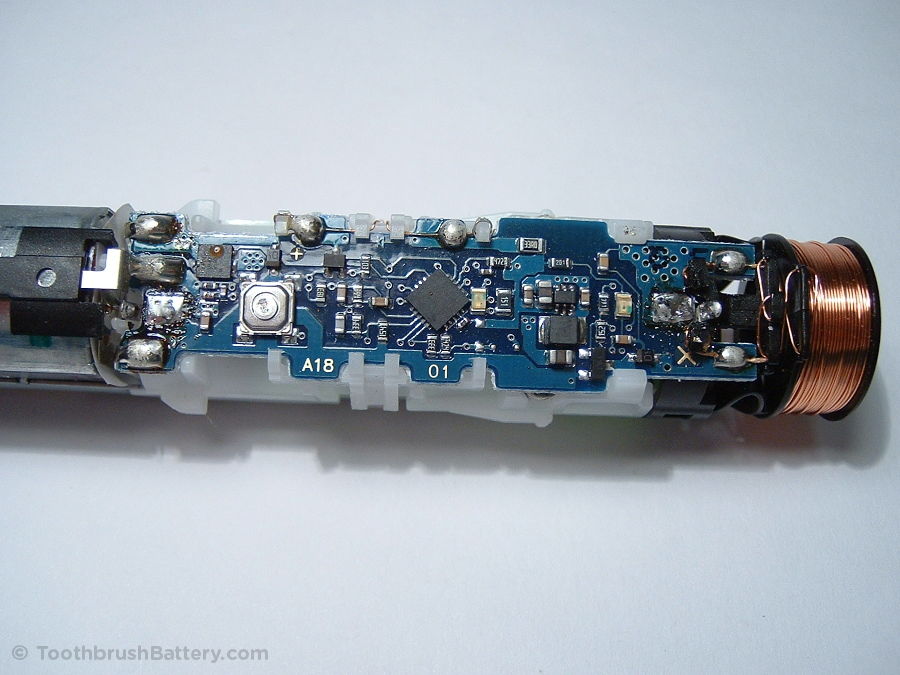
Then it’s on to the copper wire solder points for the charging coil (arrowed below, right) and the pressure warning light (arrowed below, left). Carefully desolder these and lift the wires away from the circuit board trying not to melt the plastic around them.
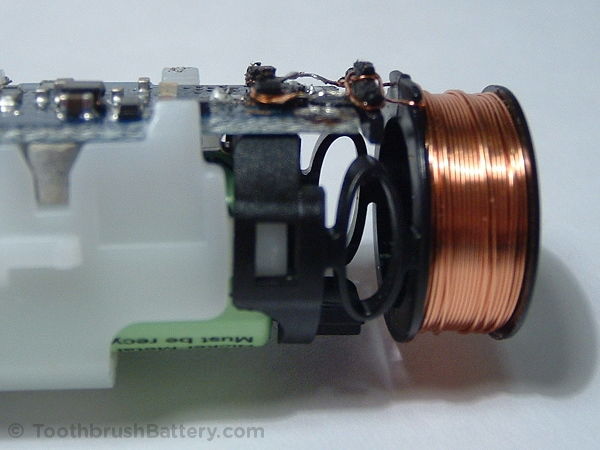
Using the screwdriver carefully press in on the white clips on both sides (one arrowed below) which hold the black coil support in place and unclip the coil, putting it to one side.
Unclip the carrier for the pressure warning light wires and gently remove the carrier from the top shaft (arrowed below) then put it to one side.
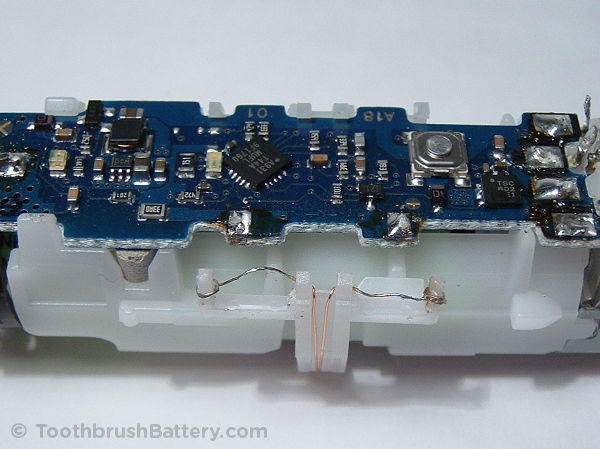
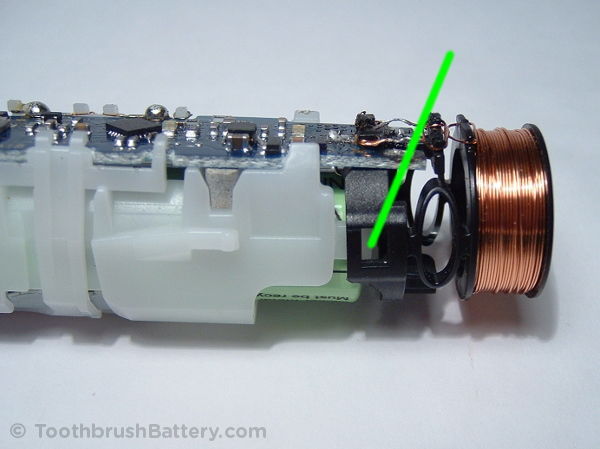
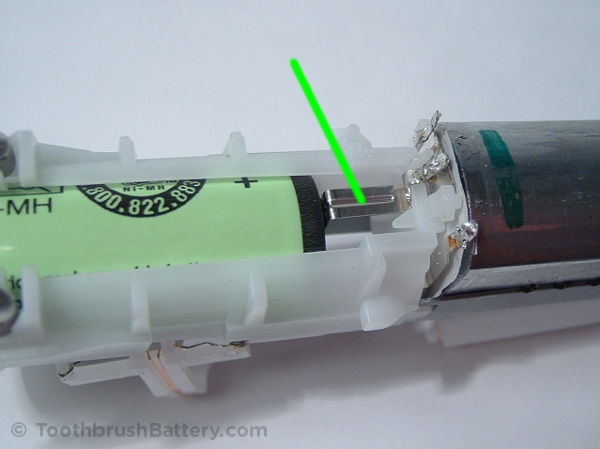
You should now be able to unclip the circuit board at the motor end of the board and slide it out.
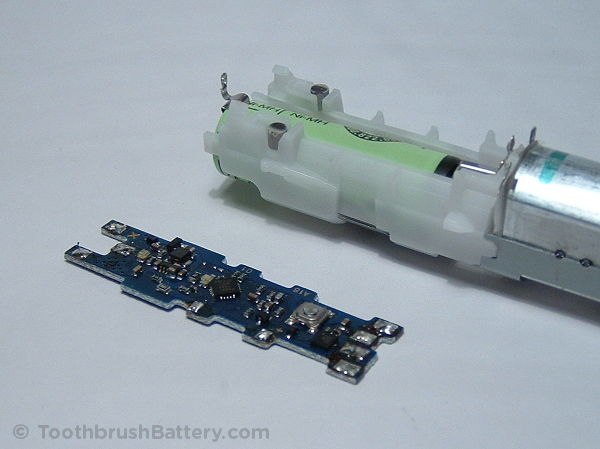
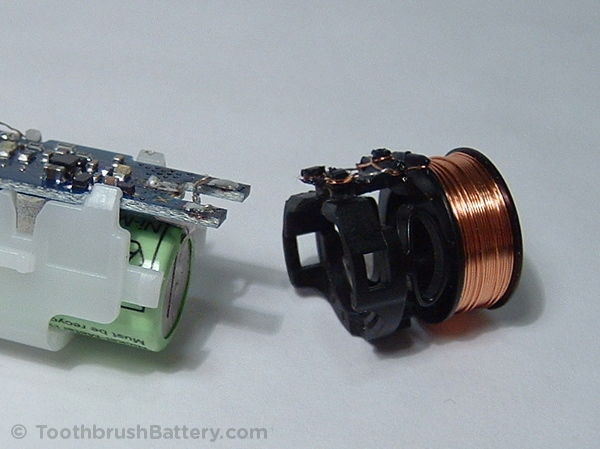
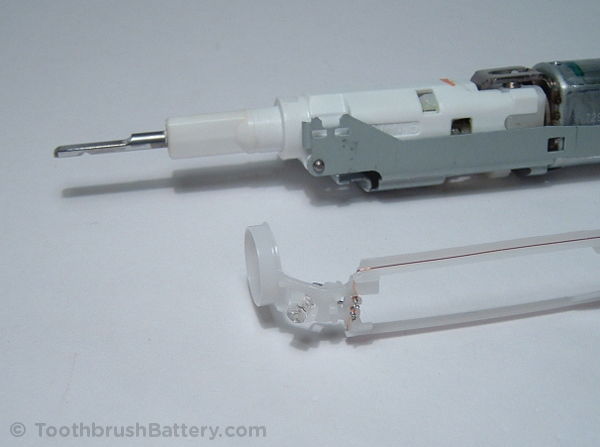
Finally, remove the battery from the toothbrush.
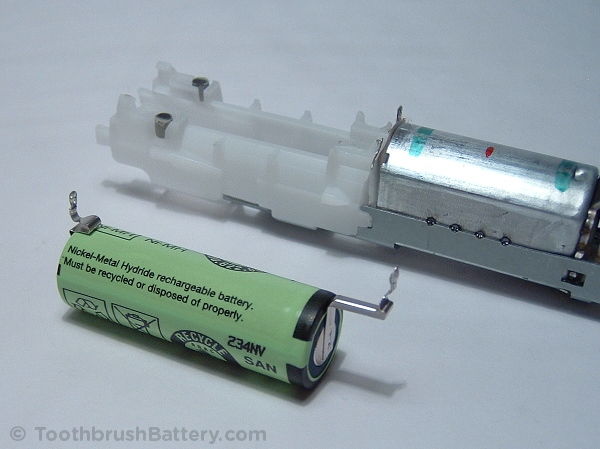
Measure your battery and if it is 42mm long you might have the option of fitting a longer battery instead. Because it is physically larger, a longer battery will have a higher electrical capacity (mAh) and will run for longer between recharges. Do you notice how the metal tag on the positive terminal extends horizontally away from the battery? Take a look at the picture below to see how the positive tag extends through some empty space inside the handle.
When the battery is temporarily replaced with a spare or even just turned around and inserted back to front you can see how the battery comes up against plastic spacing stoppers (arrowed below) which prevent it from sliding up any closer to the motor.

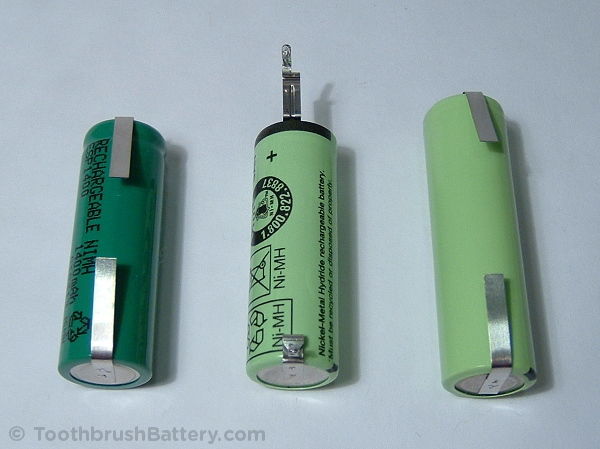
You now have the option to either replace the old battery with one of the same physical dimensions or modify the plastic housing to accept a longer, higher capacity 49mm battery. Please support us with writing these repair guides by buying your replacement battery through the links to our secure online shop shown. The original-sized 42mm x 14mm batteries are 1200mAh capacity and the longer 49mm x 14mm batteries are 2200mAh, over 80% higher capacity! Higher capacity means your toothbrush will run for longer before it needs recharging. See the picture below for (left to right) replacement 42mm battery, original 42mm battery and replacement 49mm battery.
Choose which option you’d like by clicking on the required link below:
Excellent, clear and concise instructions. As a reasonably competent diy-er I had no problems following the step-by-step guide to replace the battery in a Braun Professional 1000 toothbrush. One minor word of warning – If modifying the battery carrier to take a larger (49mm) battery be very careful not to break the clip mounted on the end of the carrier that holds the circuit board onto the carrier when fitted. As considerable force is required to cut out the battery carrier to take the larger battery this is easily done – be warned!
Excellent instructions, just replaced 2 toothbrush batteries.
One tip, it’s not necessary to desolder the coil, as it comes away with the board in my toothbrush.
At first I saw this as a challenge but actually the instructions make the job of replacing the battery quite easy. I would strongly recommend using a desoldering pump as stated in the instructions. I didn’t and found it much more difficult to desolder the fine copper wires without melting the plastic battery compartment as there is a lot of solder around the joints. I have since bought one for a couple of pounds. The ability to modify the toothbrush to take a higher capacity battery is brilliant too and quite easy. I used a No 10A scalpel blade to remove the plastic spacing ribs. Replacement battery delivered very quickly and is not to expensive.
Another brush successfully revived! Thanks for the tips about the desoldering pump and scalpel blade Ian.
Was so fortunate to find this tutorial and incredibly well-done instructions. I’m too stubborn and cheap to purchase new toothbrushes, so I replaced batteries with the larger 49mm NiMH on Oral B 3000/3756 series brushes and they work like new now! Thanks for saving me tons of money!
Just replaced battery supplied by you using your very clear instruction guide. I modified the battery carrier following your instructions to take the longer battery and reassembled with no problems and no glue required. My tip to others would be to use desoldering braid instead of a desolder pump if you can as it’s much easier and kinder to the circuit board. Thanks very much Ionic.
Thanks for the feedback Keith and for the tip about using desolder braid. Another toothbrush is kept running!
Fantastic. I have thrown away two brushes in the past, but no more! I invested in a small soldering iron and there was no holding me back; one toothbrush now up and running again. If I can do it anyone can. Thank you!
Jane
Thanks Jane, I’m glad you got your brush up and running again. Another one saved from the landfill!
Rob
Don’t underestimate yourself Jane, the first one of these I fixed came from an electronics repair shop, the battery was new, install was poor. So it was placed outside the back door for scavengers like myself to tinker with.
I only had to touch up the solder joints to fix it,
The tech that worked on it needs to double check his work on stuff like this, but he should know that by now.
Not a lot to add to all that has been said before. It looks a daunting task but actually it is quite easy. However! I can add a few pointers to the very easy-to-follow instructions.
1. Don’t do as I did and put the battery in the wrong way round! How I managed it I have no idea because the photos clearly show the orientation. The result is, the motor runs permanently and will not turn off and one of the chips gets hot very quickly. Diagnosed easily by Rob and the brush now works a treat.
2. Do use a very small soldering iron tip. Mine is 1mm. You must use a solder sucker or solder wick.
3. Put the bottom end into near-boiling water before you remove the base and it will come apart easily and the securing lug will not snap off.
Thanks for the tips John, glad you got it working. Another toothbrush saved from the landfill!
You don’t actually need to put the bottom in hot water. If you feel carefully, about 5-6mm up from the seam, below the plug indicator, you can feel the hole the securing lug snaps into. Push there with a small screwdriver or the like while pulling back in the charger. That’s how it’s designed to come apart!
All went well but this procedure is not for the faint hearted! I last did soldering of printed circuit boards when I was 18 (now 70!). Took about one and a half hours but I can see that second time around about 30 minutes should be plenty. Very clear instructions….thank you.
Glad to hear you got your toothbrush up and running again Trevor! Thanks for the feedback.
Hardest part was getting the bottom off… after that the instructions were clear and easy to follow. I agree with the other comments – a solder pump was much easier to use than desolder wick. Thanks!
Good work on getting it apart Andrew 🙂 Glad the instructions were helpful!
Many thanks for your excellent guide for the battery replacement for the Braun Oral-B Pro type 3756. I have just replaced the battery with the larger version and no problems following your guide at all. Detailed images helped so well, and I got to use my solder pump for the first time!
All charged up over night and working fine today, thank you. Now, if only you did a battery replacement for the Philips Sonicare flosser………it’s already taken apart, just need a battery. Kim
Hi Kim, great to hear about your successful repair! You mention that you’re looking for a battery for your Sonicare flosser. We have details of batteries for the Sonicare Airfloss here.
Thanks so much for the excellent, detailed guide. I am not an electronics geek, but was able to follow the guide without too much trouble. I was grateful for John’s post as I also got the battery in the wrong way the first time. Thanks to John I was able to diagnose and correct the problem although this took some time. I had to solder an extra piece of tab to the positive terminal of the battery since it was cut too short. In the end it got a little messy since I had repaired the solder joints twice and added extra battery solder, but the toothbrush works as good as new! Ionic is providing a valuable service to consumers and the environment –THANKS!
Great to hear you got your toothbrush repaired and working again Rick!
I have successfully replaced the battery in my Professional Care 3756 with the optional longer battery and like other respondents would like to mention the the very helpful Ionic Industries detailed guide. I would however suggest the better way to trim the new battery terminals would be to cut down the width from the end before cutting across, as indicated in the guide. I followed the instructions and cut across first, this required enough scissor pressure to start the cut which then cut right across. Luckily there was still enough remaining length of terminal to try again and this time I easily cut from the end along the centre. It was then easy to fold back the half width and cut it off without danger of cutting right across. I’m happy to say my toothbrush is now back to full function.
Thanks for the tip Barry! You’re right to point out the risk of cutting right through the battery tag when cutting in from the side. You can use the very tip of the scissors to snip in part of the way but this relies on the scissor blades being sharp enough and tight enough! Great to hear about another successful repair 🙂
I followed your detailed and accurate instructions and replaced the battery in my 3756 toothbrush with the higher capacity one. All went well and the red light flashed on when soldering the final battery connection in place. However, I have been unable to get the toothbrush to go into charging mode. I have checked all the usual things: coil connections and continuity (1.4 Ohms), motor connections (I checked it ran from a battery across its terminals when disassembled), no solder splashes. All I get is the flashing red light when the power switch is pressed. I have tried disconnecting the new battery and wiring in the old battery, but no joy. I partially discharged the new battery externally to see if that would help – again, no joy. Any ideas?
Hi David, good work with the install and checks – strange that it’s not working 🙁 Have you tried leaving the brush on the charger for an hour? Sometimes it takes up to an hour before the toothbrush even acknowledges that it’s charging! It could also be that the charger is faulty but that’s a pretty rare occurrence.
Hi, I have the same problem – after replacement it works but flashes red and is not charging. The charger works with another brush. So…is there some kinde of “replacement protection” in the chip? Thx for ANY helpful ideas (i also checked all internal components)…
Klaus.
Are you able to measure the voltage of the battery? You can also try leaving it running until it shuts off then give it a full 24 hour charge.
I charged the accu before inserting it, it had 1.35v…but never charged in the brush, only red blinking. It the pcb version with sop-20 housing chip so it differs from yours…maybe older but its an 3756 model. Ill test it! Thx…
I did leave the toothbrush on the charger for 24 hours but no joy. Maybe during disassembly I could have shorted something on the PCB although I’m not aware of doing so. Is there a way of resetting the ‘intelligent’ battery meter? I would have thought that it is waiting for a charge since the red light is flashing. I’ll do a bit more experimenting to see why the charging circuit is apparently not working (the time pressure is off since my wife insisted on having a replacement toothbrush!! One question: there are what appears to be 2 small ferrite pieces in the main moulding towards the charging end of the toothbrush – any idea of their purpose as they don’t appear to be part of the charging magnetic circuit?
I believe the two beads are a catalyst to absorb any gases (i.e. hydrogen) given off by the battery in the rare situation that it over charges. You’re right that they’re not part of the induction charging circuit.
Regarding your own toothbrush, the battery meter in the current 3756 isn’t sophisticated enough to adapt itself so it won’t need resetting. I’d suggest re-fitting the old battery and checking for shorts on the PCB – a common one is the pressure sensor switch (if fitted) connection touching the positive battery connection. However, it’s more likely with yours that one of the charging coil wires has come off. Also check that no surface-mount components have moved on the PCB near to where you’ve been soldering.
I recently replaced a battery due to the pressure sensing light of the oral-b pro 1000 kept flashing (and the toothbrush would lose power after a short time after attempted recharging – prior to battery replacement). After the replacement, the pressure-sensing light continued to flash, and the new battery wouldn’t charge up much. It was obviously charging a bit, but not fully. Interestingly – when the new battery then became low (as expected), I then kept the toothbrush by itself, without charger until the pressure-sensing light eventually fully drained the battery (and hence no more flashing pressure sensing light after some number of hours or so) – and I notice that a recharge of my toothbrush from a totally drained battery state will charge the battery up to full capacity again. However – using the toothbrush leads to the flashing pressure sensing light situation again – so that the toothbrush will keep running (for a relatively long time – such as using it for a week or so) until the battery gets drained again. In this case – I’m suspecting a component on the circuit board has failed —– or the circuit board is behaving in an out-of-spec way. I’m thinking that – in this case, my original battery was probably ok, and the circuitboard isn’t 100% well.
Check the area around where the pressure sensor switch plate is soldered to the PCB. A stray blob of solder can cause a short circuit. Check the positive metal battery tag nearby too as they are very close.
Thanks for those recommendations! I have checked. Everything looks ok. I think the board developed a fault to start with. The original symptom was flashing red light (pressure sensor light flashing – eg. light off for a few seconds, red light for half second or so, then off for few seconds – repeatedly). But – interestingly, once the toothbush is turned on, the unit would behave normally – no flashing pressure sensor light when normally operating the motor. And the pressure sensor light works when we apply too much pressure. The issue was – during charging, the pressure sensor light would flash (as mentioned), and the green charge light would flash normally – indicating charging. However, the charging would not allow for a full charge. The charging indicator would keep flashing as ‘normal’, so it appears as if it’s charging normally. But after a week, the battery would become drained, to the point where the motor would no longer operate/move. But still enough power to keep the pressure sensing light flashing. After battery replacement – same issue. But what I have noticed is – if I completely drain the battery so that even the pressure sensor light has no more power to flash, then I am able to put the toothbrush on the charger. If I then leave the toothbrush on the charger under this condition, then the pressure sensor light won’t flash during the charging process, and the battery is also (interestingly) able to reach fully charge. At the end of the charging, the green charging light will then cease to flash (which is normal). But the red pressure sensing light eventually begins to flash again! But….the difference now is – the battery reaches a full charge. Absolutely fully charged. This will allow the toothbrush to be used for a week or so – until charge runs out again. In which case, I would need to allow the battery to fully drain away (ie. until even the red pressure sensor light has no power to flash anymore). That’s when I would have to allow uninterrupted charging. I found that it needs to be uninterrupted charging, because pulling the toothbrush from the charger pre-maturely (during the charging) would result in the same flashing flashing pressure sensor light situation again – where the charger won’t put much charge into the battery. And – just to be complete – attempts to re-charge when the motor has no more energy to move (but pressure sensing light still flashing) will allow the battery to become charged a little. Eg. 5 to 10 hours of charging under this condition would allow the motor to turn again for maybe 1 minute of usage only, before running out of juice. I think it’s a circuit board issue – something on the board has gone out of specs. Thanks again!
In my experience the flashing pressure sensing indicator means an internal fault. In my case, the innards of the toothbrush had somehow filled with water.
I have now repaired ‘my’ toothbrush (since my wife got a new one!) and was very careful when disconnecting the battery. Before this I checked the battery voltage on the tooth brush at full charge (1.386V) and when empty (red light, 1.232V). I checked the replacement battery was between these limits (it was 1.271V) before fitting. Everything went according to plan and I am now getting the full use of the higher capacity battery.
Hi David, great to hear you got the toothbrush up and running and have given it a new lease of life!
Hi
I have successfully changed the battery and the tooth brush now functions just like new. The instructions are very clear, precise and accurate; well done and thanks for the information.
One suggestion though: – the polarity of the old battery was clearly marked but the new battery (supplied through your website) had no polarity markings at all. Using my meter I was easily able to identify the correct polarity and connected it up correctly. As a suggestion maybe ensure that all replacement batteries supplied have polarity identification and make reference in the re-assembly information, or if they are supplied without markings then suggest using a voltmeter to determine correct polarity otherwise if reversed, damage could occur.
In summary, an excellent set of instructions that achieve the end result in a very easy to follow manner.
Hi John, great to hear the instructions were useful. Thanks for the tip about battery polarity. We have put an additional photo on the battery listing showing the groove around the outside of the battery – this is at the positive end.
Hi
The battery in my toothbrush was appearing to charge but would die almost immediately. I bought a new longer version from yourselves and installed it according to your excellent instructions. It then charged for about 36 hours (flashing green) being tried for a while. However, it would only run for about 4 minutes (and rather slowly at that) before running flat and flashing red. A further charge (another 12 hours plus) didn’t help and it now goes flat almost immediately. This is almost exactly the same as the old battery was doing.
Do you have any thoughts please?
Hi Dave, I think the first thing to do would be to run through our trouble-shooting tips, particularly the ones about the soldering and coil wires.
I’ve replace the toothbrush battery for a new one of 2100mAh and the first charge lasted 10 days, the second only a couple of them. I’ve replaced before seen this site, a friend of mine told me how to do it. My question is, it’s due to the quality of the battery? I mean, the old one was 1600mAh. 2100mAh are 2100mAh, it is possible that it only lasts one cycle?
Hi Antonio, it could be a faulty battery but run through the checks on our toothbrush trouble-shooting page and see if that helps.
I did change the battery to a 3756 and it lasted one cycle for 10 days. The second lasted 2, the third cycle 2… I redo the whole work, I disconnected the battery and weld again. I charge at full and lasted 10 days again, with the same battery, but the second cycle lasted 2… The toothbrush doesn’t allow to charge the battery fully if you don’t disconnect it from the circuit. Is not a battery problem.
I read your trouble-shooting page. No solution fit to my case I think.
Any suggestion?
Thanks!
After 2 days and the red light coming on, can you try the 10-second charge trick? i.e. run the toothbrush until it stops, put it on charge for 10 seconds, run it until it stops, charge it for 10 seconds, and so on until it will no longer run.
When using the Braun 3756 battery replacement instructions – they are excellent by the way – I noticed one little remark that needs to be added. That is, when trimming down the replacement battery tab to make it narrower, you should use scissors. It doesn’t say WHAT to use to trim the small tab down. Just keep that in mind on the tabs for the replacement battery. I just replaced both of ours and they now work just fine. Better than buying new toothbrushes, ha?
Rick
Thanks for the tip Rick! Good to hear you were successful in repairing your brushes,
Did the replacement regarding the instruction. Great thing! Thank you! Unfortunately, the pressure warning light is shining all the time if the brush is on. Everything looks okay and I don’t know where I did the mistake. I removed the (desoldered) the pressure warning switch and turned the brush on, no change. Don’t know what to do.
One thing: if desoldering the wires for the pressure warning light, the wire is melting the plastic where it is winded up. But that’s no problem, because they are placed where they have been and that should be no problem…
How can I fix that problem with the pressure warning light, which is shining all the time?
Hi!
Sorry for spaming. Now I know – after desoldering the wires for the pressure light, that if the right wire is soldered on, the pressure warning light is shining constantly (for orientation: coil on the right side and brush is lying horizontally in front of me). But I did not change anything on the PCB, and the wires are not touching anything. So what is the problem? Could you please help.
After desoldering the whole part and looking for the failure, I come to the conclusion, that the pressure warning switch contact must be short circuited with the battery plus pole. Anyway. I don’t know how. But the metal from the pressure warning switch is getting very hot after re-soldering it and that’s very strange. It must be under constant voltage and there must be a short circuit. I could not fix it so I did not apply it again. It is not so important for me to have the pressure light working, but okay, it would be complete with it. It works without it as well…
Hi Hanno, Glad to hear you found what was causing the problem. Yes the pressure sensing switch is connected to the PCB very close to the positive solder tag from the battery so these can easily touch each other. Make sure the battery tag has been narrowed and folds closely around the edge of the PCB.
Just wanted to say thanks for the clear guide, and all went very smoothly, including the upgrade to a higher capacity battery. I think the thing I enjoyed most (other than restoring my toothbrush to working order) was the feeling of fighting back against that damned planned obsolescence!
Keep up the fight, Mike! Glad the guide was useful 🙂
Clear instructions. I got the longer battery and modified the plastic cage. The new battery however will not charge, no green charging light. It was charging the old battery previously so I am not sure what happened. The new battery had enough power to run the motor so I know the batter was soldered on properly. Somehow the charging mechanism doesn’t work after reassembly.
Have a look through our toothbrush battery problem solving tips. It’s probably the charging coil that is either not soldered on quite right or the copper wire has snapped.
Excellent and clear instructions, both visually and written step by step. I completed the upgrade to the larger capacity battery. As mentioned by previous DIYers, watch for excessive heat on the plastic tabs holding the coil and pressure switch, they melt rather easily, but on reassembly even with slight damage you can manage to fit and solder effectively without any shorts. Another brush saved ! Thanks
Excellent instructions, thank you. I found it a bit fiddly but I did the upgrade to larger battery and it all worked first time. I successfully rebatteried my wife’s fancier Braun last year, so this is beginning to become a habit for me, thanks to Ionic. Great stuff.
A brilliant, clear set of instructions that made the job very easy to complete. Everything back in working order, great and thanks for the suggestion to replace with a bigger battery, much better than the original.
The instructions and layout/navigation through the site is second to none. I have never come across a tutorial that has been so considered & precise. Well done. As another said “should have used a desoldering pump” then I would have found it even easier. I like the ethic of trying to repair things rather than binning & buying a new product.
Thanks Mark, you’re welcome!
Molto bello, spiegato bene, complimenti.
Ma dopo aver seguito le istruzioni passo passo , ed aver rimontato il tutto non si accende la luce della ricarica. Peccato avrò sbagliato qualcosa. Saluti
Thanks Maximilian. If the charging light is not illuminating please read the help available on our support page.
Thank you for this great guide!
I’ve replaced my battery yesterday and at first I was a bit down because I thought it didn’t worked – no charging light, looked dead. There was some water inside and the board was little corroded so I assumed I broke it completely during cleaning or soldering. I started to accept the fact I would need to buy a new toothbrush anyway but decided to give it a try and left it on the changer over night. And guess what? After few hours on the charger without any sign of life it started blinking! And it’s working again!
I followed the guide and replaced with a larger battery. My 1st time trying to fix a gadget, helped by a friend with a solder iron. We had one snag, the two copper wires on the side broke but I think they were long enough to solder back on.
It charges and turns on but the pressure sensor light is always on. Is there a way to disable it as I don’t need it anymore and that’ll stop it draining the battery.
If the pressure sensor light is permanently on there is probably a short circuit somewhere. Check your soldering around where the pressure switch is joined to the PCB and where the LED wires join the PCB. You can always remove the pressure switch and see if the brush works correctly without the switch plate installed.
I’m going to leave it alone as I don’t have a soldering iron anymore. Also I’m getting 50 mins and counting out of the bigger battery, compared to probably 28 mins (1 week’s brushing 2 min twice a day).
So I’m very happy with my first attempt. Thanks for the guide!
An updated tip on this issue – if the pressure sensor light is stuck on then the pressure sensor switch is either not connected or not clipped onto the toothbrush assembly correctly at the head end.
To me there seems only one way to connect the pressure sensor. I have a problem where the pressure light is on all the time. I checked and resoldered where the + battery connector is on the side of the pressure connector soldering. Can not see any short circuit. Can there be a short circut under the PCB where the + battery strip is folded?
There could be a short under the PCB but this is unlikely. With the pressure switch removed the light will stay on all the time, so check that the top end of the pressure switch is clipped correctly in place. Alternatively, you can remove the pressure switch and just live with the light being on (when the brush is running.)
Superb, clear instructions. A bit on the fiddly side to do but well worth the effort. I took the plunge and decided to go for the larger battery but had no difficulties at all. That’s fixed my toothbrush, now to do the wife’s. Many thanks for your guide.
Hi! I just reassembled my toothbrush after following your instructions. I had to modify the battery holder as I bought a longer battery and it worked like a charm. The brush is now in the charger and it is blinking green. :-). So far so good eh?
Thanks for a very nice guide.
Regards from Sweden
Great instructions. I’ve changed the battery – charged it up – motor works – but the head doesn’t vibrate/rotate. The motor is moving the gear from side to side but I’m not getting any movement above that.
Any ideas?
Also, the red light flashes (the one that indicates the battery needs recharging) after every use even though the battery seems fully charged.
Regarding the motor, you’ll need to open up the handle and look at the gear linkages. There is probably a reciprocating arm that has been disconnected from a cam.
Regarding the red light, once the battery is fully run down and recharged the internal battery-meter should re-sync and this will stop happening.
I see a strange phenomenon with my 3756 toothbrush:
When the brush is switched off the pressure sensor warning light flashes every 3seconds for about half a second.
When switched on the tootbrush works fine. Even the pressure sensor seem to work: The light flashes when a certain pressure is detected and is permanently on when the pressure get even higher.
Basically it works but my wife cant stand the flashing and told me she will buy a new one.
Hi, thanks very much for your great instructions.
I was just wondering what the spring in the base of the toothbrush is for.
Despite soaking in warm water the clip broke when I opened the toothbrush housing so with the spring in it won’t hold shut.
I don’t want to glue the base up in case I want to replace the battery again in the future but the toothbrush seems to work just as well with or without the spring.
Is it just intended to support the battery and therefore is not really vital or does it serve another purpose?
Thanks for the help.
The spring seems to hold all the inner workings up against the top of the outer handle, not just the battery. I’d suggest removing the spring for a few weeks while you check that the battery runs and charges well. Then re-fit the spring and use a small spot of superglue on just the plastic tab of the clip to keep the base shut. No need to go glueing around the seal. If you use a small enough amount the base can still be removed next time you want to replace the battery.
Wow, thanx a million! That was the best of instructions. I now have an almost new toothbrush with an elongated battery life!
Thanx again!
Hi. Thanks for the information on this site. I have replaced batteries in a previous generation of Braun toothbrushes but there are enough differences for this site to be really useful.
My only query is why unsolder the coil? I did not bother and had no problem replacing the battery.
Desoldering the coil can make it easier to get the battery out, but if you can manage without then that’s great 🙂
Great, made it look so simple and it was. Very informative and with precise instructions took me just 20 minutes. Thanks .
When replacing the battery with the longer one, why do you have to bend the tags in that “in and back out again then up” pattern with a flat screwdriver tip? Are the bends required to hold something in place?
Hi Daniel, This is a reliability factor – the bends in the solder tags are to prevent the vibration of the toothbrush from breaking the solder joints or lifting the solder pad off the PCB.
Cheers, the tags on my battery were long enough, even with the bends so I am happy I kept the bends. It is nice to know what they were for.
That’s another one saved from landfill – the 1400mAh 4/5 AA replaced with a 2700mAh full AA.
The only fiddly part of the guide was avoiding melting the plastic posts on the pressure warning light cradle. I lost one but the other was fine. It went back together properly anyway. The hot water tip was good and saved my base clip.
Thank you!
Got the Braun version overhauled (w/ the larger battery) thanks to the detailed how-to. Didn’t see any other comments regarding battery charging protocol, so I checked while disassembled: Average charge current is about 90 mA; the highest voltage I saw while charging was about 1.5V; and the discharge cutoff voltage (under load) was slightly above 1.0 V. So, I guess we can’t blame the charging regimen for the apparent ‘shortened battery life’, unless someone with an ‘updated battery’ has other data.
Couple of other observations: 1) The PCB in the Braun is of highest quality, in the sense that it would be difficult (but not impossible) to delaminate the traces by overheating with a soldering iron. That said, I would still recommend a temperature-controlled soldering station, a justifiable investment for all electronics repair. 2) The board has Surface Mount Devices (SMD) so when you’re done soldering, use a magnifying glass to check around to make sure there aren’t any solder splashes or solder balls trying to short something out or come loose and cause a weird/intermittent problem in the future.
Thanks for the interesting measurements Robert! Good tip on checking for solder splashes after you’ve finished soldering too 🙂
Good morning. I have kept your very good instructions in my web ‘Favourites’ since I last used them to replace the battery in my Braun Oral B 3000 toothbrush two and a half years ago. Last time I modified the case to take the longer battery, which was easily undertaken with a small drilling/modification tool: eg. Black & Decker Wizard or Dremmel. Therefore, when the initial replacement battery stared to show signs of ageing a month ago, I didn’t delay in ordering a new replacement; knowing that it would be an easy task to return the toothbrush to full working order. Thankfully, the base lugs have remained intact through both disassemblies, and the repaired toothbrush is now on charge as I write. Thank you for the instructions. They are superb.
Brilliant instructions however the flashing Red Battery Flat is flashing, but no green charge light when plugged in. Any top tips as it all seems to have been reconnected in the reverse of the deconnection sequence.
Confused of Bedford
Check the fine copper wires from the charging coil inside the toothbrush. These can easily break.
Brilliantly clear and comprehensive instructions. Thank you!
Another successful upgrade completed here.
Thank you for guide. My toothbrush is working excellent again. Even better with bigger battery. It was quite easy.
Thanks for the guide.
I replaced the battery a few years ago with the larger type and it worked well.
This is the 2nd replacement battery I have installed, but now after 12 hours charging (green charging light is flashing OK), the motor does not operate with a push of the button.
I have checked the soldered joints and they appear OK.
Any ideas, please?
Many thanks in advance.
Hi Jon, when you press the button do you get a red flashing light? Have a look through our troubleshooting tips here.
Hi.
Thanks for your reply.
No, there’s no red lights or sound when I press the on/off button.
Are you able to check the voltage of the battery? It should be above 1.0V to run.
Hi. Sorry for late reply.
It had 1.2v – so was OK.
However, I have just de soldered everything and re soldered all the connections and put it on charge again to reset it on it’s now operating ok.
Thanks again for an excellent site and for the help given.
Really useful guide to a straightforward battery change.
Thanks very much guys and girls. 🙂
I tried the battery replacement in one of my Braun 3756s some time back and it didn’t work, even though everything looks OK. Today I did the second of the pair and this one appears to be working fine.
On the one not working, it appears to charge correctly with the flashing green light. When you press the power button, you can hear and feel the motor try to start for one brief surge, but then nothing else but a flashing red light. Putting the brush on the charger for just a few seconds will “reset” the brush, but it doesn’t improve the function.
This brush does NOT have a pressure switch. Any thoughts?
Are you able to charge it for 24 hours then measure the battery voltage at the PCB terminals with a voltmeter/multimeter? If it’s over 1.2V the motor should run. Could the gearbox be jammed with debris? Also run through the checks on our Customer Support page.
The voltage of the battery measures over 1.3 V. I also applied a charged AA battery with leads to the two terminals of the motor and it ran fine while connected that way.
I have looked at the support page and didn’t see anything there about this issue.
The battery voltage looks good so if it won’t run then it sounds like a problem with components on the board. Something could have moved or got damaged when soldering in the new battery. I suggest desoldering the battery that’s in it, and solder in its place the wires to the AA rechargeable you mention having. The electronics should now let you press the power button on the PCB and it will power up the motor.
Worked perfectly, thanks very much – I modified the battery case and went for the larger version of the battery.
My only suggestion re your instructions would be to tell the erstwhile repairer not to worry about the plastic lugs at the end of the wires from the coil – nothing needs doing re these! I was stumped for awhile…
So satisfying to renew this battery. Imho, NOTHING that is battery-powered should have a design that requires an extensive teardown in order to replace the battery, be they toothbrushes, mobile phones, laptops…. Otherwise, they’re no better than the original Mini, where the engine must be removed to replace the fan belt (and shockingly, the Mini actually won major design awards – duh).
Thanks again!
Great to hear about your repair Steven, and thanks for the tip about the plastic lugs at the ends of the coil wires. You’re right, they don’t really matter.
Good point about the repairability of battery-powered devices. It’s so important to make this straightforward for end-users!
THE NEXT DAY… Once fully-charged, the motor tried to rotate, but the stud the toothbrush head fits on was only vibrating slightly.
Dissembled and noted the cam / linkage barely moved. Powered the motor with the battery via ‘jump leads’ and still no joy. Put a drop of penetrating oil down the head shaft / stud, and used silicon oil sparingly on all the cam and gear works, and voila: success.
Seems the toothbrush and dead battery may’ve simply sat around too long before the battery was replaced – the linkage was stiff or ‘tired’ – who knows?
(Has anyone ever opened the metal frame that holds the motor and cam drive assembly? Looks tricky… Not sure if it’s spot-brazed to the motor case.)
So if any intrepid souls get everything to work but are stumped by motor straining (but failing) to turn the cam / linkage, hopefully this may help.
We’ve a third one with a dying battery, I won’t leave THIS one lying idle so long when its battery finally dies…
Thanks again!
Thanks for the guide!
I replaced the battery and the battery indicator blinks green when charging.
But the pressure sensor keeps blinking red (every 3 seconds) when the toothbrush is off. Do you know what causes this?
Is the pressure sensor LED blinking in sync with the green charging LED? There could be a short circuit somewhere on the PCB caused by a stray blob or whisker of solder. You can also try desoldering and removing the pressure sensor switch plate – the red LED should then stay on when running but stay off when the brush is off.
It did not blink in sync. I desolderd the pressure sensor, but it kept blinking (when brush was off).
I let the toothbrush run until it was empty and let it charge, but now it won’t start anymore so I suppose it doesn’t actually charge? (will measure voltage when I can)
I have also seen that the charging coil wire is melted in the plastic on one side, could this be the problem?
It sounds like there is a short circuit somewhere, possibly at the side of the PCB where the super-fine wires terminate, the ones that run to the LED near the shaft. The melted plastic near the charging coil is not a problem, but both coil wires must be soldered to the PCB and there cannot be any breaks between the solder points and the coil itself.
Thanks for the help! I re-soldered all connections and the toothbrush did charge but the pressure light is blinking again.
Since it’s not that important, i’m just going to desolder the connection to the light.
In case you still have another solution, feel free to post.
Hi Ionic, Thanks for the very clear instructions, job done after initial trepidation but I worked through it and felt great satisfaction afterwards. Would have preferred (1) a specific instruction to say that the battery positive terminal must be towards the motor, (2) before reassembly, a note about careful cleaning of all the joints, (3) If the rubber cover was damaged during disassembly (say around the front ring) provided this has been cleaned and dried before reassembly, a small amount of white silicone sealant could be used at both ends of the cover to prevent water entry. (If this is added, silicone sealant needs to be added to the Tools/Parts/Equipment list).
Thanks for the feedback and tips Chris!
Hello sir, i manage to change the battery to oral-b pro 500, and thank you for all these clear instruction but…it seems the problem is not the battery but motor, after the replacement all works perfecty but motor power is week and sometime it stall, i measure the current and i think is very big about 1.6-1.9A
Can you meet before with this kind of problem? The resistence of motor in dc is only 0.16ohmi
There could be some debris rubbing inside the gearbox, or the frame might be twisted slightly. The current is likely to be over 1 amp with the head attached. How does it run with the inner mechanism removed from the outer casing? Are you able to put a drop of oil on the motor bearings?
I did as instructed, however as soon as I put the brush to charge, there is a permanent flashing of the red light on it (the battery indicator) even after waiting more than an hour.
Any idea what’s causing it?
It could be a short circuit on the PCB or break in the toothbrush’s charging wires. Read through our troubleshooting tips and see what you find.
I have read your excellent instructions on the 3756 toothbrush. Can I reassemble my toothbrush without the pressure warning switch or pressure warning light? I like to keep things simple as I am not very experienced in soldering. can I use an off-the-shelf double A rechargeable battery with tabs?
Thanks again for the wonderful site!
Rob
Seattle Washington USA
You can try reassembling without the pressure switch and warning light, but I’m not sure if the motor will still run at full speed as the brush will be in a permanent state of ‘pressure switch activated’ as the switch is a normally closed type.
You can use a different double-A battery that has solder tags welded on if you can get them easily at your local shop. Don’t try to solder metal tabs directly to the battery as the heat can damage the battery internally, reducing its capacity and lifespan.
Hi there! Thank you for this excellent tutorial. I have change the batteries on two toothbrush till now. Thank you!
God bless you!
Brilliant, thanks for this tutorial. I love to make do and mend and dislike consumerism, so this is right up my street. Down with planned obsolescence! 🙂 The brush is now on charge after fitting the larger battery, all seems to work as it should and I’m looking forward to fitting the other replacement battery to my wife’s brush as she made me fit mine first. Batteries delivered fast, many thanks.
You’re welcome James. Hope the second toothbrush repair goes well too. Happy brushing!
Hi I am very grateful to your suggestion at using a 11mm spanner to push top clip down I was worried I couldn’t get it on correctly. So important to keep it watertight.
Thanks for the clear and concise instructions! However, after reassembling and re soldering with the new (upgraded) battery and putting the toothbrush onto charge, I appear to be getting error codes through the green charging LED. I get 5 short flashes when I put the toothbrush initially onto charge, then as the toothbrush is ‘charging’, rather than getting the normal 1 longish flash on the green LED every 1 second or so, I get 2 short flashes every second. The toothbrush doesn’t turn on when I press the button and I’m starting to think it’s not charging. I’ve had it on charge for about 16 hours now and it’s still the same. I’d appreciate any ideas you may have!
Thanks.
Hi Seb, have a read through our troubleshooting tips, mainly checking for short circuits, stray solder blobs, etc. Also check that the battery tags are not shorting on anything.
My repair was doing this on my first few attempts.
If it isnt turning on i would be inclined to say the two battery soldering areas are not solid. Double check them, i used a small screwdriver to try and move the metal tabs to see if they will move after working on them.
I must have a hundred solder balls all over my work area trying to get them to adhere to the area nicely.
I had an issue with greasy residue being left under the solder preventing a solid connection. It needed heating up and rubbing with cloth to clean.
It should show signs of life before re-assembly.
Thanks for the guide, i purchased the longer battery with more mAh from your ebay store.
I found removing the base & retaining ring easy. I accidently broke the very delicate pressure warning light carrier, luckily it broke on the side that doesnt hold the very thin wires.
I wouldnt have attempted this without a solder sucker.
I had to triple check my soldering in various spots because there seemed to be brown greasy stuff left from the old solder i was using and more than likely my very old corroded iron which has seen better days.
Thanks for this guide
Thank you for an excellent battery replacement guide.
Replaced the battery with ‘long life’ version.
All went well, put on charger and tge green light blinks, unit remained on charger until green light on solid.
Expected a week out of it.
Speed seems fine on first use after full charge. It will probable run for a 1 1/2 days (3 cleanings) then its dead for the next one! Even though there are now battery low warnings.
I have tried fullyj charging and then letting it run to a stop (about 30 minutes) this ” short life” is repeatable. Almost as though it does not turn off when switched off. Any suggestions.?
Great instructions
Hi Martin, It sounds like either the battery is not getting a full charge or that the battery is failing. After a full 24 hours on charge (the green light might be solid for some of this) leave the brush running continuously again with no head attached. You should get an hour of running out of it before the motor starts to slow down. Let us know if you get less than an hour and we can send a replacement.
Thanks a lot for this excellent initiative and website to fight reckless consumerism !
Changed my battery successfully, toothbrush is working like a charm and starting its second life now, what a great satisfaction !
2 questions :
– is the way one solders the thin copper wires of the pressure device important? I could not remember which wire was on which soldering point, tried it randomly and luckily it worked. Would it have been the same the other way around? If yes, you should mention it in the reassembly tutorial and if not, it would be nice adding a picture to show the original soldering position of wires.
– Second, is there specific guidelines to ensure max battery life? Does the replacement battery has memory? Can i recharge it before it is empty? What are the general best practices to do with this kind of battery?
Thanks,
Tristan from France
Bonjour Tristan, Great to hear about your successful repair! To answer your questions:
1. The pressure sensor LED will only illuminate if the wires are connected with the right polarity. It will not harm the LED to be connected in reverse so it is okay to experiment with this connection.
2. We have published some toothbrush care advice on our website. Please add any of your own guidelines.
Bon Chance!
Great advice, thanks!
Saved another toothbrush here, thanks so much for the guide! A tip from my dad, who did the soldering work: it can help to desolder the coil first, so the black plastic won’t melt when you desolder the battery.
Thanks for the guide – mine is running perfectly now, apart from the pressure light which I think is just a bad connection – I may get round to looking at this at some point. I’m looking forward to upgrading my wife’s brush when the time comes! Thanks again.
I bought a battery from you a few weeks ago, the larger capacity one, I followed the excellent guide, and in no time, the brush was back on its base, green LED blinking away.
So chuffed was I, that I bought another from you a fortnight ago, and I’ve just done, unknown to her, the wife’s, green LED happily blinking away.
Wonder how long it’ll take for her to cotton on , it was down to a 3 day charge cycle!!, mine runs for well over 2weeks!.
On a slightly more serious note, I de-soldered from the PCB in the order of, charge coil, neg battery terminal, pressure sensor LED, motor terminals, pressure sensor, pos battery terminal. This way seemed to save melted plastic, however I’m probably nitpicking. Great service, brilliant guide, thanks again. Off now to recycle old battery.
Great to hear about your successful repairs Glenn, and thank you for the tip regarding desoldering order. Happy brushing!
Thank you. With the longer battery my brush has gone from single use between charges to 4.5 weeks of twice a day! My wife is jealous as her younger brush doesn’t last that long! It means we don’t need to take the charger in the camper van anymore.
Thanks for the guide. It really helped.
Initially, I did everything per the steps (except de-soldering the pressure warning light connections, also followed a video). Once I fixed it, I see the charging light is blinking but it is not working, not even the red light. So, I checked the troubleshooting guide (this helped too) and reopened to check the soldering points.
Looks like one of the motor connections and one end of the battery connection (near the coil) are dry soldered (for the unknowns – it is basically soldering was not done correctly and so disconnected). So, I soldered those two points and voila!! it worked. However, I noticed that red light was blinking when I pressed the button on the PCB (before re-assembling) but I do not see it when I pressed the button after I re-assembled. So, I will watch out for it after a complete discharge.
Note on pressure warning light connections: Also, following one of the videos, I did not de-solder the pressure warning light connections and so while handling to remove the battery, the wire got cut. However, I managed to solder the ends of the wire. I hope it would work. Nonetheless, am not bothered much about the pressure light warning. So, I would suggest to de-solder the pressure warning light connections.
Hi,
great guide! I got my toothbrush back together. It started working when I accidentally press the power button. Good to know it works before reassembly.
However, when I put it on the base to charge, it has a faster green blinking pattern. Faster than the original green blinking when it charges. The original blink was a slow on and off.
Now it has a fast on, slow off.
about 0.5seconds on, then 1 second off.
I looked at the online copy of the instructions, but there is no info on a faster blinking.
Does a faster blink pattern mean something?
thank you!
Hi, check your solder connections for the battery in case one has cracked or come loose. Apart from that, as long as the brush charges and runs okay this is nothing to worry about.
Hi, what an awesome guide! Unfortunately my rusty soldering skills melted the plastics holding the pressure warning light wires. Hope that didn’t cause any issue.
I must have soldered and desoldered, and then soldered back everything again 3 times and the battery and charger connectors maybe 2 times more.
At first, the battery charged then very quickly the charge went dead. Then i notice the charging was a fast blinking green… not normal. Didn’t charge. To cut the story short, now it won’t charge and the charging red light is blinking very fast. When put on the charger, BOTH the red and green lights are blinking fast.
Looks to me like a short somewhere but i can’t seem to see any. Any ideas?
The most common place to get a short-circuit is on the PCB around the positive battery terminal (near the motor). It is also quite easy to heat up the surrounding surface-mount components and cause them to slide off their pads.
Another toothbrush saved from an unnecessary demise, thank you Ionic.
My most recent repair for a Braun 3754, upon successful battery change the charge light blinks five times on button press but the motor won’t run. Charges correctly via the coil and I can trigger a reset/lights test via a press & hold but the motor won’t run. Feel like it’s a voltage detection circuit error. Any way to force start the motor to re-educate the battery voltage IC?
Hi Ash, Putting it on the charger for 10 seconds will normally ‘reset’ the brush to accept the new battery. Other than that, have a look at our troubleshooting tips here. Send us an email if this doesn’t get you working.
I replaced the battery of my 3756 two years ago, and breathed a whole new lease of life into it. More recently, after not using it for a couple of weeks away, I tried to use it and found that when turned on the head would not move despite it sounding like the motor was spinning. After opening it up, manually moving the plastic cogs and lubricating with some light bicycle oil, I got it working again. However, it seems much less vigorous/powerful than I remember it being before the two weeks of non-use. I have tried discharging the battery completely and recharging it. It seems to charge normally, with the light turning off upon charge completion. Is it likely that the motor is simply worn out? During the time I was fixing it, by manually spinning the plastic cogs, the motor seemed to warm up quite a bit. The battery certainly still holds its charge well.
Hi Jim, it sounds like it could be water ingress that has damaged the motor. Good idea to oil it like you did. Inspect the PCB for water damage too (corrosion, staining, crystal formation). You can try leaving it running continuously with no head attached after oiling both ends of the motor shaft, to see if that helps.
Thank you for your advice! I will do as you suggest.
I just replaced the battery in my Toothbrush and had a problem. After I resoldered the battery the toothbrush would only blink the red light after starting it. Also putting it on the charger had no effect.
After some head scratchinf I found the problem: the thin copper wires at the end of the coid had detached from the PCB during dissasembly.
After resoldering them everything started working again.
Just posting this here in case sombody else has the same issue.
I have a. 3756/54. The red charging light flashes when I press the ON switch. Does this on and off charging and if left on the charger over night. Charger is working as charges my lesser model of toothbrush. If this just a replacement battery? Thanks
Apologies. I should of said it the plug symbol light which is flashing red not the battery light
Have you tried opening up the toothbrush to check for water ingress? If it is damp inside let the insides dry out for 24 hours then reassemble and test.
Thanks for providing this great guide. Knowing you repaired the brush yourself makes toothbrushing so much more enjoyable!
Great instructions and spare battery – thank you for allowing me NOT to throw away the toothbrush just because the battery had gone. If only we could save the millions of toothbrushes that others needlessly bury each year!
Out of interest, how many times do folks find they can replace the battery in one of these toothbrushes before faults start creeping in? The internals are made of a very easily melted plastic and it is looking a little messy now that it is on its second replacement battery. It still works of course but I am wondering if original plus two long replacements is a fair life for one of these.
Many Thanks. Just replaced the battery in our 2 toothbrushes.
Great instructions and pictures.
It seemed a daunting task to replace the battery. I purchased a longer replacement battery for more time between charges. The instructions are excellent; very clear and detailed. However, I did not buy a solder pump and struggled to remove the solder! Perhaps this could be added as an option in your online store?
I cut away the plastic tabs of the battery holder with the small blade of a Swiss Army knife. I also used the scissors on the knife to trim the battery tabs.
Although the finished job looked messy it worked first time. Thank you for a great service.
Sooo.
I did replace the battery as per instruction which are great 🙂
I did struggle a bit with desoldering and disconnecting the old battery.
But finally I was able to proceed as instructed.
Unfortunately i`m stuck (probably messed up something on PCB.
The problem is that after charging for +8 hours the brush does spin for a couple of seconds and then red light shows up indicating that the battery is flat and it dies. I tried that couple of times.
The battery itself seems to be charged up properly. Before it showed 1.3V after it shows 1,45V.
I`m guessing that the element responsible for checking battery capacity is damaged.
Do You have any ideas how to test that? Which one on the PCB is that? Maybe there is a way to bypass it? 😀
Or maybe this is a known issue and the solution is simple but I`m missing it?
🙂
It sounds like the battery is charging correctly. You might need to reset the battery meter as shown on our troubleshooting page, or there might be a stray blob or whisker of solder on the PCB causing a short circuit somewhere. Also check for components that have moved on the PCB.
Just wanted to say thank you for the guide.
I melted some plastic during desoldering, but other than that, all went well.
The only thing that’s not working is the pressure warning LED, which stays always-off. The motor seems to slow down when I apply pressure, though. I melted off one of the nubs of the pressure warning light wires, though, has probably something to do with it.
(Only thing I’ll watch out for when buying batteries next time is the orientation of the soldering lugs. One was oriented “upwards”, the other “downwards”. making it extremely hard to connect both to the circuit board.)
I want just to say a big thank you for the guide! It helped me change the battery to bigger one after 6 years of using my toothbrush. By the way after 6 years using it 4 times a day it did not last more than 3 days without charge. Very bad. Anyway, it was the first time for me I used a soldering iron and the complexity was like 4 on a scale 1-10 :). The guide is perfect and describes all the necessary details. I could have bought a new toothbrush, but exchanging the battery and doing some handwork was/is much more fun! 😀
My remarks for bigger battery:
The pressure led is working only if the battery is fully charged.
Battery indicator blinks even if It has enough power for 2-3 days.
I have just replaced the battery on a 3756. Now the pressure warning light flashes during charging as the charging light also do. After 24 hours both lights are still flashing.
Before replacing the battery the warning light was also flashing which I read should be a warning for Low Battery, therefore I replaced it.
What am I going to do now? How can I check if the battery is being charged?
What a fantastic guide! Great fun getting the soldering iron out after 30 years. More businesses should be aiming for reuse/repair like this, rather than throw away and buy new. I took the opportunity to not solder the pressure indicator LED back on the print board, which has always been an annoying feature . Works a treat now, thanks!!!
Unfortunately in trying to remove the charging coil the wire to the PCB has broken. Can I just unwind some of the coil to extend it back?
Yes you can normally unwind one coil of wire. When soldering make sure you burn the clear insulation coating off the wire to get a good connection.
I have an professional care braun oral-b type 3767 brush. It just stopped charging. Have tried on a different charger and no luck. Its not the charger as another brush will charge on it. Can’t figure out how to get it apart to see what the problem is. How do I take it apart?
We have a new guide to opening and repairing the Type 3766 and 3767 brushes in our list of battery replacement guides.
Most interesting Guides & Blog, will come in very handy soon. My calendar shows the toothbrush battery capacity is headed south, a couple of days less per month & now >24hrs to recharge each time. Many thanks Ionic
I have followed the directions to the letter, and everything appears fine. When put on the charger, the toothbrush starts charging with green light flashing correctly. However, after 24 hours, when fully charged, the toothbrush does not work at all. Then when you put it back on the charger again, it starts charging. After an hour it can be used. However, when it gets fully charged after 24 hours, it won’t work at all again. Nothing. Not the slightest motor sound. Strange! I have rechecked soldering. All good. Any thoughts?
After it’s fully charged, if it won’t switch on put it back on the charger for 5 seconds and take it off again. The brush should now run as normal.
Hi. My brush just died today while using. I thought it just a no battery symptoms but when I put it on charging dork, no light what so ever. Even when I pressed the button, no red light blinking no green light charging. Nothing at all. Do you think this is related to the battery?
It could be the battery, or it could be a broken internal connection or damage caused by water ingress. Open up your toothbrush to check for broken connections and for water damage (condensation, corrosion, crystalline formations, etc.)
Hi. I did managed to do the battery replacement. However, the only thing I got is the red light blinking. Can’t run the motor nor green light charging appear. The red light didn’t stop blinking (2 second On 2 second) off even I put it on charging dork. Do you have any idea why it is happening?
It sounds like a bad connection to the battery. Check the two joints where the battery’s solder tags are soldered to the PCB.
I re solder, now red light blinking only when I press the power button. It’s stopped after a few minutes. But still not charging & no light
Run through all our troubleshooting tips as this is likely to be a short or a broken coil wire.
Brilliant instructions very clear have now done 2 toothbrushes both currently on charge. The second one took about 15 minutes including cutting away for the larger battery.
You people should be honoured with a Queen’s Awards for Enterprise and manufacturers who do not commit to the Green Agenda should be levied with crippling sanctions or put in prison IMVHO.
Is there a lithium battery available for the type 3756 to replace the original NiMH battery?
No, lithium batteries cannot be used to replace Ni-MH batteries. They are a different voltage and they need different charging circuitry to recharge them correctly.
I followed the instructions, but something went wrong: motor is not running, leds are not lit, I have no idea if charging is working (since no leds display). I was quite careful, did not do too much desoldering, don’t have the pressure sensor in my model 3754. I put the original battery on, no help. I don’t see any loose components on the pcb, but I checked and the two pins to the motor are short circuited, and this seems weird, shouldn’t the other one be plus, the other one ground? I can trigger the motor if I hold the battery so that one pin touches the motor outing and one pin touches one of the motor pins… So I guess I either I heated something up or there is an excess of lead/tin somewhere. Cannot locate any errors though… Quite tricky repair even though I have some electronics experience, glad to hear some people pull it off 🙂
If you’re measuring continuity between the two motor terminals it is normal that this will show as a short. This is how DC motors work – they have a very low internal DC resistance.
Check the PCB for stray blobs of solder and any short circuits. Also check for surface-mount components near to your soldering work that might have moved off their pads.
Brilliant, thank you for a great guide, instructions clear and simple. Less waste now going to landfill., just a battery to recycle. I cut the solder tags off the original battery and soldered onto the tags on new battery to get the right profiles and bends, this is a bit fiddley but worked well for me. An illuminated magnifying glass helped a lot.
Think I’ll give repair a miss. Soldering and de soldering frightens me to death. I’ll have to fork out for a new one.
Soldering is quite safe. It involves small amounts of heat and is commonly taught at school for jewellery-making and electronics. It’s not like welding or brazing! There are plenty of tutorials on Youtube.
Your enemies are years of old toothpaste gunge & a dull brain cell. Many cycles of very hot water & lever gets the base safely free of the wand & gunk. Same plus mole grips for the top seal first, of course. Enjoy cleaning it all before eventually poking it back in your gob.
Don’t be fooled by the PCB +ve legend, the Battery +ve tab goes to the MOTOR end. Trust me, the MCU 430G2 & motor drive chips get jolly hot with the battery reversed.
Desolder wick dead handy, I used Loctite NC-BB. Also useful, a big blob of blu-tak to bed the chassis when soldering.
Amazed it’s working & charging up, I’ve probably clipped months off the new battery life.
Don’t know what next, 33KV switchgear work or bomb disposal ? Cheers all.
Oh …. and that tiny round molding low down on the bottom cap rear, don’t poke that in. Makes a pointless hole requiring a tiny bit of Araldite or the wet stuff will get in.
Toothbrush running brilliant, way past its old charged duration, cheers again Ionic.
Tad off subject but tried similar refit to a Philips QT3310 beard trimmer. It has one tabbed “AAA” size NiMh cell 450mAhr, replaced with same size cell, 850mAhr. Hardest bit is getting the case apart, there are two major clips 40mm up from the USB socket to free, a plastic guitar pick is essential. Philips plainly designed the innards for two AAA cells, plenty of room inside so two paralleled up would go in easy. I guess the pcb charge regulator could cope but these size batteries rather ££.
I read the law is changing so manufacturers must provide spares for easy repairs soon? Well, given you can get the thing apart first ….
Glad the toothbrush repair went well Brian!
Sounds like you got your beard trimmer up and running again. As you’ve found, the key to opening many appliances is finding the hidden plastic clips. Be very wary of connecting Ni-Cad and Ni-MH cells in parallel. They don’t like being recharged in this configuration.
Hopefully the new right-to-repair legislation will increase repairability on small appliances and make all repairs easier too.
Many thanks for this great guide and higher capacity batteries. I was having to cycle 2 old toothbrushes that both only gave a couple of days’ use. I have just fitted an upgraded battery to the older of the two, and it all seems to be working fine.
I hadn’t done any soldering since school and was a bit anxious that I’d melt the pcb, but my tips would be to read through the guide in it’s entirety first, then if you’re unsure about the actual desoldering process, watch a video or two on YouTube, and finally, just to take your time.
For me the desoldering took much, much longer than putting it back together.
In retrospect, I’m not sure that the coil needs to come off. I think if you were careful, the board and coil could come out together?
Many thanks guys.
One toothbrush down, one to go.
Many thanks for this excellent guide. I have successfully replaced the battery in my Braun 3756 and given it a new lease of life. One tip – in my toothbrush, the seals had been compromised so water had leaked into the body, and there was a lot of crud built up on the circuit board, especially noticeable with a magnifier around the pins of the main chip. This can be removed by scrubbing with a wooden cocktail stick dipped in meths, or for more stubborn bits, very gentle scraping with the tip of a scalpel blade. For me, this was necessary as when I first replaced the battery, it still didn’t work, but after cleaning off the accumulated crud, it did, so I guess the crud was shorting out between pins of the chip.
Many thanks for the excellent guide and replacement battery. My toothbrush has a ‘new’ lease of life now I have successfully completed the battery swap/upgrade. The only issue I had was when de-soldering the de-solder pump plunger cap flew off and it took me 25 mins to find where it actually gone, found behind a picture frame on the wall on the other side of the room!
Just succeeded replacing my battery! For me it was not an easy job, but my toothbrush is running nicely again. I had 2 difficulties, one was a short, that was a bad soldering job – my bad. Second was fitting the top ring back into its hole – the rubber-like surface of the tootubrush is anything but slippery, the ring just refused to go back in there. A bit of food-approved grease did the trick, plus it probably sealed the set which will result in better waterproofing.
Many thanks to Ionic Industries!
You help us save the planet one toothbrush at a time…
An excellent and detailed set of instructions. I have good soldering kit, so didn’t have problems with melting plastic or de-soldering fine wires. A solder sucker is essential though! Toothbrush now with big battery installed and charging! Many thanks!
Thanx for these perfect instruction. Till now i rescued 6 brushes by replacing the batteries using your instructions.
Great work Eltjo!
I’ve just successfully replaced the battery in my 3756 toothbrush (which was so poor that I was having to charge it every night) with the larger one. I was able to replace the battery without disconnecting either the coil or the pressure wires. The only hiccup was when I had reconnected everything, nothing powered up. Having checked the battery was supplying power, I placed the handle on the charger and the green charging light started flashing. I tried switching it on again after only a moment and the motor now worked, so maybe the charger reset something.
Many thanks for the instructions, this has saved yet another one from landfill!
I purchased a battery from you for my 3756. It already had the long battery so I did not have to cut out plastic. When I assemble it and place it in the charger the light flashes but every 4-5 flashes the flash is weak or like it does not have contact. It will not charge. after one day in the charger! What can I have done wrong? The + end of the battery is closest to the motor. I hade some problems with desoldering the battery from the charger coil. Can it be I have pried loose the contact for the battery to the coil? Is this possible to fix?
Hi Asle, there might be a short-circuit caused by a stray blob of solder. Carefully inspect all around each solder joint with a magnifier to look for soldering issues and re-solder any joints that look cracked.
Fantastic instructions and replacement batteries – I have just done my third one – thank you for your help
Thanks to your very clear instructions I managed to replace the original battery.
With the old battery I could use it only 3 times then I had to charge it for 22 hrs, now I can use it 23 times and then I need to charge it for 20 hrs. So that’s a big improvement.
-Thanks again!
Just replaced the battery in my aging Braun Oral-B Professional Care Type 3756 with the larger 49mm 2200mAh battery as per your guide. No problems at all, just takes a bit of time as it was the first time. Thank you for the excellent guide. Steve
I replaced the battery in my Braun Oral-B Type 3756 following your guide. It took a little time but more importantly for me was that I didn’t need to replace it in this throw away world. Thanks for the guide!
John
We need more repair articles like this, very useful thanks!
Bravo! I didn’t need to replace the battery, but took it apart and saw that one of the charging coil wires had broken away from the solder point. Soldered it back on and good as new. Thanks!
Thank you for all the photos and details you give to replace the battery. I ordered the battery from you. I followed the instructions to thin the battery terminals and it just fit well. And more, it works well. And,, as somebody already said it is a step against this throw away world to save the planet. Also with good results you feel some accomplishment, some satisfaction
Lucien
Ok, gave the Braun toofbrush the upgrade, biggest battery ex Ionic …. this time absolutely remembering the correct battery polarity!
It’s happily charging.
Your Brush FAQ rattled the brain cell last used a lifetime ago sorting out Motorola walkytalky NiCad packs & poor capacity, memory effect. Spot on, run the battery down way beyond the flashy LED nag, be cruel to be kind.
That spring part slipped in the coil? No mechanical function I can see so maybe used as an antenna to help with the induction charging? No matter.
Thanks again Ionic
I replaced my battery with the larger 49mm 2200 mAh as you have mentioned in your instructions. I replaced this battery about 3 years ago and has worked well up until lately. Some times I can only get one or two, 2 minute brushing sessions. I have measured the battery voltage fully charged at about 1.33V. I have left the multimeter on the battery and then let it run and it will continually run for about 12 or 13 minutes and voltage drops to just around 1.14 V or so and then it quits. Does this indicate that this battery needs replacement? I have only charged this toothbrush when it was dead. The original battery did last longer than this one and this one is the larger of the two. Does it mean another new battery or is the motor just worn out.
It sounds like your battery is worn and has lost most of its capacity. So a new battery will rejuvenate your toothbrush. Over the years the motors can wear too, and can then draw higher current from the batteries which runs them down faster. Some light oil on the bearing at each end of the motor might help too, along with white grease on the gears.
Thanks for that reply Ionic – not sure the oil & grease point are in the main instructions?
I would note the, err, current best practise for charging Lithium-Ion & NiMH batteries is *not* to run them flat, nor charge to 100%
Keeping them in the range of 20-80% vastly increases the number of duty cycles, which applies for toothbrushes, mobile phones, & especially electric cars.
An excellent repair guide. I would not, however, recommend this as a first attempt at repairing anything. A very fine point soldering iron and needle nosed pliers are essential and great care must be taken. There are many very small surface mounted components and care must be taken to avoid displacement or damage of these. Similarly, the amount of solder applied should be minimal as components are closely spaced and short circuits must be avoided. Having said all this, if you have a toothbrush that doesn’t work, what have you got to lose? Just take your time and go carefully.
I found the plastic of the battery holder to be harder than I expected and, although I removed most of the webs with a scalpel, I found a Dremel was good at removing the last pieces.
I didn’t get a flashing red light when resoldering the battery but I assume the battery was supplied with no charge in it.
Overall, the repair was straightforward although a little fiddly. Having put it back together I have no parts left over and the charging light is flashing. I’ll see how it goes tomorrow.
I would agree with all Chris’s points, especially about the tooling required for such a fine repair. Along with another repair of hands, a multi-meter is your friend here!
I didn’t need the solder sucker or copper braid, just some flux & the original solder – which probably avoided a number of problems.
And yes, the 2.2Ah batter did arrive charged to 1.3V so was able to run the motor without initial charging- which I checked to ensure I hadn’t wrecked it during disassembly.
I did put mine into a standard battery charger for a few hours as I knew the old one could take 20+ hours to fully charge. And sure enough the new one still flashing green a day later. But all working fine :-}
This is great,
Thanks a lot, did a battery replacement of 4 different machines and they are all up and running!
I will do this also in our Repaircafe!!!
Best Regards,
Jan
Thank you for your feedback Jan! Where is your Repair Cafe?
I’ve just got my battery, I’m going to replace it this week.
To the EU users, bear in mind some countries now you need to pay taxes upon package arrival.
Keep up the good work,
Nestor
Thanks for the great guide.
I replaced the battery with the longer battery.
Works perfect!
P.S. You do not need to remove the charging coil from the board.
It’s 2022 and we can repair an electric toothbrush – with thanks to TBB.com :-}
Bought your 2.2AHr NiMH AA and followed the instructions above, didn’t need the solder sucker or wire braid I’d got to help with the job, but did use copper-pipe plumbing flux to very successfully rejoin the existing soldered parts.
Very pleased with the result – thank you again & keep up the good work.
Thank you for the battery and guide. Replaced the batteries on my wife’s and my toothbrushes and they work!
I need to work on my soldering technique though, it’s certainly not winning any beauty awards!
Thanks for all the useful information. I just finished installing your longer battery into our 3756. First I got a false green charging light indicator, then re-soldered the coil wires more aggressively and now it’s working like new.
I appreciate the quick shipping to the USA and will be purchasing another battery for an older model we have sitting around.
Sincerely,
Thank you so very much for the repair instructions. I was able to resurrect 2 3756 brushes that were all but dead. I modified the battery compartments and installed the larger batteries. The first charge following the repair lasted 17 days. I also used de-soldering braid to remove solder. And, I found it handy to use a “C” clamp to hold the assembly steady while doing the retrofit.
Great work repairing your toothbrushes James!
Thank you for this excellent procedure. I would much rather fix something than add to our landfill problem. I found the procedure easy to follow, though removal and reattachment of the coil was a bit of a challenge. The wires are easily broken and, if broken, the insulation is difficult to remove. The third time I went through this I did not remove the coil. That made it a bit more challenging to remove and reinstall the circuit board, and threading the negative battery lead wasn’t quite as simple, but I still found doing it this way to be less of a challenge than removing and reattaching the coil.
Hi. Thanks for these excellent instructions. I have made the repair and fitted a new larger battery and it works fine. The trouble is I have lost the spring which goes in the base of the unit. Is it essential?
Not essential but it helps hold the battery in place so it doesn’t vibrate too much.
Thanks for the reply. I managed to cut down another spring I had and used that. All good now. That’s two toothbrushes restored now!
Great work!
TIP:
Excellent instructions. This is the second replacement battery. Previous one lasted 6 years. Moment of panic when testing before pushing back into the case. The battery had been charged before fitment and I was expecting it to work once reassembled. It did not. However, a couple of seconds on the charger and it burst into life. Magic!
Hi,
As i replace the battery correctly and put the toothbrush on stand charger for charging, after a couple of times, the blinking light on toothbrush turns off and do not turn on again. what happened to the charger or my tooth brush?
i replaced 2 no of oral-b toothbrush battery at the same time, and charger not working for the two of them right now ( no lamp blinking while charging).
is there any mistake in assembling batteries?
its noted that after replacing battery , i test the charging operation and it was ok and lamp was blinking.
charger was failed during charging my toothbrush.
what happened?
The blinking charging light turns off when the batteries are fully charged.
If your toothbrush won’t run after fitting the new batteries and charging them, read through our troubleshooting tips.
Thank you so much for this guide! Perfect, managed to change battery to a larger one! Although more steps than first thought possible to do. Not a problem with the guide.
Only maybe mention that the toothbrush won’t work until reset by a charge session. You kind of want to test and know if it works before putting the cover back. But that is not possible.
Thanks Henrik. You can test that the brush charges without reassembling it into the handle casing by holding the internals over the charger. Like you mention, this also resets the circuitry if required to wake up the brush.
Hi all, a quick question – my toothbrush has stopped charging but when it is on the charger, the green light does a flickering flash. I’m not sure if this implies a dead battery or something gone wrong with the electronics. I’d like to replace the battery if that’s the problem and this guide looks excellent, but I’m not sure if a dead battery would mean no flash at all – anyone know from their own experience? Thx
This could be a symptom of water ingress. Open up your toothbrush and check for staining, corrosion or crystal formation on the PCB.
Thanks for that – I’m away for a few days, but will check when I get back. I did open it up following your easy to follow guide and didn’t spot any obvious signs of water damage but will have a closer look.
Excellent! A clear concise guide – fitted the bigger battery. These instructions made it a simple operation to complete in a couple of hours – many thanks!
Great instructions and battery supplier. I wasn’t able to get the solder wick to work, as I saw in comments that it would be useful, but I was able to move the solder enough to get the charging unit out of the way. BTW: You guys should branch out into other equipment like shavers. My current one is simple enough but newer ones might be harder.
Oral B Type 3756
I have replaced the battery with the longer, higher capacity version. All went well with this work , using your excellent instructions and the tooth brush ran for 14 days between charges, as expected, until the third charge when the battery charged but the brush would not turn on. On further investigation I find that the motor has a complete short circuit. Have you had any reports of this before, I can’t understand how changing to a higher capacity battery would affect the motor?
It is normal for DC motors to show as a short when measured for their resistance – they are effectively just a coil of copper wire inside.
Are you able to measure the voltage of the battery after charging?
Yes, it shows full charge.
Is it likely that an IC has gone? Not sure why this should happen, the bigger battery should not cause overload.
You are correct, the higher capacity battery just runs for longer. The voltage is no different to the original battery. Has the motor seized? You should be able to turn the gears by hand a little to verify this. Apart from that, have a run through our troubleshooting tips which might get you up and running.
Worked first time, although it looks like the pressure sensor is not working, but I remember reading that this is a common occurrence.
Thanks for the guide and providing the battery.
Cheers
Just completed replacement of standard size battery and all still works…phew! Some of the steps are quite tricky, especially removing the top plastic ring in my case – took a lot of effort. There’s a good tip in these comments about pressing in just below the plug symbol when opening bottom of case. This does seem to release the clip and make it very easy to open when bending the toothbrush backwards when on the charger. You can feel the dent if you push with your thumb fingernail. Very happy to have toothbrush back up to full power!
Danke für die tolle Anweisung zum Batteriewechsel. Hat ein bisschen gedauert, aber die Batterie wird geraden geladen. Ich kann mich nur den positiven Kommentaren anschließen.
Bought a longer capacity battery off you back in 2017 when my Type 3756 stopped being able to hold a decent charge. I’ve been putting off doing the replacement since then, but the charge it held got so bad that I finally bit the bullet. Happy to say that 6 years later, thanks to your instructions, the battery replacement was a complete success – charges and works great, pressure sensor and lights all working, didn’t even break the tab taking the toothbrush apart!
Nice to have my old toothbrush from 2014 back to happily chugging along! Many thanks!
Instructions were clear enough, but I still may have either bricked my toothbrush or the problem was something else than battery, as it just didn’t start and would not charge neither before or after my repairs. I have the same voltage (~1,3V) on old and new battery, and all my solders check out with resistance close to zero between the PCB and wire/connector, but still nothing lights up or charges when plced in the charger. at least without the cover on.
Some notes, ideas and improvement suggestions:
I used a solder pump, a wick would have been better.
The tip above about where to press the handle to get the base off was a great one and should be in the instructions. Additional heating did not hurt and nothing broke.
At the end of the instructions you could add info on whether it is possible to test the toothbrush without fully assembling it first. That would save a lot of aggravation because the disassembly is so iffy.
Instructions could be clearer on how to position positive and negative ends of the battery.
Hello, I replaced it with a 1.2 v, 1200 mah battery. The charging light is flashing but the engine does not start. When I press the power button, I hear a cizzz sound. When I power the motor directly from the battery, the motor runs. When I measure the output of the BMS card, sometimes it gives 1.2 volts and sometimes it shows zero. I would be happy if you help
This sounds like a short circuit so inspect the PCB to check the solder connections for short circuits, solder bridges or stray blobs of solder.
really useful guide – many thanks. Definitely think manufacturers should make items like this more ‘serviceable’ #righttorepair …
Any ideas for replacing / repairing the soft blue plastic coating on the outside that degrades and goes sticky?
Well, couldn’t be happier. I have an oral-b 3756, and, it’s been struggling with the low battery indicator flashing as of late.
I also have a La crosse BC-9009 ni-mh charger and tester, so, I tested the original battery.. came out at 1030mah instead of 1200mah.. which isn’t that bad, but the toothbrush was already dismantled so.. might as well change it while at it.
Opted for the longer battery upgrade from this website, and it test 2400mah instead of rated 2200mah! that’s 200% original battery capacity.. o.O if you take the battery wear in consideration, this is 233% capacity. I guess I need a wife, 2 kids, and a dog now.. lol
added a little bit of silicone grease to the gearing, not sure it’ll help but, oh well.
The instructions are pretty good, prevents you from breaking anything while trying to fix your toothbrush. Makes it easy tbh.
I used an mg chemical copper braid wick to remove any solder from the pads, before reassembling. That wick already has flux on it, so, it sucks solder like crazy. cheap and works like a charm, highly recommended.
Hope see this website trive, I love fixing my own stuff, keep the trash empty of perfectly fixable electronics, and save some money doing so, plus bonus, get more performance from it.. o.O
what else can you ask..
Glad to hear that the guide was useful Guillaume, great work with the repair! The longer batteries add a lot of capacity which is great for many more brushing sessions between recharges.
Thanks for the tip regarding the solder wick, it’s a useful alternative to using a solder sucker.
Reassembly tip: My lower cap wouldnt snap in tight again (tab must have broke). I coated the gasket with a generous quantity of marine adhesive sealant and clamped it in a woodworking clamp until it cured. Probably never coming open again but she’s watertight.
Thanks very much for the guide. Very sad we live in this planned obsolence economy. Right to repair!!
Great guides, great initiative! No use in throwing away a perfectly fine toothbrush just because of a worn out battery.
I hope more people do this on all their belongings!
So I am looking to replace the battery in a 3754. I would like to have the battery in hand when I change it. Will the longer battery fit if I cut away like your directions say? I would only like to take it apartonce. I don’t know the length but you say “Measure your battery and if it is 42mm long you might have the option of fitting a longer battery instead” The words that worry me are ” you might”
Hi Steven, yes you should be able to fit the longer, 49mm x 14mm battery. We’ve not heard of anyone having a 3754 where this upgrade can’t be performed.
Thanks For the quick response!!
Steve
On mine, now I have opened the toothbrush, one of the very fine non shielded wires that run up the side of the body has snapped at the top corner by the LED.
Is this repairable in anyones’s view?
Not sure i can just go and stick a blob of solder on it..
These wires have a thin transparent coating. As long as you scrape/melt this off they can be joined with solder.